Rolling A Happy Father’s Day

We play a lot of Yahtzee, a dice game marketed by Hasbro, at our house. When someone rolls five of the same number, you yell out Yahtzee! We make a big deal of it.

So, for my husband’s Father’s Day card this year, I made a Yahtzee card using some of Karen Burniston’s June 2023 dies – Fun Flowers, Game Charms, Word Set 17 – Congratulations, and the Twist Flower Pop-Up, along with some previously released dies – Coffee Cup Pop-Up, Happy Father’s Day, Border Blends – Trims, Heart Collage Pop-Up, and Rectangles and Labels – Crosshatch.

Cardbase: I started with a purchased 5×7-inch gatefold cardbase so that I would have two folds for two pop-up mechanisms. For the green background panels on the front and inside of the card, I cut three panels using the largest rectangle die from the Crosshatch Rectangles and Labels set. Two of the panels I cut long-ways in half and glued to the front and inside of the card flaps. The last panel was glued inside the card.

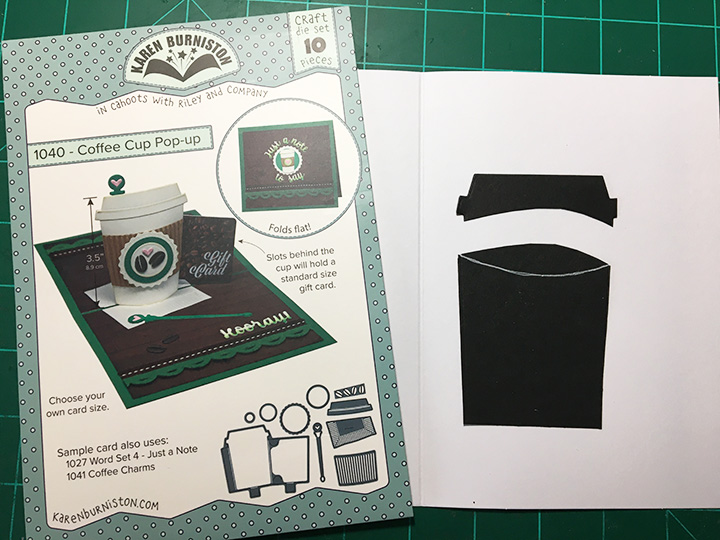
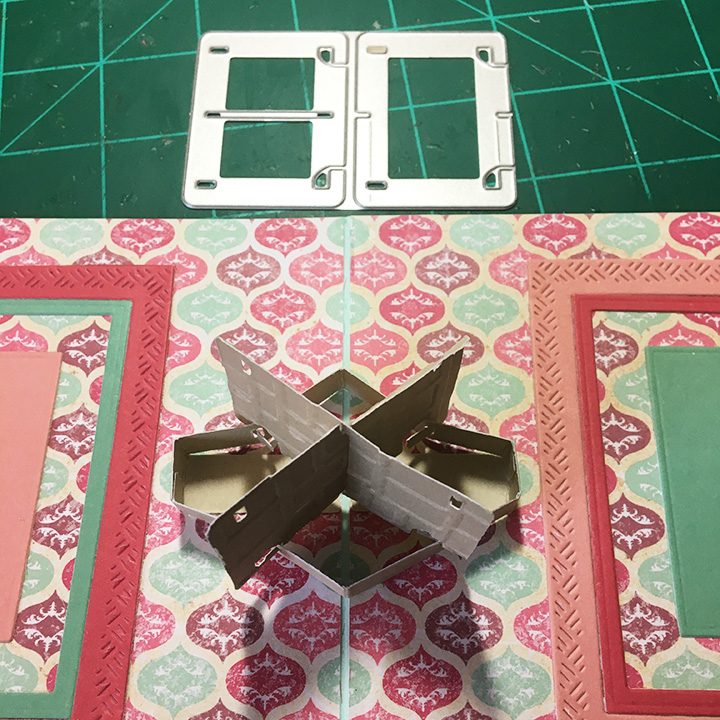
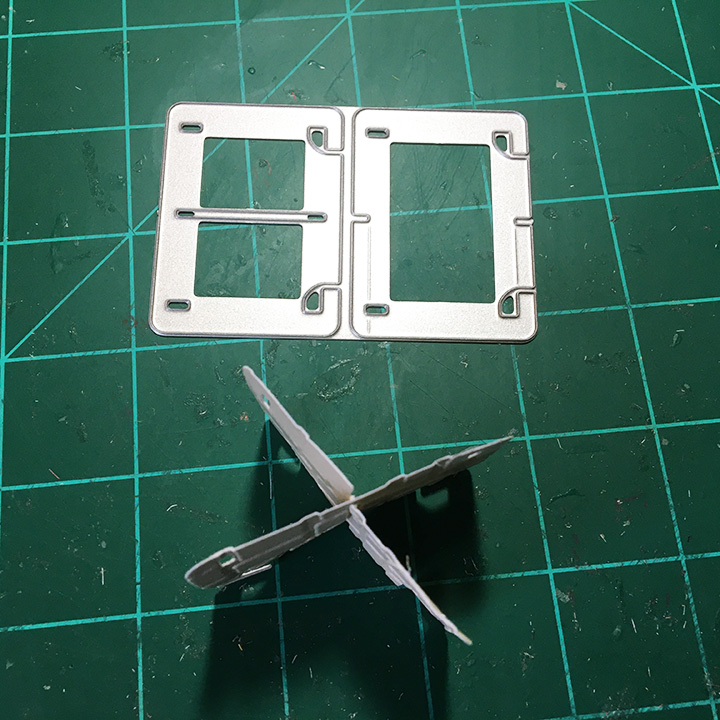
Cup and Mechanism: For the Yahtzee cup that is in our game set, I die-cut the coffee cup and trimmed off the top. I added a white line with a gel pen. The mechanism comes from the Twist Flower Pop-Up which is a smaller version of the Snowman Twist Circle mechanism. (I watched the assembly videos for the Twist Circle and the Heart Collage Pop-up before making the card.) I used a two-sided green printed cardstock that I cut two of the mechanisms from and trimmed pieces from one mechanism to cover the back sides of the mechanism that would show when open. The most difficult part of the card was finding the layout that looked the most realistic and still allowed all the elements on the two mechanisms to fold inside the card and not be sticking out. Temporary tape was extremely useful for this process as positions were tweaked.

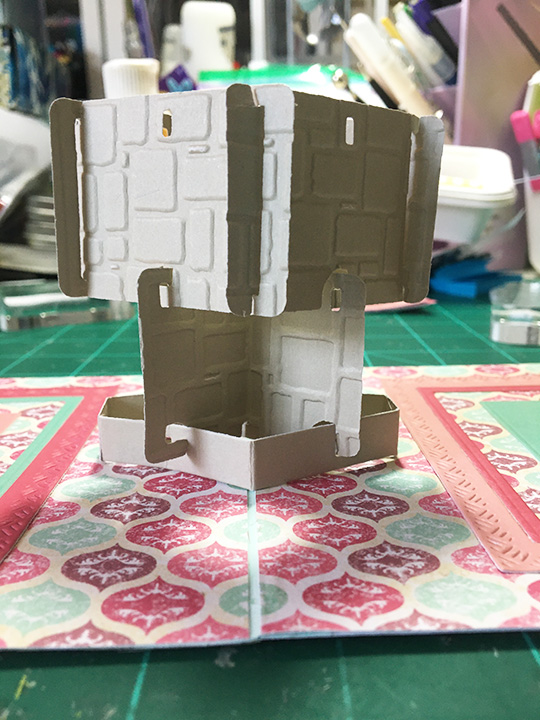
Dice and Mechanism: Five white dice were die-cut using the die with the largest numbers and five of the black backing were also cut from the Game Charms set. The small charm loop was trimmed off each one. Like the Twist Flower mechanism, I cut the Heart Collage Pop-Up from the same green cardstock as the background panels cutting two mechanisms using one for pieces to cover the reverse-sides that show when installed. Because there was no easy way to place dice on the center platform of the mechanism that didn’t involve catch points, I used a circle from the Fun Flowers set to cover the center platform.

Decorations: From my family’s stash of used Yahtzee score sheets, I took one that had several Yahtzees on it and trimmed it to size to add to the background. I fussy cut the logo to add to the cup. On the card front I used some leftover silver ribbons and tiny foil hearts cut using the Border Blends – Trims set.

Sentiments: Two die sets were used to create the card front sentiment. The Happy Father’s Day set comes with a shadow die which I cut in white. For the β€œyou’re a Big Deal,” I used Word Set 17, but without the shadows for β€œBig” and β€œDeal.”

Thank you for reading this blog post. I hope this inspires you and makes you smile. Please like and leave comments 😊

Materials Used:

Dies

Papers

  • Keep It Simple – 12×12 Double-Sided Cardstock Collection Pack – Lucky Day
  • Hot off the Press– 8 1/2 x 11-inches Foil Cardstock – Fireworks Blue Holographic
  • Hot off the Press– 8 1/2 x 11-inches Foil Cardstock – Stars Silver Holographic
  • Recollections – 8.5Γ—11 White Gold Shimmer Cardstock
  • Gold and Silver Foil Cardstock
  • Black and White Cardstock
  • Park Lane Paperie – A7 Gatefold Cardbase and Envelope – White

Adhesives

Tools

Miscellaneous

  • Vintage Yahtzee Score Sheet

Patriotic Sympathy Basket

One of my cardmaking friends lost her husband to cancer recently. He was career military. I wanted to make a flower basket for the card with a nod to his military career, so I did the colors of red, white and blue with some flag bunting on the sides of the basket.

I use the following Karen Burniston dies Woven Basket Box Card, Wide Woven Box Card, tag from Tag Book Pop-Up, flowers from the Flowers and Bee and Flower Pot Pop-Up, and With Sympathy sentiment. I also tried the new Small Scenes Bam Box to pop-out the basket when pulled from the envelope.

Please watch the assembly videos for the various dies that are located toward the bottom of each die set’s link page before starting a card.

When assembling the woven basket, I like to make the rims of the basket fold by lining up a metal ruler from pointed edge to pointed edge. This make a straight fold that is more rounded to cover the top edges of the basket.

When making the flowers, I like to use some flower shaping techniques such as using a tool with a round ball on its end to push the center of the flower into foam to create depth. I most often use my fingers to curl the petal tips under. On the large hibiscus-like flower I used the ball tool to shape the undersides of the petals. Many flowers, such as daisies, have two layers of petals.

The arrangement of the flowers always scares me, but I tried to remember my flower arranging class tricks from years ago. Start with the largest flowers first, creating a tall focal point in the center and shorter to the sides. Fill-in with smaller flowers symmetrically and finish with baby’s breath to fill-out the empty spaces.

I cut the β€œwith Sympathy” sentiment from matte gold cardstock and curved the word sympathy to fit the front of the basket. In addition, I cut a white tag from the Tag Book Pop-Up and stamped and heat embossed the tag with β€œSending prayers your way” in matte gold embossing powder. A narrow ivory organza ribbon was used to tie the tag on to a basket handle. A personal message can be written on the tag back.

The folded card fits into a catalog 6×9 inch envelope. To mail the card, I fold a sheet of 8 1/2 x 11-inch white cardstock in half to fit inside the envelope and cushion the card in the mail.

Thank you for reading this blog post. I hope this inspires you and makes you smile. Please like and leave comments 😊

Materials Used:

Dies

Stamps

  • Waffle Flower – Clear Stamps – Sweet Sentiments -271296
  • Simon Says Stamp! – Clear Stamps – Brushed Flowers – sss202392c

Papers

  • Photoplay – 12×12 Double-Sided Paper Collection – Stars and Strips by Michelle Coleman
  • Keep It Simple – 6×6 Double-Sided Paper Collection – Back To basics – Ruby Collection
  • White Heavyweight Cardstock
  • White Catalog 6×9 Inch Envelope

Ink

  • Stampin’ Up – Classic Stampin’ Pad – Misty Moonlight
  • Simon Says Stamp – Pawsitively Saturated Ink
  • VersaMark – Watermark Stamp Pad
  • Sharpie – Permanent Maker – Ultra Fine Point – Yellow
  • Pigma – Mircon 03 Fine Tip Pen – Black

Embossing Poweder

  • Papercraft Society – Embossing Powder – Matte Gold

Adhesives

Tools

  • Die Cutting Machine
  • We R Memories – QuickStick
  • We R Memories – Scoring Board and Trimmer
  • Stamping Platform
  • LDRS – Stampendable Stamping Tool
  • Stamping Cloth
  • Kat Scrappiness – Anti-Static Tool
  • Scissors
  • Tweezers
  • Heat Tool
  • Ball Tipped Flower Shaping Tool
  • Foam Mat

Miscellaneous

  • Ivory Organza Ribbon – 1/4-inch wide

A Gingham Fence Birthday

It’s Sneak Peek Week for Karen Burniston’s June 2023 Release.

Today I’m featuring a picket fence accordion card using the new Fence Landscape Accordion Add-On die set which includes two kinds of flowers and some grass. Along with the previously released Landscape Rectangle Accordion set, this add-on lets you make a two or more panel interactive card. (I have made a similar card before, but I had to fussy cut the fence out. This die is a time saver.)

Watch the assembly video for the Landscape Rectangle Accordion (at the bottom of link page) before starting this card.

Cardstock needed for fence and frame should be of a heavyweight if cut in one layer, but lighter weight patterned papers can be used, but you will need to back them with more cardstock. (I used double-sided cardstock for my gingham frames and a single sided woodgrain paper for my fence and cut two layers for fence and frame.)

Accordion Frames: I cut four frame panels from a yellow-green gingham cardstock and two frame panels from a larger blue gingham cardstock. Two of the frame panels I trimmed the inside rectangle panel down to a center bar for the fence post to be glued onto. The other two panels I cut away the entire rectangle, leaving only the small pivot wings. (While I cut off the tabs on the pivot wings only frames, I would recommend waiting to trim off the tabs until you are ready to assemble the three panels together. I made a mistake in my assembly and had to patch in a tab that I had cut off earlier.)

The other two panels I cut away the entire rectangle, leaving only the small pivot wings. (While I cut off the tabs on the pivot wings only frames, I would recommend waiting to trim off the tabs until you are ready to assemble the three panels together. I made a mistake in my assembly and had to patch in a tab that I had cut off earlier.)

Repeat the trimming of the blue checked frames to have one frame with the center bar and one frame with the pivot wings.

Glue three sides of each set of frames (one center bar and one pivot wings) together leaving the tab side with no glue. (You will need to be able to hide the tab of the adjacent panel by gluing it between the layers of the frame.)

Fence: I cut six fence panels from woodgrain paper. (If I had to do it again, I would use a single layer of solid white card stock to eliminate the need for the next step.)

I trimmed of the end fence post on the three fence pieces that would be backing pieces, removing the tabs as shown.

Glue the front fence piece to the center bar. You may want to trim the center bar some to be hidden behind the fence post. Turn over panel and glue the back fence piece to the front piece, piecing in the separted post.

Place weights over glued fence layers so they dry flat. (I used clear stamping blocks and my cell phone as weights.)

I forgot and glued shut my layers on the frames, so I covered over the tabs with the tabs that had been cut off. I recommend decorating the fence before you glue the fence tabs together.

Flowers:  I tried something I had seen Karen Burniston do in one of her videos where she covered her cardstock with clear packing tape before die-cutting into it to get shiny pieces. I did this for my green leaves and stems. For the grass I used shiny green cardboard packaging.

For the flower heads, I used shiny cardboard packaging from a well know yellow cereal box and a shiny piece of blue junk mail. I cut a front and a back for each flower head as some will show through the fence. (This made for thick, dimensional flower heads.) The stems were sandwiched between the flower heads’ front and back layers. I made an assembly line for making the 12 yellow flowers using glue and a Quikstick to pick-up and place the tiny brown centers on the flowers.  When placing your flowers on the fence, remember not to place anything that will be a catchpoint below the fence or above the fence post. (I had thought about adding a small bird to the top of the fence, but it was too tall.)

Sentiments: For the front of the card, I used the β€œon your Big Day” from the newly released Word Set 17 – Congratulations. On the back of the card, I used the previously released β€œHappy Birthday” die set.  I also added a circle charm from the new Game Charms to write a personal message with a piece of ribbon. (You could also use the large circle charm in the Sports Charm set.)

Envelope: This card fits into an A6 envelope that I glued a strip of gingham cardstock to its back flap.

Thank you for reading this blog post. I hope this inspires you and makes you smile. Please like and leave comments 😊

Materials Used:

Dies

Papers

  • Echo Park – 12×12 Double-Sided Paper Collection – Best Summer Ever
  • Honey Bee Stamps – 6×8.5 Double-Sided 65# Cardstock – Grain and Grunge
  • Brown, Green and White Cardstock
  • Shiny Yellow and Blue Upcycled packaging and Junk Mail
  • A6 Ivory Envelope

Adhesives

Tools

Miscellaneous

  • Grey Blue Organza Ribbon- 1/4” wide
  • Clear Packing Tape

A Knight In Shining Armor

It’s Sneak Peek Week for Karen Burniston’s June 2023 Release.

Sometimes you need a little help. Saying β€œThank You” for a kindness given is what this card is all about.  It uses Karen Burniston’s new House of Cards Pop-Up die set along with some previously released dies including:  Banners – Crosshatch, Thank You, Princess and Mermaid, and last, but not least Knight and Dragon.

Cardbase: I started with a purchased 5×7 cardbase and cut it on its scored fold-line to make two panels that I reattached with paper tape at the short edge sides to make a top fold card. I used tape on both sides of the cardbase. Next, I covered all four panels with decorative papers.

Banners: Three colors of solid cardstock came in the paper collection, and I cut a nested set of banner shapes using the five largest dies in the Banners – Crosshatch set from each color. After playing with mixing and matching the various color combinations, I settled on my choices and glued the frames onto the cardbase allowing some of the patterned papers to show through.

Princess and Knight:  The princess, I had made some time ago, from scraps using the Princess and Mermaid die set. I braided three strands of yellow embroidery floss that matched the princess’ hair color and glued it between her hair and the back of her dress. The knight was cut from two types of silver foil cardstock and some blue scraps using the Knight and Dragon die set. (You can watch the assembly video for these dies by clicking on their dies and looking for video on the link page towards the bottom of the website page.)

Tower: For the four-story tower, I cut each of the card panel dies twice from heavy gray cardstock using the House of Cards Pop-Up die set. Next, I embossed each card using a cobble stone embossing folder. I cut the two base pieces and glued the small tabs to the other piece to for a six-sided polygon. The long tabs I glued inside the card along the fold. (This base is much like Karen Burniston’s palm tree or Christmas tree bases and the attachment of what goes on top of them involves tabs poked through holes. For an assembly video check the bottom of the page linked.)

To build the tower assemble two β€œXs” and two squares. Attach one β€œX” to the base, then attach a square followed by an β€œX.” Loosely attach the last square and place the princess in it with temporary tape. Close card and if the princess sticks-out of the card, you will need to cut a window in one panel of the top square. (I cut a lip/tab that folded over and was glued to give strength to the card.) You will have to trim off the lower half of the princess to fit in the window and the card. Glue her onto the window lip making sure her gown does not cover the notch used to attach the square to the tower. Make sure her long braid does not hamper the opening and closing of the tower. 

Glue the knight to the small side of the tower base making sure he is not attached to any of the playing card panels. Test opening and closing the card to look for catch-points before the glue dries.

Sentiments: β€œThank You” is die-cut using a die set of the same name. The inside sentiment “For coming to my aid” was computer generated, printed on thin printer paper and then die cut with a banner die. A blank banner was also cut from printer paper for a personal message.

Envelope: The smallest banner in the die set was used to cut the printed paper banner glued to the back envelope flap. It hints at the heraldry to come inside.

Thank you for reading this blog post. I hope this inspires you and makes you smile. Please like and leave comments 😊

Materials Used:

Dies

Embossing Folders

  • Darice – A2 Size – Cobble Stones

Papers

  • Craftwork Cards – 8×8 Solid Colors and Printed Papers – Flying High Collection
  • Colored Cardstock Scraps
  • Silver Foil Cardstock
  • Printer Paper
  • A7 Cardbase and Envelope – White

Ink

  • Pink and Blue Fine Tipped Markers
  • Pigma – Mircon 01 Fine Tip Pen – Black
  • Computer Printer

Adhesives

Tools

  • Die Cutting Machine
  • Scissors
  • Stamping Blocks or Other Flat Weights
  • Computer

Miscellaneous

  • Yellow Embroidery Floss

Cupcake Wedding

Its Sneak Peek Week for Karen Burniston’s June 2023 Release.

Not all weddings have cake. Some have cupcakes. This is a card to congratulate the couple on their big day using some of Karen Burniston’s June 2023 Release dies including Cupcake Landscape Accordion Add-On and Word Set 17 – Congratulations along with previously released Wedding Charms, Border Blends – Trims, Long Rectangles – Crosshatch and Christmas Trees Pop Stand.

Front side of cupcakes

Cardbase: Cut a rectangle 8×6 inches, score down the middle longways and fold to form a top-fold slimline card that measures 3 inches high and 8 inches wide. Using the second largest die in the Crosshatch Long Rectangles, cut four panels from decorative paper. Adhere two of the decorative panels to the inside of the cardbase. Die cut pop-stands into cardbase. (I used a die-cut of the three cupcakes and a T-ruler to locate the center of the card and where the center cupcake should be. Pencil marks were made on the center fold where the card center was and then where the side cupcakes’ centers were. While I cut three pop-stands, Two pop-stands for the end cupcakes would be enough to make them stand.) Add the other two decorative panels to the cardbase front and back panels covering over the holes from the pop-stands.

Cupcake Pop-Stand: Cut two of the three cupcake outline from sturdy white cardstock. Cut three frosting tops from shimmer cardstock with shimmer side up. Cut three more frosting tops from shimmer cardstock with shimmer side down. Cut four cupcake liners from silver holographic card stock and two more from gold holographic cardstock.

Backside of cupcakes

Borders: Using the third and fourth largest dies in the Crosshatch Long Rectangles, cut two frames from lightweight white cardstock. Adhere frames to front and back panels of card base. Using the wavy ribbon trim from the Border Blends – Trims, cut five ribbons from lightweight white cardstock for the inside border. (Retain the tiny hearts that are cut with the ribbon to decorate the card.) Cut two of the ribbons in half for the sides. Adhere long ribbons to the top and bottom and piece in the remaining ribbon to complete the borders.

Decorations: From the Wedding Charms cut and emboss one wedding dress and one tuxedo shirt triangle from the shimmer cardstock and one tuxedo from black cardstock. With a fine-tip black pen dot the tuxedo shirt buttons. Glue shirt triangle to back of tuxedo and then glue tuxedo to backside of wedding dress. Adhere to front of card. Cut one each of the wedding rings and champagne glasses from matte gold cardstock and glue onto top inside panel. Use hearts from border trims to decorate glasses and ring. Scatter and adhere remaining hearts among all the panels.

Sentiments: Cut β€œCongratulations on your Big Day” from matte gold cardstock. Glue β€œCongratulations” onto the card front and β€œon your Big Day” to the top inside panel. Using the smallest crosshatch die  from the Crosshatch Long Rectangles, cut one rectangle from lightweight white cardstock. Round the corners with a small corner punch.  Glue to inside lower panel as a label for a personal message.

Envelope: The card will fit in a #9 or #10 business envelope. Give a hint of what is to come by gluing a ribbon border and hearts to the back flap.

Thank you for reading this blog post. I hope this inspires you and makes you smile. Please like and leave comments 😊

Materials Used:

Dies

Papers

  • Craft Consortium – 12×12 Double-Sided Paper Pad – Secret Garden designed by Clare Therese
  • Craftwork Cards – 8×8 Heavyweight Cardstock – Olive Grey
  • Recollections – 8.5×11 White Gold Shimmer Cardstock
  • Hot Off The Press – 8.5×11 Holographic Cardstock – Stars Gold and Stars Silver
  • White Cardstock – Lightweight and Heavyweight
  • Black Cardstock
  • Gold Matte Cardstock
  • #10 Business Envelope – Kraft

Ink

  • Pigma – Mircon 01 Fine Tip Pen – Black

Adhesives

Tools

Easter Card For A Child

This card was made for Craft Roulette #168 whose parameters included a kid’s card, citrus colors, a spring scene and something metallic or foil. Maymay was the guest crafter and talked about her young nephew who writes books and has a series about Evil Chicken. Her card included Evil Chicken and she showed how to make him from scraps of cardstock.

This card was made using all Karen Burniston dies.

Cardbase: For this gatefold A7 (5×7-inches) card I started with a piece of cardstock 10×5-inches and scored and folded 2.5-inches from each of the ends longwise. Next, spritz the ends of the card before using an embossing folder to make the card front more interesting.

Chicken: The chicken is made up of a large white triangle, a tiny yellow triangle, a small dash of black, half a tiny red flower, and a thin strip of black cut into two legs and four toes. I added a wing from a scrap of white. Grass was cut using a die from the Nature Edges set.

Rabbit: The Easter Bunny was made with white and pink scraps using the Spring Animals die set. A tiny basket and eggs are also part of the die set. I colored one of the eggs with a blue metallic marker. I made two baskets one is hung on the bunny’s arm and the other is on the envelope flap.

Eggs and Mechanism: I used some eggs I had made before using metallic ink with the stencil feature on the egg dies from the Easter Charms set as well as making some citrus colors (yellows and orange) eggs from solids and patterned paper scraps. For the two mechanisms that spin the eggs around when the card is opened, I used the Heart Collage Pop-up set. (Assembly video). The mechanism is glued into the card fold. I marked a spot 2-inches from the bottom of the left fold and 2-inches from the top of the right fold. Using the mark center a mechanism over the mark and line up the fold. Glue one tab to card and fold up the mechanism as instructed in the assembly video. Place glue on other tab and close card flap to glue in place to card. Repeat for other side.

Sentiments: I created the sentiments on Canva and then resized them in Publisher.  You can download a copy. After printing them, I roughly cut the main question onto white cardstock and fussy cut a cloud shape around the words. A Velcro dot was used on the back side of the cloud as a card closure. The answer sentiment was cut directly from the paper in a cloud shape and glued to the inside cardbase. The β€œHappy Easter” was cut out with a stitched rectangle die from the Slim Frames die set. A post was cut from a scrap of brown with left over grass from the front of the card.

Envelope: The card fits into an A7 envelope. To give a hint as to what’s inside, a small Easter basket was glued to the back envelope flap.

Thank you for reading this blog post. I hope this inspires you and makes you smile. Please like and leave comments 😊

Materials Used:

Dies

Embossing Folder

  • Spellbinders – 3D Embossing Folder 5.5×8.5-inches – Dimensional Diamonds

Papers

  • White, Black, Red, Pink,  Brown, Green, Orange, Blue and Yellow Cardstock
  • Patterned Paper Scraps
  • A2 ivory Envelope

Ink

  • Neon Pink Gel Pen
  • Crafter’s Square – Metallic Marker 1.2mm – Silver and Blue
  • Sharpie – Permanent Marker – Fine Point – Yellow
  • Pigma – Mircon 01 Fine Tip Pen – Black
  • Sakura – Gelly Roll Pen – Medium – White

Adhesives

Tools

  • Die Cutting Machine
  • We R Memories – QuickStick
  • We R Memories – Scoring Board and Trimmer
  • Scissors
  • Stamping Blocks/ Weights
  • Ranger – Mister Bottle
  • Bone Folder

Miscellaneous

  • Velcro Closure

Mother’s Day Blossoms

It’s Sneak Peek Week for Karen Burniston’s June 2023 Release.

Mother’s Day is a special time to send photos of one’s children. What better way than to include their smiling faces in a garden themed card. This card features Karen Burniston’s new Twist Flower Pop-Up die set as well as two previously released sets – Happy Mother’s Day and the Long Rectangles – Crosshatch.

Cardbase: Cut a 7 1/4 inch x 8 1/2 inch rectangle of lime green cardstock. Fold in half longways to form a 8 1/2 inch tall by 3 5/8 inch wide side-fold card.

Flowers: Cut three sets of the large flower die in the Twist Flower Pop-Up set once in yellow, again in pink and lastly in reddish orange. (Total of nine flowers.) Cut four center circles from yellow and two center circles from dark green. Cut six of the tiniest flower die from dark green and three from yellow. (You may wish to cut enough pieces to assemble one more, large flower for the back of the card. I used some of my leftover pieces for the flower on the card back.) Glue the tiny flower to the circle and then the circle onto a large flower. Repeat until six flowers are assembled. Save the remaining three tiny flowers to decorate the envelope.

Print photos of faces that have been sized to fit inside a 1-inch square. (I used the software Publisher to make a 1-inch grid and then insert the photos to the correct size and printed onto an 8 1/2 x 11 inch sheet of printer paper.) Cover the printed faces entirely with clear packing tape. Cut faces out using the center circle die.  Glue faces to three different colors of the large die-cut flowers.

Twist Bases: Cut three of the twist mechanisms from lime green cardstock using die in Twist Flower Pop-Up set. Β Train all the folds. Fold mechanism into the bunny face (middle of photo) and glue the small tab at the end of an ear onto the other ear. When unfolded it should look like a basket handle (left in photo.)

Using temporary tape attach the flowers to mechanisms. Layout the mechanisms making sure nothing goes outside the cardbase when folded closed. Glue one triangular side of the mechanism and then close card to glue the second triangle side. Add leaves to flowers using temporary tape to check for catch-points. Glue flowers and leaves in their final spots after decorating the rest of the card. (I found that flower petals can rub against the mechanism making the card creak as it is open and closed, so check for catch-points before gluing the flowers onto the mechanism. My finished card has several catch-points or creaky points as noted in red on the photo below.)

Decorations:Β  Die-cut a border for the card front using the two largest dies in the Long Rectangles – Crosshatch set. The leftover center rectangle can be used on the back of the card. (Because my remaining piece of the green dotted cardstock was not big enough to cut a whole new frame, I just cut four stripes using the dies still taped together for the frame.) These border stripes are used inside the card to cover the mechanism edges and create a trellis effect for the three large flowers used as decoration beside the pop-up flowers. Β Along with the sentiment, three of the large flowers with leaves are used on the card front. Cut three hearts using the die in the Twist Flower Pop-Up set to place above a white personal message label. (I cut my label using the fourth largest die in the Long Rectangles – Crosshatch set and trimmed it to needed width.) From the Twist Flower set cut two of the daisy border from white cardstock. Add flower centers either by die-cutting tiny circles using the die that will cut 12 circles or use enamel drops. (I used Nuvo drops that I had to let dry overnight before gluing them in place.) The back of the card is decorated with leftover pieces.

Sentiment:  Using the shadow die from the Happy Mother’s Day set, cut one from shimmer cardstock. Cut the words from green cardstock. Glue together.

Envelope: Glue the three tiny flowers to the back of the envelope flap.

Thank you for reading this blog post. I hope this inspires you and makes you smile. Please like and leave comments 😊

Materials Used:

Dies

Papers

  • Catherine Pooler – 6×6 Single-Sided Paper Pad – Zen Plaid
  • Recollections – 8.5×11 White Gold Shimmer Cardstock
  • Green Heavyweight Cardstock
  • White Lightweight Cardstock
  • Lime Green Polka-Dotted Cardstock
  • #10 Business Envelope – Cream

Ink

Adhesives

Tools

Miscellaneous

  • Nuvo Crystal Drops – Dandelion Yellow
  • Clear Packing Tape

Ahoy! A Nautical Hello

I am enchanted with Sabrina Leavell‘s new nautical collection of pop-up stand cards. (See more pop-ups – Life Preserver and Ship’s Wheel by clicking on them.)

For this pop-up 3D card, I used products from Scrappy Tails’ new Nautical 2023 June Collection.

Base: Stamp on kraft paper the Caribbean Map Stamp. (To see the map colored with its coordinating layering stencils look at A Map To TheΒ Caribbean.) Cut two of the Pop Up Stand from the map. Train the folds on each piece and glue tabs with slot for rubber band together. Add rubber band. (I used a #12 band.)

Anchor: Cut two anchors from gold cardstock and two anchors from kraft cardstock using the large die from the Anchor die set. Trim the rope pieces from the gold anchors. Using the rope pieces in the die set, cut two sets of ropes from kraft cardstock. With a sponge dauber, ink the rope pieces to create shading. Glue the rope pieces to the kraft cardstock anchors. Next, glue gold anchors in place.

Sentiments: Three of the six hot foil banners in the Nautical Banner hot foil plates set were used – β€œLets sail-ebrate!” and β€œWaving Hello.” (I usually do batch hot foiling with my Spellbinders’ Glimmer Foil System because it takes time to set-up, heat-up and cool-down.) The sentiment banners are attached to the anchors with foam squares after being cut out using the coordinating dies. β€œAhoy!” was cut from navy blue cardstock from the Set Sail paper pad three times using a bonus gift die. Each β€œAhoy!” was glued in place on the base and envelope. Gems and pearls from the Set Sail Card Kit were added to each anchor.

Envelope: The card folds flat to fit into an A7 envelope that I decorated the back flap with the the remaining β€œAhoy!” and a scrap of gold rope.

Thank you for reading this blog post. I hope this inspires you and makes you smile. Please like and leave comments 😊

Materials Used:

Dies & Foiling Plates

Stamps

Papers

Foils:

  • Spellbinders – Glimmer Hot Foil – Polished Brass

Ink

  • Memento – Fade-Resistant Dye ink – Tuxedo Black
  • Ranger – Tim Holtz – Distress Ink- Vintage Photo

Adhesives

Tools

  • Die Cutting Machine
  • Sponge Dauber
  • Craft Mat
  • Scissors
  • Spellbinders -Glimmer Hot Foil System
  • Spellbinders – Quick Trimmer

Miscellaneous

A Map To The Caribbean

Taking a sailing vacation around the Caribbean Sea deserves a special bon voyage card.

For this shape card, I used products from Scrappy Tails’ new Nautical 2023 June Collection.

Map: Stamp on kraft paper the Caribbean Map Stamp. Using the coordinating stencil set –Layering Caribbean Map Trio, start with the grid stencil and brown ink. Use the next two stencils to add color to the land masses, ships, whales and compass. (I found it easier to use a white opaque marker to color the sails than use the stencil.) I used the A7 Compass Scroll die to cup the map making sure the words of β€œCaribbean Sea” were visible. To create the rolled back of the scroll, I die cut just the scroll portions of the die from kraft paper and trimmed to fit the map. I daubed brown ink to shade and age the scroll and map.

Cardbase:  Cut three scrolls from kraft paper using the A7 Compass Scroll die. Cut a 2 1/4-inch x 4 1/4-inch rectangle from kraft paper and fold in half longwise for the card hinge. Glue the hinge to one of the scrolls to be the cardback as shown in photo. Glue hinge to back of map scroll, matching the shape edges.

Trim over hanging bits of hinge. Glue the scroll edges together at hinge fold. Trim the remaining two kraft scrolls to fit inside the card and cover hinge.

Compass: Cut the nine dies that make up the compass from the A7 Compass Scroll die set. Use lightweight colored cardstock for the three main parts and ink them to provide depth and shading. Cut the smaller bits from gold cardstock.  Glue completed compass to inside of card.

Sentiment: Stamp in black, the β€œLet your dreams set sail” from the Set Sail stamp set on the top left of the map scroll.

Envelope: The card fits into an A7 envelope that I decorated the back flap with the Caribbean Islands banner fussy cut from the map.

Thank you for reading this blog post. I hope this inspires you and makes you smile. Please like and leave comments 😊

Want to see more of the Scrappy Tails nautical collection? Check out my blog posts:

Materials Used:

Dies

Stamps and Stencils

Papers

  • Kraft Cardstock
  • Matte Gold Cardstock
  • Blue, Brown, White and Yellow Cardstock
  • A7 ivory Envelope

Ink

  • Memento – Fade-Resistant Dye ink – Tuxedo Black
  • Ranger – Tim Holtz – Distress Ink- gathered Twigs, Fossilized Amber, Saltwater Taffy, Abandon Coral, Cracked Pistachio
  • Recollections – Opaque Marker – Snow
  • Sharpie- Permanent Marker – Fine Point – Red

Adhesives

Tools

  • Die Cutting Machine
  • Stamping Platform
  • LDRS – Stampendable Stamping Tool
  • Stamping Cloth
  • Sponge Dauber
  • Quickstik Tool
  • Craft Mat
  • Scissors