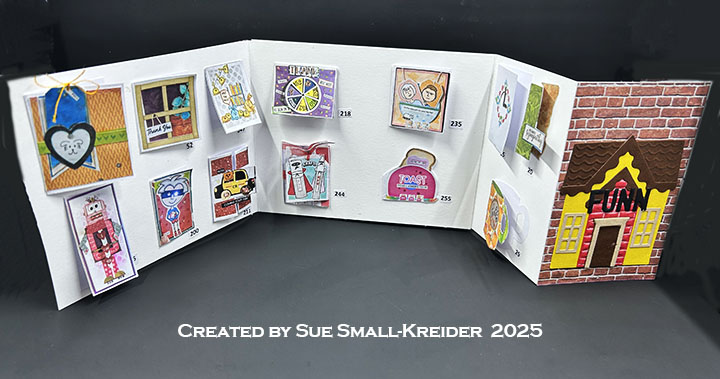
Here is a quick summary of cards using the new Karen Burniston Whirly Wheel die set.
(HINT: Click on the photo to go to the tutorial on how to make it.)
________________________
Thank you for experiencing this blog post.
I hope this inspires you and makes you smile.
Please like and leave comments 😊
________________________
Disclaimer: Karen Burniston products are provided free of charge by the manufacturer for review and use. All other items were personally purchased. Compensated affiliate links used where or when possible, meaning I will receive a small percentage commission from these manufacturers at no cost to you. This will allow me to add more content to my YouTube channel and help out a lot. Thank you.
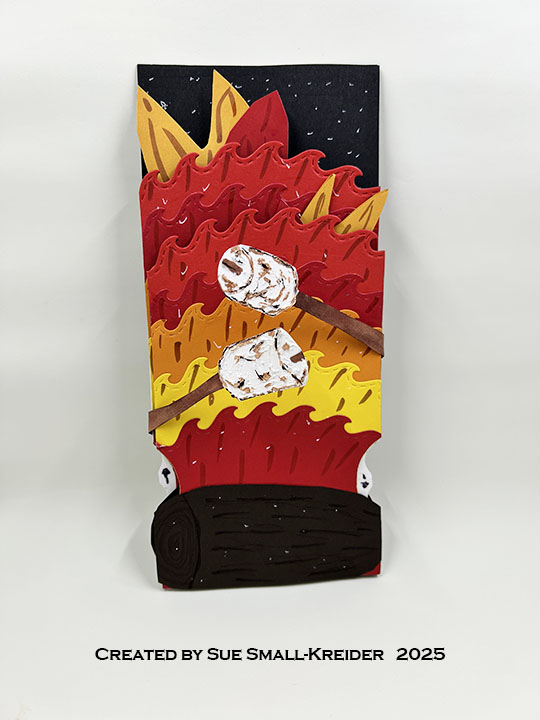
This card was made for Craft Roulette #271 whose parameters included a matchbook card, park colors, key(s) element, and curved and straight.
Watch the process video to see how I made this card.
Cardbase: Start with a 6×11-inch piece of patterned cardstock and score and fold at 3 1/4, 3 3/4 and 8 1/4-inches. Thread cardstock through the Karen Burniston Long Flap and Closure smaller flap die and center before cutting curved edge of the purse flap. Use white maker to outline curved edge.
FrontBack
Ribbon Handle: Cut an 18-20-inch piece of 3/8 to 1/2-inch wide ribbon. Punch two holes through the folded flap and thread ribbon through the holes. Leaving enough ribbon for a purse strap, tie ribbon at holes before tying bow.
Keys and Clasp: Die cut a total of four keys using the key die in the Karen Burniston Katherine Label Pop-Updie set. Cut two from silver foil cardstock and two more keys from the white backside of the silver foil cardstock. Glue keys together to form two keys that are silver on both sides. Add a jump ring to each key and then add each key to the third jump ring before attaching it to the ribbon. Glue large sequin to center of flap as a decorative clasp.
Sentiments: All the sentiments used on the card come from the Craft Roulette Funn Sentiments #01 stamp set and stamped in blue ink. stamped in black ink.
Envelope: The card fits into an A7 (5x 7-inches) size envelope that has a strip of the decorative cardstock glued to the back envelope flap.
___________________________________
Thank you for experiencing this blog post. I hope this inspires you and makes you smile. Please like and leave comments 😊
___________________________________
Disclaimer: Karen Burniston products are provided free of charge by the manufacturer for review and use. All other items were personally purchased. Compensated affiliate links used where or when possible, meaning I will receive a small percentage commission from these manufacturers at no cost to you. This will allow me to add more content to my YouTube channel and help out a lot. Thank you.
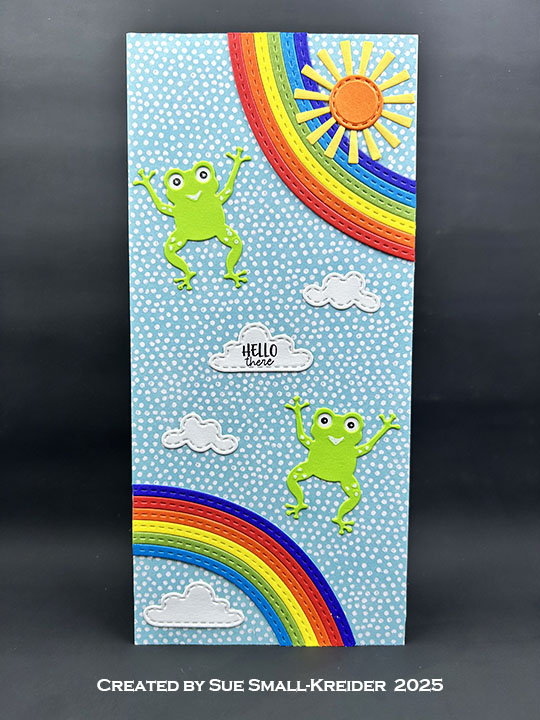
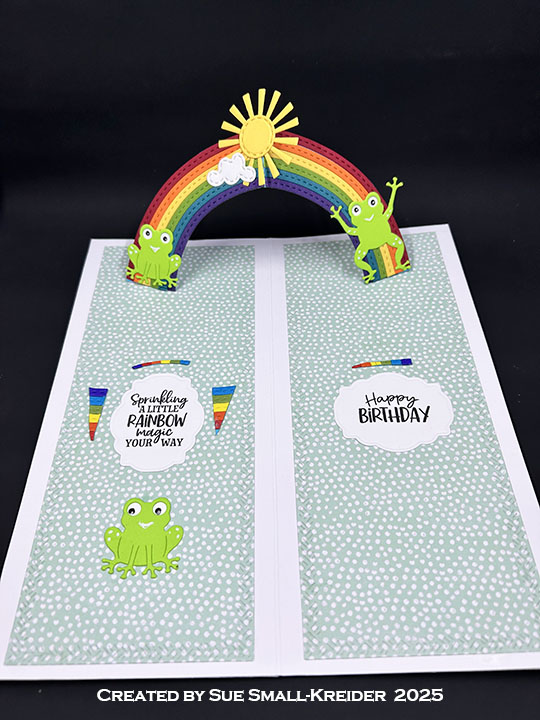
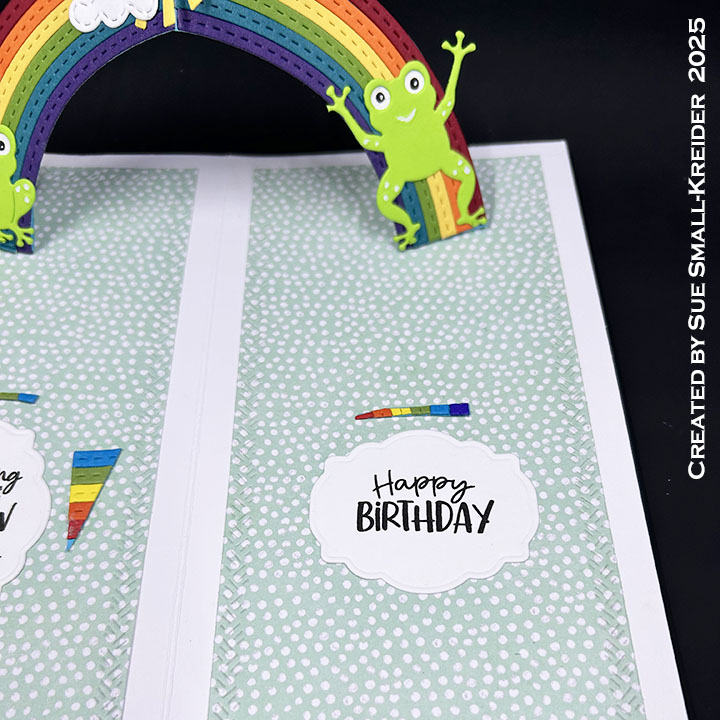
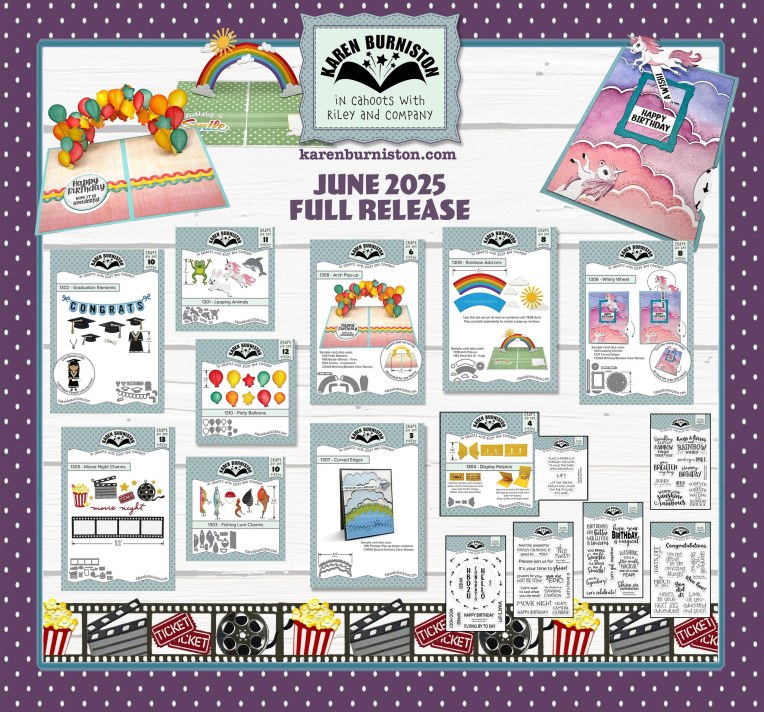
It’s Sneak Peek Week for Karen Burniston’s June 2025 release of ten new dies and five new clear stamps. For this rainbow connection slimline birthday card, I used several of the new sets including Arch Pop-Up,Leaping Animals and Rainbow Add-Ons die sets and Rainbow Greetings stamp set.
Watch the process video to see how I made this card.
Cardbase: An 8×8.75-inch rectangle of white cardstock was scored and folded into a side-fold 4×8.75 size slimline card. Thin decorative papers were used to cover the cardbase. The inside panels were cut using the largest die from the Long Rectangles – Crosshatch die set. (See video above for details on how they were cut and attached.)
Arch Pop-Up: Cut out the two large arch dies in the Arch Pop-Up from solid 65-80lb. cardstock. Assemble as shown in the video above, adding the rainbow strips which were cut using double-sided adhesive tape. Attach the pop-up rainbow arch as shown in the video.
Frogs: Cut four green, leaping frogs from the Leaping Animals die sets. Cut three green, sitting frogs from the Bayou Animals die set. With a white gel pen and frog dies as stencils, add spots and mouths to frogs. Using the eyes die from either animal set, cut four sets of eyes from white and stencil the black pupil of the eye and add a white gel pen dot onto them.
Sentiments: All the sentiments were stamped using the Rainbow Greetings stamp set with in black ink. “Sprinkling a little Rainbow magic your way” and “Happy Birthday” were cut out using the smallest fancy label die in the Rectangles and Labels – Crosshatch die set. Use the largest cloud die in the Rainbow Add-Ons set to cut out “Hello there.”
Envelope: The card fits into #10 business (4.25x 9-inches) size envelope stamped with “Wishing you sunshine and rainbows” the back flap.
Disclaimer: Karen Burniston products are provided free of charge by the manufacturer for review and use. All other items were personally purchased. Compensated affiliate links used where or when possible, meaning I will receive a small percentage commission from these manufacturers at no cost to you. This will allow me to add more content to my YouTube channel and help out a lot. Thank you.
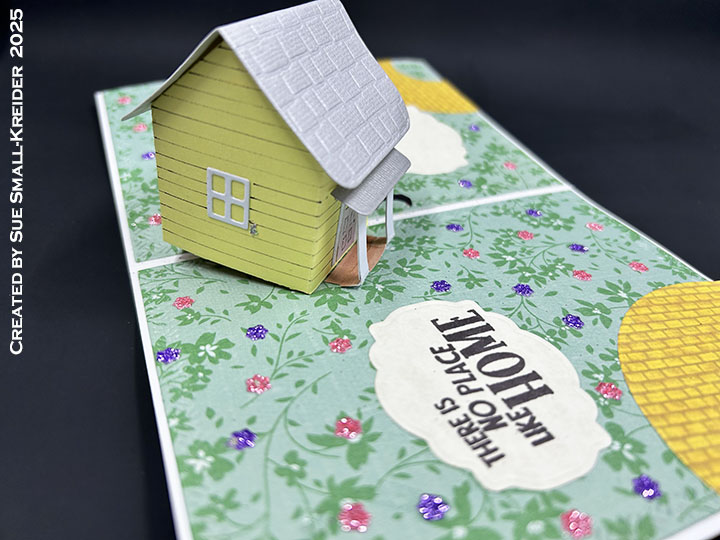
It’s the Karen Burniston design team challenge for June 2025 using the theme of Animals and Characters. I chose to make a Wizard of Oz themed card using a variety of die sets. (See Materials Usedfor the list of dies usedlocated at the bottom of this post.)
Watch the process video to see how I made this card.
Cardbase: Start with a 8.5×5.5-inch piece of single-sided patterned cardstock and fold in half to form a side-fold A2 (4.25×5.5-inch) card. Cover the two inside panels with decorative papers cut with the largest die in the Rectangles – Crosshatch die set.
House Pop-Up: (Watch the assembly video for Tiny House Pop-Up located at the bottom of the linked page.) Follow the directions in the process video above for the modifications made to the Tiny House Pop-Up using the Beach Bar Tiny House Add-Ons to add a porch to the house.
Characters: (Watch the assembly videos for Paper People, Knight and Dragon, and Monkey and Lion located at the bottom of the linked pages.) Follow the directions in the process video above for the modifications made to these die sets for the specific characters. For the Witch’s legs cut two strips of white cardstock 1/8-inch thick and draw red strips on them. Die cut shoes from the Witch and Cauldron die set in red glitter cardstock.
Sentiments: All the sentiments used on the card are stamped using brown ink and Riley and Company Wizard of Oz Dress-Up stamps.
Envelope: The card fits into an A2 (4.25x 5.5-inches) size envelope stamped with a sentiment from Riley and Company on the back flap in brown ink.
___________________________________
Thank you for experiencing this blog post.
I hope this inspires you and makes you smile.
Please like and leave comments 😊
___________________________________
Disclaimer: Karen Burniston products are provided free of charge by the manufacturer for review and use. All other items were personally purchased. Compensated affiliate links used where or when possible, meaning I will receive a small percentage commission from these manufacturers at no cost to you. This will allow me to add more content to my YouTube channel and help out a lot. Thank you.
This card was made for Craft Roulette #269 whose parameters included a square card, butterfly colors, cloud element, and tied.
Front of Card
Watch the process video to see how I made this card.
Back of Card
Cardbase: Start with a 4 x 8-inch piece of double-sided patterned cardstock and fold in half to form a top-fold 4-inch square card.
Pop-Up: Watch the assembly videos for the Little Twist Panel Pop-Up. Cut from double-sided patterned paper one of the pop-up base, two large, rounded corners panel, one of the strip panel and the two flag banner pieces. Add flag banner pieces to strip panel before attaching the strip panel to pop-up base arms. Stamp and decorate large panels before attaching them to strip panel.
Sentiments: All the sentiments used on the card come from the Bouquet Sayings stamp set except for the card front’s “Celebrate your big awesome super day” which is from the Photo Memories set. All are stamped in black ink. Clouds and hearts come from the Long Nature Edges 2 die set.
Envelope: The card fits into an A2 (4.25x 5.5-inches) size envelope. A piece of decorative paper and stamps from the Craft Roulette Basics stamp set decorate the back of the envelope.
___________________________________
Thank you for experiencing this blog post.
I hope this inspires you and makes you smile.
Please like and leave comments 😊
___________________________________
Disclaimer: Karen Burniston products are provided free of charge by the manufacturer for review and use. All other items were personally purchased. Compensated affiliate links used where or when possible, meaning I will receive a small percentage commission from these manufacturers at no cost to you. This will allow me to add more content to my YouTube channel and help out a lot. Thank you.
This card was made for Craft Roulette #268 whose parameters included a card for a student, modern colors, clothing element, and abstract blob(s). I made an A9 shaped-card of encouragement for a student of life.
Watch the process video to see how I made this card.
Cardbase: Using a 5.5×8.5 sheet of paper fold in half- long ways and draw one side of a dress. Cut the dress out and use as a pattern to trace for two dresses on an 8.5×11 sheet of cardstock. Add tabs to shoulders of one dress as hinges to create the shaped card.
Sentiments: All the sentiments are stamped using rubber stamps from Riley & Company’s Funny Bones collection, except for the “Go Girl Go” which was die cut using Karen Burniston’s Mini Alphabet die set.
Envelope: The card fits into a catalog envelope (6×9-inches).
___________________________________
Thank you for experiencing this blog post.
I hope this inspires you and makes you smile.
Please like and leave comments 😊
___________________________________
Disclaimer: Karen Burniston products are provided free of charge by the manufacturer for review and use. All other items were personally purchased. Compensated affiliate links used where or when possible, meaning I will receive a small percentage commission from these manufacturers at no cost to you. This will allow me to add more content to my YouTube channel and help out a lot. Thank you.
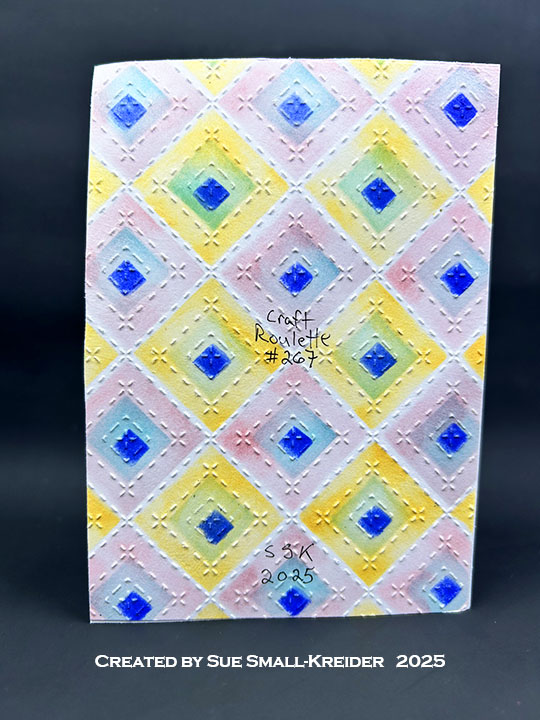
This card was made for Craft Roulette #267whose parameters included a 4 Bar card, craft store colors, se(s)/(ing)/sewn element, and stencil. I made a birthday card using dies by Karen Burniston and PinkFresh and sentiment stripes by Waffle Flower
Watch the process video to see how I made this card.
Cardbase: Score and fold a 7×5-inch piece of heavy white cardstock into 3.5×5-inch side fold card.
Stenciled Quilt Top Background: Follow directions in video to stencil the background. To create the stencils use 6×8.5-inch sheets of 100lb cardstock that have the stitched diamond die cut into the center of each of the four sheets. Using the stitch marks as your guide, cut the stencils using a craft knife and a metal straight edge or ruler.
Pop-up Twist Panel: Watch the assembly video at the bottom of the linked page. Stamp the quilt stamp onto medium weight cardstock. Die-cut the large mechanism from the Little Twist Panel Pop-Up set out of the stamped cardstock. Cut the panel from white cardstock. Cut decorative panels using the dies in set with your stamped cardstock.
Sewing Charms: Assemble as directed in Karen’s assembly video located at the bottom of the linked page for the Sewing Charms.
Envelope: The card fits into an A2 (4.25x 5.5-inches) size envelope.
___________________________________
Thank you for experiencing this blog post.
I hope this inspires you and makes you smile.
Please like and leave comments 😊
___________________________________
Disclaimer: Karen Burniston products are provided free of charge by the manufacturer for review and use. All other items were personally purchased. Compensated affiliate links used where or when possible, meaning I will receive a small percentage commission from these manufacturers at no cost to you. This will allow me to add more content to my YouTube channel and help out a lot. Thank you.
This card was made for Craft Roulette #265 whose parameters included gift card, train colors, science element, and add a flower. I used a Craft Roulette stamp set and three Karen Burnistondies die sets.
Watch the process video to see how I made this card.
Cardbase: Using Karen Burniston’s Tag Book Pop-Up die set, I cut two of the large tag frames from oxidized blue mirror cardstock and two more from oxidized copper-colored mirror cardstock. The rectangular hinge die I cut once from white cardstock.
Pop-Up Panels: I glued my thin decorated paper to a piece of thin white cardstock and let dry before cutting out the Flower Pivot Panels piece. (Follow the assembly instructions in her video on the die set’s linked page.) The six small flowers are cut from solid colored cardstock scraps using the dies from the same die set as the panels.
Sentiments: The framed “Happy Birthday” on the tag front is from the Happy Birthday Lorna Add-Ons die set. The stamped “itty bitty gift” on the back tag pocket is in brown ink using the Craft Roulette Funn Sentiments #01 stamp set.
Envelope: The card fits into a purchased A6 (4.5x 6-inches) size envelope or larger.
___________________________________
Thank you for experiencing this blog post.
I hope this inspires you and makes you smile.
Please like and leave comments
___________________________________
Disclaimer: Karen Burniston products are provided free of charge by the manufacturer for review and use. All other items were personally purchased. Compensated affiliate links used where or when possible, meaning I will receive a small percentage commission from these manufacturers at no cost to you. This will allow me to add more content to my YouTube channel and help out a lot. Thank you.
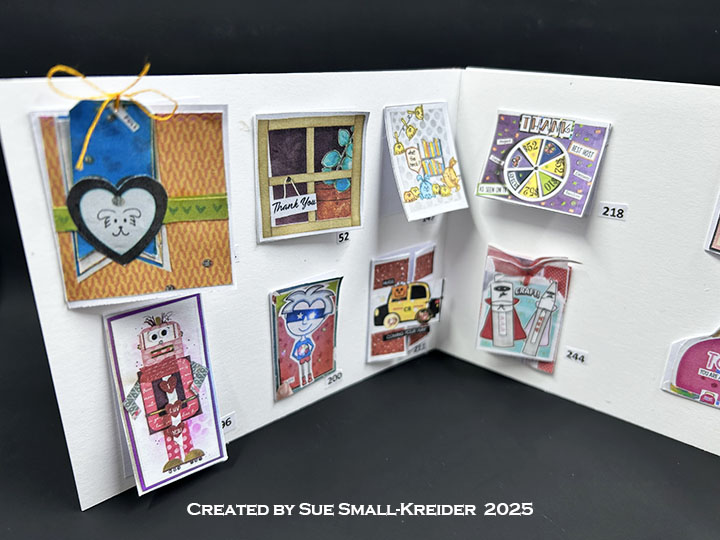
This card was made for Craft Roulette #264 whose parameters included a card for an influencer, dreamy colors, crafts/crafters, and off center.
Watch the process video to see how I made this card.
Cardbase: Cut an 8.5×11-inch piece of heavy white cardstock into two pieces that at 4.25×11-inches. Score and fold in half at 5.5-inches both pieces. On one piece score and fold at 2.75-inches. Glue the two cards together with the large rectangle panels overlapping as shown in the video. Cards: Because this card is going to Mary Gunn, I used images from her Craft Roulette Community Showcase gallery, picking cards that are iconic to the show. I tried to recreate some of the fun folds and bookmark cards.
Guide Sheet to Cards: This sheet is folded and tucked in a pocket on the back of the card.
Envelope: The card fits into an A2 (4.25x 5.5-inches) size envelope.
________________________________
Thank you for experiencing this blog post.
I hope this inspires you and makes you smile.
Please like and leave comments 😊
______________________________
Disclaimer: Karen Burniston products are provided free of charge by the manufacturer for review and use. All other items were personally purchased. Compensated affiliate links used where or when possible, meaning I will receive a small percentage commission from these manufacturers at no cost to you. This will allow me to add more content to my YouTube channel and help out a lot. Thank you.