Trinity Stamps – Nutcracker Slider Card

Welcome to Day 3 of my Nutcracker series using a variety of stamps and die sets to make some nutcracker themed cards. My card today uses products by Trinity Stamps – Nutcracker Cup Character, Take-Out Coffee Cup Shaped Card and Sundae Swirl Alphabet dies sets and Hero Arts’ A Little Nuts stamp set.

Watch the process video below to learn how this card was made.

Cardbase: Using the large die from the Take-Out Coffee Cup Shaped Card, cut out a card base from a 7.5×5.5-inch piece of black cardstock.

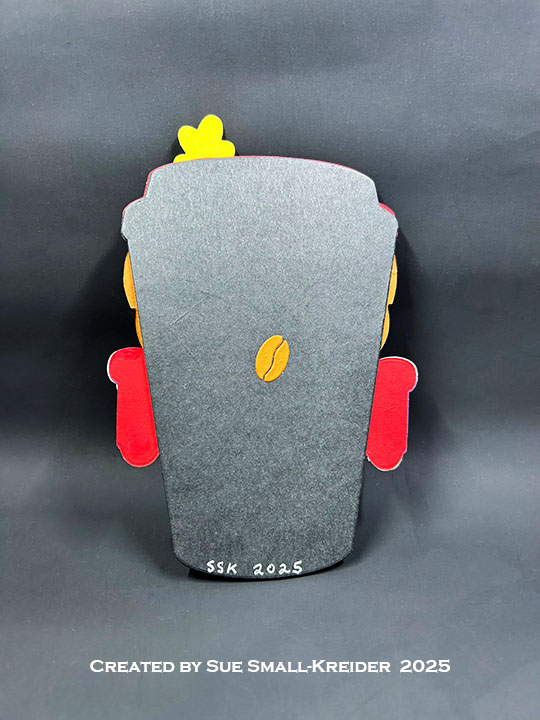
Nutcracker Front: Referring to the image of the nutcracker on the packaging for the Nutcracker Cup Character die set, cut out all the pieces using your own color scheme. (I used black for the eyes, teeth, hat bill/visor and belt, flesh color hands and nose, blue for sleeves, gold for belt buckle, sleeve cuffs, epaulets and button cording, red for jacket and hat, copper brown for hair, eyebrows and mustache, and yellow for the feather in hat.) Cut a white square to fit the back of the teeth. Cut from Flesh color, a cup holder using the die in the Take-Out Coffee Cup Shaped Card set to use as the face. Assemble as shown in video.

Sentiments: Using the Sundae Swirl Alphabet die set, cut from red the words “Happy Holidays” and glue together as directed in the video above. Cut from white a cup holder using the die in the Take-Out Coffee Cup Shaped Card set.

Envelope: The panel card fits into an A2 size envelope with a nutcracker and “Nutcracker is my favorite season” on the envelope back using the Hero Arts’ A Little Nuts stamp set.

___________________________________

Thank you for experiencing this blog post.

I hope this inspires you and makes you smile.

Please subscribe, like and leave comments 😊

___________________________________

Disclaimer: Karen Burniston products are provided free of charge by the manufacturer for review and use. All other items were personally purchased. Compensated affiliate links used where or when possible, meaning I will receive a small percentage commission from these manufacturers at no cost to you. This will allow me to add more content to my YouTube channel and help out a lot. Thank you.

Materials Used:

Dies

  • Trinity Stamps – Dies – Nutcracker Cup Character
  • Trinity Stamps – Dies – Sundae Swirl Alphabet
  • Trinity Stamps – Dies – Take-Out Coffee Cup Shaped Card

Stamps

  • Hero Arts – Clear Stamps & Dies- A Little Nuts

Papers

  • Park Lane – 8.5×11 80 lb. Shimmer Sheets – Gold
  • Recollections – 8.5×11 100 lb. Cardstock – Flesh
  • Recollections – 8.5×11 80 lb. Cardstock – White
  • Stampin’ Up – 8.5×11 80 lb. Cardstock – Copper Clay
  • Black, Blue, Red and Yellow Cardstock
  • Fraser Papers for William House – A2 Envelope – Genesis Text Milkweed Smooth

Ink

Adhesives

Tools

  • Die Cutting Machine
  • Paper Trimmer
  • Stamping Platform
  • Stamping Block
  • Blending Brush
  • Pencil
  • Tweezers
  • Riley and Company – Pick & Poke Tool
  • We R Memories – QuickStick

Miscellaneous

  • Trinity Stamps – Sparkle Spots Embellishments – Sampler

Pumpkin Spice Coffee

There’s a new mini release of five new stamp sets from Karen Burniston. For this card I’ve used the new Fall Phrases and Coffee Chat sentiment stamps along with previously released die sets – Fancy Label Accordion, Haunted Tiny House Add-Ons, Tea and Coffee Pop-Up and Fancy Solid Frame.

Cardbase: Cut three of the accordion frames from a plaid cardstock and followed the the assembly video for the Fancy Label Accordion die set. (Assembly video is at the bottom of the linked page for the die set.) Glue the frames together using the long tabs. Cut three sets of the Fancy Solid Frame and adhere to the back side of the accordion frames to hide the connecting tabs.

Card Front: Using the decorator dies in the Fancy Label Accordion set, cut a large plaid label and a smaller white label. Stamp on the white label “Let’s give ’em pumpkin to talk about” from the Fall Phrases stamp set. Glue the labels together and them on to the back of the lead pivot panel. From orange and green cardstock, cut and emboss the small pumpkin from the Haunted Tiny House Add-On die set. Glue to the label.

Coffee Mugs: Cut three of the mugs from white cardstock and two from the plaid cardstock using the Tea and Coffee Pop-Up die set. Stamp coffee sentiments onto the white mugs using the Coffee Chat stamp set. Adhere the mugs to the front and back of the pivot panels.

___________________________________

Thank you for experiencing this blog post.

I hope this inspires you and makes you smile.

Please subscribe to the email notices, like and leave comments 😊

___________________________________

Disclaimer: Karen Burniston products are provided free of charge by the manufacturer for review and use. All other items were personally purchased. Compensated affiliate links used where or when possible, meaning I will receive a small percentage commission from these manufacturers at no cost to you. This will allow me to add more content to my YouTube channel and help out a lot. Thank you.

Materials Used:

Dies

Stamps

Papers

  • Dress My Craft – 12Γ—12 in Single-Sided Cardstock – Baby Brown Gingham Checks
  • Green, Orange and White Cardstock

Ink

  • Memento – Fade Resistant Dye ink – Tuxedo Black
  • Pigma – Mircon 005 Fine Tip Pen – Black

Adhesives

Tools

Sweater Weather Pop-Up Card

There’s a new mini release of five new stamp sets from Karen Burniston. For this card I’ve used the new Fall Phrases sentiment stamps along with previously released die sets – Cupcake Pop-Up, Coffee Charms, Tiny Trees Pop-Up, Border Blends – Trims, Bam Box Pop-Up and Display Helpers.

Watch the video below to learn how I made this card.

Cardbase: Start with an 11×4.25-inch rectangle of cream colored cardstock. Score and fold at 5.5-inches to form an A2 (4.25×5.5-inch) side-fold card. Watch video above for how the four panels are covered.

Card Back

Card Front: Cut a 4.125×5.25-inch rectangle of cream cardstock. Cut .5-inch wide stripes of decorative paper to be used as a mat behind the rectangle above. Adhere strips as shown in video above to the front panel of the cardbase.

Watch the assembly videos at the bottom of each of the dies’ linked pages. Die cut from red and orange cardstock backed with double-sided tape (I had scraps from cutting rainbows) lots of the two types of leaves in the Tiny Trees Pop-Up set. Use brown ink to age the leaves.

From the Border Blends – Trims die set, cut six of the wave strands in die #1. Weave/braid two strands together as shown in the video above. Repeat with rest of strands to form the three cable sweater stripes that are on the front panel. Glue in the center of the cream panel. trim as needed.

Cut and assemble two coffee cups-to-go from the Coffee Charms set. (I used the package design to make mine.)

Once the leaves were added to the panel, I splattered some bronze ink onto the panel and then added some flat glitter spots. My leftover leaves were used to decorate the card back and the inside of the card.

Pop-Up Platform: Watch the assembly video at the bottom of the Cupcake Pop-Up linked page. Then follow the steps in the video above for how I glued the pop-up platform into the card. I added a display helper to keep the card open. Watch the assembly video for the Display Helpers to see how the “LIFT” piece is installed. (Circled in photo below.)

Card Front

Sentiments: All the sentiments were stamped in black ink using the Fall Phrases stamps set. They were cut and embossed using various dies in the Bam Box Pop-Up set. See the video above for how the labels were embossed.

___________________________________

Thank you for experiencing this blog post.

I hope this inspires you and makes you smile.

Please subscribe to the email notices, like and leave comments 😊

___________________________________

Disclaimer: Karen Burniston products are provided free of charge by the manufacturer for review and use. All other items were personally purchased. Compensated affiliate links used where or when possible, meaning I will receive a small percentage commission from these manufacturers at no cost to you. This will allow me to add more content to my YouTube channel and help out a lot. Thank you.

Materials Used:

Dies

Stamps

Papers

  • Stamperia – 12×12-inches Double-Sided Paper – Winter Botanic
  • Stampin’ Up – 8.5×11-inches Cardstock – Tea Room
  • Orange, Red and White Cardstock

Ink

  • Hero Arts – Silk Ink – Bronze
  • Memento – Fade Resistant Dye ink – Tuxedo Black
  • Ranger – Tim Holtz – Distress Ink – Rustic Wilderness, Vintage Photo
  • Sharpie – Permanent Marker – Ultra Fine Point – Black

Adhesives

Tools

  • Die Cutting Machine
  • Paper Trimmer
  • Stamping Platform
  • LDRS – Stampendable Stamping Tool
  • Stamping Blocks used as paperweights
  • Sponge Daubers
  • Scissors
  • Riley and Company – Pick & Poke Tool
  • Paper Masking Tape

Miscellaneous

  • Trinity Stamps – Flat Glitter Confetti Spots – Black, Orange

Birthday Card For A Coffee Lover

This card was made for Craft Roulette #217 whose parameters included for A2 Project, French cafe colors, June element and polka dots.

This is a card for a coffee lover with a June birthday and also celebrates the USA Flag Day on 14th of June. 

Watch the process video for how it was assembled.

Cardbase: The paper pad is 8 x8-inches, so the base piece was trimmed to 5 1/2 x 8-inches and scored 4 1/4-inches from the left edge.

Sentiments: The tag sentiments were cut from the paper collection. Gold junk mail was used to cut the β€œHappy Birthday.”

Envelope: A tag sentiment was glued to the back flap of the A2 envelope.

___________________________________

Thank you for experiencing this blog post.

I hope this inspires you and makes you smile.

Please like and leave comments 😊

___________________________________

Materials Used:

Dies

Papers

  • Stamperia – 8×8 Double-Sided Paper – Coffee and Chocolate Scrapbooking by Caistina Aaddvan
  • Gold Junk Mail
  • Fraser Papers for William House – A2 Envelope – Genesis Text Milkweed Smooth

Ink

  • Pigma – Mircon 01 Fine Tip Pen – Black

Adhesives

Tools

  • Die Cutting Machine
  • Bone Folder
  • Stamping Blocks used as paperweights
  • Scissors
  • We R Memories – QuickStick

Miscellaneous

  • Nuvo – Crystal Drops – Metallic – Dirty Bronze

Caffeinated Fun!

This card was made for Craft Roulette #210 whose parameters included Project must include action, Northern Lights colors, blackboard element(s) and oval(s).

Below is a recorded live video (37 minutes) that demonstrates how the inside-out card is made.

For a shorter experience watch the Craft Roulette process video below.

___________________________________

Thank you for experiencing this blog post.

I hope this inspires you and makes you smile.

Please like and leave comments 😊

__________________________________________

Materials Used:

Dies

Stamps

  • Crackerbox Stamps – Rubber Stamp – Coffee Cup
  • Riley & Co. – Funny Bones Rubber Stamps – Coffeeology
  • Riley & Co. – Funny Bones Rubber Stamps – If Your Eyes Hurt After Drinking Coffee

Papers

  • Memory Box – 8.5×11 Woodgrain Embossed Cardstock – Kraft
  • Black Cardstock

Ink

  • Ranger – Tim Holtz – Distress Ink- Walnut Stain
  • VersaMark – Watermark Ink Pad
  • American Crafts Embossing Pen
  • White Gel Pen
  • Hero Arts – Embossing Powder – White
  • Stampendous! – Glitter Embossing Powers Kit –  Mermaid Sea

Adhesives

Tools

  • Die Cutting Machine
  • Bone Folder
  • Stamping Platform
  • LDRS – Stampendable Stamping Tool
  • Dry Brush
  • Tweezers
  • Craft Mat
  • Stamping Blocks used as paperweights
  • Kat Scrappiness – Anti-Static Tool
  • Heat Tool
  • Craft Knife
  • Scissors
  • T-Ruler
  • Metal Ruler/Straight-Edge
  • Pencil
  • Tombow – Mono – Sand Eraser -512A

3D Coffee Truck

This card was made for Craft Roulette #207 whose parameters included an A2 size card, ice cream store colors, tasty or tastes element and a banner.

I wanted to make a pop-up or 3-dimensional A2 size card for this episode of Craft Roulette, so I modified a 3D postal truck I had made for my mail carrier to say thank you to fit into an A2 size envelope (4.25×5.5 inches.) (See Mail Truck blog post.)

___________________________________________

Thank you for reading this blog post. I hope this inspires you and makes you smile.

Please like and leave comments 😊

___________________________________________

Materials Used:

Dies

Stamps

Papers

  • Sliver Matte Foil Cardstock
  • Black, Red and White Cardstock
  • A2 Envelope – Cream

Ink

  • Stampin’ Up – Classic Ink Pad – Early Espresso

Adhesives

Tools

  • Die Cutting Machine
  • Scoring Board
  • Paper Trimmer
  • Bone Folder
  • Small Hole Punch
  • We R Memories – QuickStick
  • Tweezers
  • Stamping Blocks
  • Kat Scrappiness – Anti-Static Tool
  • Scissors
  • T-Ruler
  • Tombow – Mono – Sand Eraser -512A

Miscellaneous

  • Baker’s Twine – Red and White

A Walk Along Main Street Pop-up Card

This card was made for Craft Roulette #203 whose parameters included a flip fold card, Main Street colors, walk(s) element and heart(s).

________________________________________________________________

Thank you for checking out this blog post. I hope this inspires you and makes you smile.

Please like and leave comments 😊

________________________________________________________________

Materials Used:

Dies

  • Concord & 9th – Metal Dies – Bake Shoppe
  • Concord & 9th – Metal Dies – Book Shoppe
  • Concord & 9th – Metal Dies – Fashion Shoppe
  • Concord & 9th – Metal Dies – Pop-Up Shoppe Base
  • Concord & 9th – Metal Dies – Window Shoppe Pop-Up Base

Stamps

  • Concord & 9th – Clear Stamps – Bake Shoppe
  • Concord & 9th – Clear Stamps – Book Shoppe
  • Concord & 9th – Clear Stamps – Fashion Shoppe
  • Concord & 9th – Clear Stamps – Flower Shoppe
  • My Favorite Thinks – Clear Stamps – Coffee Shop CS-734
  • Rubbernecker Stamps – Rubber Stamp – Good Friends 642-13

Papers

  • Craft Consortium – 6×6 Double-Sided Cardstock – Brick Textures
  • My Favorite Things – 6×6 Single-Sided Paper Pad – Finishes and Textures
  • Spellbinders – 8.5×11-inch 100 lb. Cardstock – Terra Cotta
  • Spellbinders – 8.5×11-inch 100 lb. Cardstock – Snowdrift
  • The Paper Studio – 8.5×11-inch Printed Paper – Brick Wall
  • Gold and Silver Matte Foil Cardstock
  • Colored Cardstock
  • Dura-Lar – 9×11-inch .005 Clear Film or Acetate

Ink & Embossing Powder

  • StazOn – Solvent Ink – Jet Black
  • Stampin’ Up – Classic Stampin’ Pad – Early Espresso
  • VersaMark – Watermark Stamp Pad
  • Ranger – Tim Holtz – Distress Ink- Antique linen, Salty Ocean, Scorched Timber
  • Gelly Roll – Gel Pen – Gold
  • Sharpie – Permanent Marker – Ultra Fine Tip – Black
  • Pigma – Mircon 01 Fine Tip Pen – Black
  • Recollections – Detail Embossing Powder- Ebony (used on “Books” sign)

Adhesives

  • Neutral PH Adhesive by LINECO
  • Fine-Tip Glue Bottle
  • Double-Sided Tape -1/8-inch wide
  • Double-Sided Tape -1/2-inch wide

Tools

  • Die Cutting Machine
  • Bone Folder
  • Stamping Platform
  • LDRS – Stampendable Stamping Tool
  • Craft Mat
  • We R Memories – QuickStick
  • Tweezers
  • Sponge Dauber
  • Stamping Blocks
  • Heat Tool
  • Scissors
  • Metal Ruler/Straight-Edge
  • Pencil 

Coffee Loving Couple

Different things bond couples together, but for one couple I know it is coffee. This is a card to celebrate their wedding anniversary.

I used two of Karen Burniston’s new February 2024 release diesTea and Coffee Borders and Tea and Coffee Pop-Up along with several previously released dies – Rectangles and Labels – Crosshatch, Word Set 12 – Anniversary and Cupcake Pop-Up.

Thank you for reading this blog post. I hope this inspires you and makes you smile. Please like and leave comments 😊

Materials Used:

Dies

Papers

  • Carta Bella – 12×12 Double-Sided Textured Cardstock Collection Kit – Gather At Home
  • Bazzill – 12×12 inch Cardstock – Travertine
  • Recollections – 8.5Γ—11 Shimmer Cardstock – White Gold
  • Black, Brown, Pale Green and White Cardstock
  • Clear Vellum
  • #10 Business Envelope – Kraft Brown

Ink

  • Ranger – Tim Holtz – Distress Ink – Black Soot, Gathered Twigs and Saltwater Taffy
  • Pigma – Mircon 01 Fine Tip Pen – Black

Adhesives

Tools

  • Die Cutting Machine
  • Bone Folder
  • Craft Mat
  • Sponge Dauber
  • Stamping Blocks used as paperweights
  • Scissors
  • Ball Tipped Shaping Tool
  • Stiff Foam Mat

Slay Your Day!

This card was made for Craft Roulette. #188 whose parameters included a gift card, coffee shop colors, go wild element and number(s).

Have a friend who finds it hard to get going without coffee? This is the card for them complete with a coffee gift card.

It is made with Karen Burniston’s Coffee Cup Pop-Up that includes tabs to hold a gift card on the back side of the cup. The sweet dragon having his morning cuppa on the card front and the knight in shiny armor atop the coffee cup are also Karen Burniston dies.

Cardbase:  Cut from green cardstock one 5×7-inch rectangle and one 5×7.5-inch rectangle. Score and fold 1/2-inch on the 5×7.5-inch rectangle to have a 5×7-inch rectangle with a tab. Glue the tab to the other green piece to make a 5×7-inch top fold card. Cut decorative papers to cover panels inside and out.

Dragon:  (Watch the assembly video for the Knight and Dragon die set first.) I cut the dragon from two shades of green cardstock and inked some shading on him. I used the die stencil feature for his eyes, mouth and wings. His red cup is from the Coffee Charms die set.

Knight:  (Watch the assembly video for the Knight and Dragon die set first.) I cut two bodies for the knight gluing them back-to-back but sandwiching the red plume behind the helmet first. Add his shield and sword before gluing on his gloves.

Coffee Cup:  (Watch the assembly video towards the bottom of the link page Coffee Cup Pop-Up before starting.) I chose to use patterned paper with names of coffee drinks for the body of the cup, white cardstock for the cup lid and kraft cardstock for the cup band. The band die embossed the ridges on it, and I enhanced the ridges with brown ink. Yellow ink was used to shade the cup lid. I used the circle dies in the die set for the logo.

Sentiments: The β€œGo Wild!” is cut from brown paper using the die set of the same name by Karen Burniston. Th yellow banner inside says β€œand Slay the Day with Excalibur coffee,” which was computer generated.

Thank you for reading this blog post. I hope this inspires you and makes you smile. Please like and leave comments 😊

Materials Used:

Dies

Papers

  • Rubbernecker – 6×6 Double-Sided Paper Pad – Java Good Time
  • Matte Silver Cardstock
  • White, Green, Red, Black and Blue Cardstock
  • Copier Paper
  • Park Lane Paperie – A7 Cardbase and Envelope – White

Ink

  • Ranger – Tim Holtz – Distress Ink- Vintage Photo, Fossilized Amber and Mowed Lawn
  • Sharpie – Permanent Marker – Fine Tip – Black, Pink, Green, Yellow and Red
  • Pigma – Mircon 01 Fine Tip Pen – Black
  • Computer Printer

Adhesives

Tools

  • Die Cutting Machine
  • Sponge Dauber
  • Craft Mat
  • Scissors
  • Computer and Printer