This card was made for Craft Roulette #207 whose parameters included an A2 size card, ice cream store colors, tasty or tastes element and a banner.
I wanted to make a pop-up or 3-dimensional A2 size card for this episode of Craft Roulette, so I modified a 3D postal truck I had made for my mail carrier to say thank you to fit into an A2 size envelope (4.25×5.5 inches.) (See Mail Truck blog post.)
This mini album was made for Craft Roulette #195 whose parameters included Project type of Encouragement, calm colors, stuffed element and ticket(s).
I have made one other journal similar to this one in a virtual workshop by Kim Hein from Art Impressions using their Mini Journal Template and stamps. In thinking about the layout, I decided that I wanted a positive affirmation for the center back page and all the interleaving pages to it to be wintery and joyful. The theme is chasing the winter blues away.
Watch a painting tutorial before coloring any of the watercolor pieces.
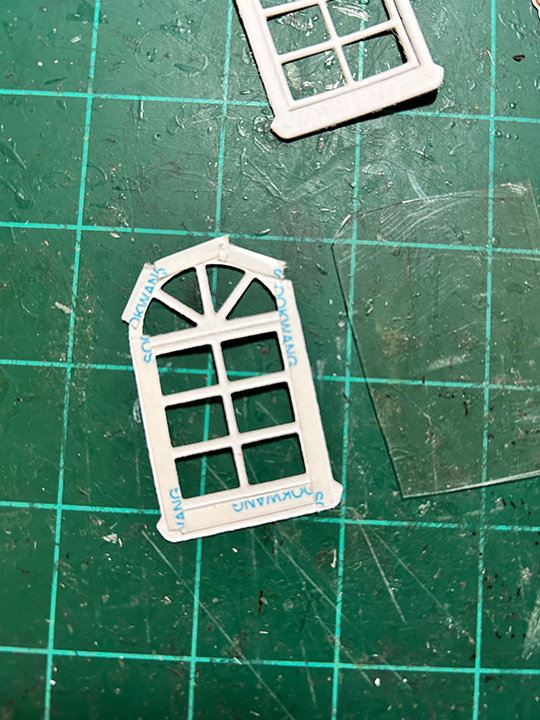
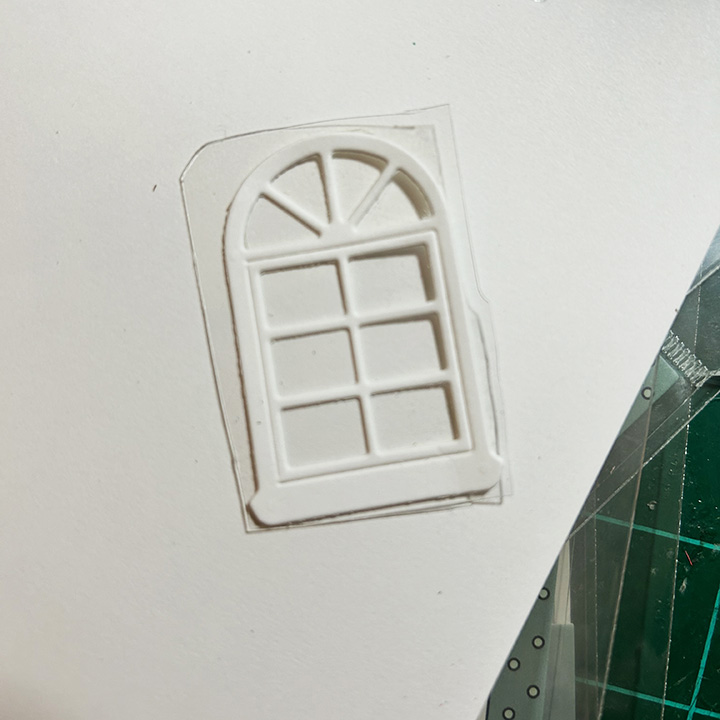
Window Journal Cover: Using the window frame and window arch dies from the Mini Journal template set, cut the arch opening into the left album cover and two of the window frames from white cardstock.
Cut a piece of clear acetate/plastic slightly larger than the window frame. Using narrow double-sided tape on the backside of one window frame, adhere the frame to the acetate piece. (Hint: If the double-sided tape is wider than the frame, peel off the backing paper and fold the tape over on itself to fit the frame.) Trim off the excess acetate around the frame. Add double sided tape to the back of the acetate and adhere over the cover opening. Attach the second frame to the back of the cover over the opening.
Room Scene Journal Cover: Stamp onto patterned paper the chair from the Matchbook Den stamp and die set. Cut out using the matching die and trim off the tab with scissors. Stamp the fireplace onto watercolor paper using a alcohol based ink and color using water-soluble inks with a water brush. Die cut fireplace and trim off tabs. Die cut picture frame and color with ink. Write the word “JOY” in the frame’s picture area with a fine-tipped blue marker. Cut a scalloped edge rectangle from a wallpaper-like patterned paper using die from the Mini Journal Template set. Assemble room scene onto the right cover panel.
Pocket of Encouragement and Ticket Pages: The blue ticket was computer generated. The yellow tags with affirming statements were from my stash of batch foiling using Spellbinder Glimmer System products. A large needle was used to pierce and thread the embroidery floss through the tags. The scalloped background piece and white lacy pocket were die cut using dies from the Mini Journal Template set.
Joy and Snowman Twister Pages: Stamp the fronts and backs of the twister Joy and snowman using the Mini Christmas Twister stamp and die set. Watercolor them. (I used glitter gloss and glitter brush markers on the twisters.) Watch a twister assembly video before assembling. Die cut two of the rectangles from patterned paper for each page using the large straight edge rectangle die in the Mini Journal Template set. Position the decorative papers onto the white page base pieces making sure not to cover the tabs. Secure the papers to page with removable tape and tape in place the smaller of the twister oval dies. Die cut through all three layers. (I had to recut the bottom layer of decorative paper, but the impression of the die was there to show me the position.) Glue patterned paper to page. (I die cut two oval frames for the “JOY” page using the two twister oval dies. They made the opening too thick to get good action with the twister, so I had to trim some of the notch away. I would not use frames unless they were from very thin paper.)
Snowman and House Pages: Using the WC Snow Globe stamp and die set, stamp the house and snowman on to 2×2 1/2-inch rectangles of watercolor paper. (I watercolored the images after viewing a number of the Art Impression painting videos.) Use the frame die in the Mini Journal Template set to cut out the images. (You can use the rest of the image that is die cut as I did with the house, or die cut a frame from decorative paper as I did with the snowman.)
Little Birds Pages: Die cut two scalloped circles using the die from the Mini Journal Template set. Stamp two birds from the Matchbook Garden set. Watercolor as shown in the opening video of this blog post. Using two of the oval cut outs from the patterned papers used for the Joy Twister page, and two scalloped rectangles of patterned paper, assemble the two bird pages. Stamp and die-cut the “hello Sunshine” banner from the Matchbook Garden set to place on the back center page.
Back Message and Ribbon Closure: I computer generated the back cover sentiment and used dies from the Mini Journal Template set to cut it out, frame and mat it. This panel is glued over the 24-inch piece of ribbon to hold it in place. Trim ribbon as needed once tied into a bow.
Thank you for reading this blog post. I hope this inspires you and makes you smile. Please like and leave comments 😊
Materials Used:
Dies
Art Impressions – Steel Dies – Mini Journal Template – 5718
Art Impressions – Steel Dies – Mini Christmas Twister Set – 5815
Art Impressions – Steel Dies – Matchbook Den Set – 5322
Stamps
Art Impressions – Clear Stamps – Mini Christmas Twister Set – 5815
Art Impressions – Clear Stamps – Matchbook Den Set – 5322
Art Impressions – Clear Stamps – Matchbook Garden – 5444
Art Impressions – Clear Stamps – WC Snow Globe Set – 5791
Foiling Plates
Spellbinders – Glimmer Hot Foil Plate – Mini Everyday Sentiments
Papers
Art Impressions – 6×6 Double-Sided 80lb Cardstock – Mini Journal Series -Mini PP -5835
Studio Light – 6×6 inch/15.2×15.2 cm Single-Sided Papers – Let it Snow
This card was made for Craft Roulette #190 whose parameters included a fancy fold card, aquarium colors, November element and 3-item cluster.
My first thought with these parameters was to a card I had made may years ago featuring a cat looking through a goldfish bowl using Karen Burniston dies. My next thought was how to incorporate a November element. Turkey instead of cat was my answer. While the accordion/pivot card is a fiddly sort of card to assemble, I wanted a quicker version, hence the Z-fold cardbase with squares cut into them and fish with sequin shells and stars sandwiched in between sheets of acetate.
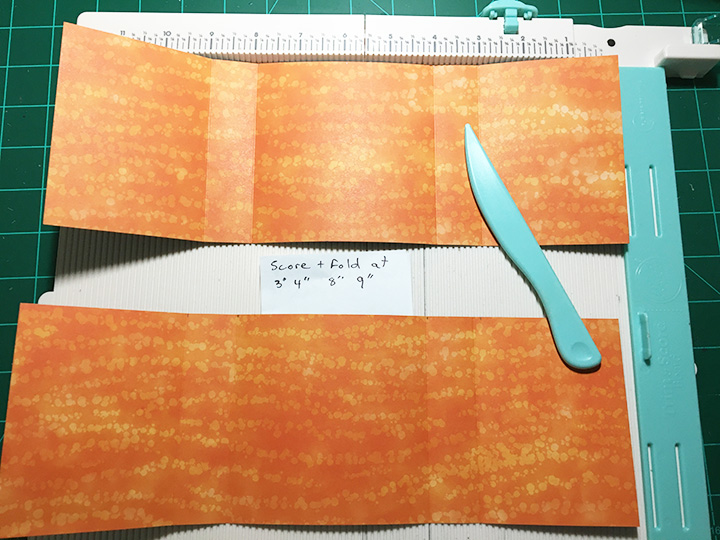
Cardbase: cut one 5 1/2-inch by 8 1/2-inch rectangle of blue cardstock and another rectangle from the same cardstock that is 5 1/2-inch by 4 3/4-inch. Score and fold the large rectangle in half to a 5 1/2-inch by 4 1/4-inch side fold card. Score and fold a 1/2-inch tab along the long edge of the smaller rectangle. Adhere the tab to one of the long edges of the other piece to form a z-fold three panel card.
Windows: Keeping the large rectangle piece of the card base fold in half, I used a 2.4-inch square die to cut through the first panel and mark where I needed to place the die to cut the second panel. I unfolded the cardbase and folded the tabbed panel back against the middle panel that had the markings of where the square die should go. Using the markings to place the die I cut the second panel’s window and made markings for where the die should be placed for the third panel’s window. After cutting the third panel, I took the square die and the next largest die with crosshatching and taped them together to form a die that would cut a frame to go around the windows. Cut six of these frames from darker blue cardstock.
Cut six squares of clear acetate or plastic film and adhere them with thin double-sided tape to the backsides of the frames. Attach frames to one side of the card base. Flip cardbase and adhere fish and decorations with glue dots to acetate making sure the placement works when the card is folded closed. When happy with the placement of aquarium items, attach the remaining three frames to sandwich the items inside the aquarium windows.
Fish: I used the fish from the Camping Charms to cut two fish from green cardstock. Then I traced their fins and scales with a green marker on both sides and then finished each side with a coat of glitter gloss. For the headwear I free-hand cut the yamaka from black and die cut the Santa hat from the Christmas Animals set.
Turkey: Because the turkey is seen from both the front and the back, I made sure to use colored cardstock that was the same on both the front and back. I only had to cut two of the decorative feather arch pieces. The beak and wattle are all cut with the same die, so I cut from orange and colored the wattle red with a marker. Textured metallic cardstock was used for the body, head and beak and wattle.
Lights: Since my family starts putting up Christmas light on Thanksgiving weekend, the light strands above the turkey and the fish with a Santa hat have multicolored lights while the lights above the fish with a black yamaka on his head has blue and white lights commonly used for Hanukkah in America. I used the light strand die from the Christmas Borders 1 set cutting the die in a variety of colors and using the black and green ones as my base strands and then snipping off other colors light blub part and gluing to the base strand. Finally, I covered the bulbs with Glossy Accents to make them look light glass blubs.
Sentiment: The sentiment is from Spellbinders and cuts in five separate pieces -H ol idays and H appy. The two words are on the front and back of each panel so that the is a continuous “Happy Holidays” being read. Thanksgiving panel in brown, Hanukkah in blue and Christmas in red.
Thank you for reading this blog post. I hope this inspires you and makes you smile. Please like and leave comments 😊
This card was made for Craft Roulette. #188 whose parameters included a gift card, coffee shop colors, go wild element and number(s).
Have a friend who finds it hard to get going without coffee? This is the card for them complete with a coffee gift card.
It is made with Karen Burniston’s Coffee Cup Pop-Up that includes tabs to hold a gift card on the back side of the cup. The sweet dragon having his morning cuppa on the card front and the knight in shiny armor atop the coffee cup are also Karen Burniston dies.
Cardbase: Cut from green cardstock one 5×7-inch rectangle and one 5×7.5-inch rectangle. Score and fold 1/2-inch on the 5×7.5-inch rectangle to have a 5×7-inch rectangle with a tab. Glue the tab to the other green piece to make a 5×7-inch top fold card. Cut decorative papers to cover panels inside and out.
Dragon: (Watch the assembly video for the Knight and Dragon die set first.) I cut the dragon from two shades of green cardstock and inked some shading on him. I used the die stencil feature for his eyes, mouth and wings. His red cup is from the Coffee Charms die set.
Knight: (Watch the assembly video for the Knight and Dragon die set first.) I cut two bodies for the knight gluing them back-to-back but sandwiching the red plume behind the helmet first. Add his shield and sword before gluing on his gloves.
Coffee Cup: (Watch the assembly video towards the bottom of the link page Coffee Cup Pop-Up before starting.) I chose to use patterned paper with names of coffee drinks for the body of the cup, white cardstock for the cup lid and kraft cardstock for the cup band. The band die embossed the ridges on it, and I enhanced the ridges with brown ink. Yellow ink was used to shade the cup lid. I used the circle dies in the die set for the logo.
Sentiments: The “Go Wild!” is cut from brown paper using the die set of the same name by Karen Burniston. Th yellow banner inside says “and Slay the Day with Excalibur coffee,” which was computer generated.
Thank you for reading this blog post. I hope this inspires you and makes you smile. Please like and leave comments 😊
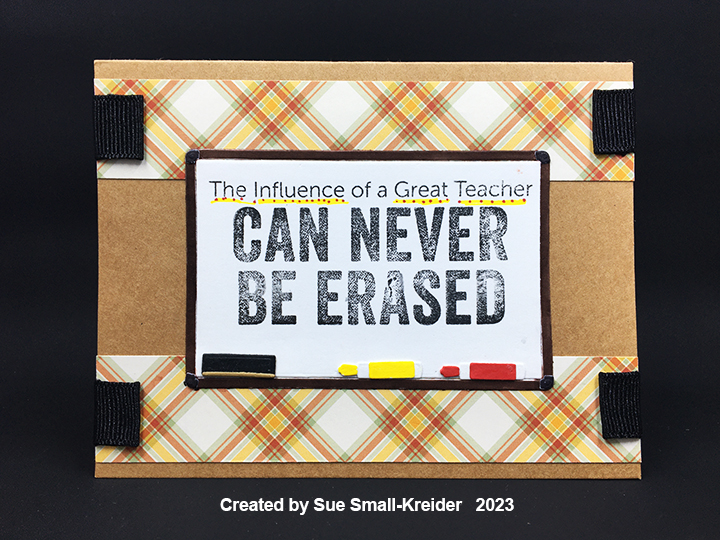
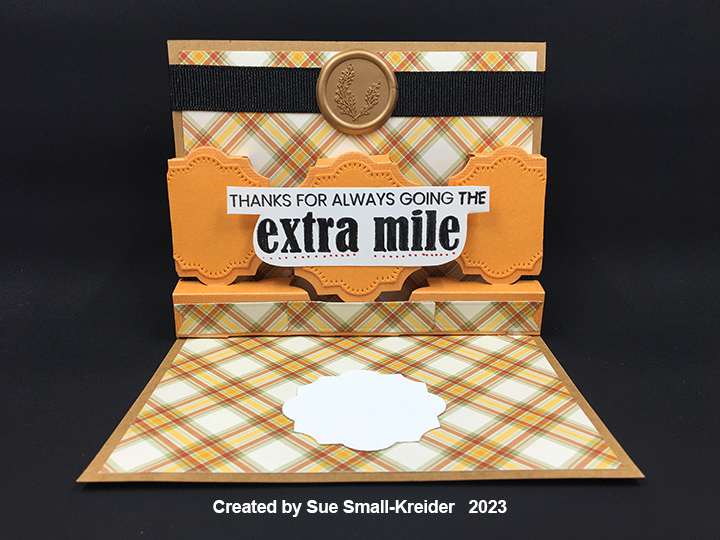
This card was made for Craft Roulette #184 whose parameters included a card for a teacher, tartan colors, Autumn or Spring scene and wrap.
Everyone has influenced someone’s life. Teachers specifically help shape lives with their explanation of the way things work. This is a card to say thank you and offer encouragement to teachers who may feel under appreciated in public schools.
I used My Favorite Things Dry Erase, Whiteboard die set along with their clear stamp set Teach, Sleep, Repeat for this card along with Karen Burniston’s Little Label Pop-Up to make the inside sentiment feel like a special award.
To decorate the envelope, I glued strips of the plaid paper to the back flap.
Thank you for reading this blog post. I hope this inspires you and makes you smile. Please like and leave comments 😊
Materials Used:
Dies
My Favorite Things – Die-Namics – Dry Erase, Whiteboard -MFT-2532
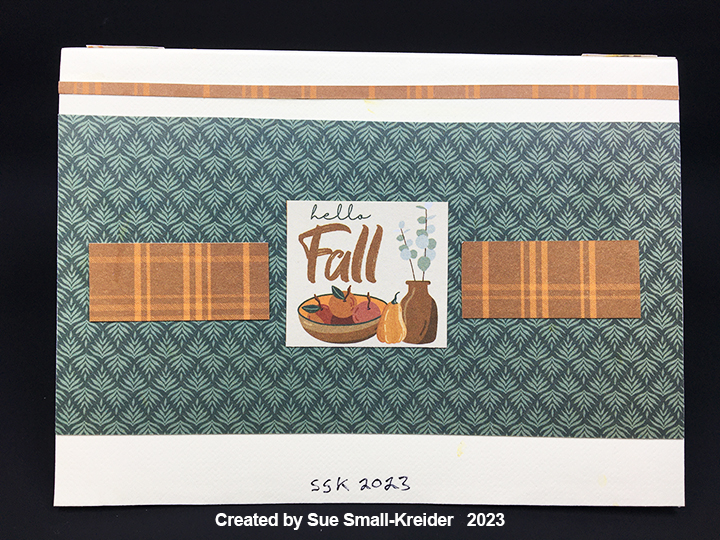
Cardbase: I used a purchased A6 cardbase that I trimmed down to 4.5×6 inches.Each of the four panels are covered with papers from the Cozy Fall paper collection. The front of the card has a stenciled wreath of leaves using oxide inks.
Oven/Stove:Watch the assembly video at the bottom of the linked page before starting the card. I cut my stove from a piece of orange cardstock covered with clear packing tape. I found that the silver foil oven door handle did not like to stay glued to the packing tape, so I reverted to glue dots to hold the handle on. The inside of the oven and pop-up platform were cut from a metallic coated black textured cardstock. I find it easier to add the stove knobs and burners to the stove in a flat position before attaching it to the card. Also it is easier to add any baking trays to the platform before attaching the oven to the platform.
Cabinets:Once the stove is attached; you can add the side cabinets. I cut the cabinets from some embossed wood grain cardstock and then inked them with brown ink to bring out the grain. The drawer and door (cookie tray) panels are part of the Oven Pop-Up set. Decorative paper was used for the countertops. The upper cabinets are cut using the cookie tray die.
TV:The TV set from the Memory Charms die set has had its antenna and feet trimmed off and Nuvo Drops added for knobs. I screen shot a photo from the Craft Roulette episode #182 and resized it to a 1-inch rectangle, print on white paper and die-cut it with the TV screen die.
Decorations: Cotton fuzz was pulled from a cotton ball to be the steam off the tray of cookies fresh from the oven. The cookie tray, cookies, turner utensil, oven rack, oven mitt, and cabinet knobs are all part of the Oven Pop-Up set. The oval rug with its white label for a personal message come from the Crosshatch Ovals set.
Sentiments: The sentiments on the front (“Happy Thanksgiving Day”) and back (“Hello Fall”) come from the Cozy Fall paper collection.
Thank you for reading this blog post. I hope it has provided some inspiration.
This card was made for Craft Roulette #176 whose parameters included: a split in the middle, jolly colors, a fruit element and a heart.
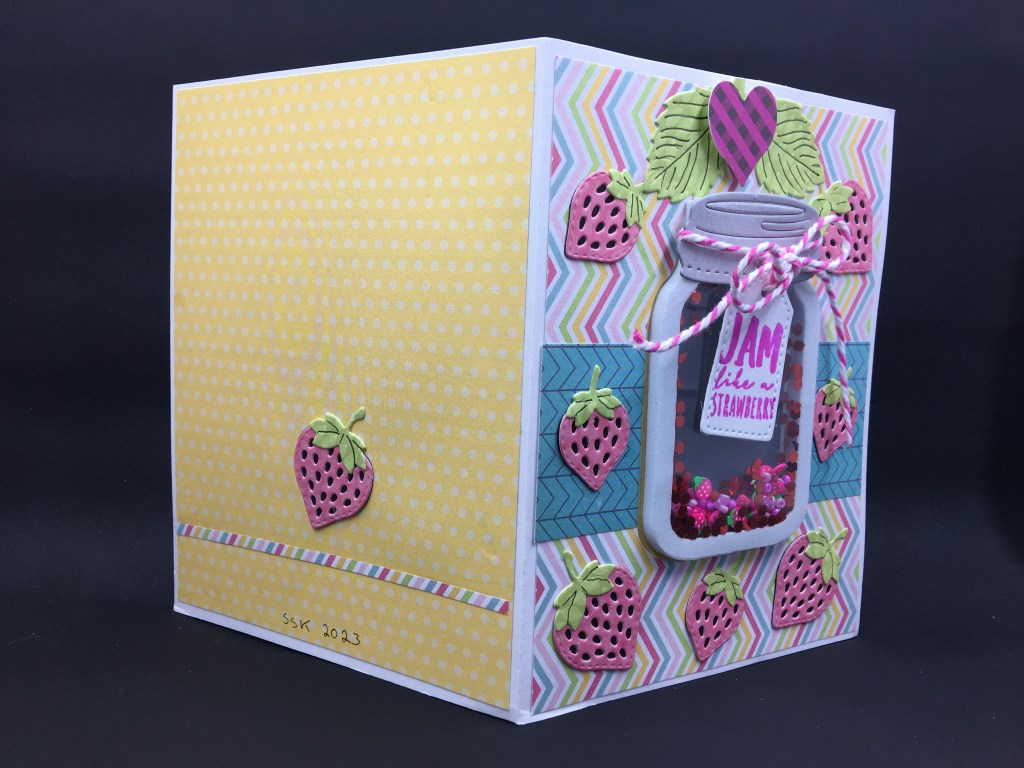
My inspiration for this card came from the Berry Special die and stamp set that came in the Die Cutting Essentials, issue 103. (This magazine is available on the Craftstash website. Note that there are different country based websites for this online vender. Use the one that works for youto avoid unnecessary currency/customs fees.) It has a stamp that says “Jam like a strawberry” so I immediately thought of a jam jar shaker and went to my Queen and Company stash of shaker kits.
Cardbase: Using a 8.5×5.5 inch rectangle of heavy white cardstock for the cardbase, I folded it in half and used a bone folder to burnish the card into a 4.25×5.5 inch A2 size. The front and back panels of the card are covered with 4×5.25 inch decorative paper rectangles. The front has an additional strip of blue decorative paper near its middle. The back uses a thin strip cut from the front panel paper as decoration. I used the jar frame die to cut the aperture into the card front when only the front decorative papers had been attached. Next, I glued on the inside decorative papers and cut the aperture again.
Shaker: Queen and Company are known for their shaker kits which use pre-cut foam shaker frames with adhesive on both sides and clear acetate covers which take the tediousness out of making shaker cards. For the jar I used two acetate pieces and one foam frame that all had been dusted with an anti-static brush. I peeled off one side of the frame’s adhesive backing and attached a pre-cut piece of acetate. Adding the glitter, seed beads and strawberry slices to the frame, I dusted the next acetate sheet again and peeled off the adhesive backing on the foam frame and attached the acetate to enclose the shaker elements. (The chucky glitter had a lot of static electric charge and jumped to the tiny bits of adhesive at the foam edges.) The shaker is attached to the card by gluing a jar frame cut from the front of the card to the inside of the card and then gluing the shaker to the jar frame.
Decorations: Eight layered strawberries were cut using the Berry Special die set from pink and green patterned paper and black cardstock. The dies cut two stems, large and small strawberry outlines and fronts with seeds cutout as well as a plant stem with large leaves. I also used two of the large leaves on the card front. Seven strawberries are scattered on the card front and one large strawberry on the back. A red plaid paper sticker on a foam dot is at the top of the card front.
Sentiments: Using the stamps from the Die-Crafting Essentials gift set, I stamped in purply-pink ink the sentiment “Jam like a strawberry” on the jar tag which is tied around the jar lid with baker’s twine, and the inside sentiment “Thank you berry much!”
Envelope: Stamped on the envelope flap is “You’re the sweetest!” in purply-pink ink.
Thank you for reading this blog post. I hope this inspires you and makes you smile. Please like and leave comments 😊
Materials Used:
Dies
Queen & Company – Steel Dies – Love Jar
Die Cutting Essentials, issue 103 – Dies – Berry Special
Stamps
Die Cutting Essentials, issue 103 – Clear Stamps – Berry Special
Shaker Elements and Frame
Queen & Company –Foam Shaker & Acetate – Love Jar
Red Chunky Glitter
Pink Seed Beads
Dress My Craft – Polymer Clay – Strawberry Slices
Papers
Queen & Company – 6×6 Double-Sided Mat Stack – Flirty Florals
Crate Paper – 6×6 Single-Sided Patterned Paper Pad – Cool Kid
Box: The box is made of double-sided decorative cardstock cut into two 12 x 4 inches rectangles scored and folded at 3 inches, 4 inches, 8 inches and 9 inches. The middle squares are glued together to form a cross. Using strips of decorative paper for pull ribbons glued to the middle of each flap, I glued the remainder of the strips as a bottom flap border. Two adhesive-backed hook and ladder fasteners are the closures.
Tree: Utilizing the Bam Box die set, I cut six of the bam box strips, 13 of the bam box decorative rectangles and three each of the largest two fancy circles in the set from green cardstock. Because I like to let the glue dry before adding the rubber bands to bam boxes, I glue in stages. (See assembly video located at the bottom of the linked page and source of tiny rubber bands.)
Glue the decorative panels to the sides of each bam box for added thickness. (By sides I mean the sides that have the diagonal flap beside them. Not the side that has the smiley face or its parallel side.) These will be the sides seen between the layers of circles.
To assemble the tree, mark in pencil the location of the bam boxes on the bottom of each circle except one of the largest. Glue bam boxes to bottoms of five circles. The sixth bam box will be the top and the leftover, large circle will be the bottom.
To finish the tree assembly, alternate the direction of the diagonal inside flaps of the bam boxes, so that they make a zig-zag pattern when looked at from the side. By alternating the direction, the bam boxes will fold flat, and the tree will flatten into an oval shape. Use glue to attach each level. Once the tree is assembled, close or flatten the tree to position it on to a 4-inch square of green decorative paper that acts as the base for when the tree is in the box. Glue the tree to the square base.
Butterflies: (Watch the video at the bottom the linked page before starting.) Using the Butterfly Collage Add-ons die set, die cut all the dies from one color of doubled sided paper. Repeat with three other colors of paper. Die cut from black all non-moving butterflies four times.
Assembling the non-moving butterflies, use the black pieces as the base that the trimmed colored paper wings are glued to. On the double-winged one bend the wings up from the black body.
To attach the butteries to the tree, play with the positioning of the fluttering large butterflies on the tree in the closed position. If the butterfly stays within the green square base, it can be glued in place. I found that the flutter butterfly piece with the slot cut into it needs to be the piece glued to the tree, making sure the slot is not obstructed so the other piece can freely flutter.
I used green leaves cut from the decorative base paper to fill-in areas of the circles that were too close to the square’s edge when closed. Add in non-moving butterflies checking their position when tree is closed and that they are not creating catchpoints for fluttering butterflies.
Tag: My favorite gift tag to use for sentiments is in the Tag Book Pop-Up set. I stamped and heat embossed the sentiment. Baker’s twine was used to tie the tag onto the pull-up loop.
Thank you for reading this blog post. I hope it has provided some inspiration.
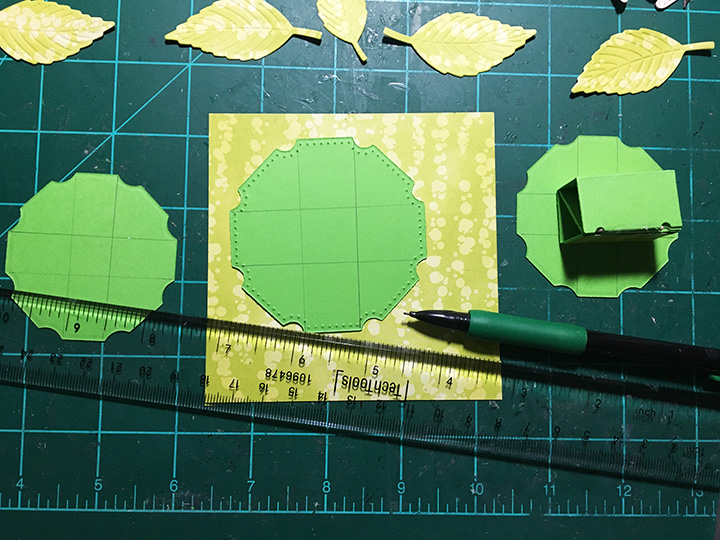
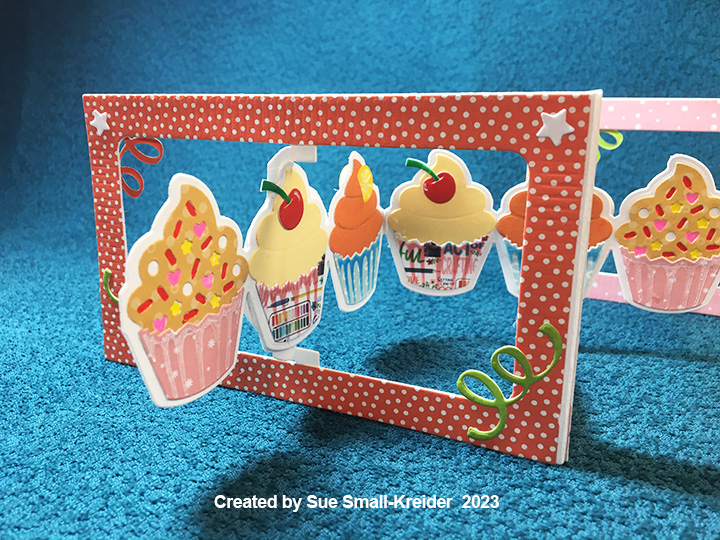
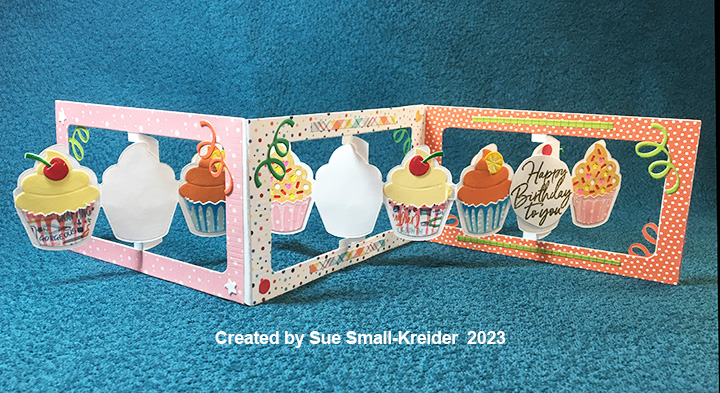
Accordion Frame: (Watch assembly video at the bottom of link page.) Cut three frames from heavy white cardstock using the Landscape Rectangle Accordion set. Trim the rectangle panel to just a pivot post. Cut a total of six frames from patterned papers and cut out the pivot panels and tabs from all to have decorative frames. Glue the white frames together as shown in video. Adhere the decorative frames. Trim off unused tab.
Cupcake Panels: (Watch assembly video at the bottom of link page.) Cut four of the cupcake panel die from the Cupcake Add-ons set from white cardstock. Cut a total of 15 of the cupcake icing piece from different papers. (I cut six from three different papers coating the yellow and orange papers with a glitter gloss. the sprinkles were die cut into the icing piece and colored with fine-tipped markers and gel pens.) Cut a total of 15 of the cupcake paper piece from different papers. Using die, stencil shadows onto cupcake papers. The sprinkles die and cherry decoration dies are included in the Cupcake Add-ons. The orange slice is from the Happy Hour Charms set. Adhere cupcakes to fronts of three of the white panels. Cut fourth panel apart into thee separate cupcake outlines. Glue decorated panels to pivot posts on frames. Decorate backs of panels using the white cupcake outlines to cover the pivot posts and the remaining six cupcakes to cover ends of panels. Glue the panels together using tabs. trim off unused tab.
Decorations: The ribbon streamers are in the Cupcake Add-ons set along with the hearts. The stars and circles come from the Paper Frames Pop-Up. Strips of decorative papers were also used from my scrap bag.
Sentiment: The white cupcake panels on the back are for either personal messages or the heat embossed happy birthday sentiment. When the card is closed the main sentiment is visible.
Thank you for reading this blog post. I hope this inspires you and makes you smile. Please like and leave comments 😊