Watch the video for instructions on the construction of the card.
Read more below on specifics of this card.
Cardbase: Cut three of the Landscape Rectangle Accordion base frames. Cut from decorative paper, three to six frames. (Cut the frame base and cut out the inside panel and side tab.)
Cupcakes: Watch the assembly video for the Cupcake Add-Ons located at the bottom of the linked page.
Sentiments: The printed paper provides much of the sentiments, while the Mini Alphabet and Numbers were used to cut from pink glitter paper “HBD2U” (Happy Birthday to You.) The Streamer ribbons come from the Big Birthday Charms and Cupcake Add-Ons die sets.
Envelope: This card fits into an A7 (5×7-inch) envelope.
___________________________________
Thank you for experiencing this blog post.
I hope this inspires you and makes you smile.
Please like and leave comments 😊
___________________________________
Disclaimer: Karen Burniston products are provided free of charge by the manufacturer for review and use. All other items were personally purchased. Compensated affiliate links used where or when possible, meaning I will receive a small percentage commission from these manufacturers at no cost to you. This will allow me to add more content to my YouTube channel and help out a lot. Thank you.
This card was made for Craft Roulette #251 whose parameters included for a slimline card, lumberjack colors, hat(s) or cap(s), and lace or doily.
Watch the process video to see how I made this card.
Cardbase: Each card is made from a 2×6-inch piece of double-sided patterned paper, folded into a top-fold 3×2-inch card. The box to hold them is made using Karen Burniston’s Candy Hearts Box die.
Sentiments: The sentiments were all stamped in black ink using the Craft Roulette Funn Sentiments #01 set except for the “Hats off to you” which was handwritten.
Envelope: The flatten box with three cards will fit into an A2 (4.25x 5.5-inches) size envelope.
Disclaimer: Karen Burniston products are provided free of charge by the manufacturer for review and use. All other items were personally purchased. Compensated affiliate links used where or when possible, meaning I will receive a small percentage commission from these manufacturers at no cost to you. This will allow me to add more content to my YouTube channel and help out a lot. Thank you.
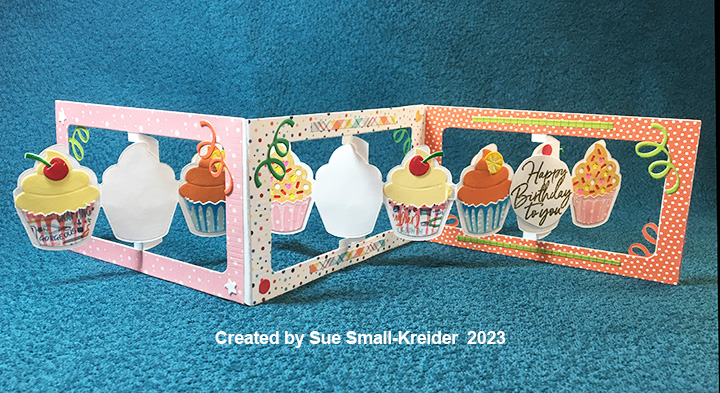
It’s the Karen Burniston design team challenge for January 2025 using the theme of First 100 Craft Dies of KB Riley LLC. We were asked to make a card using any of the die sets with item numbers between 1001 and 1100. For this challenge I chose to make a six panel Charm Accordion birthday card based off one Karen Burniston made in 2018. (You can watch her video of this card at the bottom of this linked page for the Charm Accordion die set.)
Watch the process video to see how I made this card.
Card FrontCard Back
Cardbase: The finished cardbase folds down to 3 1/2-inches wide by 4 1/2-inches tall by 3/8-inch thick. To make the cardbase, cut three of the Charm Accordion double panel die from heavy cardstock. Cut the double panels in half to separate the panels. Cut five 3/4-inch wide by 4 1/2-inches tall strips of the same cardstock. Die cut five of the tabbed square connector pieces from heavy cardstock. Watch the video on how to assemble. Cut decorative papers to create frames for each panel as directed in the video.
Charms: Two different die sets were used for the charms that dangle in the connector frames. The present with a bow, the party hat and the cupcake are from the Birthday Charms set while the butterflies are from the Charm Accordion set. I used the stencil feature of the cupcake die to color in the sprinkles with fine tipped markers.
Sentiments: The letters that spell the word “HAPPY” were cut using the Alphabet set while the word “birthday” comes from Word Set 2 -Birthday.
Envelope: Because of the thickness of this card, it would have to be hand-delivered or mailed in a padded envelope as a package.
___________________________________
Thank you for experiencing this blog post.
I hope this inspires you and makes you smile.
Please like and leave comments 😊
___________________________________
Disclaimer: Karen Burniston products are provided free of charge by the manufacturer for review and use. All other items were personally purchased. Compensated affiliate links used where or when possible, meaning I will receive a small percentage commission from these manufacturers at no cost to you. This will allow me to add more content to my YouTube channel and help out a lot. Thank you.
It’s time for the Karen Burniston April 2024 Design Team Challenge with the theme of Thirst Quencher. I chose lemonade as my thirst quencher and a card theme of a summer fete (festival or fair).
At a fete, there are generally small booths selling baked goods, drinks and other trinkets or handicrafts, so my card is a slimline (3 3/4 x 8 1/2-inch) card with three food booths using Karen Burniston dies.
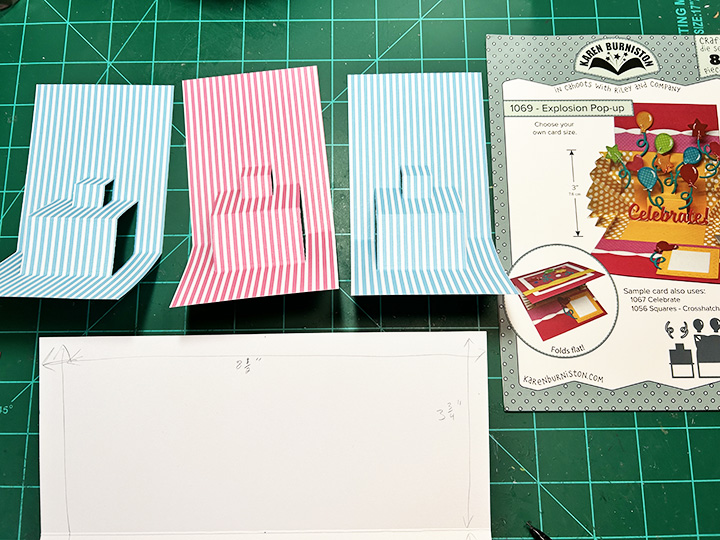
Cardbase: Start with an 8 1/2 x 7 1/2-inch rectangle of a thick cardstock. (I used white.) Score at 3 1/2-inches and fold in half to create a top-fold 3 3/4 x 8 1/2-inch card base.
Booths: Cut three 6×3-inch panels of striped paper. (If you have longer than 6-inch striped paper cut them 7 1/2×3-inches.) Score and fold each panel at 3 3/4-inches. Using the pop-up center die from the Explosion Pop-Up, center the die on the fold of each panel. Train the folds as directed in the assembly video for the die set located at the bottom of the linked page. Glue pop-up panels inside card with the long side attaching to the inside top panel. Cover the bottom panel with grassy patterned paper. (I cut strips of the 6×6-inch patterned paper 1-inch wide to go through the pop-ups and cover over the striped paper.) I used a border print card layer to created the tablecloths on each booth table.
Posts and Banners: The posts are cut from glossy white cardstock using the Street Lantern die with the scrolling arms cut off. The pendant banners are made using the die from the Twist Panel Pop-Up set and threading them onto baker’s twine. The twine was wrapped around the knob top of a post before gluing it in place. (The two ends of twine can be taped to the front of the card to be covered over by the front panel.) The green bows that cover the looped twine on the posts are from the Street Lantern Pop-Up set. (I found it helped with the opening and closing of the card to place a small drop of glue at the top back center of each pendant to keep them from becoming catch-points, but still allowing them some dimension.) I used computer generated “Pies,” Lemonade” and “Cakes” printed on coiper paper and cut out with the banner label from the Lorna Label Pop-Up set.
Card Front: You will need to create a panel to hide the banner twine ends under. Cut a 3 3/4 x 8 1/2-inch of blue cardstock and a 3 3/8x 8 1/4-inch rectangle of dotted printed paper. Glue the dotted paper on top of the blue cardstock with an even border all around. Cut ten fishtailed banners from decorative paper using the die from the Twist Panel Pop-Up set. Cut the letters and shadows to spell out “SUMMER FETE” using the Mini Alphabet die set. Glue the letters onto the shadows and shadows onto the banners being careful not to cover the holes at the top of the banners.
Thread the two words on two separate pieces of twine. Die cut the “Enjoy the” from different colors using the Enjoy The Ride set. Once the placement of the words and banners have been established, tape the banner twine ends to the back of the panel. Glue the words and banners down onto the panel. Attach panel to cardbase front. (I used glue and double-side ½-inch tape.)
Pies: I created four pies using two different die sets. The top view lattice cherry pie and the key lime pie were created using the pie dies in the Baking Borders set. (I brushed the cherry pie red with a red glitter brush pen for some shine.) The horizontal pies were made with the pie die from the Picnic Elements set with the base piece cut from red and the crust cut from brown. All pie crust were inked with a light brown ink. The horizontal pie crusts had their slits inked red with an ultra-fine tipped red marker. I attached the horizontal pies using a foam square and a pop-up cube from a strip of white cardstock. (You could use the pop-up cube from the Oven Extras die set instead of making your own.)
Lemonade: The pitcher and glasses of lemonade were created from clear vellum with yellow cardstock behind. All the pieces were cut using the Picnic Elements die set. The pitcher is adhered to the pop-up base with a foam square and a drop of glue. The glasses are attached to a strip of clear packaging plastic with double sided tape all along the strip. The strip was threaded through the pop-up base and attached to the backside of the pop-up. (I covered the exposed adhesive on the strip with anti-static powder.)
Cakes: For these small cakes, I used the cupcakes in the Baking Borders set. I left the border base layer attached and trimmed off the excess behind the frosting. The bottom row has its center cake glued to the pop-up base while the upper row is attached to a pop-up cube.
Message Labels: The two white scalloped labels inside the card are for a personal message and are cut using the die from the Twist Panel Pop-Up set. (I did two to hide the seams of my patterned paper.)
Envelope: The card will fit into a #10 business size envelope.
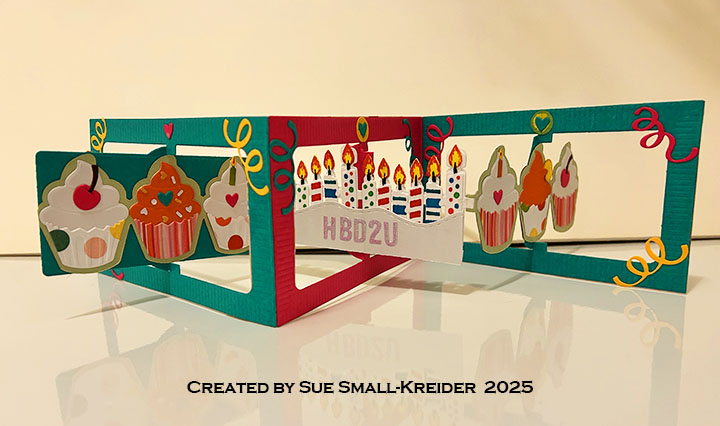
Accordion Frame: (Watch assembly video at the bottom of link page.) Cut three frames from heavy white cardstock using the Landscape Rectangle Accordion set. Trim the rectangle panel to just a pivot post. Cut a total of six frames from patterned papers and cut out the pivot panels and tabs from all to have decorative frames. Glue the white frames together as shown in video. Adhere the decorative frames. Trim off unused tab.
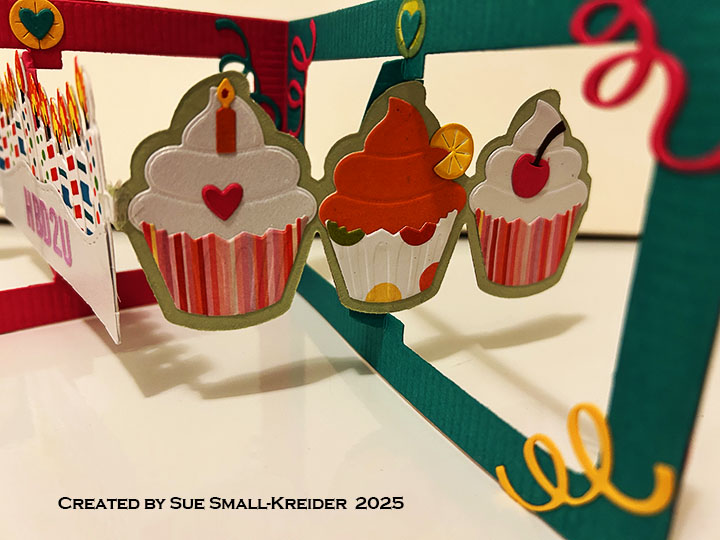
Cupcake Panels: (Watch assembly video at the bottom of link page.) Cut four of the cupcake panel die from the Cupcake Add-ons set from white cardstock. Cut a total of 15 of the cupcake icing piece from different papers. (I cut six from three different papers coating the yellow and orange papers with a glitter gloss. the sprinkles were die cut into the icing piece and colored with fine-tipped markers and gel pens.) Cut a total of 15 of the cupcake paper piece from different papers. Using die, stencil shadows onto cupcake papers. The sprinkles die and cherry decoration dies are included in the Cupcake Add-ons. The orange slice is from the Happy Hour Charms set. Adhere cupcakes to fronts of three of the white panels. Cut fourth panel apart into thee separate cupcake outlines. Glue decorated panels to pivot posts on frames. Decorate backs of panels using the white cupcake outlines to cover the pivot posts and the remaining six cupcakes to cover ends of panels. Glue the panels together using tabs. trim off unused tab.
Decorations: The ribbon streamers are in the Cupcake Add-ons set along with the hearts. The stars and circles come from the Paper Frames Pop-Up. Strips of decorative papers were also used from my scrap bag.
Sentiment: The white cupcake panels on the back are for either personal messages or the heat embossed happy birthday sentiment. When the card is closed the main sentiment is visible.
Thank you for reading this blog post. I hope this inspires you and makes you smile. Please like and leave comments 😊
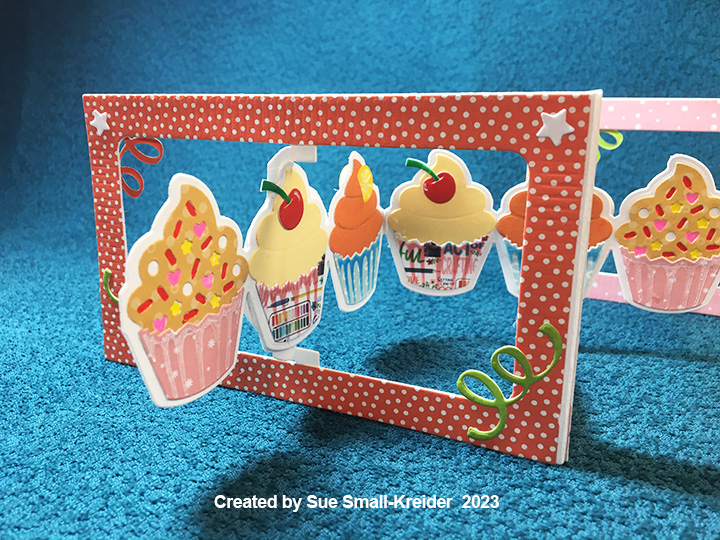
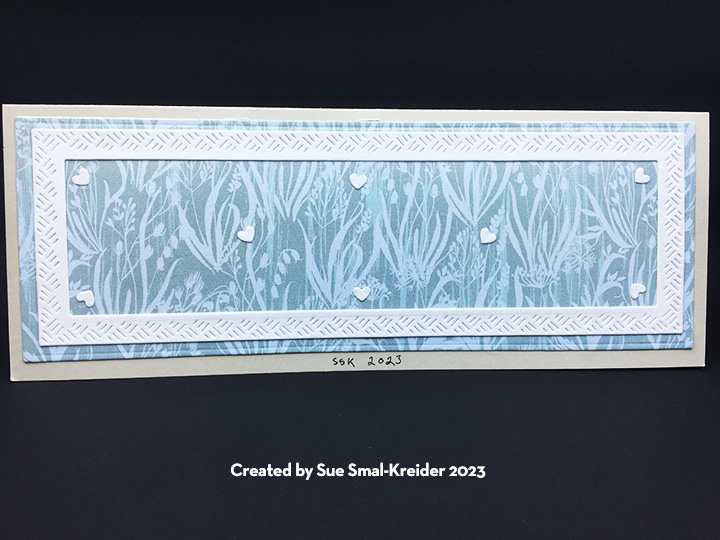
Cardbase: Cut a rectangle 8×6 inches, score down the middle longways and fold to form a top-fold slimline card that measures 3 inches high and 8 inches wide. Using the second largest die in the Crosshatch Long Rectangles, cut four panels from decorative paper. Adhere two of the decorative panels to the inside of the cardbase. Die cut pop-stands into cardbase. (I used a die-cut of the three cupcakes and a T-ruler to locate the center of the card and where the center cupcake should be. Pencil marks were made on the center fold where the card center was and then where the side cupcakes’ centers were. While I cut three pop-stands, Two pop-stands for the end cupcakes would be enough to make them stand.) Add the other two decorative panels to the cardbase front and back panels covering over the holes from the pop-stands.
Cupcake Pop-Stand: Cut two of the three cupcake outline from sturdy white cardstock. Cut three frosting tops from shimmer cardstock with shimmer sideup. Cut three more frosting tops from shimmer cardstock with shimmer side down. Cut four cupcake liners from silver holographic card stock and two more from gold holographic cardstock.
Backside of cupcakes
Borders: Using the third and fourth largest dies in the Crosshatch Long Rectangles, cut two frames from lightweight white cardstock. Adhere frames to front and back panels of card base. Using the wavy ribbon trim from the Border Blends – Trims, cut five ribbons from lightweight white cardstock for the inside border. (Retain the tiny hearts that are cut with the ribbon to decorate the card.) Cut two of the ribbons in half for the sides. Adhere long ribbons to the top and bottom and piece in the remaining ribbon to complete the borders.
Decorations: From the Wedding Charms cut and emboss one wedding dress and one tuxedo shirt triangle from the shimmer cardstock and one tuxedo from black cardstock. With a fine-tip black pen dot the tuxedo shirt buttons. Glue shirt triangle to back of tuxedo and then glue tuxedo to backside of wedding dress. Adhere to front of card. Cut one each of the wedding rings and champagne glasses from matte gold cardstock and glue onto top inside panel. Use hearts from border trims to decorate glasses and ring. Scatter and adhere remaining hearts among all the panels.
Sentiments: Cut “Congratulations on your Big Day”from matte gold cardstock. Glue “Congratulations” onto the card front and “on your Big Day” to the top inside panel. Using the smallest crosshatch die from the Crosshatch Long Rectangles, cut one rectangle from lightweight white cardstock. Round the corners with a small corner punch. Glue to inside lower panel as a label for a personal message.
Envelope: The card will fit in a #9 or #10 business envelope. Give a hint of what is to come by gluing a ribbon border and hearts to the back flap.
Thank you for reading this blog post. I hope this inspires you and makes you smile. Please like and leave comments 😊
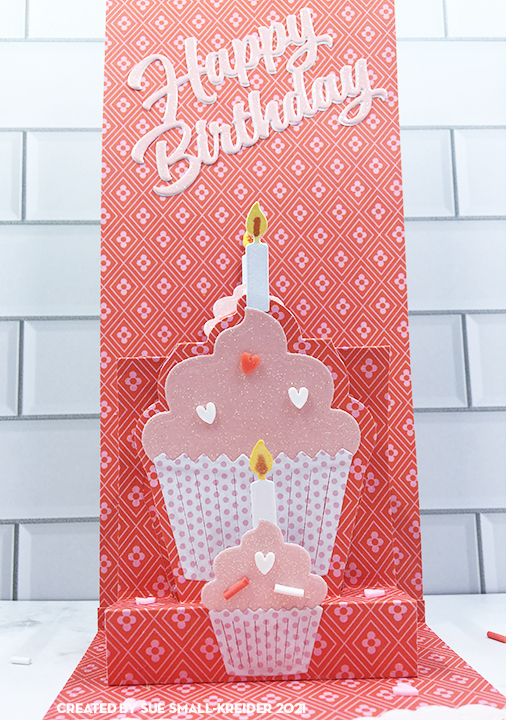
Cards for tiered birthdays (as in 29 again and again) can be fun to make when you add in a pop-up element like a third tiny cupcake.
This card was inspired by the Karen Burniston Mission Poppable for August 2021 to use her Parcel Pop-Up die set. In addition to that die set, I used her Cupcake Pop-Up, the sentiments of “You’re Sweet” and “Happy Birthday,” and the candle from the Cake Pop-Up.
The double side paper is from Echo Park which is an older set designed by Lori Whitlock called Happiness is Homemade. Because the heavy cardstock is double-sided, it cut down on heavy layers of decorative papers.
I assembled the parcel pop-up as shown in Karen’s assembly video But I did not put on the decorative square front panel or flap. I also used a longer strip as the pop-up arm so that it would be tall enough to be seen behind the cupcake pop-up which was cut from a scrap piece of card stock and cut with tabs at the top and bottom to attached to card base and the parcel mechanism front.
The sentiments are cut once from pink glitter cardstock and once from glossy white paper (backside of some packaging). The white is just slightly seen so that the red on red stands out on the “You’re Sweet.” I used a topper from the paper set that had an oval design and the used an oval die to cut it out to frame the cupcake.
Because the card is a slimline size card to fit in a No. 10 business envelope, I needed a large white paper doily to fill the bottom half of the card and allow for a space to write a personal message.
The back of the envelope is stamped with a watermelon colored ink using a cupcake and “Made with love” stamps from Simply Made Crafts.
Thank you for reading. If you enjoyed this blog post, please like it and follow the blog. 😊