Cowgirl Graduation Card

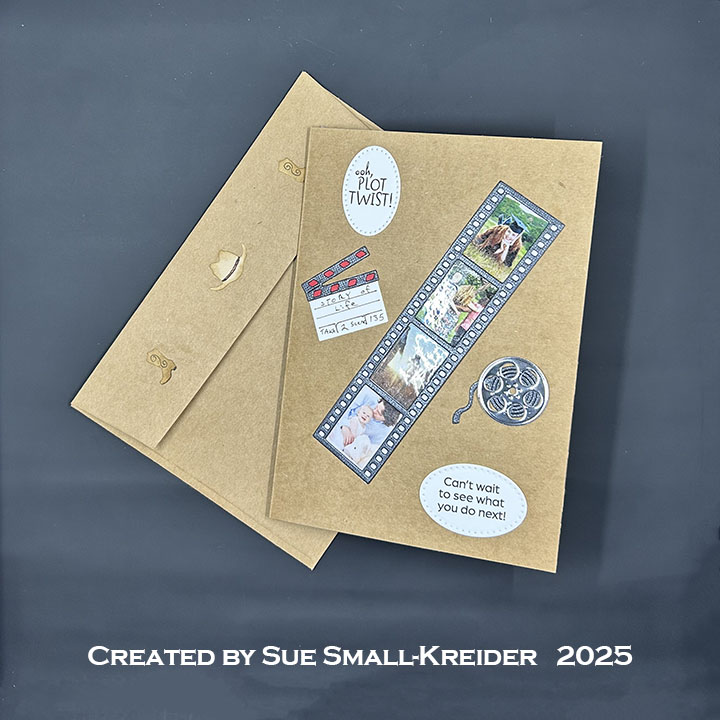
It’s Sneak Peek Week for Karen Burniston’s June 2025 release of ten new dies and five new clear stamps. For this cowgirl graduation card, I used several of the new sets including Leaping Animals, Movie Night Charms and Rainbow Add-Ons die sets and Movie Night stamp set.

Watch the process video to see how I made this card.

Cardbase:  Cut a 5×7-inch A7 cardbase from brown kraft cardstock. (I used a purchased cardbase and envelope.) Cover the inside with decorative paper. Clouds and sun are cut using the Rainbow Add-Ons die set.

Pop-Up:  Watch the assembly video at the bottom of the linked page for the Stocking Pop-Up as well as the video above.

Horse and Fence:  Cut one tan unicorn body from the Leaping Animals die set and from dark brown cut the tail and mane pieces. (I cut three of the tan because my cardstock was less than 80lb weight.) Use the die stencil features to draw in the horse’s eye, mouth, nostril and hooves with a thin black marker. Cut one fence from heavy white cardstock using the Farm Edges die set. Glue fence to top edge of pop-up over piece and glue horse to inner pop-up tombstone piece.

Cowgirl:  Cut out one body, one hair style, one pair pants, one collared shirt, and one women’s short sleeved top from the Paper People die set. Cut one scarf bandana and two pair of cowboy hat and boots from the Tiny Accessories 3 set. (One set of hat and boots will be used on envelope.) I used a white brush marker to age the jeans and brown ink to age the hat and boots. The brown vest was made by cutting off the sleeves of the women’s top and cutting it up the middle. The front corners of each side were trimmed off to make a matching “v” similar to the neckline of the vest. The shirt and jeans were trimmed to fit under the vest. Boots were also trimmed to fit under the jeans. A piece of hemp cording was looped and glued together before adhering under the cowgirl’s hand.

Movie Elements:  Cut out of charcoal gray the film strip, film reel film and the clapper board “V” dies from the Movie Night Charms set. Cut the clapper board large base piece from white and color in the top “V” with red marker. Use thin black marker and die stencil feature to ink in the board’s lines. Cut one reel die from silver foil cardstock. Cut off all charm loops from clapper board and film reel. Assemble as shown in video above. Fill film strip with photos. (I used digital images that were resized on computer and printed on computer paper that was covered with clear packing tape.)

Sentiments:  All the sentiments were stamped using the Movie Night stamp set with in black ink. “Ooh, plot twist!” was cut out using the smallest oval die in the Rectangles and Labels – Crosshatch die set. “Can’t wait to see what you do next!” and “Lights, Camera, Celebrate!” were cut out using the oval die in the Lorna Label Pop-Up set. “And the award for totally crushing it goes to…YOU!” was cut out using the smallest fancy label die in the Rectangles and Labels – Crosshatch die set.

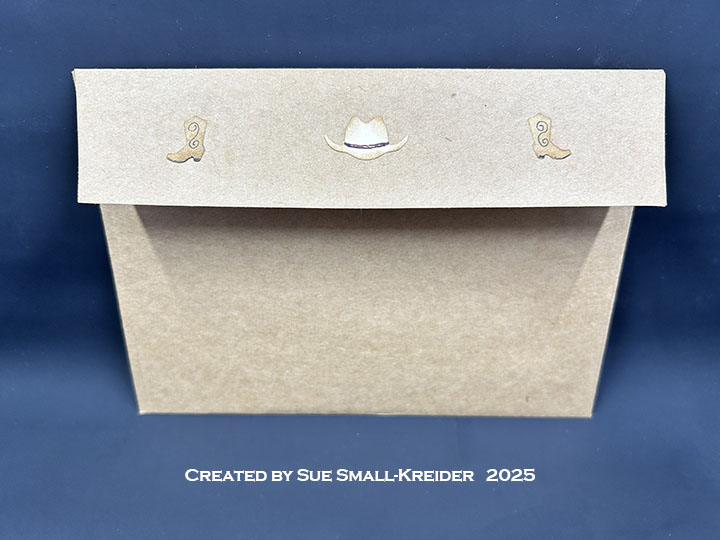
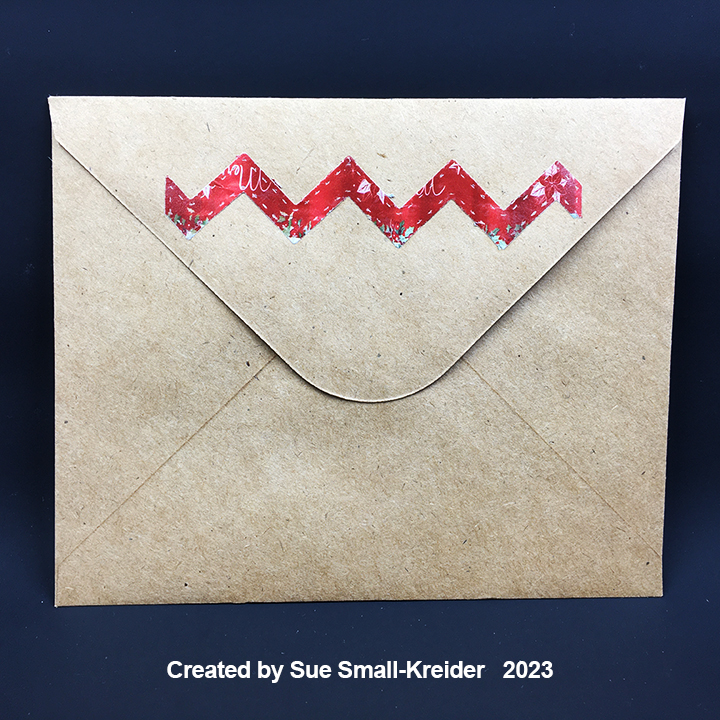
Envelope:  The card fits into an A7 (5x 9-inches) size envelope with a die cut a cowgirl hat and boots the back flap using the Tiny Accessories 3 set.

__________________________

Thank you for experiencing this blog post.

I hope this inspires you and makes you smile.

Please like and leave comments 😊

__________________________

Disclaimer: Karen Burniston products are provided free of charge by the manufacturer for review and use. All other items were personally purchased. Compensated affiliate links used where or when possible, meaning I will receive a small percentage commission from these manufacturers at no cost to you. This will allow me to add more content to my YouTube channel and help out a lot. Thank you.

Materials Used:

Dies

Stamps

Papers

  • Carta Bella – 12×12 Double-Sided Patterned Cardstock – Cowgirl – Howdy Bandana
  • Divinity Designs – 6×6 Single Sided Decorative papers – Baby Girl Paper Pad
  • Maja Design – 6×6 Double-Sided Patterned Cardstock – Hygge
  • My Colors – 12×12 Metallic-Coated Textured Cardstock – Black Bear
  • Blue, Brown, Orange, Tan and Yellow Cardstock
  • White Cardstock
  • Park Lane Paperie – A& Cardbase and Envelope – Kraft Brown

Ink

  • Memento – Fade Resistant Dye ink – Tuxedo Black
  • Pigma – Mircon 005 Fine Tip Pen – Black
  • Ranger – Tim Holtz Distress Ink – Gathered Twigs
  • Scrapbook.com – Brush Marker –White
  • Sharpie – Permanent Marker – Fine Tip – Red
  • Stampin’ Up – Stampin’ Write Dual-Tipped Marker – Chocolate Chip

Adhesives

Tools

  • Die Cutting Machine
  • Paper Trimmer
  • Bone Folder
  • Score Board
  • Stamping Platform
  • LDRS – Stampendable Stamping Tool
  • Stamping Block
  • Scissors
  • Tweezers
  • Pencil
  • Paper Masking Tape
  • Sponge Dauber
  • We R Memories – QuickStick

Miscellaneous

  • Cousin – D.I.Y!- Natural Hemp Cord #20

Santa’s Helpers

This card was made for Craft Roulette #187 whose parameters included a card made with cardstock and not-cardstock, Santa’s workshop colors, collar(s) element and zig-zags.

As a simple Christmas card with a pieced paper background and sentiments from the paper pad. This was a quick card to make in less than two hours. I started with the Carta Bella Letters to Santa paper pad and a mail-order catalog page of a red Christmas shower curtain to die cut three different colors of chevron background die. After separating all the pieces into a tray, I took the woodgrain frame and glued it to an A2 (4.25-inches by 5.5-inches) kraft card base. Alternating the colors, I filled in the frame.

The two sentiment cards or toppers were cut from the paper pad. Santa’s helpers with their collars was popped-up on the card front with foam dots. Small dots of translucent red Nuvo Drops were added to the elves’ shoe and hat tips. Santa’s face with “Merry Christmas” greeting were added to the card inside.

An extra red zig-zag stripe of red decorates the envelope flap.

Thank you for reading this blog post. I hope this inspires you and makes you smile. Please like and leave comments 😊

Materials Used:

Dies

  • Divinity Designs – Metal Die – Chevron Background – CBD474

Papers

  • Carta Bella – 6×6 Double-Sided Paper Pad – Letters To Santa
  • A2 Cardbase and Envelope – Kraft

Adhesives

  • Neutral PH Adhesive by LINECO
  • Fine-Tip Glue Bottle
  • Foam Dots

Tools

  • Die Cutting Machine
  • Pokey Tool
  • Scissors
  • Paper Cutter

Miscellaneous

  • Nuvo – Jewel Drops – Holly Berries

Father’s Day Cards In Review

Here is a look at Father’s Day cards I’ve made over the years. (Click on the title to see the blog.)

Father’s Day Waterfall Pop-up

In-VEST

Work Bench

A Fishing Father’s Day

A Toolbox Father’s Day

A Train Lover’s Father’s Day

A Cabin Fathers Day Card

A Golfing Minion Father’s Day Card

YOU’RE THE G.O.A.T.

Go Bears Father’s Day Card

Waterfall Father’s Day Card – This card has photos of this man’s children that can be flipped through when the waterfall pull tab is pulled.

Thank you for reading this blog post. I hope this inspires you and makes you smile. Please like and leave comments 😊

Squeeze The Day!

Sometimes life keeps throwing lemons at people. I am always amazed at how individuals keep smiling through it all and even find time to do kind things for others as well. This is a card for those smiling individuals that know how to make lemonade out of what life throws at them.

Using the Vintage Lemon Twist papers by Simple Stories and the You Shine stamp set both in the Simon Says Stamp! July 2022 Card Kit of the Month, I crafted this card with dies from Karen Burniston, Divinity Designs, Crafter’s Companion, Made to Surprise and Oriental Trading.

The front of the card is made from the paper collection with Nuvo Drops, buttons and a tiny ribbon bow from my stash. A symmetry is a theme for this card. The back of the card is a collage of leftover pieces from making the rest of the card. (I decorated both the inside and outside of the card base because the card base was thin cardstock. I adhered the papers with double side tape and an occasional drop of glue.

I had the idea of a pitcher of lemonade pouring into a glass with a lemon slice as the inside interactive mechanism of the card. After looking at a number of Karen Burniston pop-up/interactive dies, I settled on the Mailbox Pop-Up after watching a video by Karen using the mechanism for a double spinner card which I adapted into a tilting pitcher. I cut from scrap cardstock, a template of the mailbox to know where to cut the square opening in my decorative scalloped circle (Made to Surprise). After trimming the lower lever mechanism off, I folded the piece as directed in the video and trimmed the small section off one edge that would not be covered by the scalloped circle.

Using clear vellum to resemble glass, I die cut two tumblers (Divinity Designs) and fitted a scrap of vellum behind the die-cut pale blue pitcher (Crafter’s Companion). Using a bright yellow marker, I colored the back side of the vellum as the lemonade. I always color the edges of exposed vellum with a black marker to make them more defined. From the backing paper from some adhesive sheets that I had saved because the paper had a shiny yellow surface, I cut some lemon slices (Divinity Designs) for the tumblers and pitcher.

The lemonade sentiment is from the You Shine stamp set and is heat embossed with black ink and clear embossing powder. Once heat embossed, I die cut the sentiment out with a wave oval die from oriental Trading. I cut a second oval of plain white cardstock as the sentiment for a personal message to be added.

Black backgrounds inside the card make the white scalloped circle and ovals pop. Small scraps of the yellow printed paper were used to balance out the inside decorations.

The card fits into an A2 size envelope which has been stamped on the front with a lemon slice and back flap with a whole lemon. the back flap image is colored with markers. All the stamps are from the Simon Says Stamp You Shine stamp set.

Thank you for reading this blog post. Please like and leave comments 😊

Materials Used:

Dies

Stamps

Inks

Papers

  • Pattern papers by Simple Stories – Vintage Lemon Twist
  • Clear vellum scraps
  • White cardstock scraps
  • Shiny yellow paper scraps
  • A2 white card base and envelope

Miscellaneous

You’re The Best!

Recently I received a Divinity Designs Mystery Bag for $29.95 and received three die sets, one stencil, one rubber stamp set and one embossing folder retailing for over $70 total. I decided to challenge myself to see what I could make with them. I add the Divinity Designs Thank You clear stamp set with matching Thank You die to my one brand challenge.

I cut several elements for this card in vellum. The balloons were cut from a strip of adhesive backed colored vellum that I folded and stuck to itself and then die cut the balloons. With blending alcohol markers I used the stencils within the dies to stencil the embossed designs onto the balloons. (I learn something when the ink on the heart balloon ran under the die, so I sprayed rubbing alcohol onto the vellum and it cleared the ink leaving an interesting faded ink look.) Baker’s twine was tied to the ends of the balloons and a dot of glue was used on the back side to secure the twine to the vellum.

For the beverage cup and domed lid, I cut them from clear vellum and inked the edges with a silver marker. From a white shimmer cardstock scrap, I cut the cup again and the whipped cream topping. The cup section I colored with a soft orange marker. The straw was cut from a piece of white cardstock I had drawn diagonal red stripes on with a red marker. The orange slice was cut from a bright orange scrap and outlined with a bright orange marker. To adhere the vellum cup I used a fine tipped glue bottle to line the edge of the cup before gluing to the orange cup that I had already glued the straw and orange slice to knowing that glue on vellum will be seen. The whipped cream topping was glued on top of the straw. For the vellum lid, the glue was applied to the lip that covers the cup.  The assembled cold orange drink was adhered to the pistachio inked rectangle with one layer of thin foam squares.

The white embossed fish background used the embossing folder from the mystery bag. My hope was to convey a night at a beach side carnival to say thanks. To add to the theme, I die-cut three Thank Yous from black shiny cardstock, and yellow and neon green cardstock scraps and staggered them to create the look of a neon sign.

To complete the card front I stamped, and heat embossed in black the sentiment “YOU’RE THE BEST” onto a white scrap of cardstock. I then ink blended the embossed piece with a large brush the pistachio Distress Ink. I trimmed the scrap down to a rectangle and cut a triangle from each end to make the banner.

The assembly of the card involved gluing the white and pistachio pieces to the A7 sized card base and then adhering the cup and balloons with foam squares. The cup had one layer of foam while the balloons had two layers. The three strands of the balloons’ baker’s twine was gathered and tied into a knot and glued in place on the card base. The sentiments were glued on last. Three glow-in-the-dark stars where added as bling.

To hint at the envelope’s contents, I stamped “JUST WANTED TO SAY” (from the Divinity Designs’ Thank You stamp set) in Memento’s London Fog gray ink to the back flap. I also stamped the Divinity Designs logo in the same ink on the back of the card and added my initials and year of creation.

Thank you for reading this blog post. Please like and leave comments 😊

Materials Used:

Dies & Embossing Folders

Stamps

Inks & Embossing Powders

Papers

  • White, yellow, orange and neon green card stock scraps
  • Clear vellum scraps
  • Xcut – Xtras Adhesive Vellum Sheets – purple, pink yellow
  • AC Cardstock – Kraft Cardstock – 5×7 in A7 card and envelope

Miscellaneous

Layered Crosses – Part 2

There is nothing like the burst of a sunrise from a dark morning sky.

Using five different shades of browns from tan to espresso cut one of each of the cross dies in each color. Lay out the various layers so that when assembled no cross has two of the same color.

Glue the layers together to form five crosses.

Cut a 4 1/4 x 11 inch piece of white cardstock. Score and fold at 7 3/4 inches (valley fold) and at 2 1/4 inches (valley fold).

With a sun rise stencil, orange ink and a sponge dauber, ink in the sun on the back panel. Next ink the sun rays with yellow ink.

Let ink dry before stamping the “He is risen” sentiment in black onto back panel, spacing so it is hiden when the card is closed.  On a white 2 x 4 1/4 inch piece of white paper stamp in black ink “Happy Easter.”  Glue white paper on the inside panel of the card.  (I used the paper to hide an inky mistake.)

In my stash I found some experiements I had done trying out the bokeh stenciling method to create an interesting background for the Apple Blossom butterly stamps.( I know I used Distress Oxide inks for the stenciling and some blue ink cubes from a Papercrafting Society box to stamp the butterflies.) These panels were cut down to 2 x 4 inch pieces and adhered to the front gatefold panels.

Position and then glue the cross to the left half of the closed card. 

To hint at the envelope’s contents, I stamped tulips onto the blue envelope with a yellow ink.

Thank you for reading this blog post. Please like and leave comments 😊

Materials Used:

Dies

Stamps

Stencils

Inks

Papers

  • Browns, tans and white card stock
  • White paper
  • A2 blue envelope

Miscellaneous

Layered Crosses – Part 1

Sunrise means a new day and new beginnings. Using Divinity Designs layered cross die set and a stenciled sunrise, I hope to convey this elated feeling of gladness in this z-fold Easter card.

Using five different shades of browns from tan to espresso cut one of each of the cross dies in each color. Lay out the various layers so that when assembled no cross has two of the same color.

Glue the layers together to form five crosses.

Cut a 4 1/4 x 11 inch piece of sky blue cardstock. Score and fold at 5 1/2 inches (valley fold) and at 2 1/4 inches (mountain fold).

With a sun rise stencil, orange ink and a sponge dauber, ink in the sun on the folded shut card. Ink the sun rays on the left side of folded card with yellow ink. Open up card and ink in all the sun rays on back panel using the inked sun half to lineup stencil.

Let ink dry before stamping the “He is risen” sentiment in black onto back panel, spacing so it is hiden when the card is closed.  On a white 2 x 4 inch piece of white paper stamp in black ink “Happy Easter.”  Glue white paper on the inside panel of the card.  Die-cut strips of green grass to adhere to the bottom of the stenciled sunrise panels of the card.

Position and then glue the cross to the left half of the closed card. 

To hint at the envelope’s contents, I stamped tulips onto the blue envelope with a yellow ink.

Thank you for reading this blog post. Please like and leave comments 😊

Materials Used:

Dies

Stamps

Stencils

  • Spellbinders – Fun Stampers Journey – Sunny Day Stencil 6”x6” – JM-0135

Inks

Papers

  • Blue, browns tans and green card stock
  • White paper
  • A2 blue envelope

Miscellaneous

Chevron Bag – Part II

Quick and clever gift bags for small treats were needed and the Divinity Designs Chevron Background die provided the visual pop required.

I cut three the background die three times from coordinating papers to make each of these bags. Then I placed each pattern paper pieces in separate bags so as not to lose any of the pieces especially the tiny triangles. I also kept the thin L-shaped scrap pieces from the edges of the die-cutting to be used as bag handles.

Next, I glued the frame onto a 4 1/4 x 5 1/2 inch piece of thin white paper placing dots of glue at the zig-zag points and the outside frame. (You will see that I used scrap paper for the backing that had black printing on it knowing that it would be covered with a another backing paper.)

Then the fun part of deciding on the positioning of the different papers within the frame and making a duplicate frame as well.

(I found that laying out the chevron strips and gluing the strips in place from the bottom up worked well with the duplicate frame as a guide in case of the strips being mixed-up.)

Once the glue has dried, trim the backing paper overhang away from the frame on both pieces.

Depending on the size of your paper, you may have enough scrap pieces to make the sides and/or a bottom of the bag. (I found that using 4.5 x 6.5 inches sized paper made me use two additional pieces to cut the sides (2 1/4 inches by 5 1/4 inches) and a bottom piece of 2 1/4 inches by 4 1/2 inches.)

The bottom piece is scored at 1/8 inch on the long sides and 1/4 inch along one end of the piece while the other end is marked where it needs to be folded by holding the bottom piece up to the bottom edge of the chevron frame.

Scoring the long edges of the side pieces at 1/ 8 inch is the first step for marking the sides. Using a pencil and a ruler draw a pencil line down the center each side piece. Mark a dot at 1 1/2 inches from the bottom of the center line and draw a line from the center dot to each of the corner bottom edges to from a triangle. Erase the line that is in the center of the triangle. Score along the remaining pencil lines. Mountain fold the 1/8 inch edges. Valley fold the pencil line folds.

Glue the tabs of the bottom piece to the insides of the chevron pieces and side bottom pieces.

Glue the side tabs to one of the chevron pieces, using your finger to adhere the tabs to the front pierce. Glue the remaining side tabs using a long tool such as a pencil or pen to adhere the tabs to the back piece.

Glue the L-shape scraps to the inside of the chevron pieces. Then adhere two 3 7/8 inches by 5 1/8 inches pieces of white paper to cover the bottom and side tabs and handle ends on the inside of the chevron pieces.  If you have a piece of leftover decorative paper that will fit the bottom of the bag glue it into place as well.

Like this bag? Check out this week’s other bag.

Thank you for reading this blog post. Please like and leave comments 😊

Materials Used:

Dies

Papers

  • WRF Studio – Romance 4.5” x 6.5” Design Paper Pad (230gsm Heavyweight Cardstock)
  • White paper

Miscellaneous

Chevron Bag-Part I

Quick and clever gift bags for small treats were needed and the Divinity Designs Chevron Background die provided the visual pop required.

I cut three the background die three times from coordinating papers to make each of these bags. Then I placed each pattern paper pieces in separate bags so as not to lose any of the pieces especially the tiny triangles. I also kept the thin L-shaped scrap pieces from the edges of the die-cutting to be used as bag handles.

Next, I glued the frame onto a 4 1/4 x 5 1/2 inch piece of thin white paper placing dots of glue at the zig-zag points and the outside frame. (You will see that I used scrap paper for the backing that had black printing on it knowing that it would be covered with a another backing paper.)

Then the fun part of deciding on the positioning of the different papers within the frame and making a duplicate frame as well.

(I found that laying out the chevron strips and gluing the strips in place from the bottom up worked well with the duplicate frame as a guide in case of the strips being mixed-up.)

Once the glue has dried, trim the backing paper overhang away from the frame on both pieces.

Depending on the size of your paper, you may have enough scrap pieces to make the sides and bottom of the bag. (I found that a 6 x6 inches piece allowed for one side piece of about 2 inches by 5 1/4 inches and a bottom piece of 2 inches by 4 1/2 inches.)

The bottom piece is scored at 1/8 inch on the long sides and 1/4 inch along one end of the piece while the other end is marked where it needs to be folded by holding the bottom piece up to the bottom edge of the chevron frame.

Scoring the long edges of the side pieces at 1/ 8 inch is the first step for marking the sides. Using a pencil and a ruler draw a pencil line down the center each side piece. Mark a dot at 1 1/2 inches from the bottom of the center line and draw a line from the center dot to each of the corner bottom edges to from a triangle. Erase the line that is in the center of the triangle. Score along the remaining pencil lines. Mountain fold the 1/8 inch edges. Valley fold the pencil line folds.

Glue the tabs of the bottom piece to the insides of the chevron pieces and side bottom pieces.

Glue the side tabs to one of the chevron pieces, using your finger to adhere the tabs to the front pierce. Glue the remaining side tabs using a long tool such as a pencil or pen to adhere the tabs to the back piece.

Glue the L-shape scraps to the inside of the chevron pieces. Then glue two 3 7/8 inches by 5 1/8 inches pieces of white paper to cover the bottom and side tabs and handle ends on the inside of the chevron pieces.  If you have a piece of leftover decorative paper that will fit the bottom of the bag glue it into place as well.

Don’t miss tomorrow’s bag from other other papers for a different look.

Thank you for reading this blog post. Please like and leave comments 😊

Materials Used:

Dies

Papers

  • WRF Studio – Romance 4.5” x 6.5” Design Paper Pad (230gsm Heavyweight Cardstock)
  • Lawn Fawn double-sided 6” x 6” patterned cardstock from my stash
  • White paper

Miscellaneous