Day 2 of 12 Days of Christmas Ovens

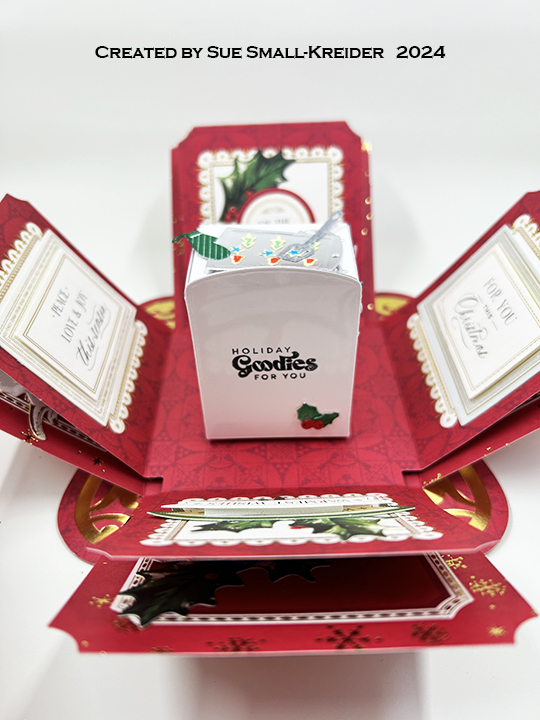
It’s Day 2 of my 12 Days of Christmas Ovens.

I’m using a Gingerbread House Explosion Box kit by Anna Griffin and dies and stamps by The Greetery to make this special treat box and Christmas decoration.

Watch video above for a tutorial on how I made the Box.

___________________________________

Thank you for experiencing this blog post.

I hope this inspires you and makes you smile.

Please like and leave comments 😊

___________________________________

Disclaimer: Karen Burniston products are provided free of charge by the manufacturer for review and use. All other items were personally purchased. Compensated affiliate links used where or when possible, meaning I will receive a small percentage commission from these manufacturers at no cost to you. This will allow me to add more content to my YouTube channel and help out a lot. Thank you.

Materials Used:

Dies

  • The Greetery – Wafer Thin Steel Dies – Bake Someone Happy

Stamps

  • The Greetery – Clear Stamps – Bake Someone Happy

Papers

  • Anna Griffin – Gingerbread House Explosion Box
  • Anna Griffin – Present Pop-Up Card making Kit – Ephemera & Sentiment Stickers
  • Anna Griffin – Carte Noel – Sentiment Stickers
  • The Paper Cut – 8.5×11 Glossy 10 PT Kromekote Cardstock – White
  • Silver Foil Cardstock
  • Acetate/Clear Plastic

Ink

  • Stampin’ Up – Classic Ink Pad – Real Red & Shaded Spruce
  • StazOn – Solvent Ink – Jet Black
  • American Crafts – Metallic Marker – Silver
  • Gel Pens – Blue, Green and Red
  • Mont Marte – Dual Tip Art marker – E2 Raw Sienna
  • Sharpie – Permanent Marker – Ultra Fine Tip – Black, Green & Red

Adhesives

  • Neutral PH Adhesive by LINECO
  • Fine-Tip Glue Bottle
  • Double-Sided Tape – 1/8-inch wide
  • Foam Squares

Tools

  • Die Cutting Machine
  • Heat Tool
  • Stamping Blocks
  • Scissors
  • We R Memories – QuickStick
  • Paper Masking Tape

Miscellaneous

  • Candy or Small Baked Treat

A Laundry Explosion Box Card for mother’s Day

This card was made for Craft Roulette #213 whose parameters included for hello project, robust colors, workplace element and mixed media. It is intended for young children to give to their mother.

I wanted to use a new Craft Roulette inspired laundry die and stamp set from Trinity Stamps called Loads of Fun.

Box: From a 12 x12-inch square of cardstock, draw lines every 3 7/8-inches on all sides. Draw a 1/4-inch tab on one side flap. Cut as shown on video. On a 6-inch square of cardstock draw lines 1-inch from edge on all sides. Cut lid as shown on video. Assemble as directed on video.

Washing Machine: Cut from glossy white cardstock one washing machine from the laundry die set. Cut the knobs and buttons from black and silver and glue in place. For the box piece the forms the 3D washing machine, cut a piece 8 1/2 x 2-inches. Fold at 3 1/8-inches, 4 1/2-inches and 7 1/2-inches. Cut a piece that will cover the side of the box from glossy white cardstock. Cut another piece of glossy cardstock the width of the top of the washing machine and the length of the top of the box, plus 1/2-inch for the two 1/4-inch tabs. Assemble as shown in video.

Table: Cut a piece of white cardstock 1×6-inches. Score and fold at 1/4-inches, 1 5/8-inches, 3 1/4-inches, and 4 5/8-inches. Glue tab to other end to form cube. Glue onto washer side and floor.  Die-cut, color and assemble laundry soap bottle and box. Using foam squares, attach them to wall atop table.

Basket: Cut four of the laundry basket from the laundry die set in green. Trim off the sides from two of the baskets, fold sides into tabs and glue onto sides of other two basket pieces to form a four-sided box. Cut fabric scraps and form into folded laundry. Glue laundry onto box base and then add glue to inside of basket before placing around folded laundry.

Sentiments: “Loads of Appreciation” and “Thank You” were stamped in black on a white die cut fancy label before being glued onto a box flap. “Happy Mother’s Day” was die cut from a scrap of the blue box cardstock. The “Greetings To My Favorite Domestic Engineer” on the box lid was computer generated.

____________________________________________

Thank you for experiencing this blog post.

I hope this inspires you and makes you smile.

Please like and leave comments 😊

____________________________________________

Materials Used:

Dies

Stamps

Papers

  • American Crafts – 12×12 inch Single-Sided Papers – 341467
  • Core’dinations – 12×12 inch Textured 80lb. Cardstock – Candy Shop Canvas
  • The Paper Cut – 8.5×11 Glossy 10 PT Kromekote Cardstock – White
  • The Paper Studio – 8.5×11 Printed Paper – Random Dot – Robin’s Egg Blue
  • Silver Matte Cardstock
  • Clear Plastic Packaging
  • Black, White and Yellow Cardstock

Ink

  • StazOn – Solvent Ink – Jet Black
  • Scrapbook.com – Glitter Brush Marker –Deep Blue, Frosty Blue, Red Shimmer
  • Sharpie – Permanent Marker – Fine Tip – Black
  • Sharpie – Permanent Marker – Ultra Fine Tip – Black, Green, Red

Adhesives

  • Neutral PH Adhesive by LINECO
  • Fine-Tip Glue Bottle
  • Double-Sided Tape – 1/8-inch wide
  • Foam Squares
  • Clear Tape

Tools

  • Die Cutting Machine
  • Bone Folder
  • Stamping Blocks
  • Scissors
  • Pencil
  • We R Memories – QuickStick
  • T-Ruler
  • Tombow – Mono – Sand Eraser -512A
  • Craft Clips

Miscellaneous

  • Red & White Checkered Ribbon

A Drop of Sunshine’s Inspiration Box

Have to share some inspiration with you from a papercrafter who goes by the name Drop of Sunshine. I have been inspired by her mixed media creations, but she has shared some papers and digital kits to make things like this exploding box.

To access her free digital download that I am linking to, you need to be a member of Craftworld.com which is a free membership based site where papercrafters (and crafters in general) have a community to post and share their projects, get inspiration, and converse with crafters from all over the world.

I downloaded and printed the six sheets that make up this exploding exploding box digital kit on lightweight white cardstock. I followed Drop of Sunshine’s YouTube tutorial and only changed up the center decoration by cutting the four flower wreaths with no background into two cones, one spiral strip and one base mat. The two cones I glued one on top of the other and used the spiral to make the top of the tree. I fussy cut most of the individual rose blooms and leaves and shaped them by scoring, folding and curving the leaves with my fingers. The roses are in several sizes so the layers are largest on the bottom and the smallest on top again with folding and curving the petals with my fingers.

From scrap cardstock left from fussy cutting I made four small loops to act as ‘faux foam tape’ to raise the circle sentiments up. The other sentiment strips were curved and pleated using my fingers. I used a black pen to write the recipient’s name on one of the blank banners.

Below is all the flower and sentiments I had left over from the kit. I made the box in about two hours using only scissors, glue, ruler, scoring board and black pen.

Thank you for reading this blog post. Please like and leave comments 🙂

Please check out Drop of Sunshine’s YouTube Channel too!