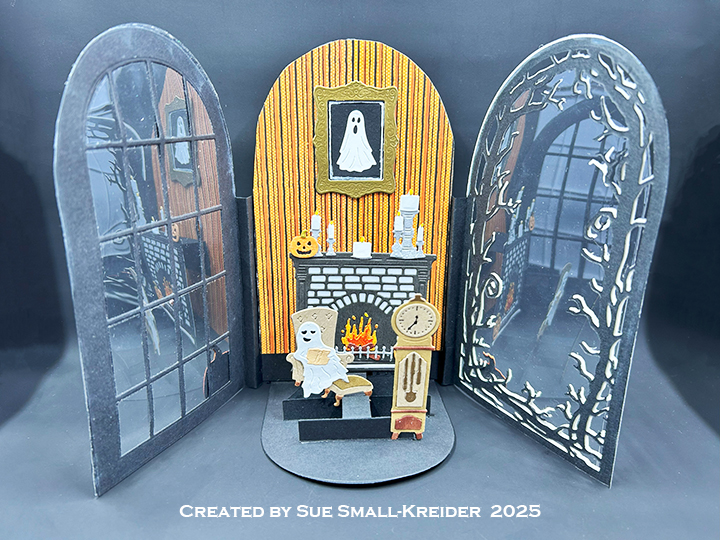
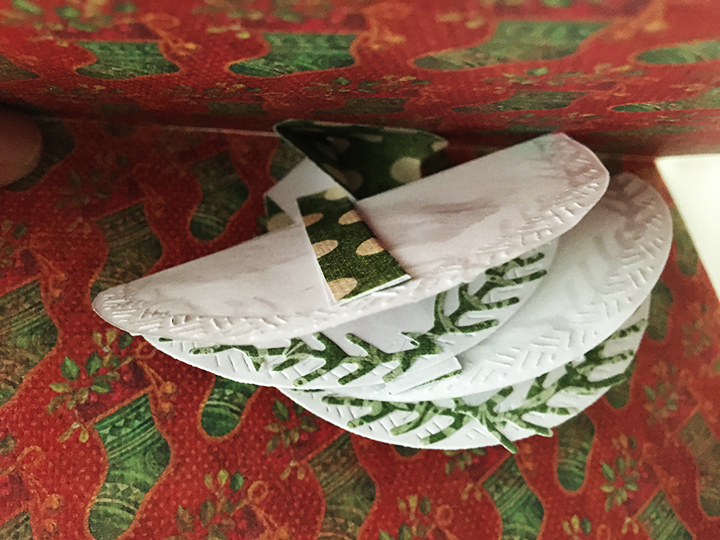
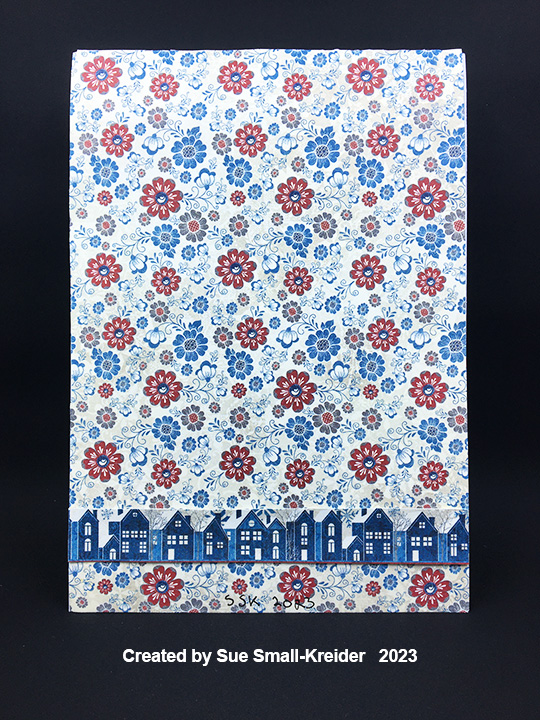
I recently purchased some new Scrappy Tails Halloween dies to make some pop-up tri-fold cards. Here is my first go at making one of Sabrina Leavell’s tri-fold cards. I watched a few of her YouTube lives before I began.
Watch the video below to see how I made this card.
___________________________________
Thank you for experiencing this blog post.
I hope this inspires you and makes you smile.
Please subscribe to the email notices, like and leave comments 😊
___________________________________
Disclaimer: Karen Burniston products are provided free of charge by the manufacturer for review and use. All other items were personally purchased. Compensated affiliate links used where or when possible, meaning I will receive a small percentage commission from these manufacturers at no cost to you. This will allow me to add more content to my YouTube channel and help out a lot. Thank you.
Materials Used:
Dies • Scrappy Tails – Metal Craft Dies – Ghost Gallery • Scrappy Tails – Metal Craft Dies – Ghost Study • Scrappy Tails – Metal Craft Dies – Halloween Tri-Fold Window Add-On
• Scrappy Tails – Metal Craft Dies – Spooky Fireplace • Scrappy Tails – Metal Craft Dies – A7 Tri-fold Pop Up Card Base
• Grafix – 8.5×11 Dura-Lar Acetate .005 – Clear Film
• Concord & 9th – 8.5×11 Cardstock – Mushroom
• Fun Stampers Journey – 8.5×11 Cardstock – Tin Pail
• Black, Browns, Oranges, Tans, White and Yellow Cardstock
• #10 Business Envelope – White
Ink • Memento – Fade Resistant Dye ink – Tuxedo Black • Pigma – Mircon 01Fine Tip Pen – Black • Sakura – Gelly Roll Pen – Medium – White • Stampin’ Up – Stampin’ Blends Marker – Dual Tip – Dark Copper Clay & Dark Wild Wheat
This mini album was made for Craft Roulette #195 whose parameters included Project type of Encouragement, calm colors, stuffed element and ticket(s).
I have made one other journal similar to this one in a virtual workshop by Kim Hein from Art Impressions using their Mini Journal Template and stamps. In thinking about the layout, I decided that I wanted a positive affirmation for the center back page and all the interleaving pages to it to be wintery and joyful. The theme is chasing the winter blues away.
Watch a painting tutorial before coloring any of the watercolor pieces.
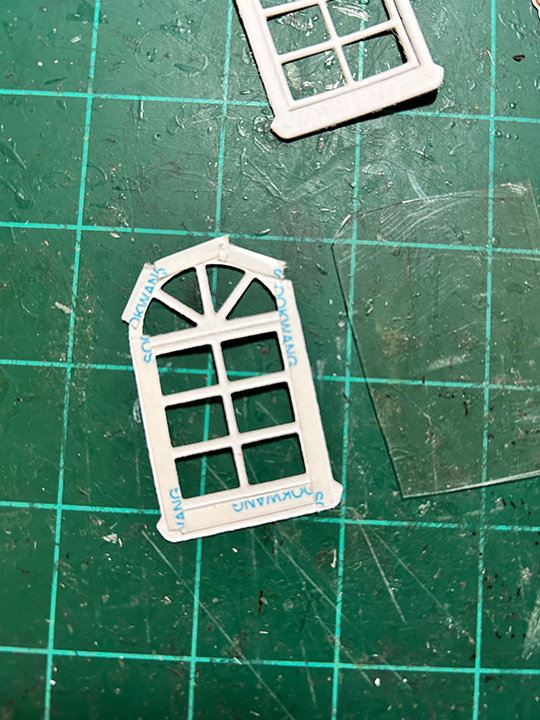
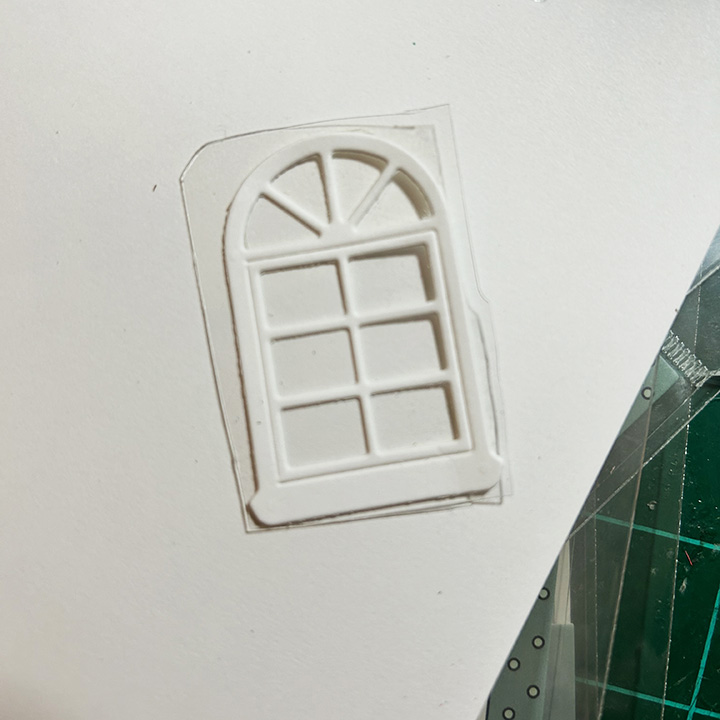
Window Journal Cover: Using the window frame and window arch dies from the Mini Journal template set, cut the arch opening into the left album cover and two of the window frames from white cardstock.
Cut a piece of clear acetate/plastic slightly larger than the window frame. Using narrow double-sided tape on the backside of one window frame, adhere the frame to the acetate piece. (Hint: If the double-sided tape is wider than the frame, peel off the backing paper and fold the tape over on itself to fit the frame.) Trim off the excess acetate around the frame. Add double sided tape to the back of the acetate and adhere over the cover opening. Attach the second frame to the back of the cover over the opening.
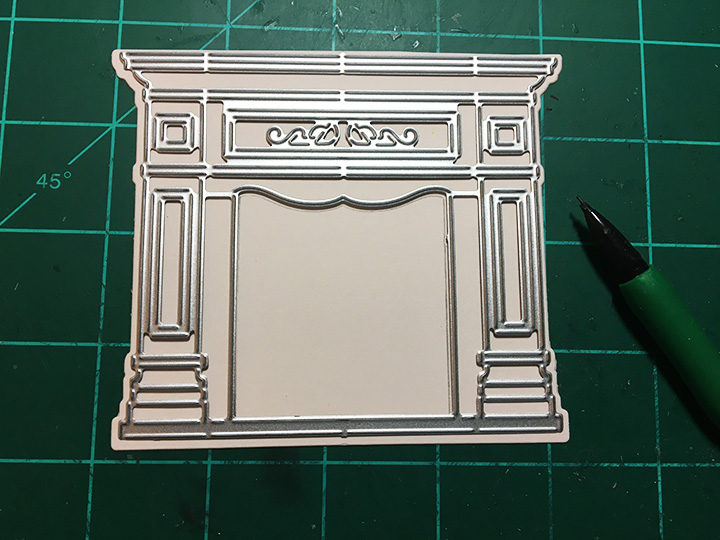
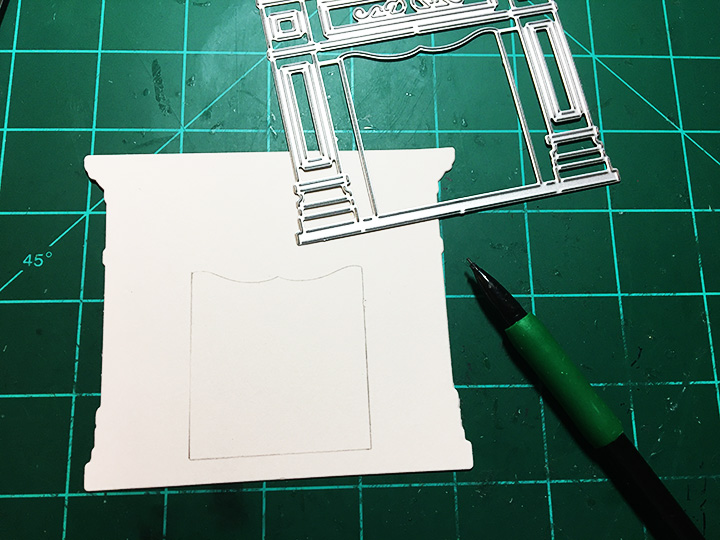
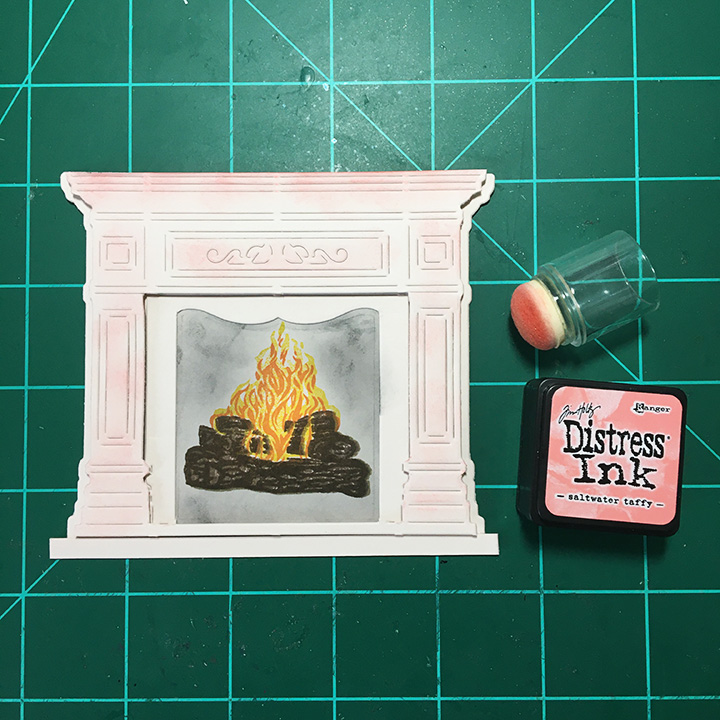
Room Scene Journal Cover: Stamp onto patterned paper the chair from the Matchbook Den stamp and die set. Cut out using the matching die and trim off the tab with scissors. Stamp the fireplace onto watercolor paper using a alcohol based ink and color using water-soluble inks with a water brush. Die cut fireplace and trim off tabs. Die cut picture frame and color with ink. Write the word “JOY” in the frame’s picture area with a fine-tipped blue marker. Cut a scalloped edge rectangle from a wallpaper-like patterned paper using die from the Mini Journal Template set. Assemble room scene onto the right cover panel.
Pocket of Encouragement and Ticket Pages: The blue ticket was computer generated. The yellow tags with affirming statements were from my stash of batch foiling using Spellbinder Glimmer System products. A large needle was used to pierce and thread the embroidery floss through the tags. The scalloped background piece and white lacy pocket were die cut using dies from the Mini Journal Template set.
Joy and Snowman Twister Pages: Stamp the fronts and backs of the twister Joy and snowman using the Mini Christmas Twister stamp and die set. Watercolor them. (I used glitter gloss and glitter brush markers on the twisters.) Watch a twister assembly video before assembling. Die cut two of the rectangles from patterned paper for each page using the large straight edge rectangle die in the Mini Journal Template set. Position the decorative papers onto the white page base pieces making sure not to cover the tabs. Secure the papers to page with removable tape and tape in place the smaller of the twister oval dies. Die cut through all three layers. (I had to recut the bottom layer of decorative paper, but the impression of the die was there to show me the position.) Glue patterned paper to page. (I die cut two oval frames for the “JOY” page using the two twister oval dies. They made the opening too thick to get good action with the twister, so I had to trim some of the notch away. I would not use frames unless they were from very thin paper.)
Snowman and House Pages: Using the WC Snow Globe stamp and die set, stamp the house and snowman on to 2×2 1/2-inch rectangles of watercolor paper. (I watercolored the images after viewing a number of the Art Impression painting videos.) Use the frame die in the Mini Journal Template set to cut out the images. (You can use the rest of the image that is die cut as I did with the house, or die cut a frame from decorative paper as I did with the snowman.)
Little Birds Pages: Die cut two scalloped circles using the die from the Mini Journal Template set. Stamp two birds from the Matchbook Garden set. Watercolor as shown in the opening video of this blog post. Using two of the oval cut outs from the patterned papers used for the Joy Twister page, and two scalloped rectangles of patterned paper, assemble the two bird pages. Stamp and die-cut the “hello Sunshine” banner from the Matchbook Garden set to place on the back center page.
Back Message and Ribbon Closure: I computer generated the back cover sentiment and used dies from the Mini Journal Template set to cut it out, frame and mat it. This panel is glued over the 24-inch piece of ribbon to hold it in place. Trim ribbon as needed once tied into a bow.
Thank you for reading this blog post. I hope this inspires you and makes you smile. Please like and leave comments 😊
Materials Used:
Dies
Art Impressions – Steel Dies – Mini Journal Template – 5718
Art Impressions – Steel Dies – Mini Christmas Twister Set – 5815
Art Impressions – Steel Dies – Matchbook Den Set – 5322
Stamps
Art Impressions – Clear Stamps – Mini Christmas Twister Set – 5815
Art Impressions – Clear Stamps – Matchbook Den Set – 5322
Art Impressions – Clear Stamps – Matchbook Garden – 5444
Art Impressions – Clear Stamps – WC Snow Globe Set – 5791
Foiling Plates
Spellbinders – Glimmer Hot Foil Plate – Mini Everyday Sentiments
Papers
Art Impressions – 6×6 Double-Sided 80lb Cardstock – Mini Journal Series -Mini PP -5835
Studio Light – 6×6 inch/15.2×15.2 cm Single-Sided Papers – Let it Snow
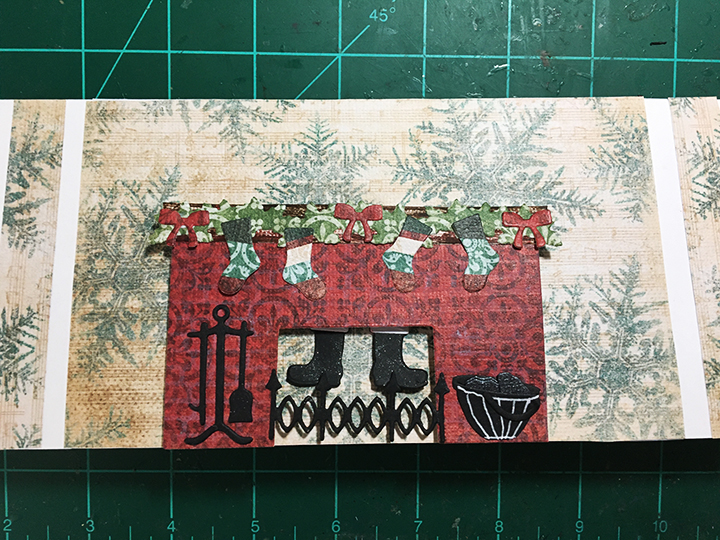
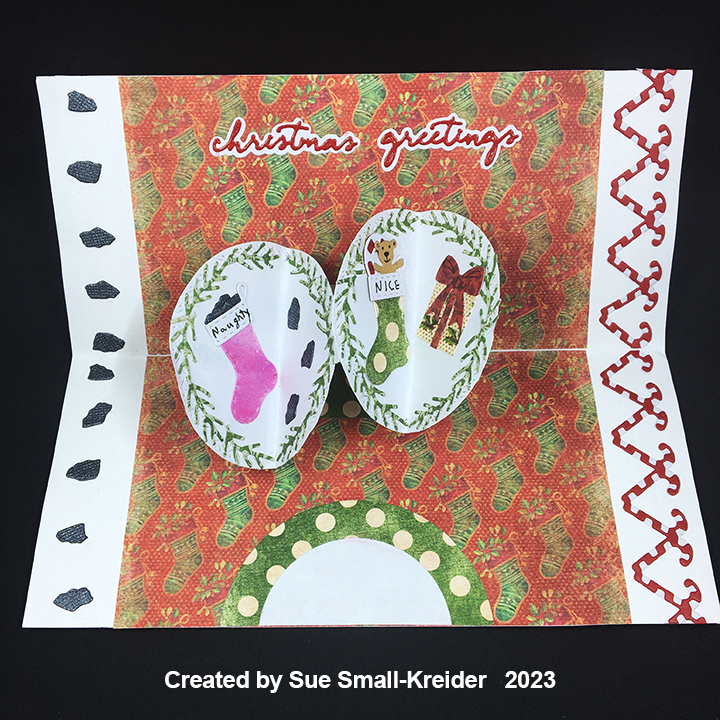
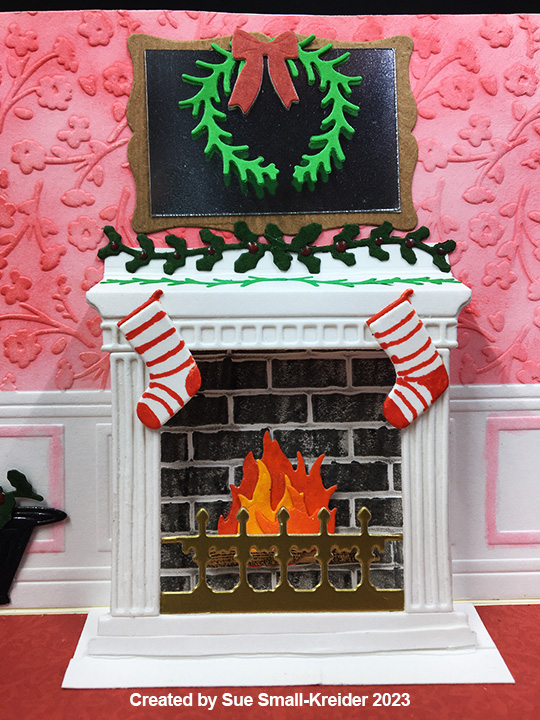
It’s the Karen Burniston design team challenge for December 2023 with the theme of “Naughty or Nice” using Christmas stockings and the idea that naughty persons get coal in their stockings while people who have been good/nice will get presents and sweet treats in their stockings.
Before starting, I recommend watching the assembly videos of the pop-ups which are usually near the bottom of the linked pages for the various dies used.
Cardbase: I folded a 7 3/4-inch by 8 3/4-inch rectangle of white cardstock long-wise in half for the cardbase. Because my decorative papers were 4 1/2-inchby 6 1/2-inch, I centered the papers on each of the four panels.
Fireplace: The fireplace main piece was cut using white ink rubbed on the die before cutting. The mantel piece was die cut and folded in half and glued together to add dimension. Christmas decorations – candles, stockings, greenery, bows, fireplace guard and tools are all in the Fireplace Extras 1 set. I cut down the pail from the Adirondack Chair Pop-Up set to be a coal shuttle next to the fireplace. For the picture of Father Christmas, I fussy cut it from the decorative paper collection I used.
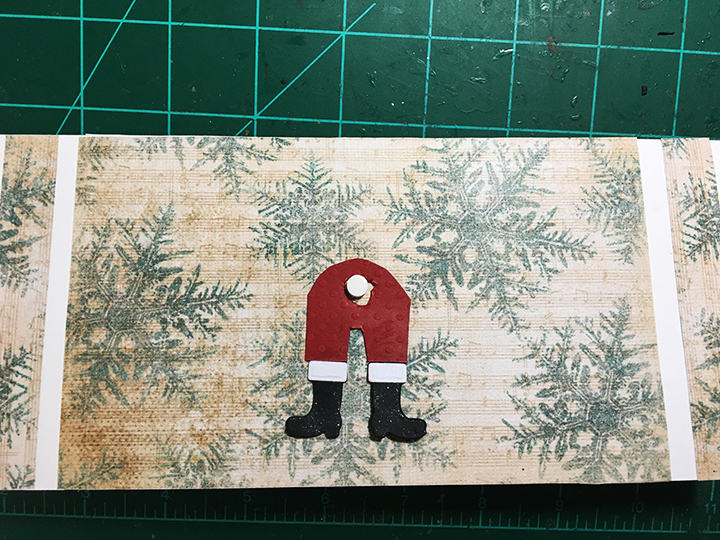
Santa’s Boots: The boots are cut from black and white cardstock using the dies in the Fireplace Pop-Up set. Use the tab atop the boots to attach red pants that were cut free-handed with a holed punched and widened to accommodate a small foam dot. The boots were coated with glitter gloss before attaching to the card. Follow the pictures above for order of assembly of fireplace and Santa’s pants and boots. The fireplace was attached with two layers of foam tape to be slightly taller than the foam dot so that the boots would swing freely.
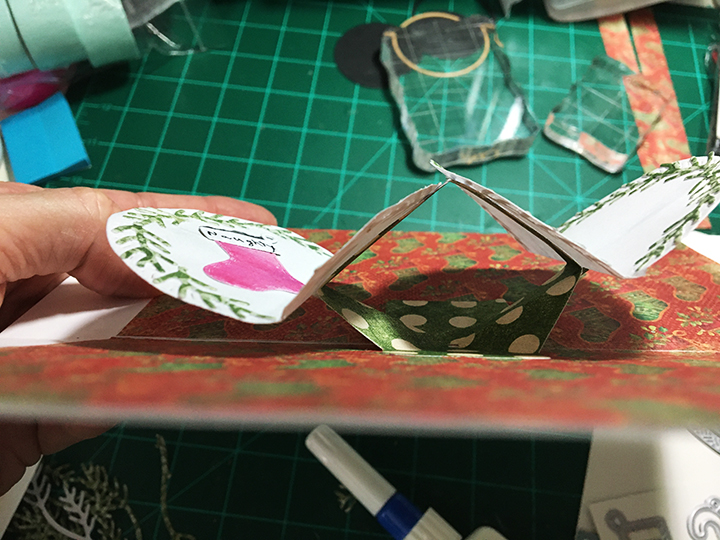
Wreaths: Using the second largest crosshatch circle, I cut two from heavy white paper. The greenery was made by cutting off the fir needles from the branch piece in the Holiday Charms set. Stockings and their coal, teddy bear and candy cane come from the same charms set. The wrapped gift is from the Big Birthday Charms set.
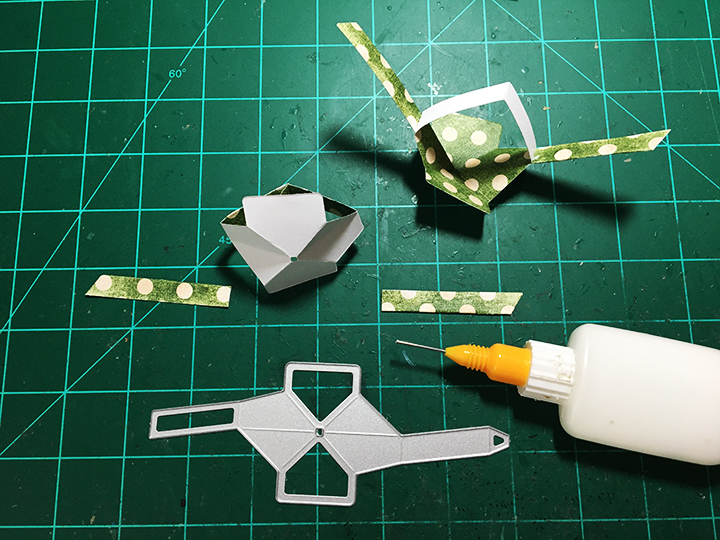
Inside Pop-Up Mechanism: I added extension arms onto the Twist Flower Pop-up mechanism to form a “W” shape. (Watch this Halloween card video to see how to make the mechanism.) The circle wreaths were folded in half and glued to the two “V” arms, playing with the positioning of the circles so there are no catchpoints.
Borders: The inside border of candy canes comes from the Christmas Borders 2 die set while the coal comes from the Holiday Charms. For the back borders, the branch die from the Holiday Charms set was used. Leftover strips of decorative papers were added to the card front as borders.
Sentiments: Clear tape over red cardstock is the secret to the glossy script letters with plain white cardstock shadows. The sentiments all come from the Small Script – Christmas die set. On the front is “ho ho ho” with “Christmas greetings” inside the card.
Envelope: The stocking border from the Christmas Borders 2 set was cut from the same striped paper that was used on the fireplace stockings and glued to the back envelope flap to hint at what’s to come.
Thank you for reading this blog post. I hope this inspires you and makes you smile. Please like and leave comments 😊
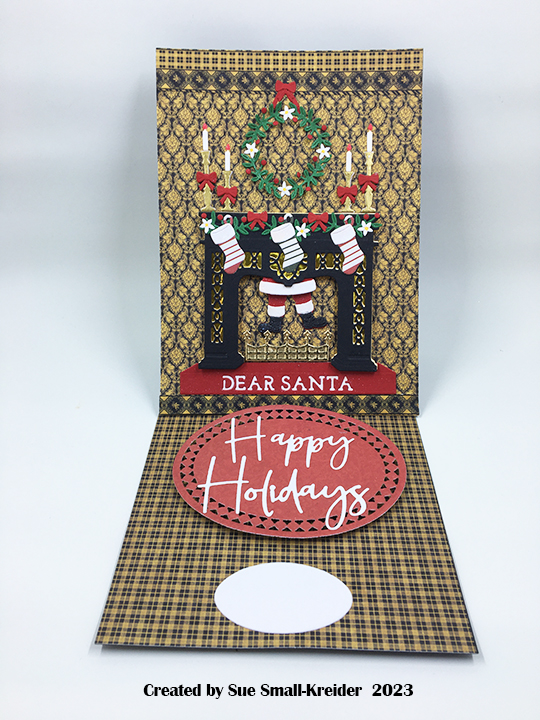
With Santa shimmering down the chimney with his legs swinging left and right, this card became my submission for Craft Roulette episode #191 whose parameters were a drop-down card, supper table colors, seasons element, and shiny.
Cardbase: Cut one 5×7-inch rectangle from heavy black cardstock. Cut another piece from black using the template pictured below. Train the folds of the larger piece. This will be the bottom base with easel arm. Glue the tab on the easel arm to the back of the 5×7 piece making sure when the card is folded shut that the top 5×7’s edges are aligned with the bottom piece. Cover the card front with decorative paper as well as the bottom panel. I added decorative borders for quarter floor molding and picture rail near the ceiling top.
Fireplace and Santa: Watch the assembly video. I used two layers of cardstock for the fireplace and four layers for the candlesticks. The foam dot I used was thick, so I used two layers of foam tape to keep the fireplace higher than Santa. Glitter gloss was brushed over all of Santa as well as the fur on the stockings’ tops. The gold foil in the fireplace decorative panels is from an envelope liner.
Decorations: The set comes with dies for the greenery, tiny flowers and berries as well as the bow. I used a red glitter pen for the candle flames and a yellow marker for the flower centers.
Sentiments: The fireplace set comes with four messages. I choose “Dear Santa” to die-cut into the red hearth piece which is backed with a solid white hearth piece. Glitter gloss was applied to the red hearth. To create the easel stopper, cut an oval rug and pop it up on foam dots. Glue die-cut “Happy Holidays” onto oval. Because of my dark background paper, I added a smaller white oval for a personal message.
Envelope: I decorated the back flap of the envelope and the card back with decorative paper scraps.
Thank you for reading this blog post. I hope this inspires you and makes you smile. Please like and leave comments 😊
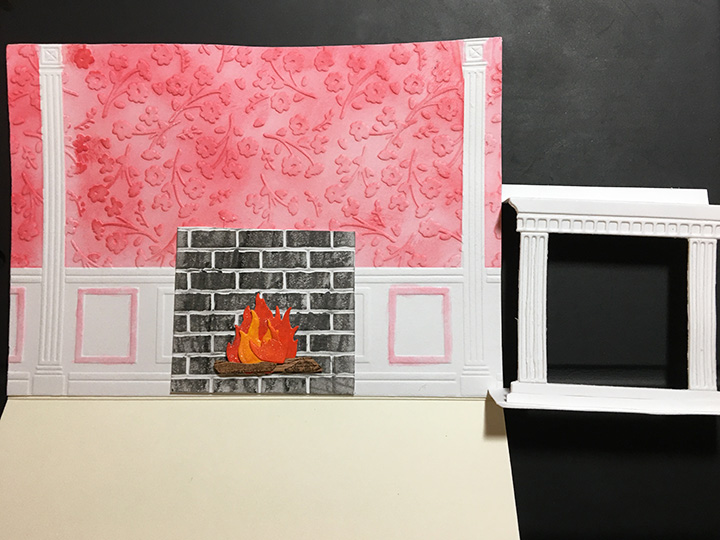
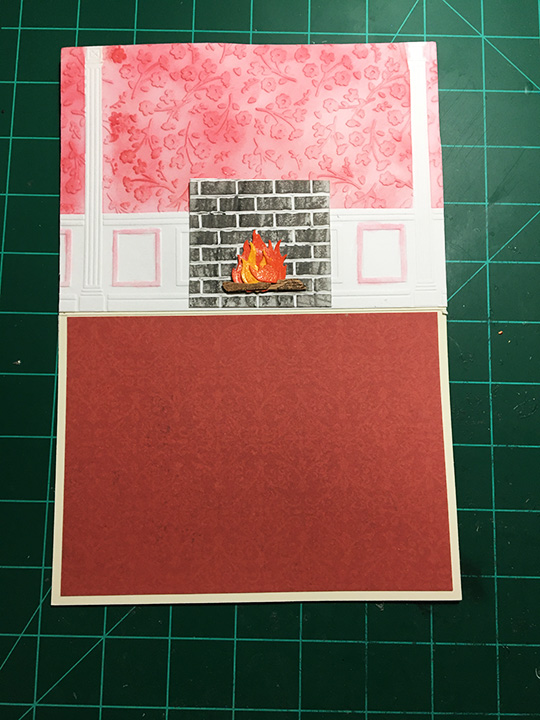
This is the eighth card in the Fireplace Christmas Card series.
Santa’s coming. Can you hear him on the rooftop? He’s sliding down the chimney.
For this card I used Karen Burniston dies to create an accordion card with a pop-out fireplace with Santa’s boots dangling in the fireplace opening. (Before starting, please watch the assembly video for the Fancy Label Accordion located near the bottom of the linked page.)
Cardbase: I cut three Fancy Label Accordion panels from heavy white cardstock. I also cut four of the same panels from red decorative paper and two panels from green decorative paper. The green paper panels I adhered to a cardstock panel. (I realized I needed to cut one more green panel to cover the tabs when all the panels are glued together.)
The red panels I trimmed out the center label at the pivot points. Using the largest and second largest label dies in the set to cut a frame, I cut borders from two of the red center labels. For the back personal message label I used the largest of the label dies to cut a frame that went to the edge of the white label.
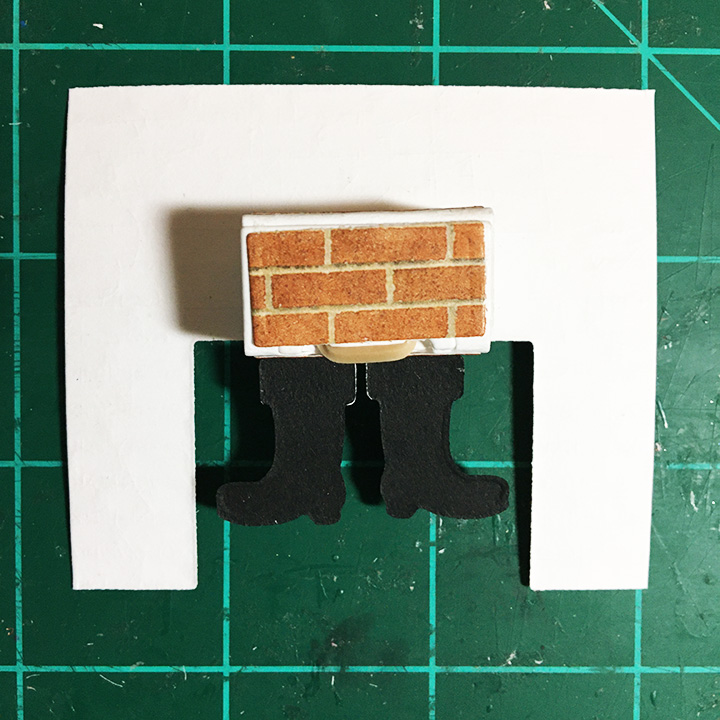
Fireplace: I cut the fireplace front and mantel pieces using the Fireplace Pop-Up. For the fireplace I glued a brick decorative paper to white cardstock and die-cut it using the embossing feature. I then trimmed off a 5/8-inch from each side of the fireplace so it would fit into the card. The mantel piece was cut from white and ink blended.
Bam Box and Boots: Because I was using a different mechanism than the fireplace mechanism, I recommend watching the assembly video for the small bam box. I tried both sizes of bam box, but you need to use the smaller one to get the fireplace to fit on the label and not catch when the card is folded closed. Glue three of the four decorative panels to the bam box. Before you add the rubber band to the bam box, cut the teardrop shaped holes for the boots (circled in red in photo below) using a sharp pointed piercing tool and scissors. (I used an old ice pick or awl.) If you plan to glue the bam box arched side to the fireplace, cut the holes in the panel just below it as shown in the photo circled in red. Attach the boots by slipping the tabs through the holes.
Assemble the bam box as usual.
I did not attach the fourth decorative panel on my card since I knew the arched side would be glued to the back of the fireplace. Test the placement of the bam box on both the fireplace and the pivot label before the glue sets. Once the fireplace is attached to the panel, attach the mantel with the wider side glued to the fireplace.
Card Back: Every time I make an accordion card, I forget to save the decorative frame papers to glue on last, to cover the tabs that get glued as the card is assembled. This time I did it to the middle green panel.
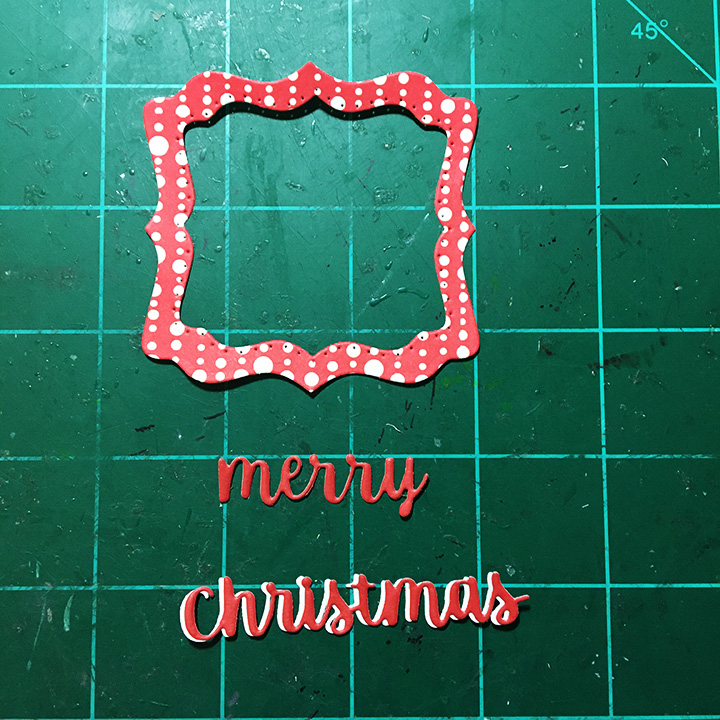
Sentiments: “Ho Ho Ho” comes from cutting down the “Hooray!” in Word Set 4 while “Merry Christmas” is from Word Set 3. The Santa face is from the Gnome and Santa die set.
To get the word” Christmas” to stand-out from the red border paper I cut an additional “Christmas” in white and off set it behind the red word.
Envelope: The red “Merry Christmas” on the envelope flap and its green border are stamps from Anna Griffin.
CRX Sheet: The card recipient experience (CRX) sheet explains how to close the fireplace. it is a free download.
This is the seventh card in the Fireplace Christmas Card series.
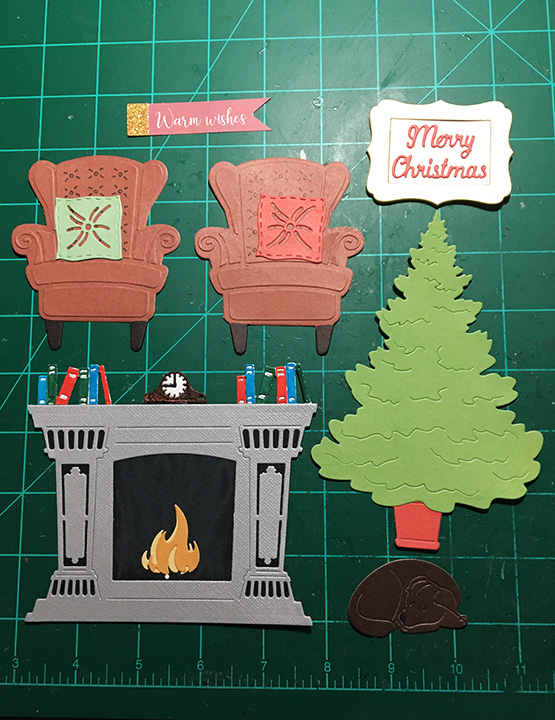
Waiting for the grandchildren to arrive to decorate the tree. It’s that peaceful moment when the dog is asleep before the fire and the chairs are ready for tired bodies.
For this card I used two Paper Discovery die sets by Olga Direktorenko – Timeless Room and Elegant Roomas well as the Timeless Room embossing folder. These sets are available in limited quantities from Craftstash. Olga is an amazing designer of scene dies and stamps who lives in Ukraine.
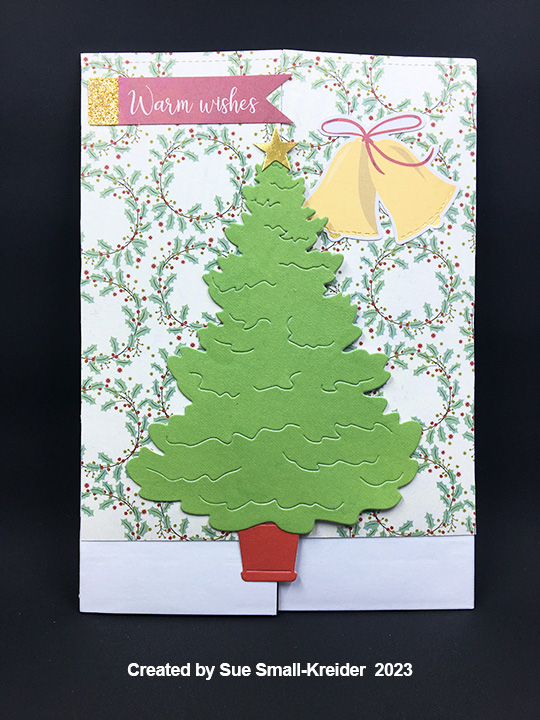
Cardbase: A purchased A7 (5×7 inches) gatefold cardbase and matching envelope were used for this card. The inside was covered in a red and white striped wallpaper with embossed floor moldings made using the Timeless Room embossing folder. A red rug is in the center bottom. The outside has wreath paper from the same 6×6 paper pad as the striped paper.
Fireplace: The fireplace die cuts a detailed image that needs to be backed with black paper to make the details stand out. The final touch is the snoozing chocolate labrador retriever in front of the fire.
Chairs: The chair die in the Timeless Room set has an outline die and then one other die that cuts all the detailed pieces that make up the dimensional chair. The seat back die has a stencil feature for tufting which I used with a fine-tipped black marker to add this detail to the chair. The cushions are from the same set. When attached to the inside flaps of the card, the chair extend slightly over the edge, but card covered by the tree on the card front when the card is closed.
Card Front: An evergreen tree sits in a red pot waiting to be decorated. The tree is from the Elegant Room set while the pot is from the Timeless Room set. The left half of the tree is glued to the left card flap. The yellow bells were added to balance out the banner. Both are from a Spellbinder’s Christmas card kit.
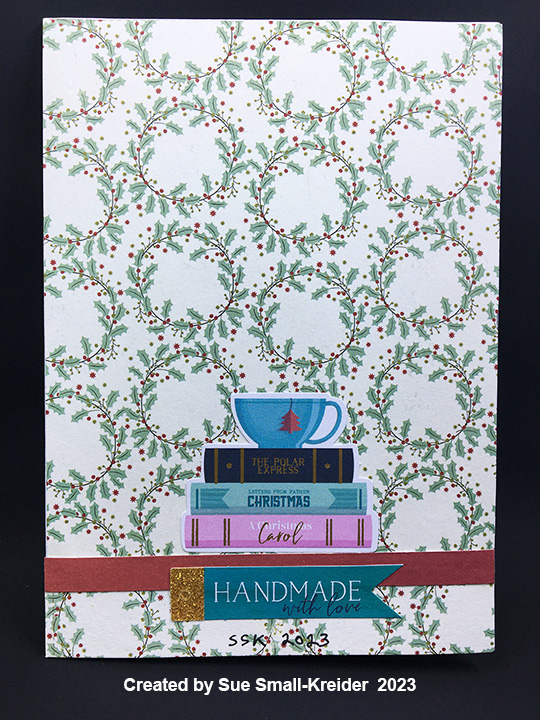
Card Back: A red strip covers the seam where the two pieces of paper meet. Ephemera from a Spellbinder’s Christmas card kit was used to decorate the back including a stack of Christmas themed books and a banner stating, “Handmade with love.”
Sentiments: The front banner “Warm Wishes” is from a Spellbinder’s Christmas card kit. “Merry Christmas” is part of the Elegant Room set and includes the frame. The two white ovals over the chairs are spaces to write personal messages.
Envelope: The back flap is decorated with yellow bells from a Spellbinder’s Christmas card kit.
Thank you for reading this blog post. I hope this inspires you and makes you smile. Please like and leave comments 😊
This is the sixth card in the Fireplace Christmas Card series.
Fireplaces have a bit of magic in them on Christmas eve. This easel card plays into the magic complete with an elf sitting on the mantel shelf.
Hero Arts made the Stamp & Cut XL Fireplace set that was used to make this card along with Graphic 45 patterned paper Lets Get Cozy.
Cardbase: Starting with a purchased A7 cardbase, I cut it along its fold to have two pieces of 5×7 inch rectangles. Next, I cut a piece of the heavy weight pink cardstock 7.5-inches by 4.25-inches and folded at 2-inches and at 5.5-inches. (You may need to change the fold in the easel arm as I did, but you can cover the extra fold line with decorative paper.)
One tab was glued to the top of a cardbase panel and the other tab will be glued to the base of the other panel once it is decorated as the card front. Cover the bottom card base panel with a carpet like patterned paper. Also cover the back side of the case base with patterned paper. (I choose a wallpaper-like floral print and put a house border along the bottom edge to ground the back of the card.)
Fireplace: While designed to be a single layer die-cut, the fireplace can be cut multiple times to create a more 3D effect. The dies need to be clipped to separate the main outline of the fireplace from the mantel piece and the stocking from the rest of the piece. Cut one outline piece and one mantel piece from heavy blush pink cardstock. You will have to cut the mantel piece from the cardstock at its connecting points with a kraft knife. Cut another mantel piece to fussy cut the scalloped inner opening that frames the firebox. (I like to cut this piece to include some of the columns.)
On the outline piece, trace the firebox opening with a light pencil using the mantel piece die.
Using the layering stamps with two shades of brown ink for the logs and yellow and orange ink for the flames, create the burning logs within the penciled firebox. Using a blending brush, ink up the firebox to make sooty walls. Glue the inner firebox frame around the inked firebox. Use foam squares on the back of the mantel piece to adhere it to the outline piece. Blend some color onto the mantel piece.
Decorations: There are a number of decoration stamps in Fireplace Stamp & Cut set. I stamped both candles, the elf, tallest tree and the pinecones in greenery onto white heavy cardstock and heated embossed them before coloring with watercolor pencils. Next, I fussy cut them out leaving a long tab at the bottom of each to attach them to the fireplace I glued the tabs to the backside of the mantel piece and place foam squares on the backs of the pieces. The stockings were also stamped, heat embossed and watercolored. They are glued to the front of the mantel piece.
Sentiments: All of the sentiments were stamped, and heat embossed onto cardstock. The “ho ho ho” was stamped on pink cardstock to go at the base of the fireplace as if the sounds were coming down the chimney into the firebox. Crosshatch dies were used to cut out the larger sentiments of “Warm wishes” on a rug and “Merry Christmas” on a wall plaque. A second white rug was added for a personal message. The first rug is popped up on foam squares to act as an easel stop while the second rug is glued down for the ease of writing a message.
Envelope: The back flap of the envelope is stamped with a green elf to hint at the magic to come.
CRX Sheet: With many interactive cards, the recipient needs instructions on how to open and set-up the card. I create CRX sheets (card recipient experience) to include in the envelope. You can download for free the easel/double easel CRX sheet.
Thank you for reading this blog post. I hope this inspires you and makes you smile. Please like and leave comments 😊
This is the fifth card in the Fireplace Christmas Card series.
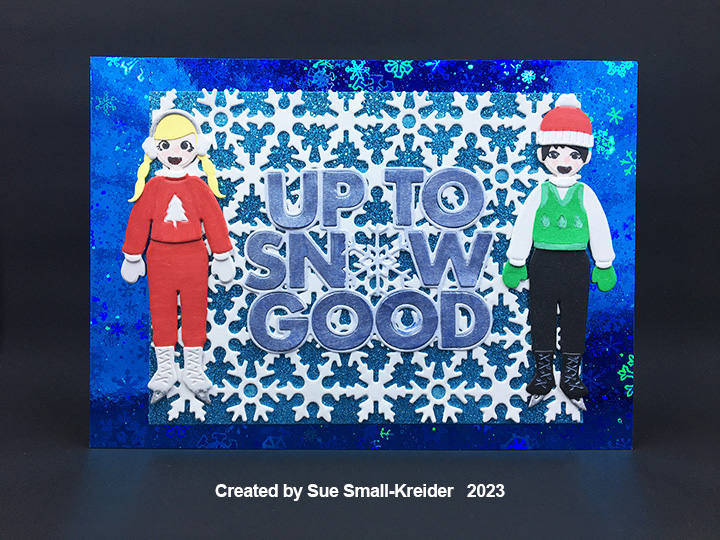
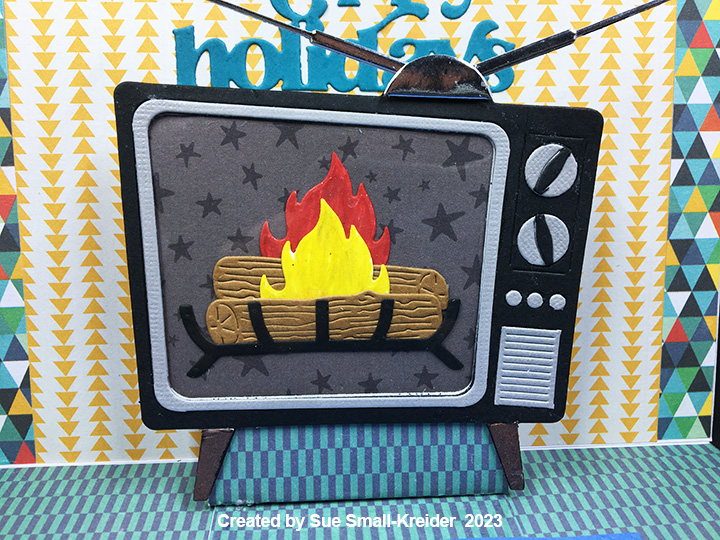
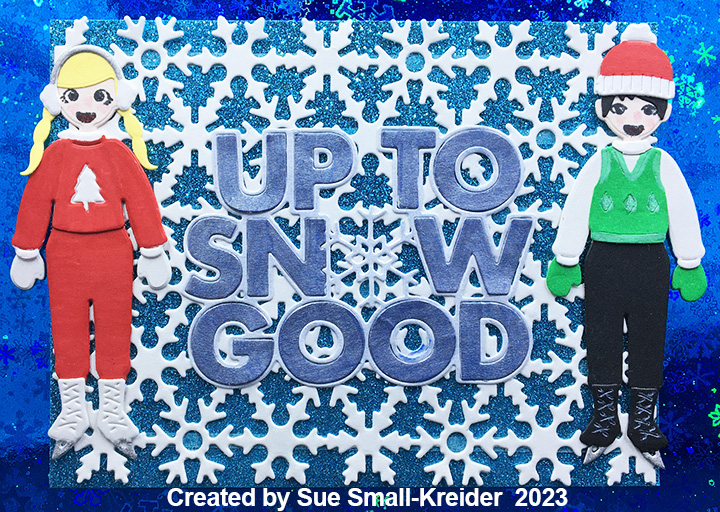
In the good old-days of the 1950s and 1960s, the winter holidays meant snow, winter sports like ice skating on a homemade ice ring made in the backyard of 2×4 boards and a few inches of water frozen. On Christmas day the TV stations broadcast images of burning logs to replace the normal programing.
This card commemorates those childhood memories using dies by Hero Arts along with basic dies and stamps by other companies.
Cardbase: I used a purchase A7 (5×7 inch) cardbase and envelope. I covered the inside with papers that represent wallpaper and carpeting. The card back is also covered with patterned paper. Because I used 6×6 inch patterned paper and some designs I only had one piece, I placed borders of contrasting paper.
Pop-Up: I wanted this television set to pop-up inside the card, so once it was assembled, I made my own pop-up cube from scrap carpeting patterned cardstock (I would have used the wallpaper, but I had no more of it.) The pop-up cub is made from strip 2.5×7 inches, folded at .5-inches, 3-inches, 3.5-inches and 4-inches, and the .5-inch tab is glued onto the carpet panel inside the card, butted up against the fold and the other 3-inch end of the strip glued to the wallpaper panel. The TV is glued to the front of the pop-up.
TV: As with many Hero Arts dies, you have to cut them multiple times and then fussy cut with scissors the decorative pieces such as the TV knobs, speaker box and legs. I cut the knobs, speaker and screen frame from a textured metallic gray cardstock and legs from woodgrain paper.
The whole television I cut once from black and twice from a thick cardstock in my junk mail recycling. The junk mail pieces I glued together. On the back of the black piece, I attached a piece of clear acetate using thin double-sided tape. Next, I trimmed the excess acetate. (Don’t attach black front to junk mail back piece until burning log screen is attached.)
White cardstock that was colored with markers and covered with glitter gloss was used for the flames while recycled kraft cardboard packaging was what the logs were cut from. Once the burning logs were assembled, they were glued to star patterned paper TV screen piece. Place a piece of wide clear packing tape over the backside of the junk mail piece and place the finished screen inside the junk mail frame. Glue the black front to the junk mail piece.
Attach the TV to the pop-up inside card. Play with the antenna placement so they won’t show when the card is closed. (I cut the antenna once from silver foiled packaging and once from the thick junk mail cardstock and glued together.)
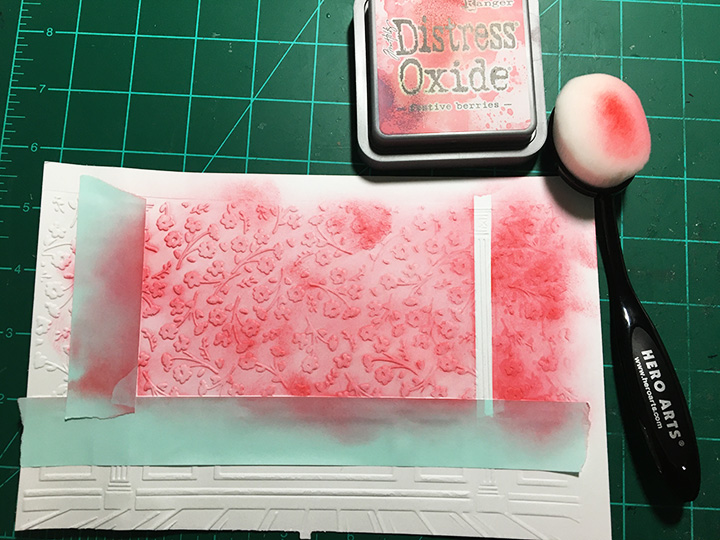
Card Front: For this layered mat front, I used a 5×7 inch rectangle of holographic snowflake cardstock that I cut a 4×5.25 inch crosshatch rectangle out of the center. A 4.25 x 5.5 inch piece of glitter cardstock was covered with a snowflake pattern plate attached with 1/8-inch wide double-sided tape. The open places in the center of some snowflakes had stickiness from the tape adhesive and was covered with an anti-static brush and powder.
Skaters: Hero Arts makes a paper doll die-cut series complete with a variety of hair and facial expressions as well as clothing and accessories. These mid-century styles ice skaters use the Winter Accessories set along with the basic Hero Lifestyle Forms and Faces sets. Markers were used to color the clothing.
Sentiments: Two die cut sentiments were used on this card. On the front is “Up To Snow Good” a pieced die set by Riley & Company. I cut it once from heavy white cardstock and colored the letters with a blue metallic marker. I used glue to attach all pieces to the snowflake pattern plate. Inside the card is “Happy holidays” a die set by Simon Says Stamp. The lavender rug inside the card is a place for a personal message.
Envelope: To hint at what is to come, the back flap of the envelope was stamped with an Art Impressions’ sentiment stamp in blue ink.
Thank you for reading this blog post. I hope this inspires you and makes you smile. Please like and leave comments 😊
This is the fourth card in the Fireplace Christmas Card series.
Grand rooms to celebrate Christmas evokes feelings of another time that is both formal and cheery.
To create the 3D card front and inside pop-up fireplace, Crafter’s Companion Gemini Create-A-Card die sets were used along with a Paper Discovery embossing folder to create the textured wallpaper and moldings.
Embossed Walls: I made a room scene card a few years back using the same embossing folder to create the wall. Because I liked the look of the red ink blending and the white woodwork of that earlier card, I repeated it. I cut two pieces of heavy weight white cardstock, spritzed them with water and used the embossing folder with the suggested sandwich of embossing mat and thin plate to emboss in my die-cutting machine. (I used 3M post-It notes the last time I ink blended the wallpaper.) This time with low-tack paper tape, I masked off the columns and wainscoting molding before ink blending.
Cardbase:For the cardbase, I used a purchased ivory A6 (4.5 x 6.25 inch) card with matching envelope.The two embossed wall pieces go on the card front and the inside top panel. Because they are back-to-back, heavy layers of decorative papers need to go on the card back to balance out the weight of the two panels when the card is opened. The advent calendar numbers on the back are to suggest the counting of days until Christmas.
Card Front: I placed the embossed piece with the left column at the left edge of the card. The dies for the staircase are in the tree die set and cut just the banister and stair treads. I embossed a smaller piece of molded wainscoting to adhere the stair treads to with thin foam square. The railing backs-up to the column. Using a brown marker, I colored the hand railing before adding some greenery swags from the accessories die set and ornaments from the yuletide treasure set.
The Christmas tree is popped-up on thicker foam squares. I used some tiny holographic tinsel to create the illusion of a fir tree. More of the ornaments from the stairway are used with a glitter foam star as tree decorations. For the tree stand, I trimmed-down the coal shuttle from the accessories set after die-cutting it from black shinny packaging. The frame of the sentiment is cut from matte gold cardstock and the white sentiment pieced into the frame and glued in place with thin strips of cardstock on the backside, before being adhered to the card with thin foam squares.
Fireplace: Because the fireplace die is designed to be cut out from the cardbase, I had to modify it by cutting it from a scrape of heavy white cardstock and cutting a .25-inch tab across the top and a similar tab at the base. The four decorative molding pieces need to glued on to the mantel piece. I cut a .5-inch strip to go across the two side flaps of the hearth stone so the firebox has a white floor.
Next, I cut a 2.5-inch square of white cardstock and embossed it in the brick folder. Using gray and back Distress crayons, I colored the bricks to look sooty before gluing them in place to the inside wall of the cardbase. Using the flame and logs from the accessories set, I cut the pieces and then used some glitter inks to color the flames. The logs were cut from brown woodgrain paper. The fender or fire guard piece was cut from gold matte cardstock and glued to the backside of the mantel piece. (Fender is also in accessories set.) The carpet needs to be glued onto the bottom inside card panel before the mantel can be glued in place. Glue goes on the bottom of the hearthstone and the back top tab. I positioned the bottom piece to be a smidge from the cardbase fold. With the fireplace folded flat on the carpet, I lowered the cardbase top panel onto the flattened mantel piece to get the correct placement.
Room Decorations: With in the accessories set, there are the coal shuttle, holly and greenery garlands, a wreath and bow, two stockings and a picture frame. The mirror is a piece of sliver plastic packaging adhered to the woodgrain embossed cardstock frame with double-sided tape. Nuvo Drops were used on the holly strands for berries. A fine-tipped marker was used to create the striped stockings.
Sentiments: There is only one sentiment of “Happy Christmas” on the card front. The cream-colored rug inside the card can be used to write a personal message.
Envelope: To hint at what is to come, “Warm Wishes” has been stamped in red ink onto the back envelope flap.
Thank you for reading this blog post. I hope this inspires you and makes you smile. Please like and leave comments 😊