A Gingerbread Cart Gift Card Holder

This card was made for Craft Roulette #231 whose parameters included for Project – Outside/Inside, tulip colors, festival element and checks.

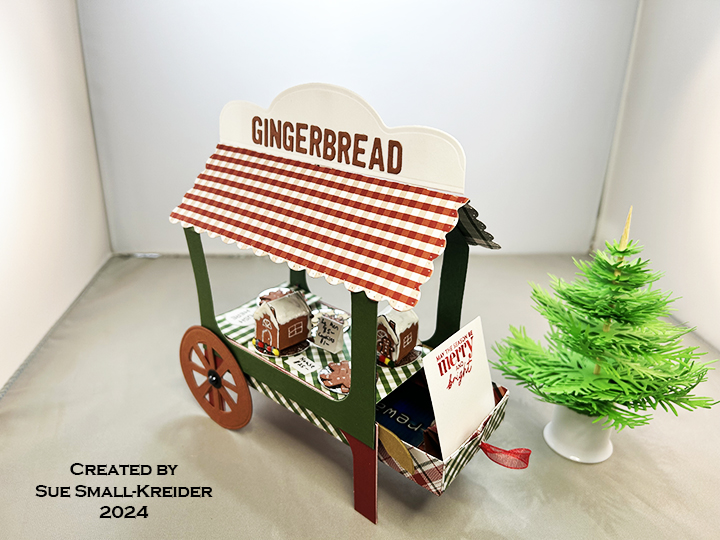
Watch the video to see how I made this cart.

___________________________________

Thank you for experiencing this blog post.

I hope this inspires you and makes you smile.

Please like and leave comments 😊

___________________________________

Disclaimer: Karen Burniston products are provided free of charge by the manufacturer for review and use. All other items were personally purchased. Compensated affiliate links used where or when possible, meaning I will receive a small percentage commission from these manufacturers at no cost to you. This will allow me to add more content to my YouTube channel and help out a lot. Thank you.

Materials Used:

Dies

Stamps

  • Lawn Fawn – Clear Stamps – Sprinkled With Joy-LF1271
  • Scrapbook and Cards Today’s Jolly Holiday workshop kit
  • Trinity Stamps – Clear Stamps – Papercrafting Magic

Papers

  • Bazzill – 8.5×11 Cardstock – Cotton Candy
  • Photoplay – 6×6 Double-Sided Cardstock – Holiday Plaids
  • Stampin’ Up – 8.5×11 Cardstock – Copper Clay
  • Silver Foil Cardstock
  • Black, Green and White Cardstock

Ink

  • Stampin’ Up – Classic Ink Pad – Real Red
  • StazOn – Solvent Ink – Jet Black
  • Creative Craft Products – Alcohol Markers – Dual Tipped – WG1 Warm Grey
  • Pigma – Mircon 05 Fine Tip Pen – Black
  • Sharpie – Permanent Marker – Fine Tip – Green
  • Sakura – Gelly Roll Pen – Medium – White

Adhesives

Tools

  • Die Cutting Machine
  • Teflon Folder
  • Paperweight
  • Stamping Blocks
  • Stamp Shammy
  • Scissors
  • Pencil
  • We R Memories – QuickStick
  • Tweezers
  • Metal Ruler
  • T-Ruler
  • Craft Clips
  • Paper Masking Tape

Miscellaneous

  • Nuvo – Crystal Drops – Dandelion Yellow, Double Denim, Red Berry, Simply White & Woodland Green
  • Black Metallic Adhesive Gems
  • Pear Blossom Press – Twinkle Lights

Gift Card Box with Three Mini Pop-Up Cards

This card was made for Craft Roulette #224 whose parameters included mini cards, “a pretty day” colors, scent(s)/nose(s) and packaging.

I chose to make a gift card box with three mini pop-up cards to celebrate Christmas. Karen Burniston Dies were used to create the box and pop-up mechanisms.

Cardbases: Mini cards are 2 x 7-inch rectangles of double-sided papers folded in half and trimmed to fit inside the box.

Box:  Using Karen Burniston’s Candy Hearts Box die set, cut one of the box die. Assemble as shown in the video at the bottom of the linked page. Glue journaling cards to decorate the box.

___________________________________

Thank you for reading this blog post.

I hope this inspires you and makes you smile.

Please like and leave comments 😊

___________________________________

Materials Used:

Dies

Papers

  • Graphic 45 – 8×8 Double-Sided Cardstock – ‘Twas The Night Before Christmas
  • Silver Foil Cardstock – Recycled Packaging
  • White, Green and Brown Cardstock

Ink

Adhesives

Tools

  • Die Cutting Machine
  • Stamping Blocks used as paperweights
  • Scissors
  • Paper Masking Tape

Winter Bag Bear

Needing something cute to put a gift card in with a winter theme, I quickly created this mini gift bag with a polar bear holding a heart.

Karen Burniston’s December 2023 release includes the Mini Gift Bag die set that makes a collapsing bag that will hold a gift card and fit in the palm of your hand.

If you use a patterned paper that doesn’t have a design with a distinct up and down to it, you can cut the entire bag from a 6×6 piece of paper.

I use red vellum to cut a heart with the heart die in the set.  The bear is from the Winter Animals set and the tiny heart he holds comes from the Safari Animals sets.

For the bag handles, I used 1/4-inch wide organza ribbon tied as a loop for each side with the knots hidden inside the bag.

Thank you for reading this blog post. I hope this inspires you and makes you smile. Please like and leave comments 😊

Materials Used:

Dies

Papers

  • Ink N’ Splatter – 6×6 Double-Sided Paper Pad – Winter Blues
  • The Paper Studio – 8.5×11-inch – Red Vellum
  • White, Red and Gray Cardstock

Ink

Adhesives

Tools

Miscellaneous

  • Blue Organza Ribbon – 1/4-inch wide

Bagged and Tagged

Beautiful holiday papers inspired this gift card holder/Christmas card.

It uses two of the new die sets in Karen Burniston’s December 2023 release – Mini Gift Bag and Topper Tags.

Cardbase: Cut two tags using the largest die in the topper tags set from decorative paper. From the same double-sided paper cut a strip 5×1/2-inch and fold lengthwise in half for the card hinge. Glue the hinge to the tag edges to form the inside of the card. Tie ribbon through the tag hole on each side of the card.

Gift Bag: Plan out what images you want to see on the mini gift bag when it is attached. Center the larger of the two bag dies using the square opening over your desired image making sure the top flat die edge with holes is at the top of your image. (I have a few upside-down paper bags in my stash.) Assemble bag as shown on the packaging. Glue the flat side of the bag to the inside of the card. Add the ribbon handle by threading ribbon through the holes and knotting it inside the bag.

Sentiments: The main sentiments of “Merry & Bright,” “Merry Christmas,” and “Warm Wishes” are all on the decorative cardstock. The white tag label inside for a personal message is cut from smallest tag in the tag set and uses the heart hole protector also in the set.

Envelope: The tag card easily fits into a #10 business envelope.

Thank you for reading this blog post. I hope this inspires you and makes you smile. Please like and leave comments 😊

Materials Used:

Dies

Papers

  • Graphic 45 – 8×8 Double-Sided Paper Pad – Warm Winter Wishes
  • White and Red Cardstock
  • #10 Business Envelope – Kraft

Adhesives

Tools

Miscellaneous

  • Red Organza Ribbon – 1/4-inch wide

Slay Your Day!

This card was made for Craft Roulette. #188 whose parameters included a gift card, coffee shop colors, go wild element and number(s).

Have a friend who finds it hard to get going without coffee? This is the card for them complete with a coffee gift card.

It is made with Karen Burniston’s Coffee Cup Pop-Up that includes tabs to hold a gift card on the back side of the cup. The sweet dragon having his morning cuppa on the card front and the knight in shiny armor atop the coffee cup are also Karen Burniston dies.

Cardbase:  Cut from green cardstock one 5×7-inch rectangle and one 5×7.5-inch rectangle. Score and fold 1/2-inch on the 5×7.5-inch rectangle to have a 5×7-inch rectangle with a tab. Glue the tab to the other green piece to make a 5×7-inch top fold card. Cut decorative papers to cover panels inside and out.

Dragon:  (Watch the assembly video for the Knight and Dragon die set first.) I cut the dragon from two shades of green cardstock and inked some shading on him. I used the die stencil feature for his eyes, mouth and wings. His red cup is from the Coffee Charms die set.

Knight:  (Watch the assembly video for the Knight and Dragon die set first.) I cut two bodies for the knight gluing them back-to-back but sandwiching the red plume behind the helmet first. Add his shield and sword before gluing on his gloves.

Coffee Cup:  (Watch the assembly video towards the bottom of the link page Coffee Cup Pop-Up before starting.) I chose to use patterned paper with names of coffee drinks for the body of the cup, white cardstock for the cup lid and kraft cardstock for the cup band. The band die embossed the ridges on it, and I enhanced the ridges with brown ink. Yellow ink was used to shade the cup lid. I used the circle dies in the die set for the logo.

Sentiments: The “Go Wild!” is cut from brown paper using the die set of the same name by Karen Burniston. Th yellow banner inside says “and Slay the Day with Excalibur coffee,” which was computer generated.

Thank you for reading this blog post. I hope this inspires you and makes you smile. Please like and leave comments 😊

Materials Used:

Dies

Papers

  • Rubbernecker – 6×6 Double-Sided Paper Pad – Java Good Time
  • Matte Silver Cardstock
  • White, Green, Red, Black and Blue Cardstock
  • Copier Paper
  • Park Lane Paperie – A7 Cardbase and Envelope – White

Ink

  • Ranger – Tim Holtz – Distress Ink- Vintage Photo, Fossilized Amber and Mowed Lawn
  • Sharpie – Permanent Marker – Fine Tip – Black, Pink, Green, Yellow and Red
  • Pigma – Mircon 01 Fine Tip Pen – Black
  • Computer Printer

Adhesives

Tools

  • Die Cutting Machine
  • Sponge Dauber
  • Craft Mat
  • Scissors
  • Computer and Printer