A Persian Sunrise Birthday Card

Trying a new die set sometimes means looking at the manufacturer’s blog for ideas on ways to use it. I looked at the LDRS blog for inspiration. The idea of ink blending a piece of cardstock in sunrise colors seemed appropriate.

Using a piece of white cardstock larger than the 5 1/2 x 4 1/4 inches coverplate dies, I ink blended six lighter/darker shades of pink, purple and blue Distress Oxides inks with sponge daubers. Next I cut the  blended cardstock using Coverplate III, saving the large cutouts to be inserted later. Using Opal Blaze Polishes, I rubbed three shades of the polished sheen onto the die-cut frame, leaving the inserts plain. (The polishes tend to make the ink colors be a shade whiter and thus adding drama to the differences between the plain insert bold colors and the lustrous polished frames of the coverplate.)

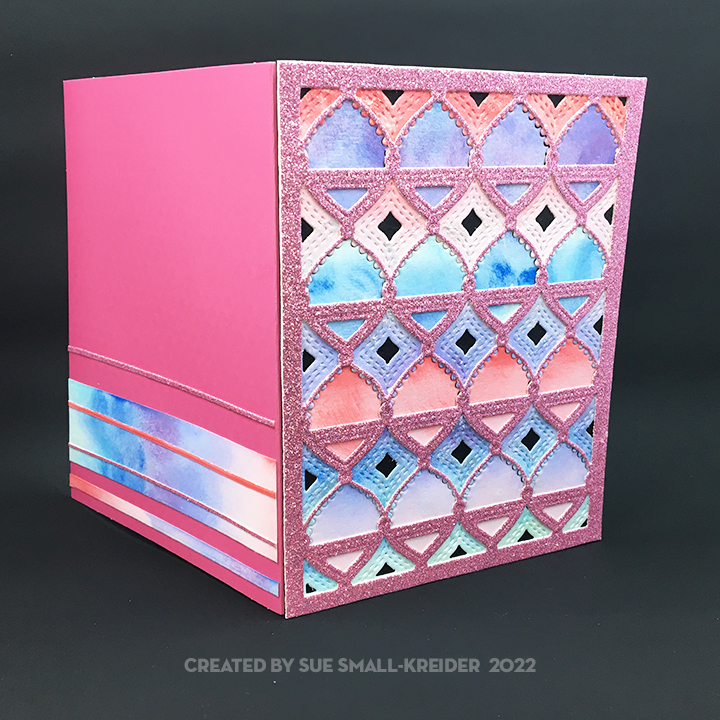
For the Coverplate I, I used a non-shed glitter cardstock that had been in my stash (Sorry, I don’t know the brand.) I played with the positioning of the two layers of coverplates, until I settled on the most pleasing one for these materials.  Next, I re-inserted the leftover inserts from Coverplate III reversing the order to get the most contrasts between insert and frame ink colors. To back the layers, I used a very thick and fibrous, black cardstock (again from my stash, so I don’t know the brand.) The piece was then mounted on a pink card base and the back of the card decorated with scraps left from die-cutting the two coverplates.

For the front sentiment, I went through my stash of foiled greetings that I do from batch foiling on scrap pieces. The rose gold foiled piece on dark blue is attached to the card from with foam tape to make it float above the background.

The inside sentiment is from a new stamp set by PoppyStamps. It is stamped on adhesive backed blue vellum with black StazOn ink. (I used StazOn ink because vellum sometimes is hard to get ink to dry on. StazOn as its name implies will stay on most surfaces that are hard to ink.)

The final touches to the card front were adding some bling with flat back gems from my stash of Buttons Galore & More shaker element mixes. (Many of their mixes are limited editions, so order early when you browse their website and see a mix you love.)

The envelope flap was stamped with another sentiment from the PoppyStamps set with a pink to purple ombre ink.

Thank you for reading this blog post. Please like and leave comments 😊

Materials Used:

Dies

Stamps

  • PoppyStamps – Clear Stamp Set – Colorful Life – CL509

Inks

  • Ranger – Jim Holtz’s Distress Oxide Ink – Spun Sugar, Festive Berries, Shaded Lilac, Dusty Concord, Tumbled, Prize Ribbon
  • StazOn – Solvent Ink – Jet Black
  • Recollections – Ombre Ink Pad Pink to Purple

Foiling

Papers

  • Blue scrap cardstock
  • Lightweight white cardstock
  • Thick black cardstock
  • Pinkish lavender glitter cardstock
  • Xcut – Xtras Adhesive Vellum Sheets – Blue
  • A2 pink card base and white envelope

Miscellaneous

Flowery Birthday Wishes

Inspiration for this flowery card with bling came from the LDRS website for the single layer use of coverplate II and a recent workshop with Donna Butler for the sentiment banners layout. My go-to-bling comes from my Buttons Galore & More stash of shaker element mixes. (Many of their mixes are limited – editions, so order early when you browse their website and see a mix you love.)

I choose to cut a yellow and a green flowered coverplate so that I could cut out the yellow flowers and glue them onto the green. Next, I used an orange marker to color the centers of the flowers. (The orange flatback shiny gems do not show up well in the photos, but they do add some sparkle to the card.)

In my stash was a teal-colored card base which I glued the coverplate to using a fine-tipped glue bottle. The back of the card was decorated with left-over strips from die-cutting.

The banner sentiments were ones I had hot foiled during a batch foiling session.  The inside sentiment comes from a PoppyStamps clear stamp set and was stamped onto adhesive-backed yellow vellum using Staz-on black ink. (I used a heat tool to speed-up the drying time of the Staz-on ink before I adhered the vellum to the inside of the card.)

The back flap of the envelope is stamped in green ink with a cluster of flowers hinting at what is to come inside the envelope.

Thank you for reading this blog post. Please like and leave comments 😊

Materials Used:

Dies

Stamps

  • PoppyStamps – Clear Stamp Set – Colorful Life – CL509
  • All Seasons Wreath Clear Stamp Set designed by Clare Buswell- free gift in Cardmaking & Papercraft, issue 190

Inks

  • StazOn – Solvent Ink – Jet Black
  • Stampin’ Up – Classic Stampin’ Pad – Pear Pizzazz
  • Crayola blending markers

Foiling

Papers

  • Orange, green and yellow scrap cardstock
  • Lightweight pale yellow and neon green cardstock
  • Xcut – Xtras Adhesive Vellum Sheets – Yellow
  • A2 teal card base and white envelope

Miscellaneous

Bounty of the Season

“May the bounty of the season fill your heart and home” is the message of this layered Thanksgiving card. It uses the October 2020 Large Die of the Month by Spellbinders as well as a variety of other brands’ elements to make a 6 ½ x 5 inches card with matching envelope.

I started by using an older Tim Holtz brick stencil with his fired brick Distress Ink on a 6 x 4 ½ inches brick red cardstock. I went through my paper scrap bins for the paper that I cut the rest of the scene’s elements, much of it coming from junk mail advertisements and envelopes. The brass letter slot and doorknob where from a candy box.

The window was cut twice from white and black cardstock and pieced together. All the white elements were cut from shiny coated packaging. Several years ago, I employed a tiny Fiskars oak leaf punch to cut the colorful leaves from junk mail. The leaves were used to make the door wreath which uses the wreath from the die set as a base. The welcome mat is cut from a brown craft paper.

By laying out the doorway pieces on the stenciled red panel I knew where to glue the bottom step piece and then the left column, red door and right column followed by the top piece. (I recommend watching the assembly video to understand how the pieces all go together.) A sticky tip tool is especially useful in assembling this doorway scene’s tiny pieces.

After the glue on the front panel was dry, I took a soft glue eraser to the white sections to erase the glue smudges.

I stamped the inside sentiment using paper masks (from sticky note paper) to allow only the intended sections to be stamped using three colors. The order of stamping was light to darkest ink – orange, green, brown. I placed a fussy-cut mask of the pumpkin after the orange layer was stamped which is hard to see in the photos showing what I masked for each stamping layer. Before I stamped the sentiment stamp in brown, I removed the pumpkin vine stamp from the stamping platform.

As is my style, I like to stamp the envelope flap with a hint of what’s inside.

SUPPLIES

Dies/Punches

Stamps/Stencils

Ink

Paper

Miscellaneous

Give Thanks

Pumkin-frontAutumn leaves are falling.  This simple shadow box card is made using Hunkydory -Moonstone Shadow Box Frame Die Set -MSTONE076, LDRS creative’s Happy Fall Sentiments stamp set, Fiskars Oak Leaf punch and Spellbinders Jack-O-Lantern die set. The finished size is 3 inches x 4 inches by 1 inch.Pumkin-side

Using only one panel in the shadow box with the pumpkin cut twice from heavy cardstock and adhered with a strip of foam tape between each pumpkin to create dimension, makes for a simple decoration. The top pumpkin was lightly rubbed with Ranger Distress Ink -Vintage Photo and a the stem and vine cut from brown paper. The tiny oak leaves create a wreath on the front of the card. (Oak Leaves were cut from scrap paper using a Fiskars tiny punch.) A plaid paper from Authentique – Pioneer-Plaid THA005-355057 completes the front. The sentiments are stamped on white cardstock with Stampin’ Up Chocolate Chip Ink Pad. American Crafts’ Sticky Thumb Double-sided Super Sticky Red Tape – 1/8 inch was used to assemble the shadow box while Tombow Multi Mono Liquid Glue wasused to adhere leaves and sentiments.