Peacock Pop-Up Card

It’s Sneak Peek Week for Karen Burniston’s February 2026 Release of new dies and stamps.

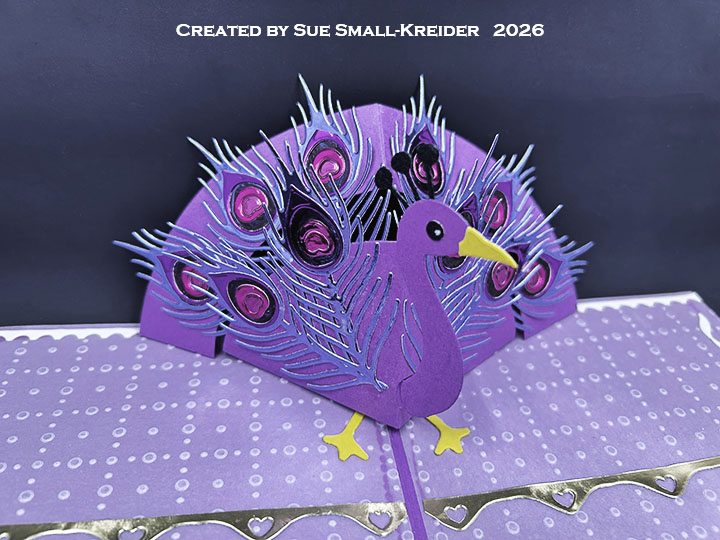
Today’s card uses the new die set of Peacock Add-Ons as well as the previously released Greeting Labels, Arch Pop-Up, Lorna Label Pop-Up and Border Blend – Trims sets. Sentiments come from the new clear stamp set called Strut Your Stuff. The new dies and stamps will be available for order starting February 2, 2026.

Watch the process video to see how I made this card.

Cardbase: I used a 10×7-inch rectangle of purple cardstock scored and folded in half to form a 5×7-inch side fold A7 size cardbase. I covered the front and inside with 5×7 rectangles of embossed pink vellum. I used a square scrap of the vellum to decorate the back. Decorate with Border Blend – Trims and other leftover decoration bits as shown in video.

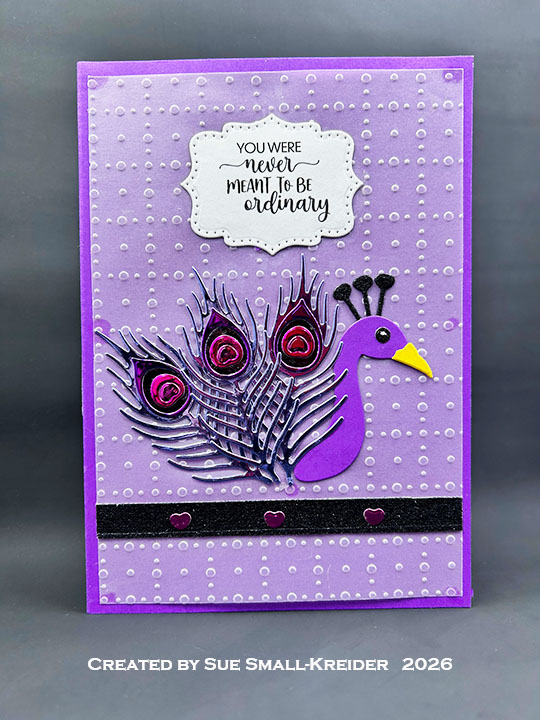
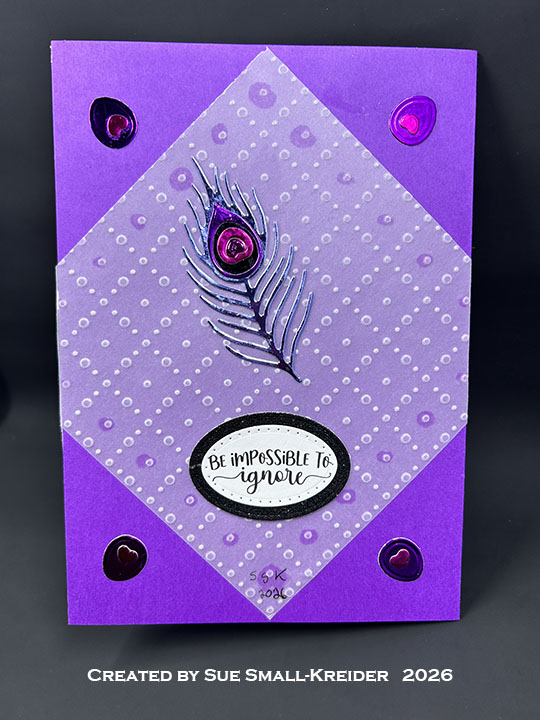
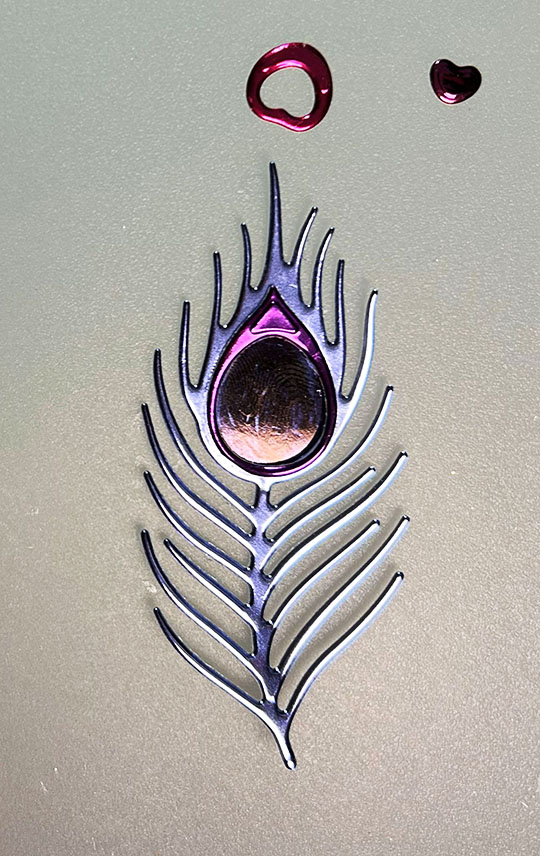
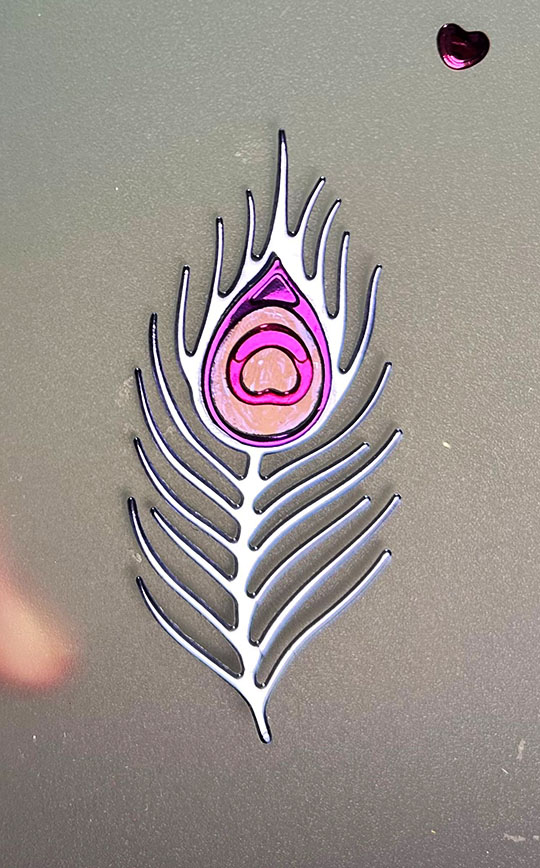
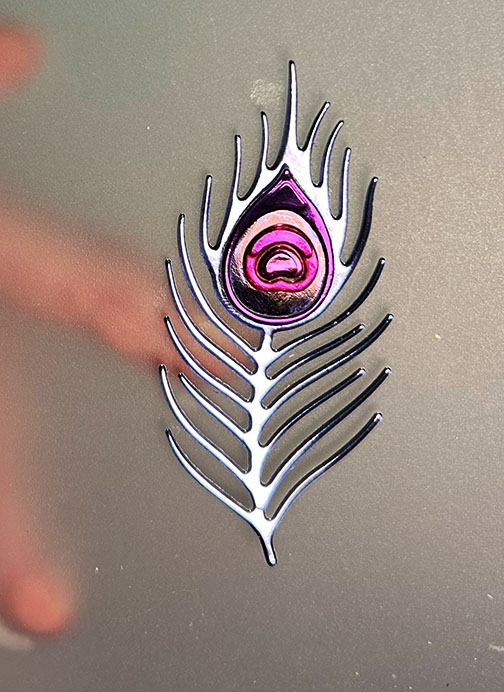
Peacock Pop-Up: Using the Arch Pop-Up set, cut one of the two arch pieces from purple cardstock. From the Peacock Add-Ons die set, cut the head and large fan-shaped pieces from purple. From the same die set, cut fourteen feathers, and fourteen of the feather’s “eye” decorations in three other colors than the feather. (I used four shades of blue/purple/pink mirror foil cardstock and a black permanent marker to color the foiled cardstock.) Cut the eye and peacock’s “crown” or corona from black cardstock. (I used some glitter black cardstock.) Eye highlights were added with a white gel pen. From yellow cardstock cut the feet and beak. Follow the video above and photos to assemble the pop-up peacock using ten of the feathers. (I cut a second set of pieces to make another head and used three of the feathers to make a flat peacock on the card front. The final feather I placed on the card back.)

Sentiments: The sentiments from the Strut Your Stuff set were stamped in black ink on white cardstock and cut out using the Greeting Labels die set. The inside label for “You were made to stand out” also uses a label die from the Lorna Label Pop-Up set to cut the black glitter label.

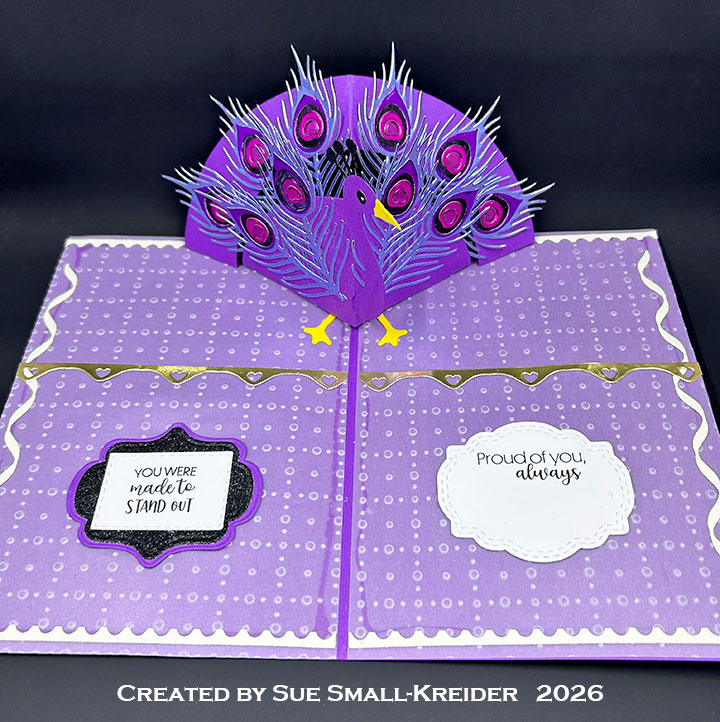
Envelope: The card fits into an A7 (5×7-inches) size envelope with a tiny heart leftover from the feather decorations.

___________________________________

Thank you for experiencing this blog post.

I hope this inspires you and makes you smile.

Please subscribe, like and leave comments 😊

Follow my YouTube channel, Instagram and Pinterest as well.

___________________________________

Disclaimer: Karen Burniston products are provided free of charge by the manufacturer for review and use. All other items were personally purchased. Compensated affiliate links used where or when possible, meaning I will receive a small percentage commission from these manufacturers at no cost to you. This will allow me to add more content to my YouTube channel and help out a lot. Thank you.

Materials Used:

Dies

Stamps

Papers

  • American Crafts – Core’dinations – 8.5×11 inch Textured Glitter Cardstock – Black Tie
  • Encore – 12×12 inch Foil Cardstock – Fuchsia, Kunzite, Regal Purple, & Serene Blue
  • Stampin’ Up – 12×12 inch Embossed Vellum – So Very Vellum – Pink
  • Purple, White and Yellow Cardstock
  • A7 Envelope – White

Ink

  • Memento – Fade Resistant Dye ink – Tuxedo Black
  • Pigma – Mircon 05 Fine Tip Pen – Black
  • Sakura – Gelly Roll Pen – Medium – White
  • Sharpie – Permanent Marker – Chisel Tip – Black
  • Sharpie – Permanent Marker – Fine Tip – Black

Adhesives

Tools

  • Die Cutting Machine
  • Paper Trimmer
  • Scoring Board
  • Bone Folder
  • Stamping Platform
  • Scissors
  • Paper Masking Tape
  • Ruler
  • Tweezers
  • We R Memories – QuickStick

Monster Purse Birthday Card

This card was made for Craft Roulette #300 whose parameters were: a purse card, 1990s colors, outdoor critters element and textile. I used Karen Burniston dies to create this card.

Watch the process video below to learn how this card was made.

Cardbase: I folded a 5×7.7-inch rectangle of white cardstock in half and placed the second largest die from the Ovals – Crosshatch die set with one edge overhanging the fold to make a folded oval cardbase. Add ribbon handles as shown in the video above. Cut two more ovals using the same die from pattern paper, trim off the side next to the fold as shown in the video.

Monster: Cut two 4×5-inch rectangles of neon green fake fun fur to cover the front and back purse panels. Cut the eyes, mouth and horns using the Monster Playful Add-Ons set. Use the stencil feature of the horn and eyes dies to add strips and highlights.

Sentiments:Happy Birthday” is a die from Karen Burniston.

Envelope: This purse card fits into an A2 (4 1/4×5 1/2-inches) size envelope.

___________________________________

Thank you for experiencing this blog post.

I hope this inspires you and makes you smile.

Please subscribe, like and leave comments 😊

Follow my YouTube channel, Instagram and Pinterest as well.

___________________________________

Disclaimer: Karen Burniston products are provided free of charge by the manufacturer for review and use. All other items were personally purchased. Compensated affiliate links used where or when possible, meaning I will receive a small percentage commission from these manufacturers at no cost to you. This will allow me to add more content to my YouTube channel and help out a lot. Thank you.

Materials Used:

Dies

Papers

  • Impression Obsession – 6×6-inch Paper Pack 80lb Cardstock – Basics 1 – Yellows
  • Orange Scrap from Old Envelope
  • Black and White Cardstock

Ink

Adhesives

Tools

  • Die Cutting Machine
  • Scrapbook.com – Magic Mat
  • Paper Trimmer
  • Tweezers
  • Scrapbook.com – Mint Tape
  • Scissors (Paper and Fabric)

A Snowy Yeti Pop-Up Birthday Card

This card was made for CRAFT ROULETTE #294 whose parameters included an A2 card, holiday colors,  from the mountains element, and fancy paper. I used stamps and dies by Karen Burniston to make this card.

Watch the process video to see how I made this card.

Cardbase: Watch the video to see how the card base was cut with a corner fold using the Rectangles – Crosshatch dies. The front and back panels were embossed using the embossing plates in my die-cutting machine and the Pattern Plate – Swirls die. Color swirls with a blue glitter brush marker.

Yeti Pop-Up: Cut from white the largest die in the Playful Pop-Up and the arms from the Monster Playful Add-Ons set. From blue cut the face plate square from the Playful Pop-Up and hands from the Monster Playful Add-Ons. Cut the mouth with lots of teeth in the from the Monster Playful Add-Ons once from black and once from red. Cut the v-shaped tongue piece from black and trim into two oval nostrils. Cut the two sets of oval eye pieces from black and white. Assemble pop-up as shown in the video above.

Sentiments:RAWR!” is cut from blue and white cardstock. The inside sentiment “Hope your Birthday is Wild” is from the Monster Sayings stamp set and cut out using the Greeting Labels die set.

Envelope: The card fits into an A2 (4.25x 5.5-inches) size envelope.

___________________________________

Thank you for experiencing this blog post.

I hope this inspires you and makes you smile.

Please subscribe, like and leave comments on this site and my YouTube channel. 😊

___________________________________

Disclaimer: Karen Burniston products are provided free of charge by the manufacturer for review and use. All other items were personally purchased. Compensated affiliate links used where or when possible, meaning I will receive a small percentage commission from these manufacturers at no cost to you. This will allow me to add more content to my YouTube channel and help out a lot. Thank you.

Materials Used:

Dies

Stamps

Papers

  • Bazzill – 8.5×11 Cardstock – Evening Surf 7-798
  • Black, Red and White Cardstock
  • Fraser Papers for William House – A2 Envelope – Genesis Text Milkweed Smooth

Ink

  • Scrapbook.com – Shimmer Glitter Brush Marker – Frosty Blue

Adhesives

Tools

  • Die Cutting Machine
  • Paper Trimmer
  • Bone Folder
  • Stamping Platform
  • Stamping Blocks used as paperweights
  • Scissors
  • Pencil
  • Eraser
  • Paper Masking Tape
  • Tweezers
  • Spellbinders – Mighty Mister Spray Bottle
  • We R Memories – QuickStick

Monster Pop-Up Card

It’s Sneak Peek Week for Karen Burniston’s November 2025 Release of new dies and stamps.

Today’s card uses the new dies of Playful Pop-Up, Monster Playful Add-Ons, Dog and Cat Playful Add-Ons, Greeting Labels and Rawr! As well as Ovals – Crosshatch and Rectangles and Labels – Crosshatch. It also uses the new Monster Sayings stamp set. The dies and stamps will be available for pre-order starting November 24, 2025.

Watch the process video to see how I made this card.

Cardbase: I used a 12×12-inch sheet of yellow cardstock folded in half and used the largest plain rectangle die from the Rectangles and Labels – Crosshatch set placed with one corner over the fold to get a diagonal opening card base. Assemble card as shown in video.

Monster Pop-Up: Using the Playful Pop-Up set, cut one of the largest die, the decorative notched square and the “Y” piece die from blue cardstock. From the Monster Playful Add-Ons die set, cut the large eye and tooth from white. Cut the arms from blue. Cut the eye center and mouth with tongue from black. Cut the horns from green and stencil on the stripes. Follow the video above and photos to assemble.

Monster Body: The body is an oval from the Ovals – Crosshatch die set. The leg is the “Y” piece die from the Playful Pop-Up set cut down. Eye highlights, finger nails and toe nails along with buttons were added with a white gel pen.

Bow: From the Dog and Cat Playful Add-Ons die set, cut from yellow cardstock – the largest eyeball, the largest cat ears and the paw arms. Trim off the paw end of the arms to make a fish tail ribbon ends and assemble as shown in the video above.

Sentiments: Rawr! Is die cut into the green panel before being glued onto the yellow cardbase. The blue shadow was cut with the word die taped inside the shadow die and the tiny pieces from the centers of the R’s and A glued in place onto the yellow. Inside the sentiments were stamped using the Monster Sayings set and cut out using the Greeting Labels die set. A white label cut from the same labels set is for a personal message. The card back has an eyeball and “I only have eye for you.”

Envelope: The card fits into an A6 (6 1/2×4 3/4-inches) size envelope.

___________________________________

Thank you for experiencing this blog post.

I hope this inspires you and makes you smile.

Please subscribe, like and leave comments 😊

Follow my YouTube channel, Instagram and Pinterest as well.

___________________________________

Disclaimer: Karen Burniston products are provided free of charge by the manufacturer for review and use. All other items were personally purchased. Compensated affiliate links used where or when possible, meaning I will receive a small percentage commission from these manufacturers at no cost to you. This will allow me to add more content to my YouTube channel and help out a lot. Thank you.

Materials Used:

Dies

Stamps

Papers

  • Core’dinations – 12×12 inch Textured 80lb Cardstock – Candy Shop
  • Black, Neon Green, Pink, White and Yellow Cardstock
  • A6 Envelope – White

Ink

  • Memento – Fade Resistant Dye ink – Tuxedo Black
  • OLO – Marker – Bubble Gum RV0.2
  • Pigma – Mircon 05 Fine Tip Pen – Black
  • Sakura – Gelly Roll Pen – Medium – White
  • Sharpie – Permanent Marker – Fine Tip – Green
  • Stampin’ Up – Stampin’ Write Marker – Dapper Denim

Adhesives

Tools

  • Die Cutting Machine
  • Paper Trimmer
  • Bone Folder
  • Stamping Platform
  • Scissors
  • Paper Masking Tape
  • Metal Ruler
  • Tweezers
  • We R Memories – QuickStick

Miscellaneous

  • Nuvo – Aqua Shimmer Bush Marker – Glitter Gloss

A Monsters’ Gallery of Birthday Fun!

Just a fun birthday card featuring monsters on a Karen Burniston Photo Fan Pop-Up.

Watch the process video to see how I made this card.

Cardbase: Starting with a 5.5×8.5-inch rectangle of white cardstock folded in half to form a 4.25×5.5-inch side-fold A2 cardbase, the card was covered with colorful glassine paper inside and out. The inside panels were cut with the largest die in Karen Burniston’s Rectangles-Crosshatch set.

Monsters:  Monster Gallery stamp set is used as a front panel cut out as separate squares for the inside pop-up feature. The images were colored with watercolor pencils and then waterbrushed to even out the color.

Photo Fan Pop-Up: Watch the assembly video at the bottom of the linked page for the Photo Fan Pop-Up die.

Sentiments:  The inside sentiments of “Celebrate your big awesome super day” and “Happy Birthday to You” are from Karen Burniston’s Photo Memories stamp set. The “Monster Wishes” on the card front and “Monster Hugs” on the card back are from the Monster Gallery stamp set.

Envelope:  The card fits into an A2 (4.25x 5.5-inches) size envelope. On the back flap there is a “M” cut from scrap paper and glued there.

___________________________________

Thank you for experiencing this blog post.

I hope this inspires you and makes you smile.

Please like and leave comments 😊

___________________________________

Disclaimer: Karen Burniston products are provided free of charge by the manufacturer for review and use. All other items were personally purchased. Compensated affiliate links used where or when possible, meaning I will receive a small percentage commission from these manufacturers at no cost to you. This will allow me to add more content to my YouTube channel and help out a lot. Thank you.

Materials Used:

Dies

Stamps

Papers

  • Recollections – 8.5×11 65 lb Cardstock – white
  • Scrapbook.com – 4.25×5.5 Heavy Weight, Smooth, 400 GSM Mixed Media Paper Pad – White
  • We R Memory Keepers – 12×12 inch Food Safe & Grease Resistant Glassine Paper – Oh Goodie!
  • Fraser Papers for William House – A2 Envelope – Genesis Text Milkweed Smooth

Ink, Pigments

  • Memento – Fade-Resistant Dye Ink – Tuxedo Black
  • Ranger – Tim Holtz – Distress Watercolor Pencils – Antique Linen, Barn Door, Cracked Pistachio, Fossilized Amber, Kitsch Flamingo, Mermaid Lagoon, Mustard Seed, Pickled Raspberry, Prize Ribbon, Salty Ocean, Salvaged Patina, Speckled Egg, Spiced Marmalade, Twisted Citron, Villainous Potion
  • Pigma – Mircon 005 Fine Tip Pen – Black

Adhesives

Tools

  • Die Cutting Machine
  • Paper Trimmer
  • Bone Folder
  • Stamping Platform
  • LDRS – Stampendable Stamping Tool
  • Stamping Blocks used as paperweights
  • Scissors
  • Paper Masking Tape
  • Waterbrush