Fourth of July picnics often involve desserts with blueberries and strawberries since they are in season. This card evokes a family gather with home baked pies.
I used the new Papertrey Ink – Picnic Time die set to create these pies. I used red bases covered with a red glitter brush marker (Scrapbook.com.) The crusts were cut from light kraft cardstock and inked brown or tinted blue (Distress Ink – Vintage Photo and Prize Ribbon.) The blueberries are cut from blue cardstock. The pies are attached with thin foam squares.
The background decorative papers are by Bo Bunny – Celebrating Freedom. I used a purchased cardbase and envelope from Park Lane Paperie in an A6 size. The star buttons are from HoneyBee Stamps.
The sentiment is one I created on Canva.com and sized to my needs. it is attached with thick and thin foam dots. Decorative paper strips adorn the envelope flap.
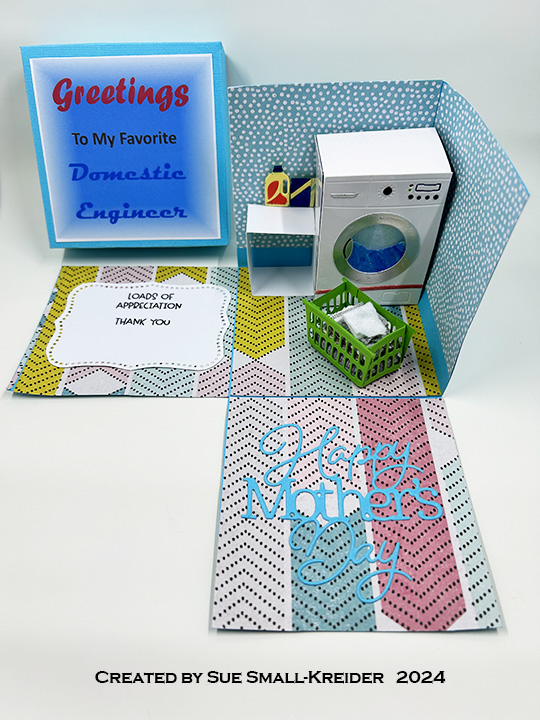
This card was made for Craft Roulette #213 whose parameters included for hello project, robust colors, workplace element and mixed media. It is intended for young children to give to their mother.
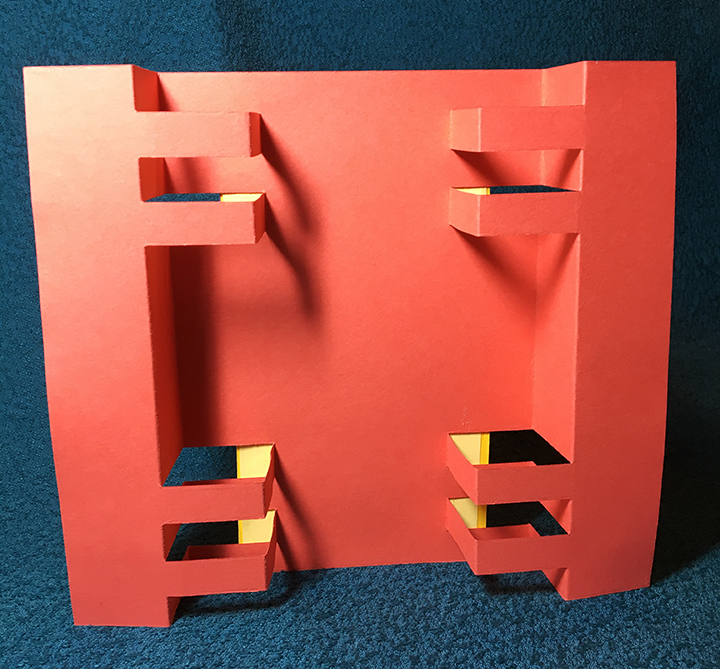
Box: From a 12 x12-inch square of cardstock, draw lines every 3 7/8-inches on all sides. Draw a 1/4-inch tab on one side flap. Cut as shown on video. On a 6-inch square of cardstock draw lines 1-inch from edge on all sides. Cut lid as shown on video. Assemble as directed on video.
Washing Machine: Cut from glossy white cardstock one washing machine from the laundry die set. Cut the knobs and buttons from black and silver and glue in place. For the box piece the forms the 3D washing machine, cut a piece 8 1/2 x 2-inches. Fold at 3 1/8-inches, 4 1/2-inches and 7 1/2-inches. Cut a piece that will cover the side of the box from glossy white cardstock. Cut another piece of glossy cardstock the width of the top of the washing machine and the length of the top of the box, plus 1/2-inch for the two 1/4-inch tabs. Assemble as shown in video.
Table: Cut a piece of white cardstock 1×6-inches. Score and fold at 1/4-inches, 1 5/8-inches, 3 1/4-inches, and 4 5/8-inches. Glue tab to other end to form cube. Glue onto washer side and floor. Die-cut, color and assemble laundry soap bottle and box. Using foam squares, attach them to wall atop table.
Basket: Cut four of the laundry basket from the laundry die set in green. Trim off the sides from two of the baskets, fold sides into tabs and glue onto sides of other two basket pieces to form a four-sided box. Cut fabric scraps and form into folded laundry. Glue laundry onto box base and then add glue to inside of basket before placing around folded laundry.
Sentiments: “Loads of Appreciation” and “Thank You” were stamped in black on a white die cut fancy label before being glued onto a box flap. “Happy Mother’s Day” was die cut from a scrap of the blue box cardstock. The “Greetings To My Favorite Domestic Engineer” on the box lid was computer generated.
____________________________________________
Thank you for experiencing this blog post.
I hope this inspires you and makes you smile.
Please like and leave comments 😊
____________________________________________
Materials Used:
Dies
Papertrey Ink – Wafer Thin Metal Dies – Happy Mother’s Day
The sweet pinks and reds of old-fashion rose bushes always remind me of their scent. This Mother’s Day card is a loving way to say how much mothers are appreciated.
I used Honeybee Stamps’ layering Bold Backgrounds Vintage Roses dies for the front of the card. The roses are cut from three different shades of pink cardstock and inked with a bright red ink. The leaves were cut in an apple green and inked with a medium green ink. There layering guide which you have to download from the Honeybee Stamps website shows how the the three sizes of roses are assembled. The sentiment banner is a strip of apple green cardstock 4 1/2-inched wide by 1/2-inches tall with fishtails ends cut free-hand and inked to match the leaves. The gold foiled sentiment strip “Appreciate You” is from Spellbinders that I had batched foiled previously.
The inside “Happy Mother’s Day” sentiment is cut from the apple green cardstock using a die by Papertrey Ink. The back of the card is covered with a striped sheet of printed paper from This Calls for Confetti.
I went stash diving to find a old-fashioned looking rose for the back of the envelope and ended up using a stamp set from Pinkfresh Studios called Pretty Paisley. The roses were stamped in melon red ink while the tiny sentiment “It’s the little things that make life big” was stamped in a green pear ink.
This slimline easel card was inspired by some made by Jennifer McGuire. Elements from both sets were used to create the paperdoll and an action wobble spring.
To assemble the paperdoll, begin by stamping and heat embossing the facial features using the stamps from the Tasha set. (I colored the tongue with a pink gel pen and the teeth and eye highlights with a white gel pen.) Play with the layout of the hair pieces, ears and head. Once you have the position using a pencil, mark the location of the head and ears on the long hair piece. Glue the ears in place using a fine tipped glue bottle then glue bangs in place. Glue top half of head to long hair piece making sure to leave the lower half without glue.
Adhere collar and button placket to front of blouse. Glue blouse to shoulders and neck piece. (I used Nuvo drops for the buttons and let the piece dry overnight before going to the next step.) Using the fine tipped glue bottle, attached the head to the neck. Glue the long hair to back of shoulders.
Assemble arm and sleeve as directed on cutting instructions. (You may want to cut an additional sleeve and cuff if it will be seen on the backside.) Add the action wobble spring to the back of the arm.
To make the card base cut two piece of patterned cardstock 8 1/2 x 4 inches. Score one piece across the short end 1/2 inch. Fold and glue the tab to the end of the other piece. Score and fold the top flap of card base at 2 3/4 inches to form the easel.
Glue three hellos together to form the easel stop that will be glued to lower card base. The fourth hello will be used for decoration on the card front when closed.
Position paperdoll and arm piece on the easel portion of card front. Make sure that the hand is within the card front when closed. Adhere paperdoll and arm to card making sure to only glue lower half of paperdoll to easel. The arm’s elbow needs to not touch or catch on the card base. (I ended up having to trim a small tip of the elbow on this card to make it wave smoothly.)
Now you have a card that will wave a cheery hello.
“A truly great friend is hard to find, difficult to leave and impossible to forget,” is the sentiment stamped on the back of the envelope.
Hope this fun card has put a smile on your face and provided some inspiration for your crafting. 😊
According to the Language of Flowers, a small book that Amazon Drygoods reprinted from its Victorian original, lilies of the valley mean a “return of happiness.” And so to, does this card promise happiness from it envelope through to its inside message.
Based on a panel die from Tutti Designs, that was die-cut twice (one white cardstock and one green paper), this card comes together with its sentiments. The front “With love” is a foiled strip on scrap cardstock. (Sometimes when my mojo is lacking, I make a batch of foiled sentiments to have on hand.)
Inside the sentiment is heat embossed onto vellum. The longer sentiment is:
“Let us be grateful
to people who make us happy;
they are the charming gardeners
who make our souls blossom.”
Only liquid glue was used in the assembly of the card.
The back flap of the envelope was stamped with a Card Making Magic sentiment “OPEN immediately to release happiness!” to hint at what the enclosed card is about
Back side of tower card with space for a personal message.
Close-up of shaker
Using the Pink Fresh Studio slimline circle apertures dies with the My Favorite Things 2-inch circle shaker pouches works well. The only thing I had to do was to snip in between each scallop to allow the pouch to fit through. I cut the circles apart and rounded the corners. Had to use some teal mirror card to suggest water or sky. After gluing the teal mirror card and lemon-yellow layer together, I glued the shaker pouches to the lemon-yellow layer, filled the pouches and then glued the pale-yellow backing to each. (Remember to use an antic static pad to wipe the inside of pouch to cut down on the static cling of sequins to the plastic.)
The Towers die set comes with all the rectangular matting layer panels. The base card is cut in a grapefruit orange and the panels are in a pale yellow and a lemon yellow.
The stars/suns are made from the Made to SurpriseExcellent Edges die set by cutting the bottom star from orange and the top from pale yellow. The tiny 3D red and pink flowers and greenery are decorative elements I had left over from another project and are cut from the Spellbinders3D Fun Time Cruiser die set.
Finishing touches are the stamping of the sentiment and the back-envelope flap from the What the Doodle Sun stamp set.