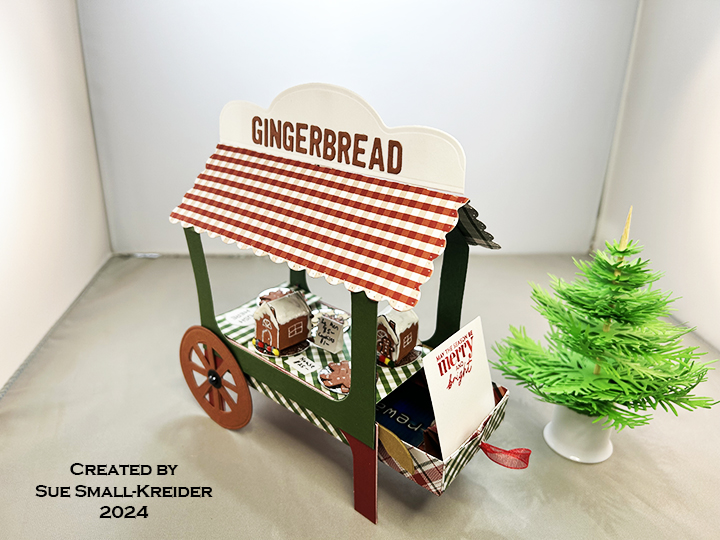
This card was made for Craft Roulette #231 whose parameters included for Project – Outside/Inside, tulip colors, festival element and checks.
Watch the video to see how I made this cart.
___________________________________
Thank you for experiencing this blog post.
I hope this inspires you and makes you smile.
Please like and leave comments 😊
___________________________________
Disclaimer: Karen Burniston products are provided free of charge by the manufacturer for review and use. All other items were personally purchased. Compensated affiliate links used where or when possible, meaning I will receive a small percentage commission from these manufacturers at no cost to you. This will allow me to add more content to my YouTube channel and help out a lot. Thank you.
Before starting, I recommend watching the assembly videos of the pop-ups which are usually near the bottom of the linked pages for the various dies used.
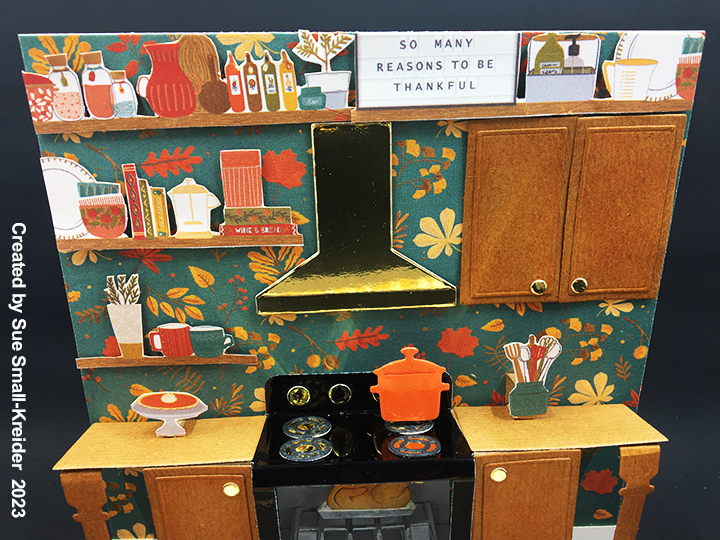
Cardbase: I started with a rectangle of patterned cardstock 12×6 inches that was folded in half to form a 6-inch square, top fold card. The outside was left to the beautiful autumn trees (Photoplay Autumn Vibes-Crunchy Leaves) while the inside top panel with a teal blue leaf wallpaper and the bottom panel a brown textured cardstock.
Oven/Stove: I was genuinely surprised at how easy the pop-up oven is assembled. It has just two pieces -the outer shell which I cut from black mirror cardstock and the inner platform which I cut from a gray cardstock. The platform attaches much like the Little Labels Pop-Up with the front tabs gluing to the floor of the card and the back tab gluing to the wall of the card. Before I attached the outer shell, I added a 1 3/8-inch square of clear plastic packaging to the back of the oven door with double-sided tape. Then I cut another oven door from gray cardstock trimming the bottom 1/8-inch shy of the fold line to cover the plastic inside when the door was opened. I also cut a 2-inch square of gray cardstock and glued it to the back wall just above the pop-up platform. This will be the inside wall of the oven. It is easier to add the items inside the oven before the outer shell is attached. I glued a silver rack to the platform and then added two pop-up cubes for the top oven rack which I trimmed one of the long edges from. Once the top rack was glued in place on the two cubes, I added another cube on top for the turkey pan which is in the Oven Extras set.
I find it easier to glue all the knobs, burners and door handle to the stove while it is still flat. (For this stove I cut all the knobs, burner base circles and door handle from gold foil cardstock). To attach the oven shell, glue the bottom to the center of the platform and then fold the oven flat and add adhesive to the back of the stove knob panel. Close the card and the top panel will be positioned on the card wall so that it forms the stove. On the tabs that come off the sides of the stove top add glue. Now position the squares of the cabinet pieces’ onto the tabs. Glue cabinet bottoms to the top edge of the platform, so that there is a toe kick below the cabinets.
Cabinets: Once the stove is attached, you can add the side cabinets. I cut the cabinets from some embossed wood grain cardstock and then inked them with Rusty Hinge ink to bring out the grain. The upper cabinets and lower cabinet door fronts are cut using the larger rectangle die in the Oven Extras set and then covered with the small rectangle die pieces.
To make the counter tops longer to fill the card, I followed Sandy Diller’s idea to use the larger rectangle door die for the countertops and two trimmed lampposts from the Street Lantern Pop-Up set for the turned legs that support the extended countertops.
Decorations: Between the two oven sets are lots of fun pieces that add dimension and realism to the pop-up scene. The Oven Pop-Up set includes the stove burners and knobs, oven rack and door handle. The Oven Extras set includes the turkey and roasting pan in the oven and pot on the stove as well as three pop-up cube strips that I used to pop-up the oven rack, pan inside the oven and pot on the stove. The turkey is cut in two pieces – leg bone base in pan and the bird body. The body I cut from kraft cardstock and inked with Fossilized Amber and Vintage Photo inks. The bone/pan base was cut from white cardstock and the pan colored with a silver marker, the body piece glued on so it sits in the pan and the bone was inked with rusty hinge ink.
For the orange pot, I used clear packing taper over orange cardstock to die-cut the pot. The plaid rug is cut from the second largest crosshatch die from the Rectangle Crosshatch set. I found a patterned paper (Photoplay Thankful Collection) with shelves of kitchen items and a message board that I fussy cut and adhered to the wall with foam squares. The cooking hood was cut from gold foil cardstock using the hood die from the Oven Extras set. The large pumpkin on the floor is from the Autumn Elements set.
Sentiments: The small strip sentiments of “give thanks with a grateful heart” (card front) and “thankful hearts” on envelope flap are from the same paper collection as the autumn trees paper used on the card front. “Happy Thanksgiving” was cut into the plaid rug with the waste pieces saved and glued on to the card floor once the rung was glued in place. These words are from Word Set 7.
Envelope: The sticker leaves and sentiment strip on the back of the envelope set the tone for the card inside and are from the Photoplay Autumn Vibes paper collection.
Thank you for reading this blog post. I hope this inspires you and makes you smile. Please like and leave comments 😊
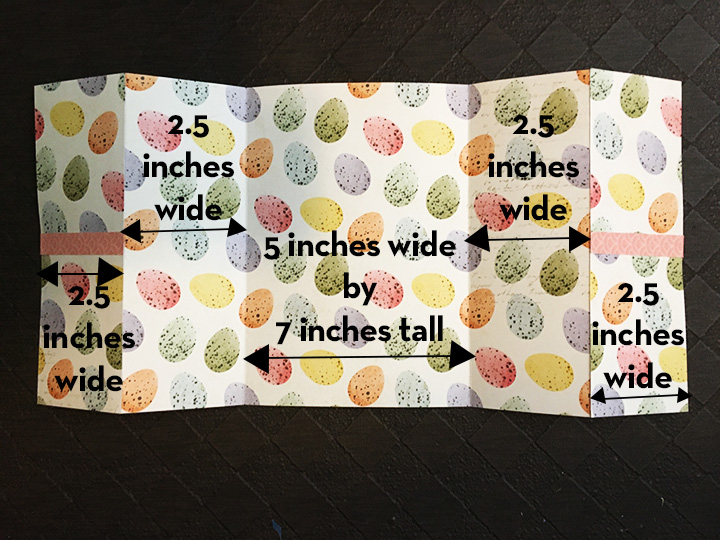
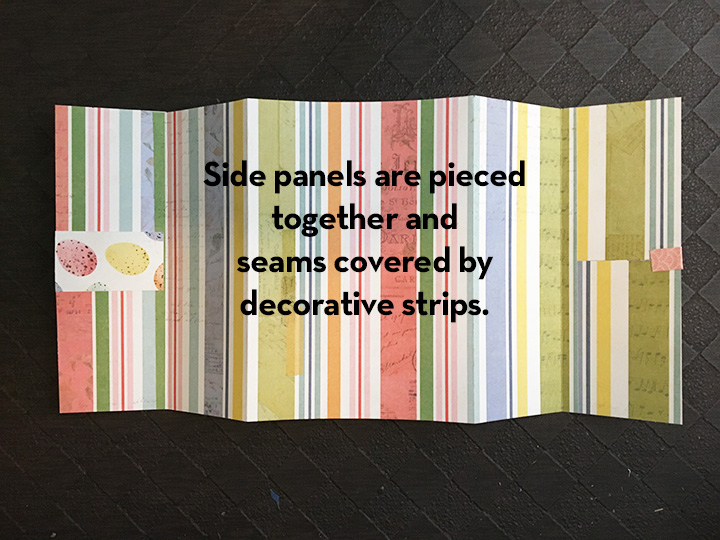
The card base is an extended gatefold with aperture windows cut through the front and side panels that allow two spring animals to peek out the card front. From a 12×12 sheet cut a 10.5×7-inch rectangle. Score and fold at 1/4-inch, 2 3/4-inches, 7 3/4-inches, 10 1/4-inches. Glue front panels (2.5×7 inches) to the side tabs. (I had to piece together my front panels using decorative strips of paper to hide the seams.)
Close card and layout your card front decorations using the smallest decorative label dies from Bam Box set to cut the windows. Tape dies in place using removable tape and open out cardbase and then fold back the front panels so that the dies will cut through both front and side panels.
Create two bam boxes per directions on assembly video. Assemble a bunny and a chick in an egg following their assembly video. (I used half of a cotton make-up removal pad to die the bunny’s tail.)
(I used a paper cutter to trim my sentiment toppers and a circle die to cut the wreath sentiment.)
Layout your inside decorations of the card using placement of the animals glued to the bam boxes in a flatten position making sure the animals will be seen through the windows. (I used fancy labels from two sets to create the personal message label – Label Charm Pop-Up and Rectangles and Labels Crosshatch.)
For the back of the card, I chose to glue a 30-inch piece of ribbon under a decorative panel to tie the card shut. Cut a scalloped rectangle using the new Rectangle and Labels die set and glued a sentiment topper from the Echo Park paper pad. Tie the card shut to get correct placement of ribbon before gluing decorative panel on to card back. (For my signature block on the card back, I fussy cut three eggs from the scraps of printed paper.)
The card fits into an A7 envelope decorated with one of the window off-cuts as a seal on the envelope flap. I like to enclose instructions on how to close the Bam Box. You can download the instructions below.