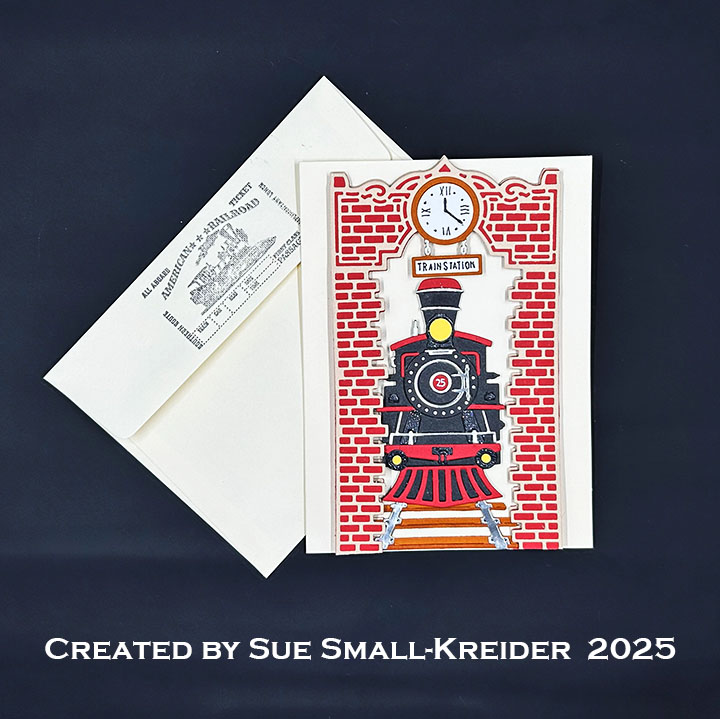
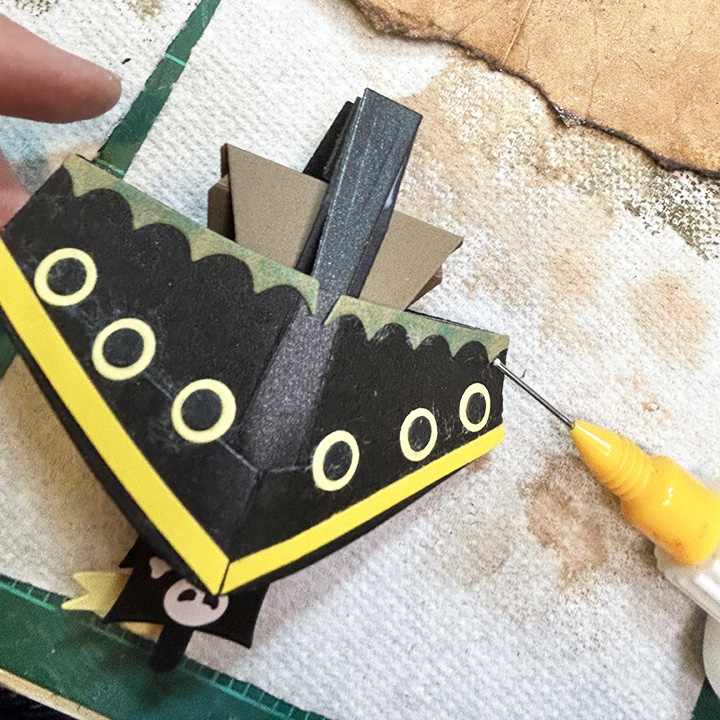
This card was made for Craft Roulette #298 whose parameters were: an A6 card, Gummi Bear colors, rhymes with “-ack” element and tearing. I used Scrappy Tails dies and Honey Bee Stamps to create this card.
Watch the process video below to learn how this card was made.
Cardbase: I used a purchased American size A6 (4 5/8×6 1/4-inches) cream-colored, cardbase and matching envelope.
Train: The train and brick frame come from the Scrappy Tails TrainStation Pop-Up Tunnel Card die set. Watch video above for details on assembly.
Sentiments: “Happy Birthday Wishes” on a train ticket stamped and die cut using the Honey Bee StampsTicket To Ride. Punch a small hole and thread some embroidery floss through the hole and tie.
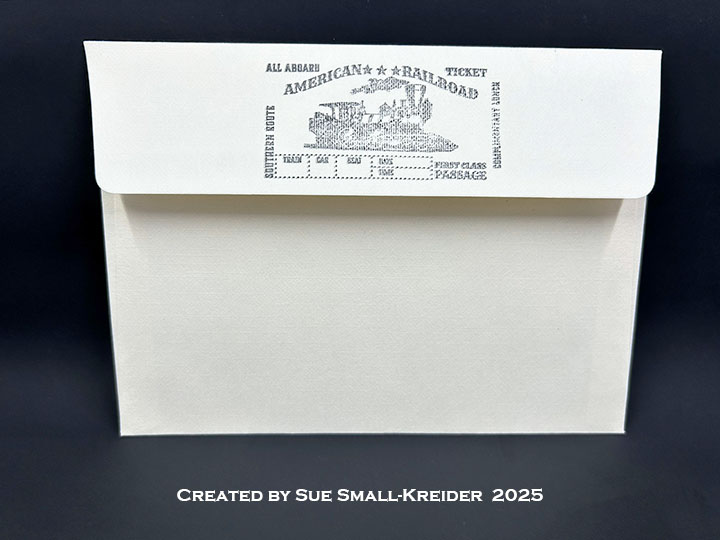
Envelope: The panel card fits into an A6 (4 3/4×6 1/2-inches) size envelope with the back flap stamped with the train ticket in black.
Disclaimer:Karen Burniston products are provided free of charge by the manufacturer for review and use. All other items were personally purchased. Compensated affiliate links used where or when possible, meaning I will receive a small percentage commission from these manufacturers at no cost to you. This will allow me to add more content to my YouTube channel and help out a lot. Thank you.
Materials Used:
Dies
Scrappy Tails – Dies – Train Station Pop-Up Tunnel Card
Stamps
Honey Bee Stamps– Clear Stamps & Dies – Ticket To Ride
Papers
American Crafts – Core’dinations – 8.5×11 inch Textured Glitter Cardstock – Black Tie
Stampin’ Up – 8.5×11 80 lb. Cardstock – Copper Clay
Silver Matte Cardstock.
Black, Red, Tan, White and Yellow Cardstock
Park Lane Paperie – Cardbase & Envelope – Cream
Ink
Memento – Fade-Resistant Dye Ink – Paris Dusk, Rose Bud, Tuxedo Black
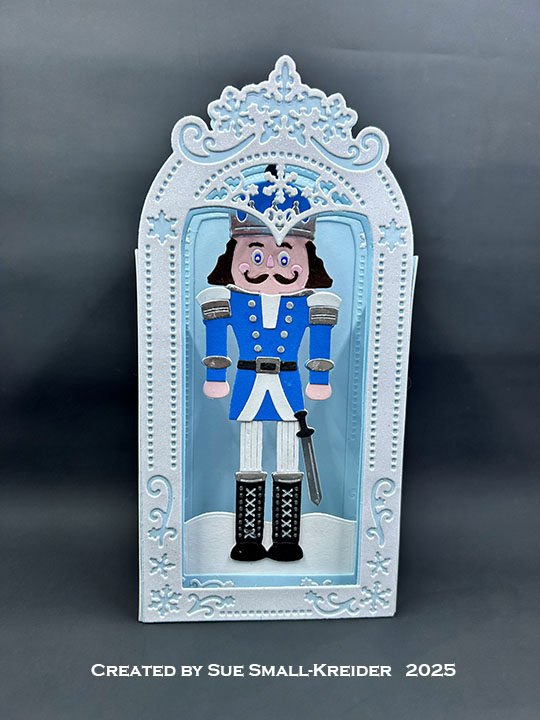
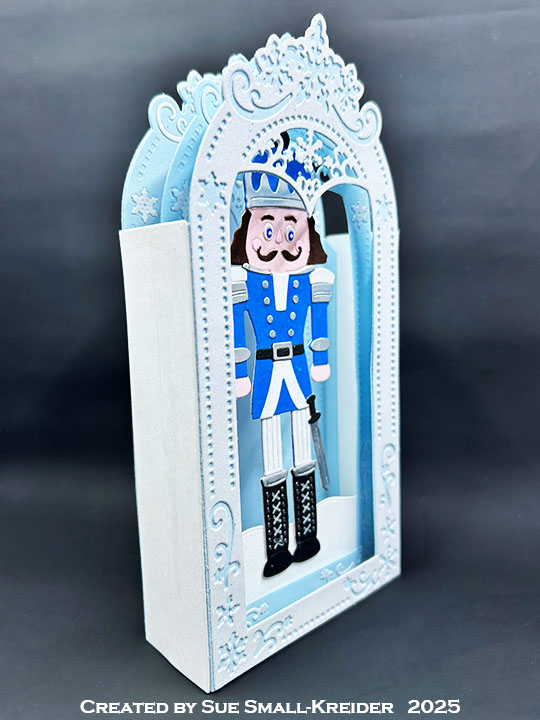
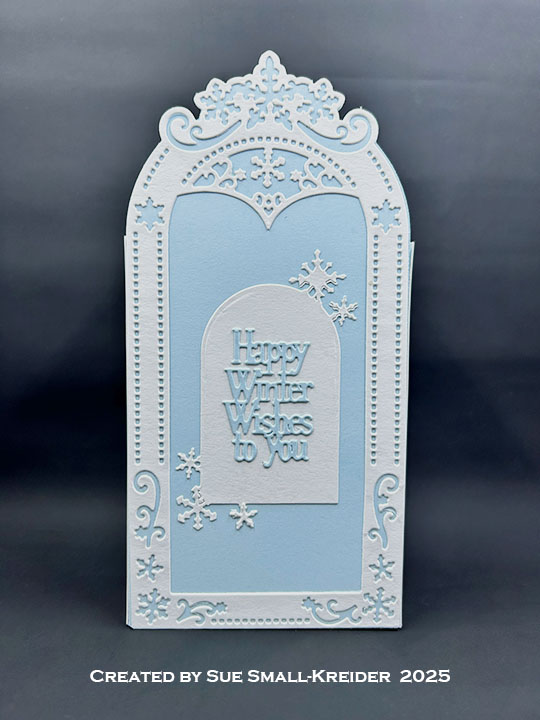
Welcome to Day 10 of my Nutcracker series using a variety of stamps and die sets to make some nutcracker themed cards. My card today uses dies by Scrappy Tails – Nutcracker , Snowflake Pop-Up Tunnel Card and Train Station Pop-Up Tunnel Carddie sets.
Watch the process video below to learn how this card was made.
Nutcracker: Referring to the images of the nutcrackers on the packaging for the Nutcrackerdie set and the video above, cut out all the pieces using your own color scheme. (I cut out the entire body from flesh colored cardstock and then dressed the nutcracker.) The nutcracker is glued into the second layer of the tunnel card at the hat (onto the lattice work of the frame) and at the boots onto the snow piece. (The snow piece is glued to the back side of the frame. )
Tunnel Card: Using a pale blue cardstock, cut three of the tabbed frame pieces and one large solid arched piece from the Snowflake Pop-Up Tunnel Card die set. Cut from white, one frame without tabs, one arch with snowflakes and one snow piece. From white glitter cardstock cut one frame without tabs. Punch out all the decorative pieces from all the white frames and save for decorating the blue embossed frames. Glue the plain white frame onto the solid blue arch piece and then glue the smaller snowflake arch onto the blue arch inside the white frame. Glue the white glitter frame onto one of the embossed blue frames. Decorated the other two blue embossed frames with the snowflakes and swirls from the white frames. For the first and second frames fold the tabs toward the back and then fold the third frame’s tabs toward the front. Add 1/8 to 1/4-inch wide double-sided tape to the sides of the tabs that will be adhered to the side pieces. Cut two side pieces from white using the side piece from the Train Station Pop-Up Tunnel Card die set. (If you don’t have the Train Station set, cut two 1.25×5-inch rectangles.) Assemble the tunnel card as shown in the video.
Sentiments: The back sentiment of “Happy Winter Wishes to you” comes from the Snowflake Pop-Up Tunnel Card die set.
Envelope: The panel card fits into an A7 (5×7-inch) size envelope with the back flap decorations of snow from the Snowflake Pop-Up Tunnel Card die set.
___________________________________
Thank you for experiencing this blog post.
I hope this inspires you and makes you smile.
Please subscribe, like and leave comments 😊
___________________________________
Disclaimer:Karen Burniston products are provided free of charge by the manufacturer for review and use. All other items were personally purchased. Compensated affiliate links used where or when possible, meaning I will receive a small percentage commission from these manufacturers at no cost to you. This will allow me to add more content to my YouTube channel and help out a lot. Thank you.
Materials Used:
Dies
Scrappy Tails – Dies – Slimline Nutcracker Spinner
Scrappy Tails – Dies – Snowflake Pop-Up Tunnel Card
Scrappy Tails – Dies – Train Station Pop-Up Tunnel Card
Papers
Concord & 9th – 8.5×11 Cardstock – Powder
Gina K. – 8.5×11 100lb. Cardstock – Blue Raspberry
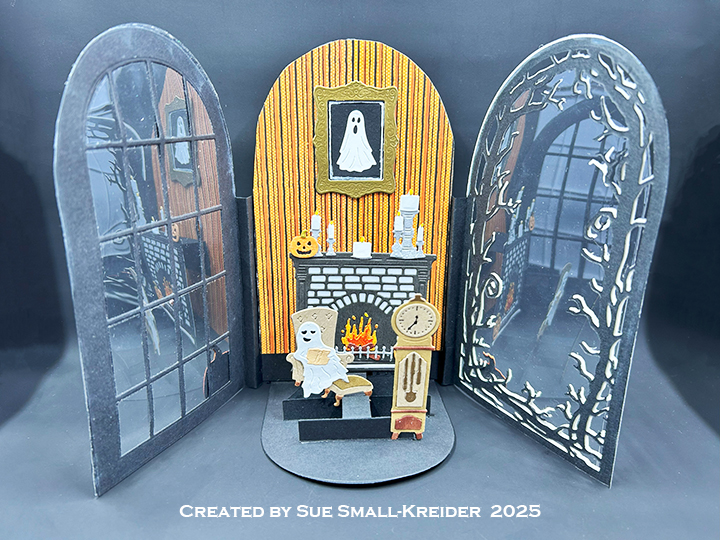
I recently purchased some new Scrappy Tails Halloween dies to make some pop-up tri-fold cards. Here is my first go at making one of Sabrina Leavell’s tri-fold cards. I watched a few of her YouTube lives before I began.
Watch the video below to see how I made this card.
___________________________________
Thank you for experiencing this blog post.
I hope this inspires you and makes you smile.
Please subscribe to the email notices, like and leave comments 😊
___________________________________
Disclaimer: Karen Burniston products are provided free of charge by the manufacturer for review and use. All other items were personally purchased. Compensated affiliate links used where or when possible, meaning I will receive a small percentage commission from these manufacturers at no cost to you. This will allow me to add more content to my YouTube channel and help out a lot. Thank you.
Materials Used:
Dies • Scrappy Tails – Metal Craft Dies – Ghost Gallery • Scrappy Tails – Metal Craft Dies – Ghost Study • Scrappy Tails – Metal Craft Dies – Halloween Tri-Fold Window Add-On
• Scrappy Tails – Metal Craft Dies – Spooky Fireplace • Scrappy Tails – Metal Craft Dies – A7 Tri-fold Pop Up Card Base
• Grafix – 8.5×11 Dura-Lar Acetate .005 – Clear Film
• Concord & 9th – 8.5×11 Cardstock – Mushroom
• Fun Stampers Journey – 8.5×11 Cardstock – Tin Pail
• Black, Browns, Oranges, Tans, White and Yellow Cardstock
• #10 Business Envelope – White
Ink • Memento – Fade Resistant Dye ink – Tuxedo Black • Pigma – Mircon 01Fine Tip Pen – Black • Sakura – Gelly Roll Pen – Medium – White • Stampin’ Up – Stampin’ Blends Marker – Dual Tip – Dark Copper Clay & Dark Wild Wheat
This is the first in a series of cards that have shelves as the main element of the card.
Today’s card is a plant ladder made with dies by Scrappy Tails.
Watch the process video to see how I made this card.
Cardbase: Use the outline die in the Plant Ladder die set to cut a shaped cardbase from a 3×12-inch piece of card stock that has been folded in half. Place the die so that the two top cutting edges of the die are just off the fold.
Sentiments: I am leaving off any sentiment so that there is space inside and on the card back to write a message.
Envelope: The card fits into an A2 (4.25x 5.5-inches) size envelope with a cardstock liner to keep the palm tree leaves from getting damaged in the mail.
___________________________________
Thank you for experiencing this blog post.
I hope this inspires you and makes you smile.
Please like and leave comments 😊
___________________________________
Disclaimer: Karen Burniston products are provided free of charge by the manufacturer for review and use. All other items were personally purchased. Compensated affiliate links used where or when possible, meaning I will receive a small percentage commission from these manufacturers at no cost to you. This will allow me to add more content to my YouTube channel and help out a lot. Thank you.
Materials Used:
Dies
Scrappy Tails – Metal Dies – Plant Ladder
Papers
Bazzill – 12×12 Cardstock – Sand Dollar
Black, Browns, Greens, and Yellows Cardstock Scraps
Fraser Papers for William House – A2 Envelope – Genesis Text Milkweed Smooth
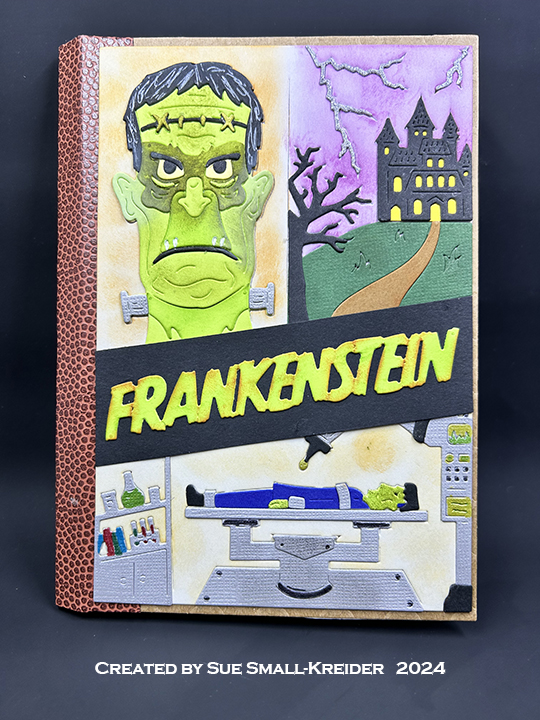
This card was made for Craft Roulette #237 whose parameters included a pop-up card, Trick or Treat colors, boutique, and jewelry.
I chose to make Mary Shelley’s gothic novel Frankenstein as a pop-up book card using dies by Scrappy Tails.
Watch the process video to see how I made this card.
Cardbase: The card base is made using the Scrappy Tails A7 Pop up Book die set. (I apologize for not having included video of the frame assembly.) The accordion fold pages frame that goes inside the book card can be seen in an assembly video by the designer by clicking here.
Sentiments: The “Halloween Greetings” is a stamp from PoppyStamps. The “Boo-tique Books specializing in Gothic Novels” was computer generated and die using a label die from the Scrappy Tails Life is a Story die set.
Envelope: The card fits into a catalog (6×9-inches) size envelope. “This book belongs to…” is stamped in black on the envelope flap.
___________________________________
Thank you for experiencing this blog post.
I hope this inspires you and makes you smile.
Please like and leave comments 😊
___________________________________
Materials Used:
Dies
Scrappy Tails – Metal Dies – A7 Pop up Book – Parts 1 & 2
Scrappy Tails – Metal Dies – Frankenstein Tomb Stone
Scrappy Tails – Metal Dies – A7 Frankenstein CP
Scrappy Tails – Metal Dies – Life is a Story CD
Stamps
Papercraft Essentials Magazine Issue 183, January 2020 – The Next Chapter
PoppyStamps – Clear Stamps – Bugs and Hisses -CL512
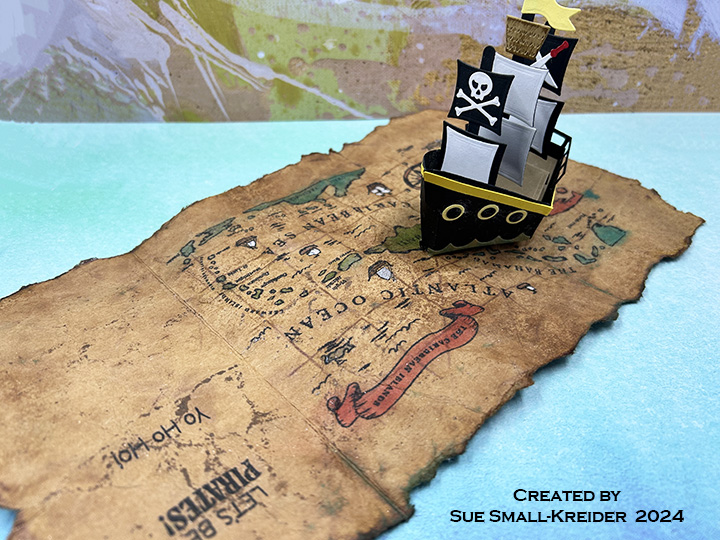
It’s time for the July 2024 Karen Burniston Design Team Challenge with the theme of SET SAIL.
“Let’s Be Pirates” is the theme of this card made withKaren Burniston’s June 2024 release ofnew dies andclear stamps. For this card (which could be used for birthdays, Father’s Day, and just for fun), I used several of the new sets including: Pirate Borders, Pirate Ship Add-Ons and Boat Pop-Up die sets and Pirate Sentiments clear stamp set.
Cardbase: Cut a piece of kraft card stock 7-inches x 12-inches. Score and fold at 3 1/2-inches and 8 1/2-inches to form a gate fold cardbase with overlapping flaps. Stamp map onto cardbase. Use map’s stencils to ink in map. Stamp sentiments using the new Pirate Sentiments stamp set. Tear off and distress the card edges. Crumple up the cardbase flatten and crumple again. Spritz the cardbase with water. Lightly spray brown inks and splatter watercolor paint onto cardbase. Spritz again to allow inks to soak into the cardstock. Crumble cardbase while still damp. Dry flat over paper towel. (You may want to practice all the distressing with ink and water on scrap kraft cardstock before distressing your cardbase. I sprayed water to the back of the map as it was colored with Distress Inks which would run.)
Pirate Characters: Watch the video above to see how the pirate characters were made. The pirate captain’s hat was switched out with one from the new Pirate Borders. The treasure chest and captain hat borders are also from the Pirate Bordersset.
Train the folds on the ship’s body piece cut from the Boat Pop-Up die set in black. Glue the small side tab while the piece is folded flat. All of the following pieces are cut using the Pirate Ship Add-Ons set. Cut the boomerang shaped bow piece from black. Glue to the narrow-tabbed front of the ship while folded flat. Cut the back railing from black and glue to inside of ship back while folded flat. Cut 10 of the small circles in black and 10 of the larger circles in pale yellow. Glue small circles on top of large circles and attach them to ship body as show in photos.
Cut two sets of wave pieces. Ink blue. Glue to the sides of ship body, but not to the front or back flat panels. (The waves stick out in front to a point while the back jut out two wave points.) The tiny edge of the wave pieces match-up at the center side folds.
Cut the deck and seat pieces from the Boat Pop-Up die set in brown. Train folds. Trim off the front edge of the seat piece. (See red circle in photo.)
Cut two of the u-brace pieces from the Boat Pop-Up die set in black. Train folds and fold edges of tabs to fit through slots in the deck piece as shown in photos.
Cut two sets of masts from the Pirate Ship Add-Ons set in a thick back cardstock. Glue the mast pieces together matching up the different sizes to form two smaller masts and one taller mast. Slide the tallest mast through the center slot of the deck down between the two u-braces. (See red circled photo.) Glue to one of the u-brace sides. Add the second mast through one of the end slots and check alignment of the two masts in the folded position. Glue to u-brace. Repeat with third mast.
Test placement of seat (referred to as deck in photos) between center mast and back mast. Glue the deck front tab between the center tab and the mast. Glue back deck tab to back mast tab.
Cut three sets of the two sail dies from the Pirate Ship Add-Ons set in black. Cut three of the smaller sails from white and one of the large sail from white. Attach one of the small white sails to cover one small black sail. Do the same with the large white and black sails. Center the remaining two small white sails to the remaining two large black sails. (I used white label paper that had adhesive on the back.) Cut the sail decorations also from white and use the stencil feature of the skull die. Color the sword handles red. Attach decorations to smaller sails. Cut two of the crow’s nest basket from brown. Ink them brown. Cut the two flags from yellow. Starting with the tallest center mast, glue the flag at the top of the mast, the mast between the two pieces of flag then attach the basket in the same manner. Next attach the all-white small sail followed by the all-white large sail. For the smaller masts glue a decorated sail at the top and then a large sail.
Fold the deck up and add glue just to the front u-brace bottom. Slide folded deck into flatten ship body matching the front body narrow tab with u-brace. Repeat with back u-brace and body tab.
Test opening ship. You may have to help train it opening all the way. Flatten to glue into the cardbase. Add glue to one of the ship body tabs and attach with end of tab being in the cardbase fold. Add glue to other ship body tab and fold cardbase flap over to attach. Wait until glue has dried to open.
Sentiments: Stamp all sentiments before distressing the cardbase using Pirate Sentiments stamp set. On the front flaps are “It’s A Great Day to be a Pirate!” and “You arrr an absolute treasure.” Inside is “Let’s Be Pirates” and “Yo Ho Ho!” There is space inside for either a personal message or a die-cut sentiment such as Happy Birthday or Happy Father’s Day.
Envelope: This card will fit into an A7 (5 x 7-inch) envelope. (I choose to hand deliver the card because of the wax seal on the back of it.)
If you’ve read this far click here to go to yesterday’s Blog Hop Giveaway
Just wanted to share the card fronts and light-up lighthouse card I made at workshops at the Orlando Stamp & Scrapbook Expo last week.
I took a class with Jennifer from Stamplistic on using the Spellbinder’s Better Press. We made a number of card fronts trying different techniques and papers. To get the letterpress look of an embossed plate, you need to use the thick cotton paper such as the Better Press papers. We learned to add sprays to the paper before stamping onto the paper for the crisp imprint and ink coverage of image. You can add a variety of ink colors to one plate, or use one of the new registration plate sets and print different colors in several printing passes. I found the Better Press to be a quick way to get professional and elegant looking images. The cost is more than rubber or clear stamps, but as long as you get enough ink on the plates, you get a professional looking image that you can then watercolor or color with alcohol markers.
Sabrina Leavell ofScrappy Tails taught a quick workshop on making a dimensional lighthouse with a Pear Blossom one light to make it light-up.
Lots of great and friendly vendors at the Expo too.
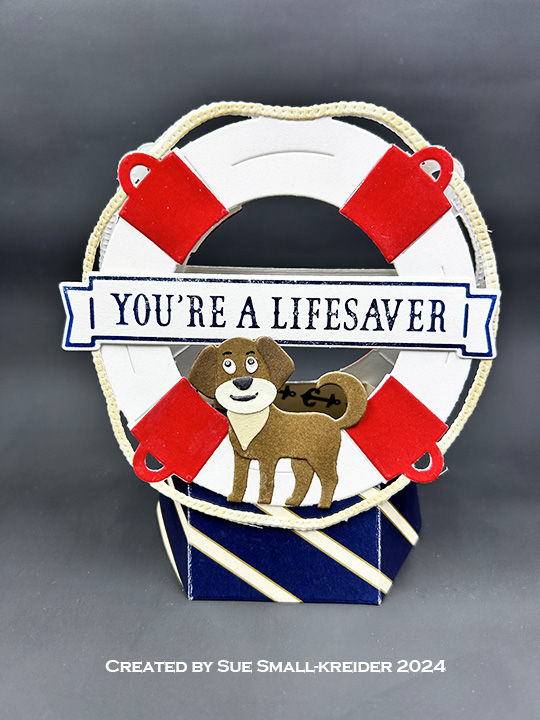
This pop-up display card sail-ebrating life was made for Craft Roulette #196 whose parameters were a celebration project with apple farm colors, preserve(s) element and a dog.
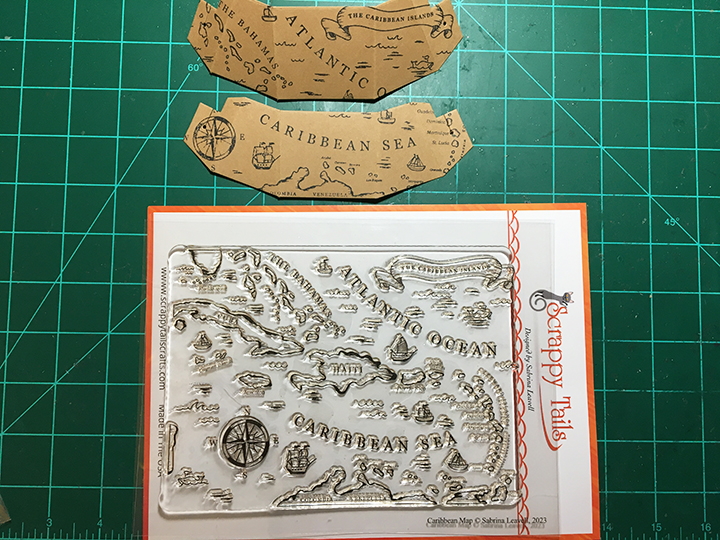
Base: Stamp on kraft paper the Caribbean Map Stamp. (To see the map colored with its coordinating layering stencils look at A Map To The Caribbean.) Cut two of the Pop Up Stand from the map. Train the folds on each piece and glue tabs with slot for rubber band together. Add rubber band. (I used a #12 band.)
Anchor: Cut two anchors from gold cardstock and two anchors from kraft cardstock using the large die from the Anchor die set. Trim the rope pieces from the gold anchors. Using the rope pieces in the die set, cut two sets of ropes from kraft cardstock. With a sponge dauber, ink the rope pieces to create shading. Glue the rope pieces to the kraft cardstock anchors. Next, glue gold anchors in place.
Sentiments: Three of the six hot foil banners in the Nautical Banner hot foil plates set were used – “Lets sail-ebrate!” and “Waving Hello.” (I usually do batch hot foiling with my Spellbinders’ Glimmer Foil System because it takes time to set-up, heat-up and cool-down.) The sentiment banners are attached to the anchors with foam squares after being cut out using the coordinating dies. “Ahoy!” was cut from navy blue cardstock from the Set Sail paper pad three times using a bonus gift die. Each “Ahoy!” was glued in place on the base and envelope. Gems and pearls from the Set Sail Card Kit were added to each anchor.
Envelope: The card folds flat to fit into an A7 envelope that I decorated the back flap with the the remaining “Ahoy!” and a scrap of gold rope.
Thank you for reading this blog post. I hope this inspires you and makes you smile. Please like and leave comments 😊