Owl And The Pussycat Valentine

It’s the Karen Burniston design team challenge for January 2023 using the Raising Platform Pop-Up die set.

For my card I chose a Valentine theme using excerpts Edward Lear’s 1870 poem “The Owl and The Pussy-cat.” The action in this card comes as a wave lifting the pea-green boat up in the sea near the edge of the sand.

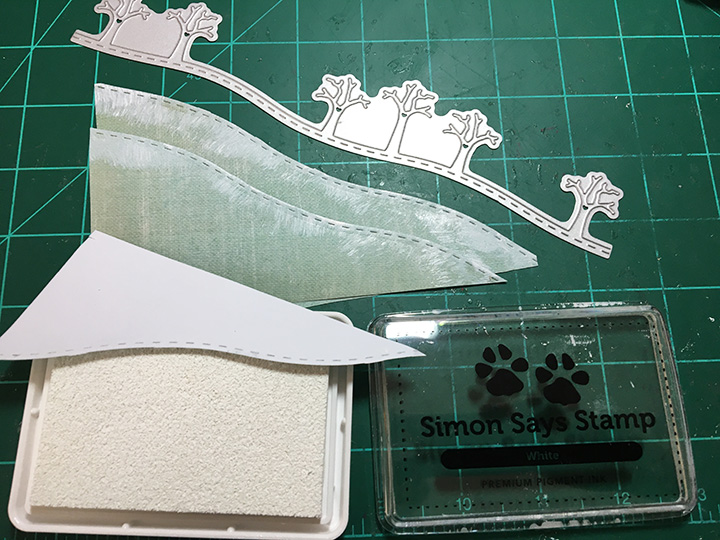
Cardbase: I used a purchased 5×7-inch (A7) white cardbase and covered the front and back panels with decorative blue sea patterned cardstock cut using the largest crosshatch rectangle in the Rectangles and Labels – Crosshatch set. Inside, I cut a 5×7 rectangle out of my one sheet of wave paper making the angle of the waves to match the angle of the raising platform base. From the scraps of wave paper, I pieced out the other inside panel leaving the bottom right corner without waves. I cut a sandy beach from patterned paper to cover the right corner. The edges of the beach were inked with blue ink and sea foam was added using a textured white paint. Trim off excess decorative paper from the card edges.

Raising Platform: (Watch the assembly video before starting.) From blue sea patterned paper cut, using the Raising Platform Pop-Up set, the “L” shaped mechanism piece, the largest label and a strip 1/4-inch by 2 1/2-inches. (Save the strip for use under the Boat section.)

(If your mechanism is cut from a one-sided patterned paper, cut a coordinating blue-green pattern paper cut two of each of the decorative diamond-shaped panels to cover the inside of the mechanism that is visible when assembled.)

Attach to inside of the card base as shown in assembly video/package instructions. Add waves cut from blue-green patterned cardstock using a die from the Tropical Scene set to the mechanism base making sure they don’t have catchpoints.

Owl: (Watch the assembly video before starting.) Cut two owls from brown, a triangle beak and a set of feet from yellow, one set of eyes from black and one oval from white using the Feathered Animals set. Glue white oval to back of one owl piece and attach black eyes. Add white dots to eyes as shown on packaging. Glue back owl piece to front and glue in the brown eye circles to back of head. Using the owl die, stencil on the feathers and wings to front and back of owl.

Cat: (Watch the assembly video before starting.) Cut two cats and two collars using the Cat and Dog set. Using die, stencil face on to one cat piece. Trim tag off one collar and glue to back cat piece and tagged collar to front cat piece. (I used markers and glitter brushes to color the collar.) Glue the green tab cut from scrap green cardstock used for the boat to the back side of one cat piece and then glue the other piece sandwiching the tabbed piece in between.

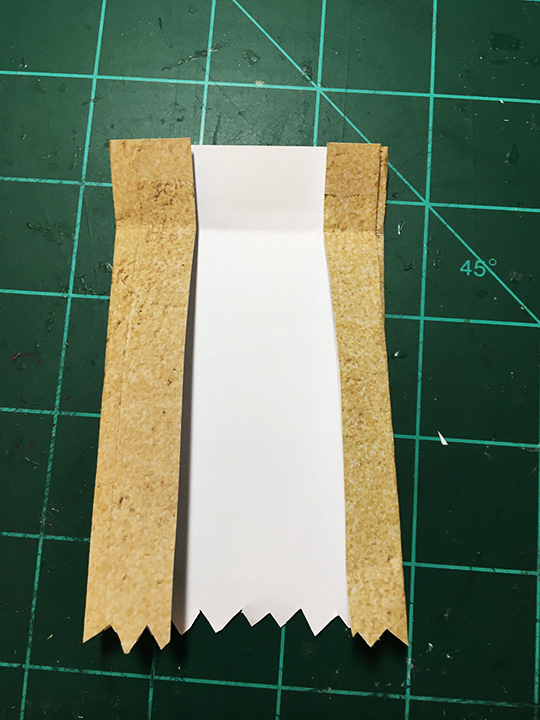
Boat: The boat is made by trimming off the two arm sections of the Raising Platform Pop-Up “L” shaped mechanism. (See photo for white sections to keep.) Train all the folds in the two pieces. Glue the tab to the inside of each piece to form the pointed front and back of the boat. Place one piece inside the other piece so that the untabbed tip of one piece points into the base point of the other and fold the sides to form a triangle. (See photo of inside of boat for folds.) Repeat with other piece. Glue the two pieces together making sure the boat is long enough to hold the cat and owl pieces.

Take the strip 1/4-inch by 2 1/2-inches cut in the Raising Platform section and fold in half. Fold again a 1/2-inch from the center fold and then 3/4-inch from the center fold. Repeat on the other side of the fold. (If using a one-sided patterned cardstock, cut 1/2-inch strips to cover the two ends that will show when assembled.) glue strip to bottom of boat as shown in photo.

Cut two more of the boat pieces for the inside of the boat. Trim off tabs and cut down the center fold to form diamond shapes. Glue in the cat and the owl inside the boat using their green tabs. Glue green boat diamonds inside the boat covering the animals’ tabs.  Trim off excess patterned paper as needed along boat top edges.

Fold strip on bottom of boat form a cradle that the boat sets on when placed on raising platform . Adjust strip’s folds as needed. Glue cradle to platform.

Train boat and platform to close properly.

Sentiments: I used computer generated sentiments sized to be cut using dies in the Rectangles and Labels – Crosshatch set. I aged the pieces that were printed on cream cardstock by roughing-up the edges with a distress tool (knife sharpener) and crumpling the pieces and inking with yellow, brown and blue inks. On the inside sentiment I stamped in yellow a crescent moon in the clouds and on the front sentiment shooting stars in the corners. Tiny iridescent star confetti were glued randomly on the sentiments. On the card back credit is given to Edward Lear for the poem excerpts.

Thank you for reading this blog post. I hope this inspires you and makes you smile. Please like and leave comments 😊

Materials Used:

Dies

Stamps

  • Penny Black – Clear Stamps – My Universe
  • Hero Arts – Clear Stamps – Galaxy Peek-A-Boo Parts

Papers

  • Kaisercraft – 12×12 Double-Sided Paper – Uncharted Waters
  • Love Cardmaking issue 4 – Digital Papers – By the Shore
  • Mrs. Sparkle & Co. – 5.5 x7.5 Single-Sided Paper – Woodgrain Color
  • Park Lane Paperie – 12×12 Printed Paper – Nautical
  • Bazzill – 8.5×11 Textured Cardstock – Tiara -18-1002
  • Fun Stampers Journey – 8.5×11 Cardstock – Pumpkin Bread
  • Black, Yellow, White and Cream Cardstock
  • Park Lane Paperie – A7 Cardbase and Envelope – White

Ink

  • Stampin’ Up – Classic Stampin’ Pad – Pineapple Punch
  • Ranger – Tim Holtz – Distress Ink- Vintage Photo
  • Hampton Art – Acid Free, Dye-based Mini ink Cube – Light Blue
  • Nellie’s Choice – Effect Snow
  • Sharpie – Permanent Marker – Ultra Fine Point – Black
  • Sharpie – Permanent Marker – Ultra Fine Point – Brown
  • Sharpie – Permanent Marker –Fine Point – Pink
  • Pigma – Mircon 03 Fine Tip Pen – Black
  • Crafter’s Square – Metallic Marker – Gold
  • Scrapebook.com – Glitter Brush Marker – Red Shimmer

Adhesives

Tools

Miscellaneous

  • This Calls For Confetti – Bokeh Bliss Teeny Tiny Mix
  • This Calls For Confetti – Leprechaun Gold Sequin

Beach Wedding Card – part 2

A destination beach wedding can be fun. This card came with the design brief for a grandmother unable to attend her granddaughter’s beach wedding. It must reflect the beach theme, be unique and have a place to hold a monetary gift either as a gift card or check.

Using Karen Burniston’s new February 2023 release which has a Beach Bar Add-ons set that converts her previously released Tiny House Pop-up into a topical hut with a thatched roof, I was able to make a beach village scene with a chapel and tiki bar hut. The new release also has a Beach Borders set that provided the flamingos and dancing crabs used on the back of the card. One other new die set in the release provides a 5×7 inch Crosshatch Rectangle and a Label used on the front of the card box.

See yesterday’s Beach Wedding Card – Part 1 for instructions on paper prep, chapel, tiki hut, flamingos and card back decorations.

Gift Card Bag:  The gift bag is cut from the same paper as the card base panels. The rectangle is approximately 5 inches wide by 4 inches tall. Fold the sides at 3/8-inch, 3/4-inch, 1 1/4-inches, 3 3/4-inches, 4 1/4-inches and 4 1/2-inches. Fold bottom 1/2-inch and measure the size of gift card and panel where it will go before trimming the top of the bag in a zig-zag pattern. Glue the three closed side tabs of bag to card panel.

Waves:  The waves are created using three corner-cut pieces of blue paper that are die-cut with the Long Nature Edges rolling hill with trees die. Trim off the trees. Using a white ink pad, rub the wave edges along ink pad edge to add the white foaming part of the waves. Glue waves over corner of card base cutting apart where the fold is on card base. Trim overhanging edges of blue paper.

Closure Band:  Because my decorative papers were thin paper, I used a sheet of double-sided adhesive to adhere the sand patterned paper to the cardstock before die-cutting the heart. The roof fringe die from the Beach Bar Tiny House Add-ons was used to cut eight fringe strips that are glued around the back edge of the heart.

The band is a 1 3/4-inch by 8 1/2-inch strip of cardstock loosely folded around the card with enough wiggle-room to slide it on and off the card. I glued the heart over the seam on the band. The back of the band is decorated with a flamingo border from the new Beach Borders set.

Box: I took two 8 1/2-inch by 11-inch sheets of brown kraft cardstock to make the box. The top is made from a 9 1/4-inch by 7 3/8-inch rectangle and the bottom is made from a 9 1/8-inch by 7 1/4-inch rectangle. Score 1-inch from all sides of each rectangle. Make tabs at the corners by cutting one side of the squares made by the transecting score lines. Glue tabs to inside.

Die-cut a label from the same cardstock using the crosshatch fancy label from the Rectangles and Labels Crosshatch set. This will be a place to put the bride and groom’s name and wedding date.

Because the card is a tight fit, the following method to add a ribbon will provide a way to pull the card out of the box and secure the box closed. Cut a ribbon 60 inches long. Place the center of the ribbon in the center of the bottom of the box with the ribbon running the length of the box.  Place card in the box. Place lid on the box with label tag over the top of the card.  

Flip box over and loop the ribbon over itself to form a cross. Flip box back over and tie a bow on the front to secure the box closed.

You now have a keepsake wedding card from a grandmother to her granddaughter that can be stored in its own box.

Thank you for reading this blog post. I hope this inspires you and makes you smile. Please like and leave comments 😊

Materials Used:

Dies

Papers

  • The Paper Studio – 12 x12 inch Paper Pad – Beach House
  • Brown Kraft Cardstock – 8.5×11 inches
  • White, Black, Matte Gold, Blue and Pink Paper and Cardstock Scraps

Pens & Ink

  • Pigma – Mircon 01 – Black
  • Gelly Roll – Gel Pen – White
  • Staples – Liquid Stix – Hot Pink Chisel Nose Highlighter
  • Mechanical Pencil
  • Simon Says Stamp – Premium Pigment Ink – White

Miscellaneous

Beach Wedding Card – part 1

Beach Wedding Card – Part 1

Welcome to our Karen Burniston Products – KB Riley LLC February 2023 Release Blog Hop. (See details at the end of this post and blog list.)

A destination beach wedding can be fun. This card came with the design brief for a grandmother unable to attend her granddaughter’s beach wedding. It must reflect the beach theme, be unique and have a place to hold a monetary gift either as a gift card or check.

Using Karen Burniston’s new February 2023 release which has a Beach Bar Add-ons set that converts her previously released Tiny House Pop-up into a topical hut with a thatched roof, I was able to make a beach village scene with a chapel and tiki bar hut. The new release also has a Beach Borders set that provided the flamingos and dancing crabs used on the back of the card. One other new die set in the release provides a 5×7 inch Crosshatch Rectangle and a Label used on the fronts of the card and box.

Card Base: Cut a 10×7 inch cardstock rectangle and score at 2 1/2-inches and 7 1/2-inches. Fold the side panels inward to make a 5×7 inch gate-fold card base. Cut a 10×7 inch decorative paper rectangle and then cut into panels as shown below and adhere to inside of card. Cut similar panels of decorative paper for the outside of card. (My paper had a path of sand going diagonal through the center panel. This determined the path of the waves and placement of buildings on the card.)

Paper Prep: Because my decorative papers were thin paper, I used a sheet of double-sided adhesive to adhere the paper to a piece of cardstock before cutting out the roofs and tiny house pieces of for the chapel and tiki hut.

Chapel:  The assembly of the chapel starts with the Tiny House base with its windows and doorway cut out while still flat using the arched door from the Church School Tiny House Add-ons for the doorway and the rectangular door from the Tiny House Pop-Up for the windows.(Make sure you cut the front door from the gabled side with the bottom tab to make this building open in the direction shown.) I cut the bell from some silver foil packaging I’d saved.

Assemble the tiny house as directed in assembly video. Follow assembly video for the church tower. Add the roof fringe after the roofs are attached to their bases. I used four layers of fringe for the main roof and two layers for the tower roof. I trimmed the tower roof fringe to almost half. (Wait to adhere your buildings to your card until both are completed. It is a tight fit with the bell resting on top of the tiki hut when the are folded closed.)

Tiki Hut: Assemble the tiny house as directed in assembly video. Follow assembly video for the beach bar hut. I used three layers of fringe for the hut roof. The hut’s counters and their posts are cut from brown cardstock. The glasses are part of the Beach Bar Add-ons set which I colored the drink onto and glued to the window frames. There is a sand dune die that will let you add the flamingos or other decorations off the sides of the hut. (The sides must be the ones that have the bottom tabs that attach the hut to the card.)

Flamingos:  Each of the buildings has two flamingos attached. The Beach Bar Add-ons set has two different flamingos which come with a stencil feature to the dies to color their wings, eyes and legs. I used the bow tie from the Wedding Charms’ groom to make these flamingos into wedding guests.

Card Back:  A personal message can be written on the back of the card in the dancing blue crabs heart. The crabs are part of the Beach Borders set along with the flamingos used on the back of the closure band.

Card Front: The front two panels were first covered in blue paper and then a crosshatch frame was added to the outer edges. The frame was cut using the two largest dies in the Rectangles and Labels Crosshatch set.

See tomorrow’s Beach Wedding Card – Part 2 for instructions on making the gift bag, waves, closure band and box as well as the materials used list.

Welcome to our Karen Burniston Products – KB Riley LLC February Release Blog Hop. The Design Team have come together with Karen today for a fun blog hop to celebrate the release of 6 new dies. Sneak peeks of the new release started last week, and the dies are available to order NOW!

This release includes:

  • 1 new Charm die sets
  • 1 new Word set
  • 1 new Tiny House Add-Ons sets
  • 1 new Pop-up die sets
  • 1 new Crosshatch die sets
  • 1 new Border die set

Dies are available to order now on the website.

GIVEAWAY:

To celebrate the release Karen Burniston and each of the Karen Burniston – KB Riley LLC Design Team members will be giving away a $25 Gift Certificate to some lucky person who comments on our blog posts, so make sure you join the hop and comment on everyone’s blog post. Winners will be randomly chosen from ALL of the blog hop comments received on our blog posts by Monday, 27th of February 2023. Lots of chances to win some goodies, so just leave a comment on this post or any other blog hop posts to enter! Don’t forget to leave some way for us to contact you, in case you are a lucky winner!

Karen Burniston  

Lois Bak  

Sue Small-Kreider – YOU are HERE

Karen Aicken  

Jennifer Webster  

Frances Byrne  

Suzanne Smit  

Sandy Diller   

Fran Sabad   

Nicky Foden  

An Underwater Adventure

It’s Sneak Peek week for Karen Burniston’s February 2023 release!

Needing a card for a couple going on an oceanic ecological tour, I decided to create a luggage tag card with an underwater scene.

The card uses a variety of Karen Burniston dies including ones from her February 2023 release of beach themed dies.

For the card base I had some faux leather mermaid scales 8-inch wide ribbon that I die-cut two large tags from using the tag book pop-up die set. I next die-cut from some underwater background papers two more of the large tags. Having watched the assembly video for the tag book, I knew I needed to die-cut the hinge piece and attach it to the cardstock tags before I adhered them to the faux leather outer tags. (Because I wasn’t sure if the faux leather would adhere well with glue, I also used doubled-sided tape to attach the paper and fabric backed tag pieces.)

Wanting the jellyfish from the new sea charms set to look as if they were floating in the water, I cut the inside pivot mechanism from some medium weight clear plastic packaging. Because of its thickness the dies embossed the plastic but did not cut through the plastic. I used my surgical scissors to cut the mechanism out. Because of the see-thru quality of the plastic, I had to used double-sided tape to attach the inside panels together. To adhere the plastic to the paper lined inside of the card base, I used glue dots which look a little like air bubbles. (I adhered only one side of the mechanism until I was finished decorating the background with creatures and shells. Once satisfied that the background was complete, I adhered the remaining side of the mechanism.)

To decorate the card, I used the sea turtle from the sea animals set, the jellyfish, clam shell, crab and seahorse from the sea charms set, and the anchor, chain and “bon voyage” from the cruise charms set. The chain and jellyfish help hide the tabs the connect the pivot mechanism. (Because I used double-sided tape to adhere the decorations to the plastic, I had to push and prod the adhesives to hide behind the shapes, but some still sticks out. To made those bits of adhesive not interfere with the mechanism, I brushed anti-static powder over the areas to absorb the stickiness.)

On the front of the card, I used a spiral shell and jellyfish from the sea charms set along with the octopus from the ocean animals set and little sharks cut from the new beach borders die set. On the back of the card I cut a crosshatch rectangle panel using the first crosshatch rectangles set from leftover back ground paper and used the tiny sharks border again to edge it.

Because I hadn’t planned to add ribbon to the inside panel tags (the plastic was too thick to easily cut), used two ribbons -a narrow and a wide – on each of the card base’s two tags.

This card is to be hand delivered, so no envelope.

Thank you for reading this blog post. I hope it provides inspiration and joy. Please like and leave comments 😊

Materials Used:

Dies

Papers

  • Papercraft Society – Sam Calcott’s Underwater & Nautical Box – Background and Specialty Papers
  • Colored Cardstock Scraps
  • The Paper Studio – Clear Vellum For Printers
  • The Ribbon Boutique – Faux Leather 8-inches Wide Ribbon – Green/Blue
  • Clear Packaging – Medium Weight
  • Ranger – Tim Holtz – Distress Inks – Abandon Coral

Pens & inks

Adhesives

Miscellaneous

  • Die Cutting Machine
  • Piercing Tool
  • Scissors
  • Tweezers
  • Sponge Dauber
  • Kat Scrappiness – Telescopic Embossing Powder Tool with Retractable Brush
  • 3/4-Inch Wide Pale Blue Organza Ribbon
  • 1/4-Inch Wide Dark Blue Organza Ribbon

Seaside Vacation

Seaside vacation - front

Need a break? Jump-into this vacation card and get away, hear the waves gentling coming ashore, the occasional seabird crying out overhead, smell the sea air and feel the grit of the sand beneath your feet.

This fun, A7 sized card came from my desire to make a nautical themed card from my stash of underwater, fishy, and nautical stamps, dies, papers and embossing folders. The papers and embossed/inked background came from one of early papercrafting magazines I purchased – Love Cardmaking issue 4 and its the “By the Shore” embossing folder, stamps and digi papers. I love these papers and have used them for to make a number of cards in years past. Two small stamp sets from Prima Marketing’s Seashore collection at some point made their way into my stash, but never used. Some new to me Stampin’ Up inkpads gave me the excuse to try stamping the small nautical stamps.

After pulling together all the various elements that I might use and having noticed a trend of shapes being layered askew on card fronts, I decided to try the trend. I played with the layout and began by gluing the blue background over the front and back of card. Next, I glued edges of inked embossing folder piece and trimmed off the overlaps that went off the edges. The top is wrapped over the fold and glued on the back.

Seaside vacation - front-cu

Using two different thicknesses of foam squares/dimenisionals, I adhered the stamped pieces to the front. The rectangular card needed somethings to hide the fact the rope border didn’t fully meet-up at the corners. In digging around in my elements caddy, I found some K & Company die-cut sea life images which were all too big for my purposes, but on the packaging were just the right size of images which I fussy cut and adhered to the rope corners. The addition of a puffy orange starfish and a foiled rising sun sticker and, voila, the front was finished.

I had one tiny multi-colored masked and stamped image with the word “Enjoy” which I glued inside the card.  The blue paper on the back of the card didn’t come completely down to the bottom edge so I pieced together a sandy beach to complete the card.

Seaside vacation -inside-envelope

The sailing ship was stamped in blue ink on the back of the envelope.