Photoplay – Nutcracker Tags

Welcome to Day 6 of my Nutcracker series using a variety of stamps and die sets to make some nutcracker themed cards. My card today uses a die set by PhotoPlay – Nutcrackers Layered and Karen Burniston’s Topper Tags die set.

Watch the process video below to learn how this card was made.

Cardbase: Cut tags that will allow for a 4-inch figure using Karen Burniston’s Topper Tags die set. cut the decorative hole reinforcers in a contrasting color and thread a piece of baker’s twine through the hole and tie off.

Nutcrackers: Using PhotoPlay’s Nutcrackers Layered die set, create your nutcrackers as shown on packaging or create your own uniforms and hair styles.

___________________________________

Thank you for experiencing this blog post.

I hope this inspires you and makes you smile.

Please subscribe, like and leave comments 😊

___________________________________

Disclaimer: Karen Burniston products are provided free of charge by the manufacturer for review and use. All other items were personally purchased. Compensated affiliate links used where or when possible, meaning I will receive a small percentage commission from these manufacturers at no cost to you. This will allow me to add more content to my YouTube channel and help out a lot. Thank you.

Materials Used:

Dies

Papers

  • Scrapbook.com – BetterPress – 6×8-inch Double-Sided Cardstock – Nutcracker
  • Matte Gold Cardstock
  • Black, Blue, Pinks Cardstock

Adhesives

Tools

BetterPress-Nutcracker Christmas Card

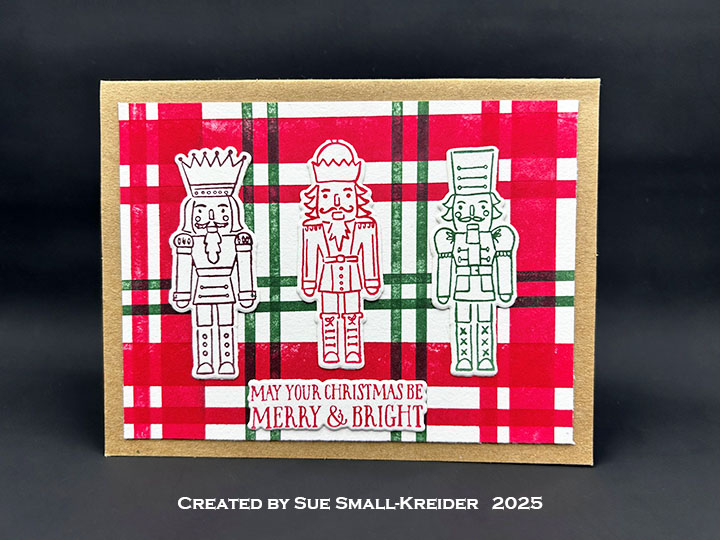
Welcome to Day 5 of my Nutcracker series using a variety of stamps and die sets to make some nutcracker themed cards. My card today uses products by Spellbinders – Simon Hurley’s BetterPress press plates & dies set Nutcracker Trio and Dina Wakley Media’s BetterPress inks of Eggplant, Fir and Ruby.

Watch the process video below to learn how this card was made.

Cardbase: I used a purchased kraft paper A2 (4.25×5.5-inch) cardbase and matching envelope.

Nutcrackers & Plaid Background: The plaid background was created using the Spellbinder’s BetterPress of the Month – Design A Plaid press plate set using red and green ink. The nutcrackers and sentiment are from Simon Hurley’s Better Press press plates & dies set Nutcracker Trio printed in purple, red and green. The inside sentiment banner is from the Design A Plaid set.

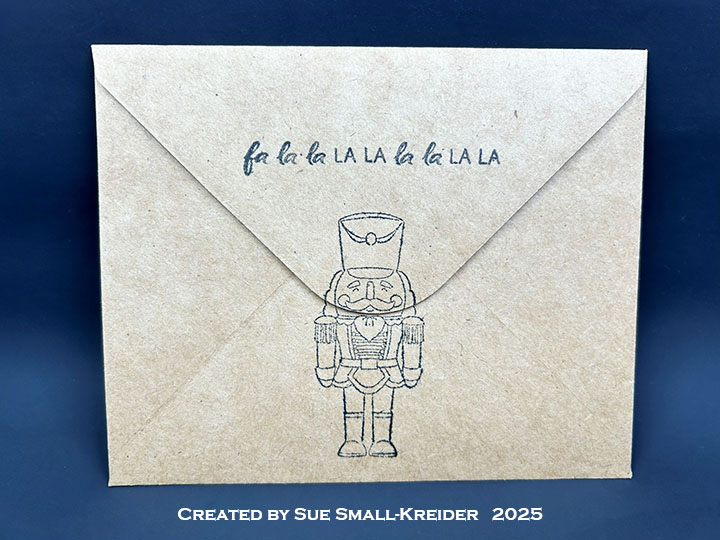
Envelope: The panel card fits into an A2 size envelope with a nutcracker and “fa la la la la la la la la” on the envelope back using Karen Burniston’s Season of Cheer and Hero Art’s Nutcracker stamp.

___________________________________

Thank you for experiencing this blog post.

I hope this inspires you and makes you smile.

Please subscribe, like and leave comments 😊

___________________________________

Disclaimer: Karen Burniston products are provided free of charge by the manufacturer for review and use. All other items were personally purchased. Compensated affiliate links used where or when possible, meaning I will receive a small percentage commission from these manufacturers at no cost to you. This will allow me to add more content to my YouTube channel and help out a lot. Thank you.

Materials Used:

Press Plates & Dies

  • Spellbinders – Simon Hurley’s BetterPress Press Plates & Dies – Nutcracker Trio
  • Spellbinders – BetterPress of the Month Press Plates & Dies – Design A Plaid

Stamps

Papers

  • Spellbinders – BetterPress – 5.5 x 4.25” (A2) Cotton Card Panels – Porcelain & Pebble
  • Target – A2 Cardbase and Envelope – Kraft

Ink

  • Pigma – Mircon 01 Fine Tip Pen – Black
  • Spellbinders – Dina Wakley Media’s BetterPress Ink – Eggplant, Fir and Ruby

Adhesives

Tools

  • Die Cutting Machine
  • Spellbinders – BetterPress Letterpress System
  • Paper Trimmer
  • Stamping Blocks used as paperweights
  • Spellbinders – Best Ever Craft Tape

Spellbinders – Dancing Nutcracker Card

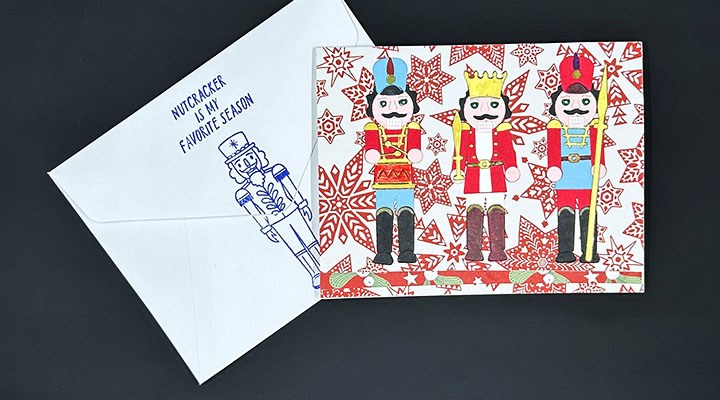
Welcome to Day 4 of my Nutcracker series using a variety of stamps and die sets to make some nutcracker themed cards. My card today uses products by Spellbinders – Dancin’ Nutcracker Fritz and Happy Holidays die sets and Honey Bee Stamps Soulful Season 3D embossing folder as well as Hero Arts’ A Little Nuts stamp set.

Watch the process video below to learn how this card was made.

Cardbase: Emboss a 5.5-8.5 piece of white 65lb. cardstock using the Honey Bee Stamps Soulful Season 3D embossing folder following the directions in the video above. Trim down to a 5×7-inch panel. Glue to the front of an A7 (5×7-inch) cardbase. (I used a purchased cardbase and envelope.)

Nutcracker & Drum: Referring to the image of the nutcracker on the packaging for the Spellbinders Dancin’ Nutcracker Fritz die set, cut out all the pieces using your own color scheme. Cut a black strip to go behind the face for the eyes. (I cut two drums – one for the front and one for the card back along with drum sticks.) Assemble nutcracker and drums as shown in video above.

Sentiments: Using the Spellbinders Happy Holidays die set, cut from red paper. (I upcycled a red envelope.)

Envelope: The panel card fits into an A7 size envelope with a nutcracker and “Nutcracker is my favorite season” on the envelope back using the Hero Arts’ A Little Nuts stamp set and blue ink.

___________________________________

Thank you for experiencing this blog post.

I hope this inspires you and makes you smile.

Please subscribe, like and leave comments 😊

___________________________________

Disclaimer: Karen Burniston products are provided free of charge by the manufacturer for review and use. All other items were personally purchased. Compensated affiliate links used where or when possible, meaning I will receive a small percentage commission from these manufacturers at no cost to you. This will allow me to add more content to my YouTube channel and help out a lot. Thank you.

Materials Used:

Dies

  • Spellbinders –Cutting Dies – Dancin’ Nutcracker Fritz – S5-644
  • Spellbinders –Cutting Dies – Happy Holidays – S2-330

Embossing Folders

  • Honey Bee – 3D Embossing Folder – Soulful Season

Stamps

  • Hero Arts – Clear Stamps & Dies- A Little Nuts

Papers

  • Spellbinders – 8.5×11 100 lb. Cardstock – Cosmic Sky
  • The Paper Studio – 8.5×11 65 lb. Cardstock – White
  • Gold Mirror Cardstock
  • Black, Pinks,Red and Yellow Cardstock
  • Park Lane Paperie – A7 Cardbase and Envelope – White

Ink

  • Memento – Fade Resistant Dye ink – Paris Dusk
  • Pigma – Mircon 01 Fine Tip Pen – Black
  • Ranger – Tim Holtz – Distress Ink- Lost Shadow
  • Stampin’ Up – Stampin’ Blends Marker – Dual Tip – Light Copper Clay
  • Sakura – Gelly Roll Pen – Medium – White

Adhesives

Tools

  • Die Cutting Machine
  • Paper Trimmer
  • Stamping Platform
  • Stamping Blocks
  • Sponge Blending Tool
  • Tweezers
  • Spellbinders – Mighty Mister Spray Bottle
  • We R Memories – QuickStick

Miscellaneous

  • Large Eyed Needle
  • Vivant – Cord/Thread – Gold

2025 ATC Calendar – DECember

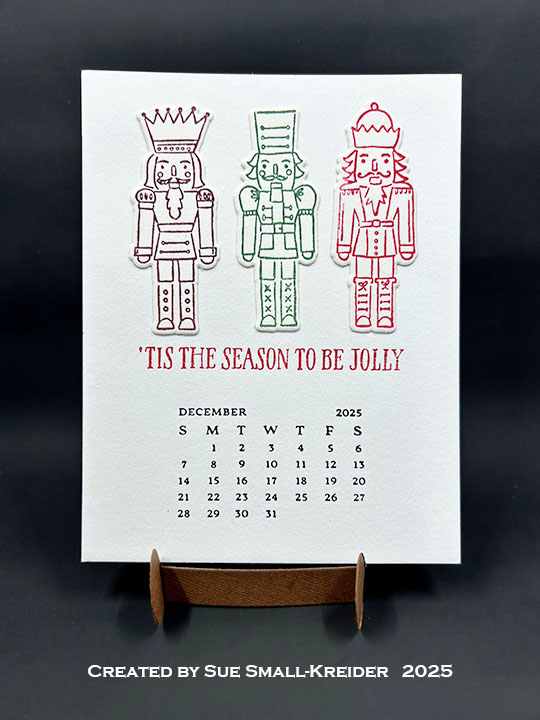
I started a new challenge for 2025 – the ATC calendar challenge. With a group of crafty friends, we are making a new image on a 4.25Γ—5.5-inch calendar card for each month.

December’s card is made with Spellbinders BetterPress Press Plate & Die set called Nutcracker Trio by Simon Hurley. It also uses Dina Wakley Media Better Press Ink in Eggplant, Fir and Ruby.

To see other months’ calendars go to click here.

Watch a video about the making of this calendar and a Christmas card made with these nutcrackers.

___________________________________

Thank you for experiencing this blog post.

I hope this inspires you and makes you smile.

Please like and leave comments 😊

___________________________________

Disclaimer: Karen Burniston products are provided free of charge by the manufacturer for review and use. All other items were personally purchased. Compensated affiliate links used where or when possible, meaning I will receive a small percentage commission from these manufacturers at no cost to you. This will allow me to add more content to my YouTube channel and help out a lot. Thank you.

___________________________________

Materials Used:


Dies
β€’ Spellbinders – Cutting Dies – Simon Hurley’s Nutcracker Trio


Press Plates
β€’ Spellbinders – BetterPress Plates – 2025 DIY Calendar

β€’ Spellbinders – BetterPress Plates – Simon Hurley’s Nutcracker Trio


Papers
β€’ Spellbinders – BetterPress – 5.5 x 4.25” (A2) Cotton Card Panels – Porcelain & Pebble


Ink
β€’ Spellbinders – BetterPress Ink – Dina Wakley Media’s Eggplant, Fir & Ruby


Adhesives
β€’ Neutral PH Adhesive by LINECO
β€’ Fine-Tip Glue Bottle

Tools
β€’ Die Cutting Machine
β€’ Scissors
β€’ Paper Masking Tape


Jolly Snowmen Birthday Postcard

This card was made for CRAFT ROULETTE #291 whose parameters included a postcard, Easter colors,  pack(s)/(ing) element, and shiny.

Watch the process video to see how I made these cards.

Cardbase: I used a 5×7-inch 220lb. cotton card panel to print the snowmen and sentiment onto the postcard front using a light blue ink.

Snowmen: Printed using the BetterPress system with the Spellbinders press plate Made with Snowflakes and colored glitter brush markers in pastel colors.

Sentiments: β€œMade with love & snowflakes” is in the Made with Snowflakes press plate set. The postmark was stamped in red ink using elements from two Purple Onion Designs red rubber stamp sets.

Envelope: The card fits into an A7 (5x 7-inch) size envelope.

___________________________________

Thank you for experiencing this blog post.

I hope this inspires you and makes you smile.

Please subscribe, like and leave comments 😊

___________________________________

Disclaimer: Karen Burniston products are provided free of charge by the manufacturer for review and use. All other items were personally purchased. Compensated affiliate links used where or when possible, meaning I will receive a small percentage commission from these manufacturers at no cost to you. This will allow me to add more content to my YouTube channel and help out a lot. Thank you.

Materials Used:

Press Plates

  • Spellbinders – BetterPress Of The Month – Made with Snowflakes – BPOM-OCT25

Stamps

  • Purple Onion Designs – Red Rubber Stamps – Vintage Birthday Postmark Set
  • Purple Onion Designs – Red Rubber Stamps – Vintage Holiday Postmarks

Paper

  • Spellbinders – 5×7-inch 220 lb. Double Weight Cotton Card Panels – Porcelain

Ink

  • Spellbinders – BetterPress Ink – French Blue
  • Memento – Fade Resistant Dye ink – Rose Bud
  • Pigma – Mircon 01 Fine Tip Pen – Black
  • Scrapbook.com – Shimmer Glitter Brush Marker – Frosty Blue, Key Lime Green, Orange Juice, Pretty Pink, Royal Purple, Sunshine Yellow

Tools

  • Die Cutting Machine
  • Stamping Block
  • Scissors
  • Best Ever Craft Tape

2025 ATC Calendar – November

I started a new challenge for 2025 – the ATC calendar challenge. With a group of crafty friends, we are making a new image on a 4.25Γ—5.5-inch calendar card for each month.

November’s card is made with Spellbinders Windy Fall Leaves Better Press plate and Better Press Ink – Bark, Clay, Saffron, Strawberry, Tawny Brown, Tuscan.

To see other months’ calendars go to click here.

Milk Shake Birthday Card

This card was made for CRAFT ROULETTE #288 whose parameters included a celebration card, on the ground colors, goes well together element, and block(s). Today’s card uses Spellbinders and Karen Burniston dies as well as stamps by Riley and Company. Glitter hearts are from Trinity Stamps.

Cardbase: I used a purchased plaid A2 (4.25×5.5-inch) card base and envelope.

Card Front: The new Spellbinders Fountain Wishes die set was used to make the milkshake and blue bird with a party hat. Many of the tiny pieces were cut from white cardstock and colored with markers. The bird and waffle fan were also inked with Distress Ink for shading. The chocolate sauce was covered in clear packing tape before die cutting.

Happy Birthday Pop-Up: All the dies used to make this pop-up mechanism and sentiment are by Karen Burniston – Happy Birthday and Shadow, Katherine Label Pop-Up.

Sentiments: The inside stamped sentiment is Funny Bones by Riley and Company. The front sentiment is a Spellbinders BetterPress plate Fountain Wishes Sentiments.

Envelope: Back flap is stamped with Funny Bones by Riley and Company and another bird from the Spellbinders Fountain Wishes die set.

___________________________________

Thank you for experiencing this blog post.

I hope this inspires you and makes you smile.

Please subscribe, like and leave comments 😊

___________________________________

Disclaimer: Karen Burniston products are provided free of charge by the manufacturer for review and use. All other items were personally purchased. Compensated affiliate links used where or when possible, meaning I will receive a small percentage commission from these manufacturers at no cost to you. This will allow me to add more content to my YouTube channel and help out a lot. Thank you.

Materials Used:

Dies

Stamp & & Letter Press Plates

  • Riley and Company – Clear Stamps – Funny Bones – RWD-738
  • Riley and Company – Clear Stamps – Funny Bones – RWD-1259
  • Spellbinders – BetterPress Plate & Dies – Fountain Wishes Sentiments – BP-338

Papers

  • Spellbinders – 8.5Γ—11 Cardstock – Raindrop
  • Tan, Cream, Pinks and White Cardstock
  • Patterned A2 Cardbase and Envelope

Ink

  • Memento – Fade Resistant Dye ink – Tuxedo Black
  • OLO – Marker – Bubble Gum
  • Ranger – Tim Holtz Distress Ink – Salty Ocean , Vintage Photo
  • Sakura – Gelly Roll Pen – Medium – White
  • Sharpie – Permanent Marker – Chisel Tip – Black
  • Sharpie – Permanent Marker – Fine Point – Green, Red
  • Sharpie – Permanent Marker – Ultra Fine Point – Black, Red
  • Stampin’ Up – Stampin’ Blends – Dark & Light Daffodil Delight

Adhesives

Tools

Tools

  • Trinity Stamps – Embellishment Mix – Pink Sparkle Hearts

2025 ATC Calendar – October

I started a new challenge for 2025 – the ATC calendar challenge. With a group of crafty friends, we are making a new image on a 4.25Γ—5.5-inch calendar card for each month.

October’s card is made with Spellbinders Boo Crew by Simon Hurley dies and some light gray ink on the ghost.

To see other months’ calendars go to click here.

___________________________________

Thank you for experiencing this blog post.

I hope this inspires you and makes you smile.

Please like and leave comments 😊

___________________________________

Disclaimer: Karen Burniston products are provided free of charge by the manufacturer for review and use. All other items were personally purchased. Compensated affiliate links used where or when possible, meaning I will receive a small percentage commission from these manufacturers at no cost to you. This will allow me to add more content to my YouTube channel and help out a lot. Thank you.

___________________________________

Materials Used:


Dies
β€’ Spellbinders – Cutting Dies – Simon Hurley’s Boo Crew


Press Plates
β€’ Spellbinders – BetterPress Plates – 2025 DIY Calendar


Papers
β€’Black, Orange, Teal and White Cardstock
β€’ Spellbinders – BetterPress – 5.5 x 4.25” (A2) Cotton Card Panels – Porcelain & Pebble


Ink
β€’ Ranger – Tim Holtz – Distress Ink – Lost Shadow
β€’ Spellbinders – BetterPress Ink – BetterPress Black


Adhesives
β€’ Neutral PH Adhesive by LINECO
β€’ Fine-Tip Glue Bottle

Tools
β€’ Die Cutting Machine
β€’ Scissors

β€’ We R Memories – QuickStick
β€’ Paper Masking Tape


Seafaring Tri-Fold Pop-Up Birthday Card

This card was made for CRAFT ROULETTE #286 whose parameters included a dude’s card, sunflower field colors, bird(s) element, and soot. Today’s card uses Spellbinders’ dies and embossing folder and Karen Burniston dies and stamps.

Watch the video below to see how this card was made.

Cardbase: Cut from blue cardstock one 1.5×5.5-inch strip and one 3.5×5.5-inch rectangle. Score and fold .5-inch from the edge on both pieces to form 1.5×5-inch strip and 3.5 x5-inch rectangle. From an 8×6 sheet of heavy blue cardstock spritz with water and use the Spellbinder’s 3D Nautical Knots embossing folder to emboss the piece. Let piece dry flat. Trim down to two pieces that are 3.5×5-inches. (I made the mistake of cutting my cardstock to finished size I wanted before I embossed, forgetting that the embossing would consume some of my cardstock. So it is better to emboss a piece bigger than what you need and then trim down.)

Ships Wheel: Cut two ships wheels with stitching holes – one from black and one from brown cardstock using the Spellbinder’s stitching Ahoy, Matey! die set. Cut one ships wheel without the stitching holes from brown. Glue the two with holes together, keeping the glue from filling the holes. Stitch the pattern using two strands of brown embroidery floss. Glue the last brown wheel to cover over the back threads. Cut one “Ahoy” sign from silver using the die in the same stitching die set. Go over the letters with a thin-tipped black marker. Glue to bottom center of wheel. Using a pencil trace the openings of the wheel onto the blue strip as shown in the video above. Cut the openings out using a kraft knife. Glue wheel to blue strip.

Walrus and Seagull: Follow the directions on packaging of the Spellbinders Shipmates die set to assemble the pair. (I glued black eyes onto the walrus and used a pink marker to color the cheeks on both animals. Also did some shading on pipe with brown ink. ) Attach each creature as shown in the video above.

Card Assembly: Glue the strip with the ships wheel to the lower right side of one of the 3.5×5-inch rope embossed rectangles. Glue the 3.5×5-inch rectangle with the walrus glued to it on the left side of the rope embossed rectangle. Glue the remaining rope embossed rectangle to the back of the card to cover the card flap tabs.

Pop-Up Mechanism: Cut one of the L-shaped mechanisms from blue cardstock using the Karen Burniston Katherine Label Pop-Up die set. (Watch the assembly video at the bottom of the linked page for the die set.) Attach inside the card as shown in the video above.

Sentiments: Using the Karen Burniston β€œHappy Birthday” and its Shadow dies, cut the inside sentiment and glue together. Adhere the seagull to the top of the words. Glue entire piece onto the pop-up mechanism, checking that it is hidden inside the card and does not become a catchpoint for the mechanism. Stamp “Ahoy Matey!”to the card front using Karen Burniston’s Pirate Sentiments stamp set.

Envelope: Stamp in blue ink “Ahoy Matey!”to the back flap using Karen Burniston’s Pirate Sentiments stamp set.

___________________________________

Thank you for experiencing this blog post.

I hope this inspires you and makes you smile.

Please subscribe for email notices, like and leave comments 😊

___________________________________

Disclaimer: Karen Burniston products are provided free of charge by the manufacturer for review and use. All other items were personally purchased. Compensated affiliate links used where or when possible, meaning I will receive a small percentage commission from these manufacturers at no cost to you. This will allow me to add more content to my YouTube channel and help out a lot. Thank you.

Materials Used:

Dies & Embossing Folder

Stamps

Papers

  • Bazzill – 8.5Γ—11 Cardstock – Tiara -18-1002
  • Spellbinders – 8.5×11 100lb Cardstock – Lunar Gray & Raindrop
  • Stampin’ Up – 8.5×11 110lb Cardstock – Copper Clay
  • Blue 65lb Cardstock
  • Black, Green, White and Yellow Cardstock

Ink

  • Crafter’s Square – Metallic Marker – .05in/1.2 mm Point – Silver
  • Memento – Fade Resistant Dye ink – Paris Dusk
  • OLO – Marker – Cotton Candy
  • Pigma – Mircon 01 Fine Tip Pen – Black
  • Ranger – Tim Holtz – Distress Ink – Vintage Photo
  • Sakura – Gelly Roll Pen – Medium – White

Adhesives

Tools

  • Die Cutting Machine
  • Paper Trimmer
  • Riley and Company – Pick & Poke Tool
  • Stamping Blocks
  • Scissors
  • Paper Masking Tape
  • Pencil
  • Self-Healing Cutting Mat
  • Excel Blades – K71 Fingertip Craft Knife

Miscellaneous

  • Brown Embroidery Floss – 838