I started a new challenge for 2025 – the ATC calendar challenge. With a group of crafty friends, we are making a new image on a 4.25×5.5-inch calendar card for each month.
My March card is made with PoppyStamps dies from their Corner Shoppe collection.
Disclaimer: Karen Burniston products are provided free of charge by the manufacturer for review and use. All other items were personally purchased. Compensated affiliate links used where or when possible, meaning I will receive a small percentage commission from these manufacturers at no cost to you. This will allow me to add more content to my YouTube channel and help out a lot. Thank you.
Materials Used:
Dies
Spellbinders – Cutting Dies – DIY Easel
PoppyStamps – Craft Dies – Corner Shoppe Wooden Cart -2619
PoppyStamps – Craft Dies – Flower and Leaf Sprinkles -2622
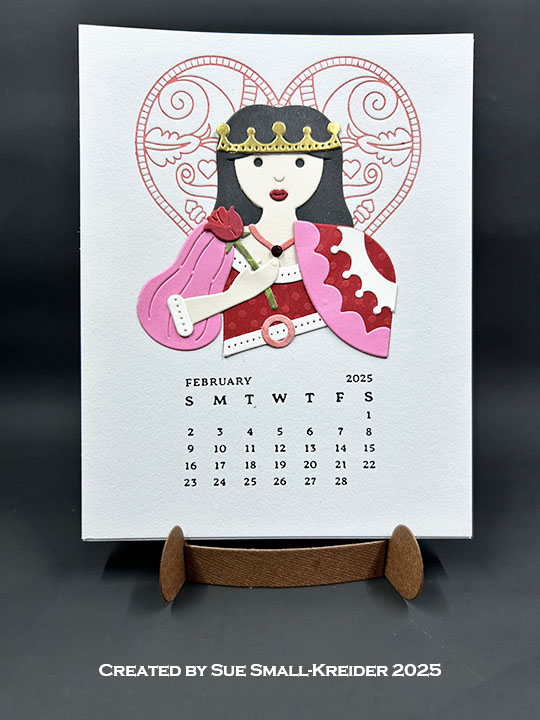
I started a new challenge for 2025 – the ATC calendar challenge. With a group of crafty friends, we are making a new image on a 4.25×5.5-inch calendar card for each month.
Watch the process video to see how I made this calendar card.
Disclaimer: Karen Burniston products are provided free of charge by the manufacturer for review and use. All other items were personally purchased. Compensated affiliate links used where or when possible, meaning I will receive a small percentage commission from these manufacturers at no cost to you. This will allow me to add more content to my YouTube channel and help out a lot. Thank you.
Materials Used:
Dies
Spellbinders – Cutting Dies – DIY Easel
Spellbinders – Cutting Dies – Reversible Royal Court by Jaycee Gaspar
I’m starting a new challenge for 2025 – the ATC calendar challenge. With a group of crafty friends, we are making a new image on a 4.25×5.5-inch calendar card for each month and then exchanging them.
I printed up four sets of 2025 monthly calendars using Spellbinders BetterPress 2025 DIY Calendar press plates. I also cut out four easels for the calendars to set on using the Spellbinders DIY Easel die set.
I printed the BetterPress January Snowdrop image using BetterPress Leaf green ink on the January calendar card to give an idea to my friends how the calendar works.
Now we have an excuse to get together once a month to exchange calendar cards for the next month and talk about how we created them.
___________________________________
Thank you for experiencing this blog post.
I hope this inspires you and makes you smile.
Please like and leave comments 😊
___________________________________
Disclaimer: Karen Burniston products are provided free of charge by the manufacturer for review and use. All other items were personally purchased. Compensated affiliate links used where or when possible, meaning I will receive a small percentage commission from these manufacturers at no cost to you. This will allow me to add more content to my YouTube channel and help out a lot. Thank you.
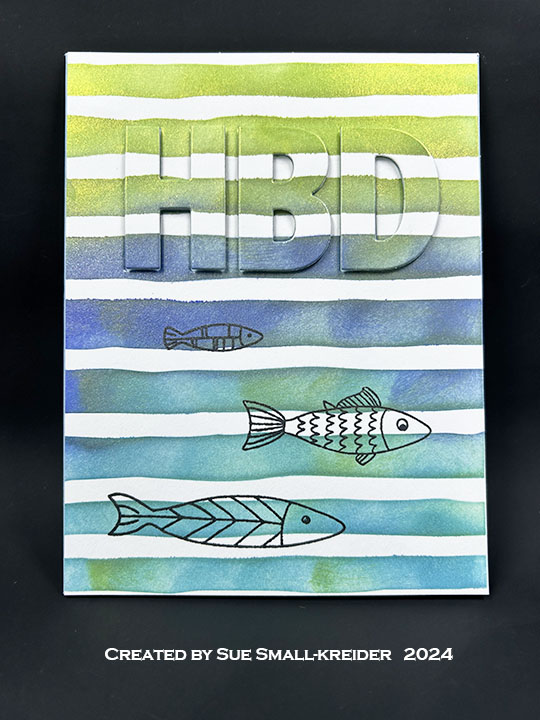
I needed a birthday card for a fisherman, so I used a stenciled background I had previously made along with some cute fish stamps and Craft Roulette’s Funn Sentiments #01 stamp set and coordinating dies.
Watch the process video to see how I made this card.
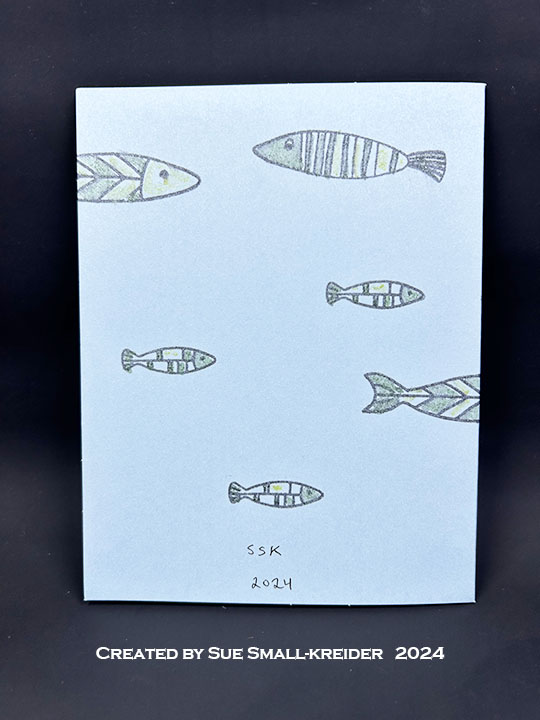
Cardbase: I used a purchased A2 (4.25×5.5-inch) blue cardbase. (Note that I made multiples of this basic card with the stenciled front panel and die cut letters.)
Stenciling and Fish: For the card front, I used a 4.25×5.5-inch rectangle of 65 lb. white cardstock and stenciled the lines using Spellbinders’ Dynamic Backgrounds stencil and Spectrum Noir Shimmer inks. The fish stamps are Paper Rose Studio – Fish Family 1 and Fish Family 2. They are colored with glitter brush markers.
Sentiments: The Front sentiment is die cut using the coordinating dies from Craft Roulette’s Funn Sentiments #01 stamp set. The inside sentiments come from Craft Roulette’s Funn Sentiments #01 stamp set as does the envelope’s sentiment.
Envelope: The card fits into an A2 (4.25x 5.5-inches) size envelope.
___________________________________
Thank you for experiencing this blog post.
I hope this inspires you and makes you smile.
Please like and leave comments 😊
___________________________________
Disclaimer: Karen Burniston products are provided free of charge by the manufacturer for review and use. All other items were personally purchased. Compensated affiliate links used where or when possible, meaning I will receive a small percentage commission from these manufacturers at no cost to you. This will allow me to add more content to my YouTube channel and help out a lot. Thank you.
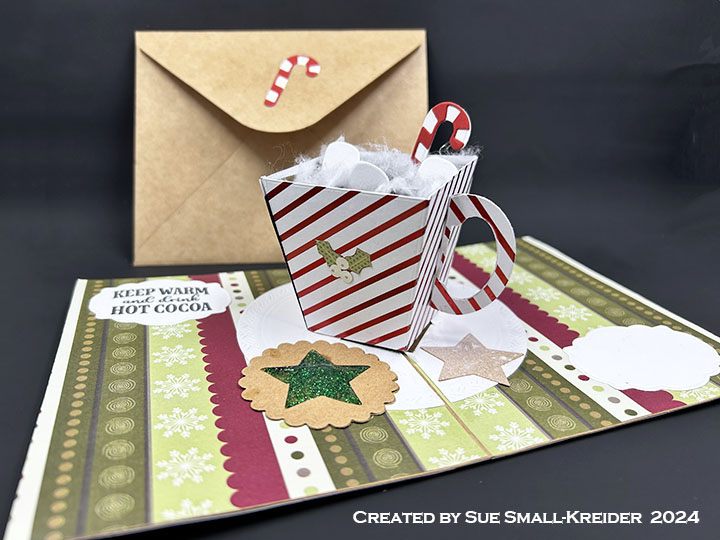
This card was made for Craft Roulette #246 whose parameters included for a holiday card, tree colors, drinking vessel(s), and something from the floor. (Watch the video to find out what was from my floor.)
Watch the process video to see how I made this card.
Cardbase: I used a purchased kraft paper cardbase that measures 4.25×11-inches when open and folded is an A2 side-fold card measuring 4.25-inches wide and 5.5-inches tall. The four panels were covered with decorative papers from my stash (Sorry, I don’t know the manufacturer of either paper.)
Card FrontCard Back
Pop-Up Mug: I modified the Flower Pot Pop-Up by cutting off the folder over flaps on the flower pot and added a handle cut from the mug die from the Tea and Coffee Pop-Up set. (See the video for how the mug was assembled.) Marshmallows are from the Camping Charms while the candy cane comes from the Stocking Pop-Up.
Cookies: The round, jam-filled two-layer Linzer cookie is cut using a scalloped circle die and small star die. The jam is made with Nuvo Glitter Drops and Glossy Accents. The star cookie was cut with an embossing die using an embossing sandwich on my die-cutting machine. The powdered sugar is white spray ink.
Sentiments: On the card front is a die-cut “Merry Christmas” made using just the word shadow and words from the Merry Christmas Lorna Add-Ons set. Inside the card two fancy labels were cut from white cardstock using the Rectangles and Labels – Crosshatch and one was stamped in black with “Keep Warm and drink Hot Cocoa” from the Winter Hugs stamp set.
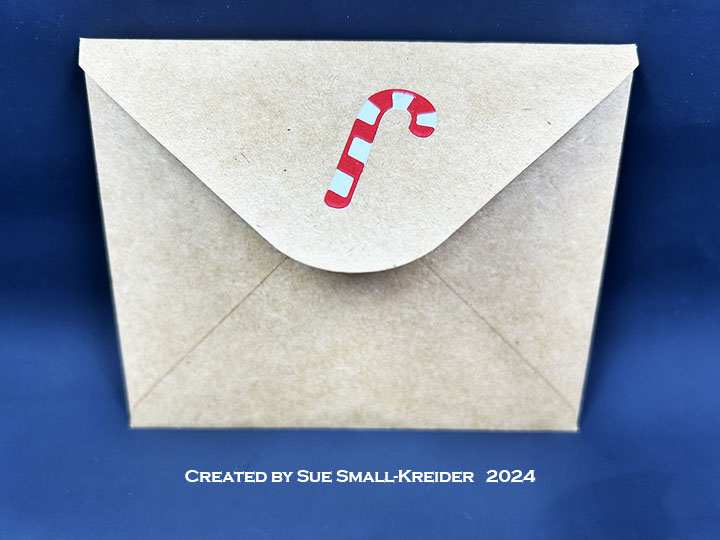
Envelope: The card fits into a purchased A2 (4.25x 5.5-inches) size kraft paper envelope. Another candycane was glued to the back flap of the envelope.
___________________________________
Thank you for experiencing this blog post.
I hope this inspires you and makes you smile.
Please like and leave comments 😊
___________________________________
Disclaimer: Karen Burniston products are provided free of charge by the manufacturer for review and use. All other items were personally purchased. Compensated affiliate links used where or when possible, meaning I will receive a small percentage commission from these manufacturers at no cost to you. This will allow me to add more content to my YouTube channel and help out a lot. Thank you.
Getting ready for the Christmas rush by making Thank You cards using my Spellbinders’ BetterPress and Karen Burniston’s Postage Pop-Up and Thank You dies.
Watch the process video to see how I made this card.
Cardbase: All the cards are made from purchased A7 (5×7-inches) kraft cardstock bases with matching envelopes.
Sentiments: The outside sentiments are all Spellbinders BetterPress plates and inks. The “I’m so Grateful for you” is printed in Clay and Coastal inks using the So Grateful for You plates and die set. The inside pop-up sentiment uses Karen Burniston’s Postage Pop-Up, Thank you and Thank You Shadow die sets.(See video above for assembly.) Thank You very much” cards use the same inks and the Thank You Very Much plates and template.
Envelope: The card fits into an A7 (5×7-inches) size envelope with hand-drawn hearts on the back flaps.
___________________________________
Thank you for experiencing this blog post.
I hope this inspires you and makes you smile.
Please like and leave comments 😊
___________________________________
Disclaimer: Karen Burniston products are provided free of charge by the manufacturer for review and use. All other items were personally purchased. Compensated affiliate links used where or when possible, meaning I will receive a small percentage commission from these manufacturers at no cost to you. This will allow me to add more content to my YouTube channel and help out a lot. Thank you.
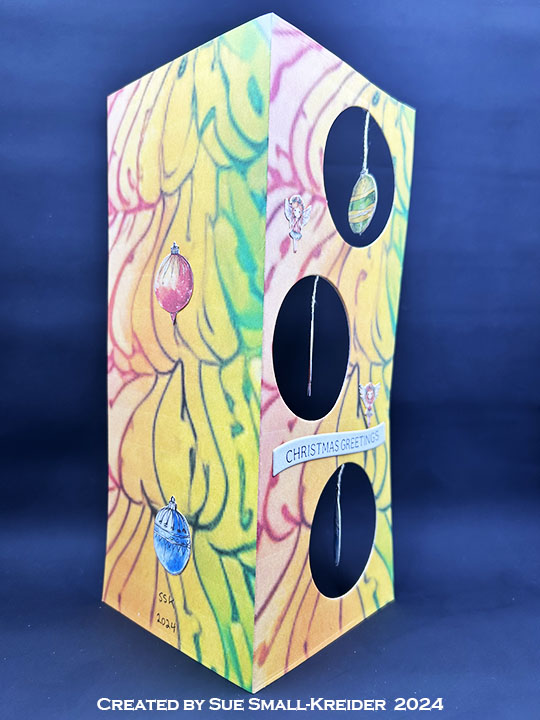
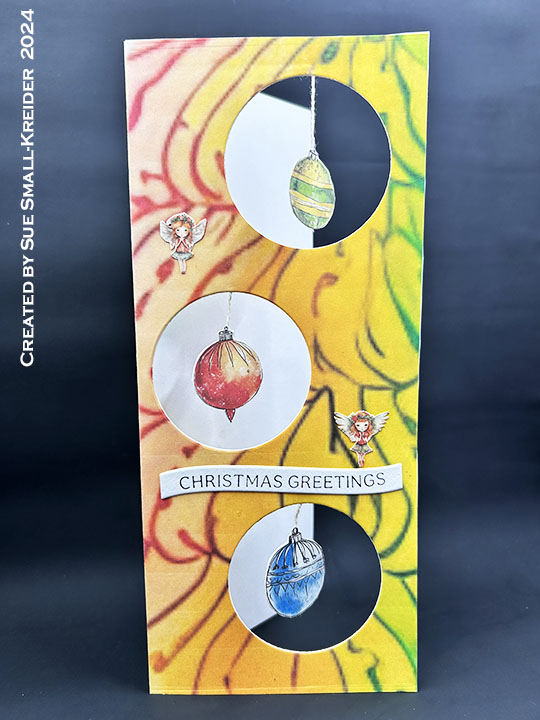
This card was made for Relatively Thoughtful’s A Treemendous Christmas Challengewhich uses the free download Treemendous Christmas images.
Watch the process video to see how I made this card.
Cardbase: Using my computer I enlarged one tree image to cover a 9.5×4.25-inch rectangle and then copied the image a second time to print the outside cardbase which I cut down to a 8.75×7.50-inch rectangle. I folded that rectangle in half for a side-fold 3.75×8.75-inch cardbase. I printed a second sheet to cover one panel of the card inside.
Sentiments: I used some Spellbinder’s BetterPress banner sentiments that I had printed and die cut previously. “Christmas Greetings” and “Happy New Year”.
Envelope: The card fits into a #10 business size envelope.
___________________________________
Thank you for experiencing this blog post.
I hope this inspires you and makes you smile.
Please like and leave comments 😊
___________________________________
Disclaimer: Karen Burniston products are provided free of charge by the manufacturer for review and use. All other items were personally purchased. Compensated affiliate links used where or when possible, meaning I will receive a small percentage commission from these manufacturers at no cost to you. This will allow me to add more content to my YouTube channel and help out a lot. Thank you.
Materials Used:
Dies
Karen Burniston in cahoots with Riley and Company – Circles – Crosshatch – 1057
Press Plates
Spellbinders – BetterPress Plate & Die Set – Mistletoe Greetings Press
Papers
Recollections – 8.5×11 65 lb. Cardstock – White
Relatively Thoughtful Digital Images – A Treemendous Christmas Challenge
This card was made for Craft Roulette #243 whose parameters included a a belly band, cottage colors, coat(s) element, and upcycled.
Watch the process video to see how I made this card.
Cardbase: The cardbase is a top-fold A2 (4.25×5.5-inch).
Sentiment: “Hooray it’s your birthday” are printed with the Spellbinder’s BetterPress system, specifically Paint The Town press plates on bisque cotton card panel with BetterPress Black ink. The inside sentiments of “Happy Birthday” and longer rhyme, come from the Craft Roulette Funn Sentiments #01 stamp set and stamped with Memento Tuxedo Black ink.
Envelope: This card fits into an A2 envelope with it’s back flap stamped with “HBD” also from the Craft Roulette stamp set.
___________________________________
Thank you for experiencing this blog post.
I hope this inspires you and makes you smile.
Please like and leave comments 😊
___________________________________
Disclaimer: Karen Burniston products are provided free of charge by the manufacturer for review and use. All other items were personally purchased. Compensated affiliate links used where or when possible, meaning I will receive a small percentage commission from these manufacturers at no cost to you. This will allow me to add more content to my YouTube channel and help out a lot. Thank you.
Materials Used:
Dies & Press Plates
Spellbinders – BetterPress of the Month – Paint the Town
This card was inspired by a 3D embossing folder that features poinsettias and candy canes by Spellbinders. It also uses some new dies by Karen Burniston and paper by Graphic 45.
Watch the process video to see how I made this card.
Card Back
Cardbase: I used a purchased A7 (5×7-inch) side fold cardbase with matching envelope. (Color the fold both inside and out using markers that are close in color to the papers, so that the white fold line is less seen.) The cardbase was covered using decorative papers.
Embossed Front: The Spellbinders 3D embossing folder of the month for October 2024 embosses a 5 1/2×8 1/2-inch surface. I used gold foil cardstock to emboss and colored the image with fine tipped alcohol markers. (I found the smaller tipped makers got brighter coverage, but I went over most of the images two or three times to get my desired color.)
Poinsettia: Using the Karen Burniston Poinsettia die set, cut one large poinsettia petals from green and another from red cardstock. Cut two of the small petals from red. Cut one red center and a second center from yellow cardstock backed with double sided adhesive tape to make stickers. Assemble the flower as shown in video. Cut berry branches and fir branches from green and berries from red cardstock covered with clear packing tape. Use berry die as a stencil to add white gel pen highlights to berries.
Fan Pop-Up: Using the Photo Fan die set, cut one of the fan mechanism piece from decorative paper matching the card inside paper. Cut off arms and save arms. Glue two arms together and attach to fan with arm edge butted into the center fold of the fan. Install fan into card as directed in the video.
Sentiment: Cut one of the Merry Christmas Lorna Add-on large die from red cardstock and the words from gold foil cardstock.
Envelope: The card fits into an A2 (4.25x 5.5-inches) size envelope. I decorated the back flap of the envelope with candy canes from the Christmas Borders 2 die set.
___________________________________
Thank you for experiencing this blog post.
I hope this inspires you and makes you smile.
Please like and leave comments 😊
___________________________________
Disclaimer: Karen Burniston products are provided free of charge by the manufacturer for review and use. All other items were personally purchased. Compensated affiliate links used where or when possible, meaning I will receive a small percentage commission from these manufacturers at no cost to you. This will allow me to add more content to my YouTube channel and help out a lot. Thank you.