Just wanted to share the card fronts and light-up lighthouse card I made at workshops at the Orlando Stamp & Scrapbook Expo last week.
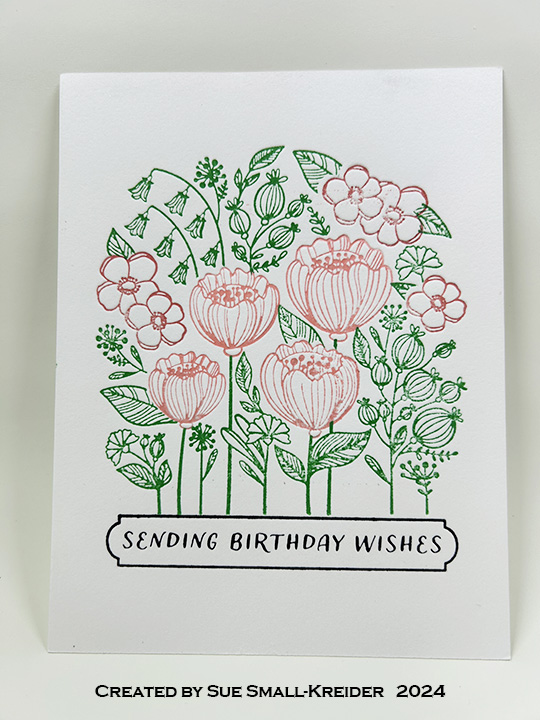
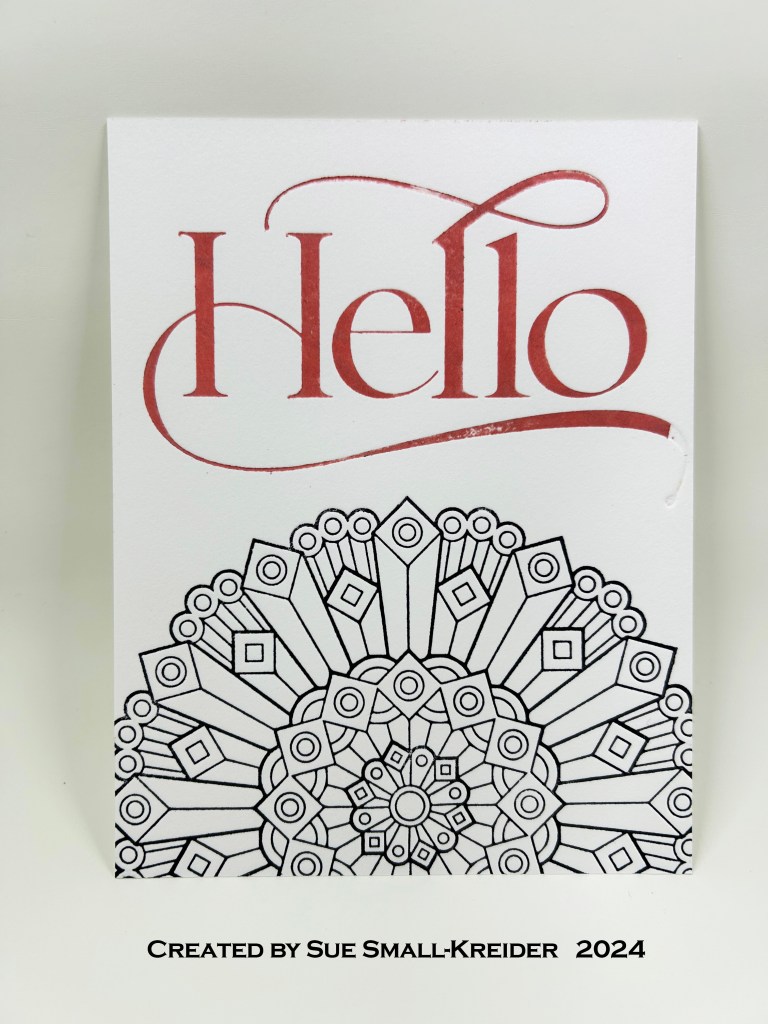
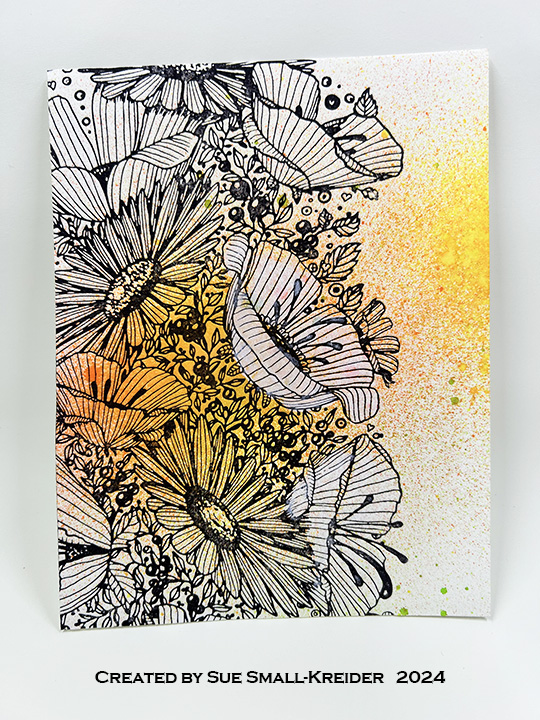
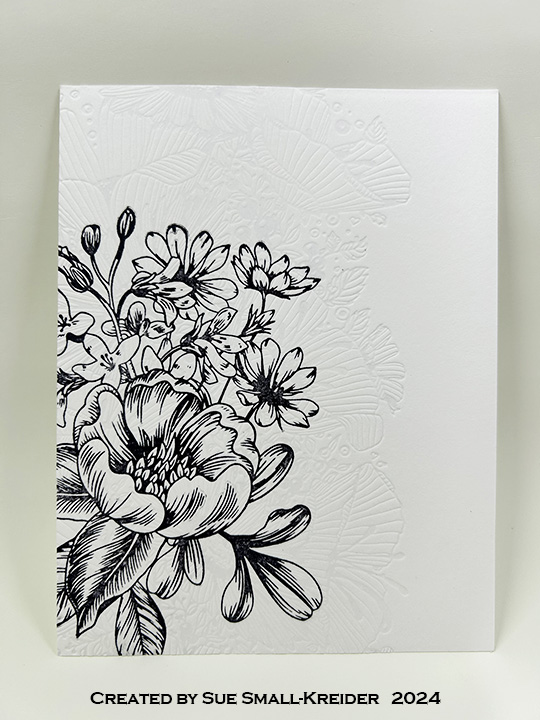
I took a class with Jennifer from Stamplistic on using the Spellbinder’s Better Press. We made a number of card fronts trying different techniques and papers. To get the letterpress look of an embossed plate, you need to use the thick cotton paper such as the Better Press papers. We learned to add sprays to the paper before stamping onto the paper for the crisp imprint and ink coverage of image. You can add a variety of ink colors to one plate, or use one of the new registration plate sets and print different colors in several printing passes. I found the Better Press to be a quick way to get professional and elegant looking images. The cost is more than rubber or clear stamps, but as long as you get enough ink on the plates, you get a professional looking image that you can then watercolor or color with alcohol markers.
Sabrina Leavell ofScrappy Tails taught a quick workshop on making a dimensional lighthouse with a Pear Blossom one light to make it light-up.
Lots of great and friendly vendors at the Expo too.
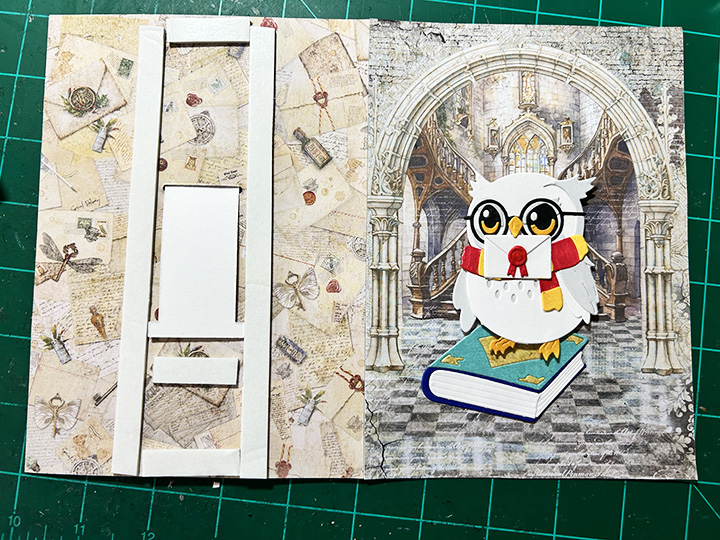
Who doesn’t enjoy receiving mail, but mail by Owl Post is special. This Harry Potter themed birthday card was a commissioned card for a Potter fan.
I used a new die set from Spellbinders for the owl on top of the book and an older die and stamp set from Concord & 9th for the envelope with pull out birthday wishes.
Cardbase: A purchased A7 (5×7-inch) cardbase and envelope was covered on the outside panels with patterned paper from Ciao Bella’ Wizard Academy paper pad. A leftover strip from the back of the card was saved for the small envelope step.
Owl and Book: (Watch assembly video first.) I found it easier to place the glasses on after adding the eyebrows and then adding the eyes. (I cut the black piece of the eyes out of white and colored the bottom “U” shapes yellow and then glued them inside the black pieces.) The beak is popped up on a tiny piece of foam tape so the envelope can fit under it. I cut the scarf from white cardstock and colored the various pieces yellow and red to create the striped scarf. To get the beak, envelope seal and book cover to sparkle, I used glitter brush pens. The book is glued flat to the card front and the owl is popped up on foam tape squares.
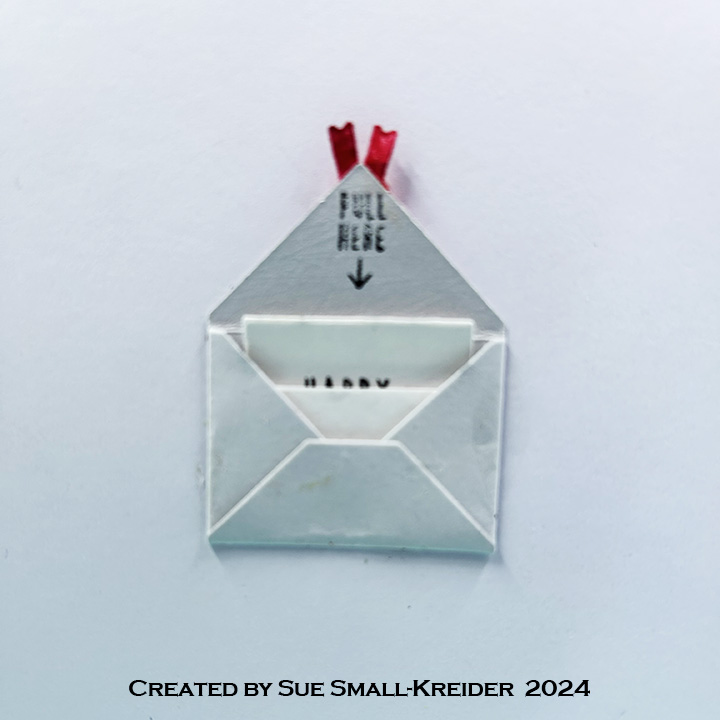
Small Envelope and Message:(Watch assembly video first.) Using the small envelope die in the Concord and 9th cut one from light grey cardstock. Fold envelope on score marks and open back up. Using the small slot die in the set cut a slot in the bottom center of envelope for the message piece to slide through. (I made the mistake of putting the slot at the top of the envelope center and had to cover the grey inside of the envelope below the slot with white.) Figure out the placement of the envelope inside the card and mark with a pencil where the slot goes and die cut it. Using the wide “T” shaped die in the set, cut one from white cardstock. Use the birthday sentiment stamp from the coordinating stamp set to get the message onto the strip.
Glue envelope center back onto inside of card panel matching up the slots. Thread message strip through the slot so that the bottom of the strip is on the back side of the card. Stamp the “Pull Here” on the top of the inside of the envelope just above the white strip. Glue the envelop bottom to its sides making sure that the white strip can move freely though the envelope. Push the white strip so that the envelope can close and on the back side of the card, place a strip of foam tape just below the “T” of the white stripe to act as a stopper for the strip. Add foam tape along the sides of the white stripe to be the channel it will follow. Peel the backing paper from foam. tape Place extra strip of pattern paper over the foam tape. Test message stripe coming out of envelope. Add red ribbon seal from the Spellbinder’s owl set to top flap of envelope.
Card Envelope: The black glasses frame is cut using the owl die set and glued onto the back envelope flap.
This card was made for Craft Roulette #207 whose parameters included an A2 size card, ice cream store colors, tasty or tastes element and a banner.
I wanted to make a pop-up or 3-dimensional A2 size card for this episode of Craft Roulette, so I modified a 3D postal truck I had made for my mail carrier to say thank you to fit into an A2 size envelope (4.25×5.5 inches.) (See Mail Truck blog post.)
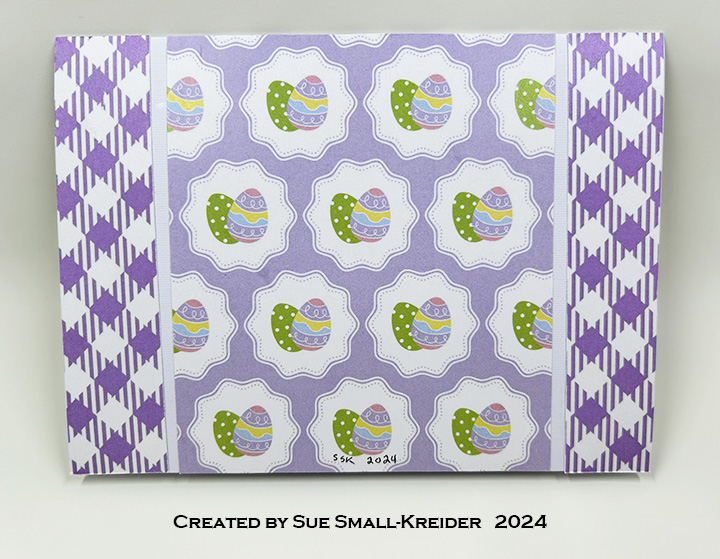
I saw a side-fold of like this card on social media and decided to make my own version using a top fold A6 (4 1/2 x 6 1/4-inches) purchased card base and the egg die from Karen Burniston’s Spring Animals die set.
Cardbase: Using a purchased A6 card base, I used double sided patterned paper from Kat Scrappiness to make a mat frame on the front panel, piecing it together as the patterned paper was 1/2-inch smaller than the card height. Added a yellow 5 3/4 x 4 1/4-inches panel over mat frame. On the back panel, I used the leftover pieces to make an interesting symmetrical design utilizing both patterned sides of the paper.
Egg Panel: A 4×5 1/2-inches rectangle cut from white cardstock, I lightly marked in pencil lines at 1 1/8-inches, 2 3/4-inches and 4 3/8-inches. Along the tops and bottoms of these lines I marked 5/16-inches from the edge. These “T” marks where to center the top or bottom of the egg die. I used the center crack in the egg die to center on the vertical lines. After die-cutting out the six eggs, I erased the pencil marks. (I found it easier to sketch out the egg placement on the back side of the card, tracing around the die to see if it looked right before die-cutting from the front of the panel.) (I added two clay flower shaker elements to the front of the card.)
Shaker Assembly: Position the white panel over the yellow panel and mark the corners of the white panel on the yellow as well as tracing the egg cut-outs onto the yellow. Using double-sided tape, adhere a 4×5 1/2-inches rectangle of clear acetate/film to the back of the white panel. Add strips of narrow foam tape to create boxes around the traced eggs on yellow panel. Using an anti static tool to apply powder to the inside of each box (including the sides of the sides of the foam tape) and back side of acetate/film on white panel. Add confetti and clay sprinkles to each box, avoid putting too much in each box and level out any high points to below the foam tape level. Holding the card base, carefully peel off the backing paper on the foam tape. Remove any confetti from tape. Using the corner marks on the yellow panel line-up the white panel and adhere to foam tape, sandwiching the confetti inside the boxes. (I like to use the confetti sequins from This Calls For Confetti who have a variety of colors, sizes and finishes and have wonderfully quick customer service/delivery time.They also have the best anti-static tool for making shaker cards.)
Sentiment: I cut out the words only using Karen Burniston’s Happy Easter word die from purple cardstock for the inside of the card.
Envelope: I cut out a sticker from the decorative paper to embellish the back of the envelope flap.
The sweet pinks and reds of old-fashion rose bushes always remind me of their scent. This Mother’s Day card is a loving way to say how much mothers are appreciated.
I used Honeybee Stamps’ layering Bold Backgrounds Vintage Roses dies for the front of the card. The roses are cut from three different shades of pink cardstock and inked with a bright red ink. The leaves were cut in an apple green and inked with a medium green ink. There layering guide which you have to download from the Honeybee Stamps website shows how the the three sizes of roses are assembled. The sentiment banner is a strip of apple green cardstock 4 1/2-inched wide by 1/2-inches tall with fishtails ends cut free-hand and inked to match the leaves. The gold foiled sentiment strip “Appreciate You” is from Spellbinders that I had batched foiled previously.
The inside “Happy Mother’s Day” sentiment is cut from the apple green cardstock using a die by Papertrey Ink. The back of the card is covered with a striped sheet of printed paper from This Calls for Confetti.
I went stash diving to find a old-fashioned looking rose for the back of the envelope and ended up using a stamp set from Pinkfresh Studios called Pretty Paisley. The roses were stamped in melon red ink while the tiny sentiment “It’s the little things that make life big” was stamped in a green pear ink.
This card was made for Craft Roulette #204 whose parameters included: thinking of you project, fairy tale colors, hear(s) or ear(s) element and stamped background.
To learn how I made the card, watch this process video.
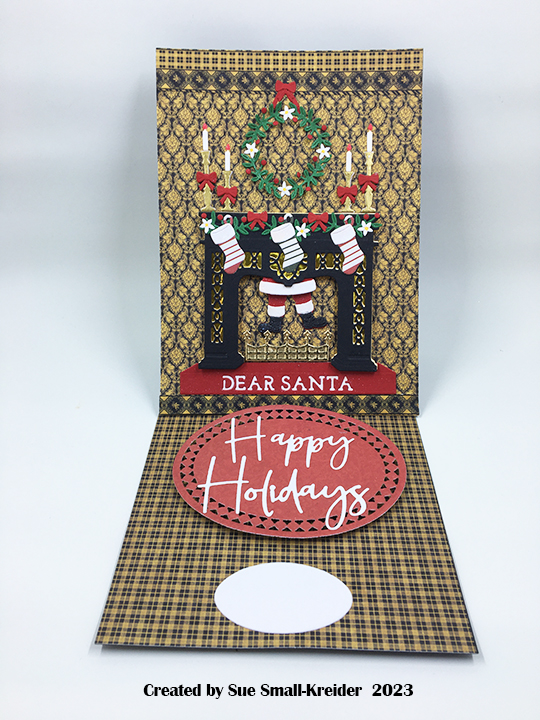
With Santa shimmering down the chimney with his legs swinging left and right, this card became my submission for Craft Roulette episode #191 whose parameters were a drop-down card, supper table colors, seasons element, and shiny.
Cardbase: Cut one 5×7-inch rectangle from heavy black cardstock. Cut another piece from black using the template pictured below. Train the folds of the larger piece. This will be the bottom base with easel arm. Glue the tab on the easel arm to the back of the 5×7 piece making sure when the card is folded shut that the top 5×7’s edges are aligned with the bottom piece. Cover the card front with decorative paper as well as the bottom panel. I added decorative borders for quarter floor molding and picture rail near the ceiling top.
Fireplace and Santa: Watch the assembly video. I used two layers of cardstock for the fireplace and four layers for the candlesticks. The foam dot I used was thick, so I used two layers of foam tape to keep the fireplace higher than Santa. Glitter gloss was brushed over all of Santa as well as the fur on the stockings’ tops. The gold foil in the fireplace decorative panels is from an envelope liner.
Decorations: The set comes with dies for the greenery, tiny flowers and berries as well as the bow. I used a red glitter pen for the candle flames and a yellow marker for the flower centers.
Sentiments: The fireplace set comes with four messages. I choose “Dear Santa” to die-cut into the red hearth piece which is backed with a solid white hearth piece. Glitter gloss was applied to the red hearth. To create the easel stopper, cut an oval rug and pop it up on foam dots. Glue die-cut “Happy Holidays” onto oval. Because of my dark background paper, I added a smaller white oval for a personal message.
Envelope: I decorated the back flap of the envelope and the card back with decorative paper scraps.
Thank you for reading this blog post. I hope this inspires you and makes you smile. Please like and leave comments 😊
This is the seventh card in the Fireplace Christmas Card series.
Waiting for the grandchildren to arrive to decorate the tree. It’s that peaceful moment when the dog is asleep before the fire and the chairs are ready for tired bodies.
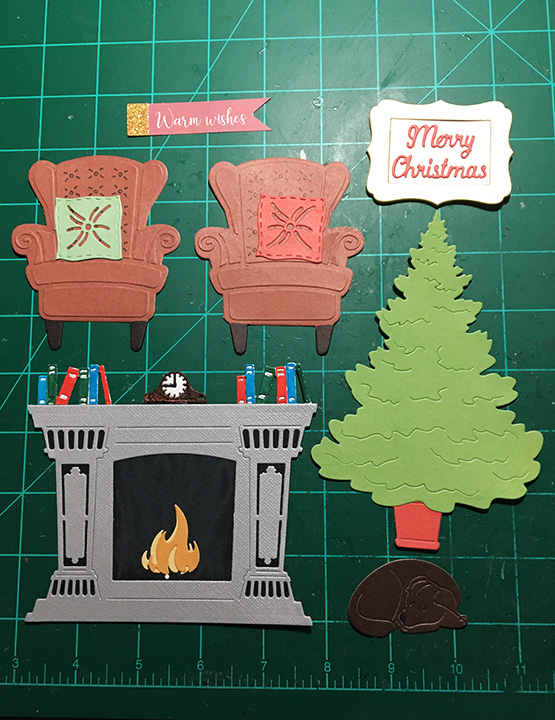
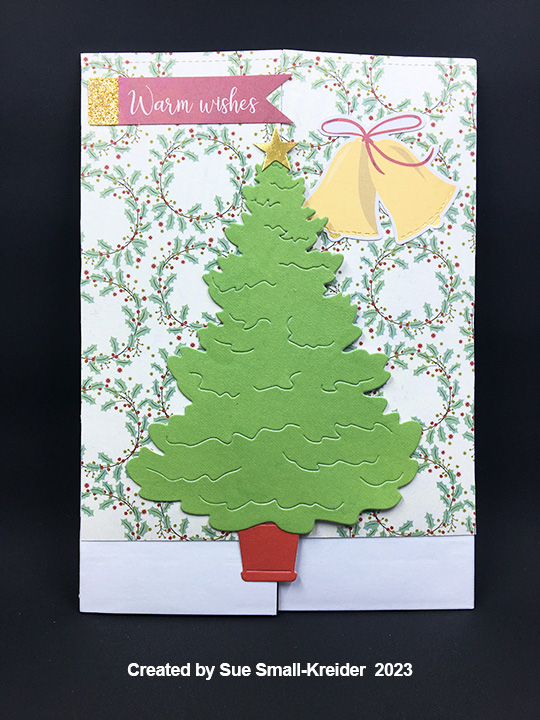
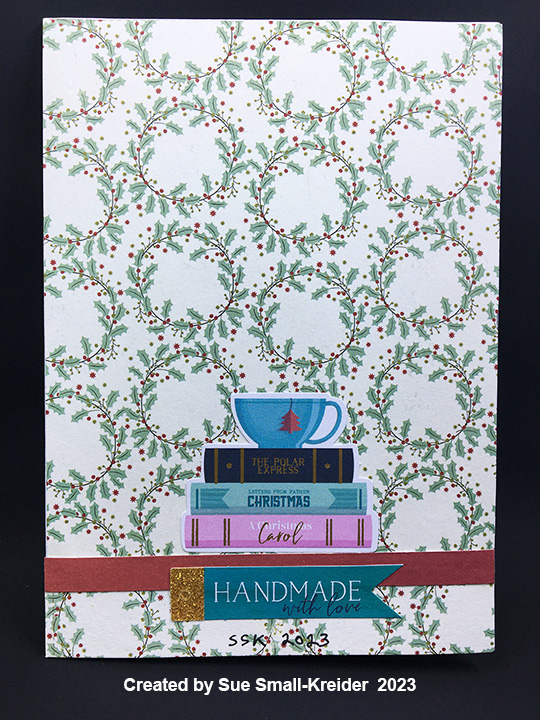
For this card I used two Paper Discovery die sets by Olga Direktorenko – Timeless Room and Elegant Roomas well as the Timeless Room embossing folder. These sets are available in limited quantities from Craftstash. Olga is an amazing designer of scene dies and stamps who lives in Ukraine.
Cardbase: A purchased A7 (5×7 inches) gatefold cardbase and matching envelope were used for this card. The inside was covered in a red and white striped wallpaper with embossed floor moldings made using the Timeless Room embossing folder. A red rug is in the center bottom. The outside has wreath paper from the same 6×6 paper pad as the striped paper.
Fireplace: The fireplace die cuts a detailed image that needs to be backed with black paper to make the details stand out. The final touch is the snoozing chocolate labrador retriever in front of the fire.
Chairs: The chair die in the Timeless Room set has an outline die and then one other die that cuts all the detailed pieces that make up the dimensional chair. The seat back die has a stencil feature for tufting which I used with a fine-tipped black marker to add this detail to the chair. The cushions are from the same set. When attached to the inside flaps of the card, the chair extend slightly over the edge, but card covered by the tree on the card front when the card is closed.
Card Front: An evergreen tree sits in a red pot waiting to be decorated. The tree is from the Elegant Room set while the pot is from the Timeless Room set. The left half of the tree is glued to the left card flap. The yellow bells were added to balance out the banner. Both are from a Spellbinder’s Christmas card kit.
Card Back: A red strip covers the seam where the two pieces of paper meet. Ephemera from a Spellbinder’s Christmas card kit was used to decorate the back including a stack of Christmas themed books and a banner stating, “Handmade with love.”
Sentiments: The front banner “Warm Wishes” is from a Spellbinder’s Christmas card kit. “Merry Christmas” is part of the Elegant Room set and includes the frame. The two white ovals over the chairs are spaces to write personal messages.
Envelope: The back flap is decorated with yellow bells from a Spellbinder’s Christmas card kit.
Thank you for reading this blog post. I hope this inspires you and makes you smile. Please like and leave comments 😊