Dear Santa I Can Explain…

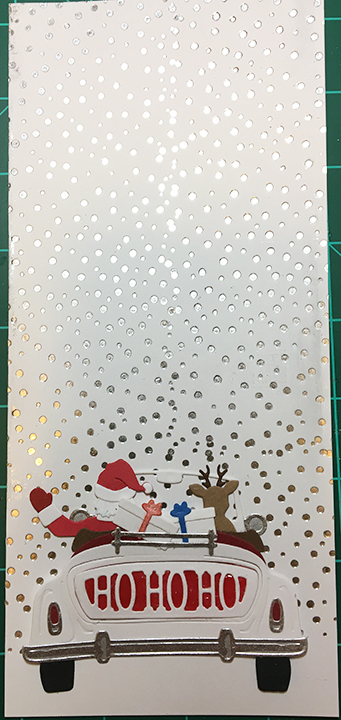
With Santa shimmering down the chimney with his legs swinging left and right, this card became my submission for Craft Roulette episode #191 whose parameters were a drop-down card, supper table colors, seasons element, and shiny.

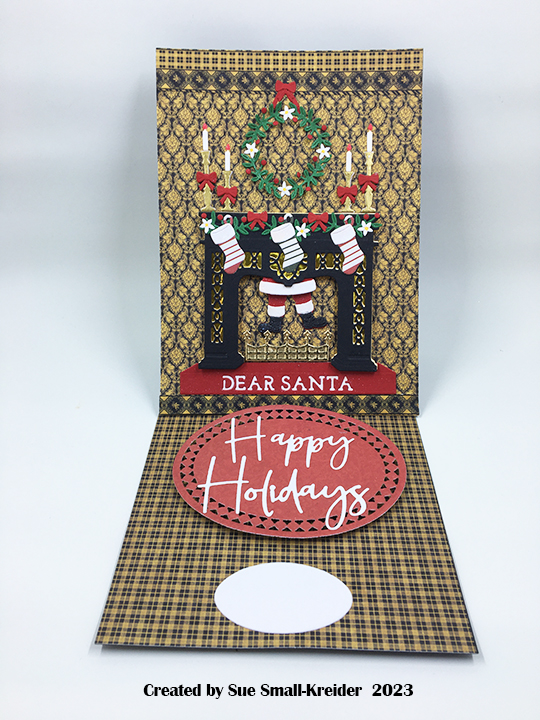
I had started this card earlier in the week after discovering Spellbinders Large-Die-Of-the-Month set for October 2021, but hadn’t finished the easel stop/sentiment. It is part of my Fireplace series.

Cardbase: Cut one 5×7-inch rectangle from heavy black cardstock. Cut another piece from black using the template pictured below. Train the folds of the larger piece. This will be the bottom base with easel arm. Glue the tab on the easel arm to the back of the 5×7 piece making sure when the card is folded shut that the top 5×7’s edges are aligned with the bottom piece. Cover the card front with decorative paper as well as the bottom panel. I added decorative borders for quarter floor molding and picture rail near the ceiling top.

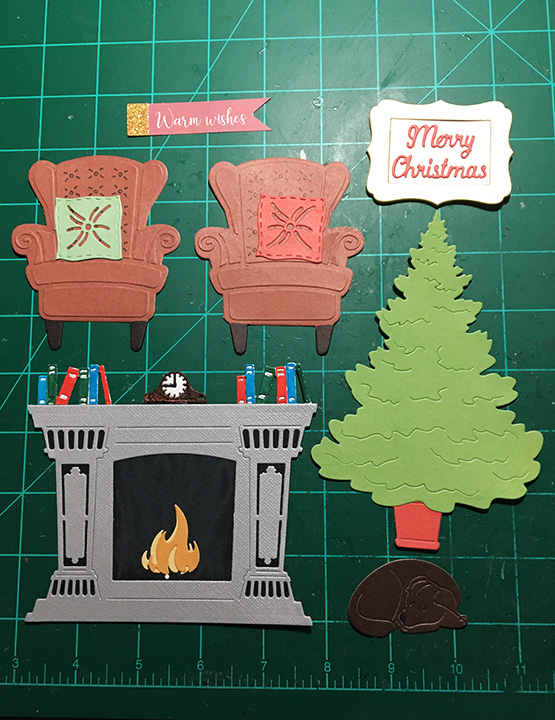
Fireplace and Santa: Watch the assembly video. I used two layers of cardstock for the fireplace and four layers for the candlesticks. The foam dot I used was thick, so I used two layers of foam tape to keep the fireplace higher than Santa. Glitter gloss was brushed over all of Santa as well as the fur on the stockings’ tops. The gold foil in the fireplace decorative panels is from an envelope liner.

Decorations: The set comes with dies for the greenery, tiny flowers and berries as well as the bow. I used a red glitter pen for the candle flames and a yellow marker for the flower centers.

Sentiments: The fireplace set comes with four messages. I choose β€œDear Santa” to die-cut into the red hearth piece which is backed with a solid white hearth piece. Glitter gloss was applied to the red hearth. To create the easel stopper, cut an oval rug and pop it up on foam dots. Glue die-cut β€œHappy Holidays” onto oval. Because of my dark background paper, I added a smaller white oval for a personal message.

Envelope: I decorated the back flap of the envelope and the card back with decorative paper scraps.

Thank you for reading this blog post. I hope this inspires you and makes you smile. Please like and leave comments 😊

Materials Used:

Dies

Papers

  • Graphic 45 – 8×8 Double-Sided Paper Pad – Warm Wishes Collection – Glad Tidings and Winter Wonder
  • My Mind’s Eye – 6×6 Double-Sided Paper Pad –Cozy Christmas
  • White, Black, Red and Cream Cardstock
  • Gold Foil Cardstock from packaging
  • Gold Foil from envelope liner

Ink

  • Stampin’ Up – Stampin’ Blends Marker – Dark Daffodil Delight
  • Scrapbook.com – Glitter Brush – Red
  • Nuvo – Aqua Shimmer – Glitter Gloss

Adhesives

  • Neutral PH Adhesive by LINECO
  • Fine-Tip Glue Bottle
  • Foam Dots
  • Foam Tape

Tools

  • Die Cutting Machine
  • Pokey Tool
  • We R Memories – QuickStick
  • We R Memories – Scoring Board and Trimmer
  • Scissors

Gatefold Fireplace

This is the seventh card in the Fireplace Christmas Card series.

Waiting for the grandchildren to arrive to decorate the tree. It’s that peaceful moment when the dog is asleep before the fire and the chairs are ready for tired bodies.

For this card I used two Paper Discovery die sets by Olga Direktorenko – Timeless Room and Elegant Room as well as the Timeless Room embossing folder. These sets are available in limited quantities from Craftstash. Olga is an amazing designer of scene dies and stamps who lives in Ukraine.

Cardbase: A purchased A7 (5×7 inches) gatefold cardbase and matching envelope were used for this card. The inside was covered in a red and white striped wallpaper with embossed floor moldings made using the Timeless Room embossing folder. A red rug is in the center bottom. The outside has wreath paper from the same 6×6 paper pad as the striped paper.

Fireplace: The fireplace die cuts a detailed image that needs to be backed with black paper to make the details stand out.                                     The final touch is the snoozing chocolate labrador retriever in front of the fire.

Chairs: The chair die in the Timeless Room set has an outline die and then one other die that cuts all the detailed pieces that make up the dimensional chair. The seat back die has a stencil feature for tufting which I used with a fine-tipped black marker to add this detail to the chair. The cushions are from the same set. When attached to the inside flaps of the card, the chair extend slightly over the edge, but card covered by the tree on the card front when the card is closed.

Card Front: An evergreen tree sits in a red pot waiting to be decorated. The tree is from the Elegant Room set while the pot is from the Timeless Room set. The left half of the tree is glued to the left card flap. The yellow bells were added to balance out the banner. Both are from a Spellbinder’s Christmas card kit.

Card Back: A red strip covers the seam where the two pieces of paper meet. Ephemera from a Spellbinder’s Christmas card kit was used to decorate the back including a stack of Christmas themed books and a banner stating, β€œHandmade with love.”

Sentiments: The front banner β€œWarm Wishes” is from a Spellbinder’s Christmas card kit. β€œMerry Christmas” is part of the Elegant Room set and includes the frame. The two white ovals over the chairs are spaces to write personal messages.

Envelope: The back flap is decorated with yellow bells from a Spellbinder’s Christmas card kit.

Thank you for reading this blog post. I hope this inspires you and makes you smile. Please like and leave comments 😊

Other Fireplace Cards by designer/brand

Materials Used:

Dies & Embossing Folders

Papers

  • My Mind’s Eye – 6×6 Double-Sided Paper Pad – Cozy Christmas
  • Craft Consortium – A4 Solids Double-Sided Paper Pad – Candy Christmas
  • Spellbinders – Mega Holiday Cardmaking Kit – Christmas – All Aboard
  • Bazzill – 8.5×11 Textured Cardstock – Tiara -18-1002
  • Matte Gold Cardstock
  • Black and White Cardstock
  • Park Lane Paperie – A7 Gatefold Cardbase and Envelope – White

Ink

  • Ranger – Tim Holtz – Distress Crayon- Hickory Smoke
  • Sharpie – Permanent Marker – Ultra Fine Tip – Black, Blue, Brown, Green and Red

Adhesives

Tools

Charting A Nautical Birthday

I often make cards with my father in mind. Growing up I visited a lot of historic sailing ships around the world with him. This is a birthday card in his honor.

For this pop-up 3D card, I used products from Scrappy Tails’ new Nautical 2023 June Collection.

Base: Stamp on kraft paper the Caribbean Map Stamp. Cut two of the Pop Up Stand from the map. Train the folds on each piece and glue tabs with slot for rubber band together. Add rubber band. (I used a #12 band.)

Wheel: Cut two wheels from embossed woodgrain paper and two wheels from brown cardstock using the large die from the Ship Wheel die set. Using sponge daubers, ink the woodgrain wheels with browns and black. Glue the brown cardstock wheels to the back of the woodgrain wheels. Die cut from gold cardstock the β€œSeas the day” sentiment letters included in the Ship Wheel set. (I cut a letter placement guild from scrap cardstock. Putting a drop of glue on the back of my hand to drip the letters in before placing them on the wheel.)

Add from gold cardstock the center wheel tuning bearings and screw heads to wheel. (While the set comes with tiny circles to cover the screws on the wheel, I elected to use Nuvo Drops for the screw heads.) Glue top handles of the two wheels together before gluing wheels to base.

Sentiment Banners: Three of the six hot foil banners in the Nautical Banner hot foil plates set were used – β€œLets sail-ebrate!” β€œHappy Birthday” and β€œJust for You.” (I usually do batch hot foiling with my Spellbinders’ Glimmer Foil System because it takes time to set-up, heat-up and cool-down.)

Envelope: The card folds flat to fit into an A7 envelope that I decorated the back flap with the β€œLet’s Sail-ebrate!” banner in red foil.

Thank you for reading this blog post. I hope this inspires you and makes you smile. Please like and leave comments 😊

Want to see more of the Scrappy Tails nautical collection? Check out my blog posts:

Materials Used:

Dies & Foiling Plates

Stamps

Papers

  • MemoryBoxCo.com – 8.5×11 Embossed Cardstock – Woodgrain
  • Kraft Cardstock
  • Matte Gold Cardstock
  • Brown, White and Cream Cardstock
  • A7 ivory Envelope

Foils:

  • Spellbinders – Glimmer Hot Foil – Red
  • Spellbinders – Glimmer Hot Foil – Polished Brass

Ink

  • Memento – Fade-Resistant Dye ink – Tuxedo Black
  • Ranger – Tim Holtz – Distress Ink- Vintage Photo, Walnut Stain and Black Soot

Adhesives

Tools

  • Die Cutting Machine
  • Stamping Platform
  • LDRS – Stampendable Stamping Tool
  • Stamping Cloth
  • Sponge Dauber
  • Craft Mat
  • Scissors
  • Spellbinders -Glimmer Hot Foil System
  • Spellbinders – Quick Trimmer

Miscellaneous

  • #12 Rubber Band
  • Nuvo – Crystal Drops – Bright Gold

Thank You To Our Mail Carrier

For all the packages and envelopes that our mail carrier has so carefully placed in our mail box or placed by our front door, I wanted to say thank you to her. So, a mail truck thank you ornament was created.

I primarily used Spellbinder’s Food Truck and Sunday Drive collection dies to create this mail truck.

I cut two of the food truck die from an 8.5 x 11-inch sheet of white cardstock. I next cut panels that were 2.75 inches wide and scored at 3/8 inches on each side. (See downloadable PDF file of templates.)

The top of the windshield strip is .25 inches tall which is not on the template. The front panel is scored across at .875 inches and the side tabs are cut away. This forms the front slanted hood.

Glue all the panels to one of the truck pieces as shown in the photo making sure that all panels are parallel to each other and tabs are all on the inside of the truck.

Glue up a mail carrier using people dies from the Sunday Drive collection (I used the Sunday Sunset Drive for this and freehand cut the hat which our mail carrier wears.) Attach mail carrier to seat panel. (It is easier at this point to letters and packages to the seat panel at this point than to add them once the truck side is attached to the panels.)

Glue the panels to the second truck piece starting at the front and working towards the back.

The roof panels as shown on the template have tow holes punched into them for a string to tie them shut and form a loop to hang the truck from.  I had to notch my tabs to fit over the cab panel. You could avoid this by attaching the roof panels first and then the other panels.

The truck is designed to fold flat, so allow enough string to allow for it being flat.

I decorated the truck using the circle dies in the Food Truck set and the steering wheel from the Sunday Drive set. The strips were cut from some scrap strips of red and blue papers. The headlights and taillights use the smallest circle die from the Food truck set. (I used yellow glitter cardstock for the headlights.)

The β€œUS MAIL” on the sides and the β€œTHANK YOU” on the back were cut using Karen Burniston’s Mini Alphabet.Β  (I cut three β€œO”s glued together to make a slider on the string to help keep the roof shut.)

Thank you for reading this blog. Please like and leave comments. 😊

Snow in review

Over the past few years, I’ve made a few cards featuring snow and thought it might be fun to review them again.

Early Christmas Cards

12 Days of Christmas Trees – Day 4

Let It Snow Shadow Box

Snowy Forest Day

A Snowy Drive with Santa

Warmish Winter Wishes

Santa Vintage Trifold

Winter is in the Air

Snow Days

Snowy Good Morning

Hillside Holiday Wishes

Silent Night in the Village

Winter Mail

Scandinavian Snowman

Meet The SnowΒ Family

All Wrapped Up In You

My spouse and I joke that neither of us can remember our wedding anniversary. We know it is in late October but we always have to look it up. This year I decided to just make a sweet Halloween card for my spouse for our anniversary.

I used the Spellbinders’ Dancin Mummy dies as well as the stamp set from the Boo Dance Party collection to make the card. The card base is a mini-slimline card made from double-sided cardstock from a 2013 Martha Stewart 12 x 12 paper pad called Gothic Manor. The legs swing on circle foam dot.

Thank you for reading this blog post. Please like and leave comments 😊 You can also follow this site.

Bee-utiful Flowery Painting

Bees, fresh paint and tulips seem like harbingers of Spring as we humans come out of winter hibernation.  I had some of the paint brush die sets from the Spellbinder’s Paint Your World Collection by Vicky Papaioannou as well as the Picket Fence Studio’s I Bee Fierce stamp set by Nicole Peterson on my crafting desk and thought they went well together. 

Having die-cut four sets of paint brushes from three of the die sets, I set about assembling the brushes noting that the handle pieces are not interchangeable, but all three sets have the same bristles die. I glued one layer of bristles to the back of each handle and another layer of bristles to the back of the silver band. Next, I studied the packaging for decorative ideas on the placement of the tulips within the bristles. I glued in place the leaves and flowers once I had figured out their placement in the two layers of bristles. I decided to ink blend some pink Distress Ink onto white cardstock scraps before die-cutting the paint drips.  I applied glue the silver band layer just on the back of the band and then placed it on top of the handle layer matching up the two lines on the band with the lines on the handle. Once the paint drips were dry, they were glued to the back of the assembled paint brushes.

Following the design rule of odd numbers of elements, I knew I had to stamp three elements to make the card front flow. Another design trick is to suggest movement by placing things on the diagonal.

I stamped the front, back and inside of the card before I adhered the paint brushes to the card. Stamping is easy when you use a stamping platform with stamping tool to help apply even pressure to the stamps. The back of the card is stamped using a Technique Tuesday stamp set.

The front sentiment is β€œI am little but I bee fierce,” while the inside says, β€œBe like the bee… fly despite the risks.” The back of the card states β€œThis is a random act of cardiness.”

The envelope back was stamped with another sentiment from the Picket Fence set as well as the smaller bee. It says β€œthat hum you hear is the sound of the mighty bee recreating our world with love, song and perseverance.”

Thank you for reading this blog post. Please like and leave comments 😊

Materials Used:

Dies

Stamps

Inks & Pigments

  • Ranger – Jim Holtz’s Distress Oxide Ink – Abandon Coral
  • Memento Fade-Resistant Dye Ink – Tuxedo Black
  • Nuvo Highly Pigmented Watercolour Pencil – Golden Canary

Papers

  • Heavyweight white cardstock
  • Colored cardstock scraps
  • Coated cardstock from junk mail
  • Silver mirrored cardstock from packaging
  • Brown #10 business envelope

Miscellaneous

Sunny and Flowery Thanks

Bright yellow and orange flowers stitched around a golden β€œTHANKS” makes for a sunny thank you.

I stitched the flowery THANKS die from Spellbinders again when I needed a special thank you card. This time picking warm colors. 

The larger flower petals and leaves were outline or chain stitched before filling in the centers of them using three strands of floss. The black flower centers are French knots. While I knotted the floss ends when starting, I finished the flowers on the back side by adding dots of glue to seal the thread ends and add dimension to the stitched frame.

After gluing the gold letters cut on the front of the stitched piece, I added foam squares with glue to back side of the stitched piece behind the letters and attached to the front of the card base. The card base is an 8 x 8 inches sheet of heavy orange card stock folded in half.

This card was for someone leaving one position to start a new job, so the flap of the envelop is stamped in a gold ink stating “start of something new.”

Thank you for reading this blog post. Please like and leave comments 😊

Like this stitched card? Here are other stitched cards:

Β·  Flowery Thanks

Β·  Stitched Flowers for a Spring Birthday

Β·  Stitched Flowers for a Summer Birthday

Β·  Stitched Valentine

Β·  Shine Bright

Materials Used:

Dies

Papers

  • Heavy yellow cardstock
  • Scrap matte gold cardstock
  • 8 x8 inch heavy weight orange cardstock

Stamps and Inks

  • Scrapbook.com -Wordfetti Oh So Happy Clear Stamps
  • Stampin’ Up – Classic Stampin’ Pad – Crumb Cake

Miscellaneous

  • Yellows, oranges and black embroidery floss
  • Large eyed needle
  • Foam squares

Who Is Door Dancing?

Knock, knock. Who’s there? Hoppy Day the dancing bunny of spring.

Interactive cards are fun and creating one with layers adds to the excitement. Hints of Easter baskets filled with eggs flank a blue door that when opened, reveals a cute white bunny that will dance when the pull tab is moved back and forth.

Both the doorway and bunny are craft die sets by Spellbinders. The doorway is the Open House Door Base using the door mat from the Open House Spring die set. (I have found that you can save on bundles from Scrapbook.com for the Spellbinder’s Open House collection.) For the dancing bunny, the March 2021 Large Die of the Month set Spring Together with Lever Pull die set was used. (I watched the assembly video for this die set before making this card.)

Die-cut the door from blue cardstock and then die cut the windows from the door. Using the door, mark its placement with pencil and then cut the three sides using a metal straight edge and craft knife. Trace the window placement from blue door to pink door and die cut the windows.

Die cut four door windows and a transom window from white cardstock. Use the large transom window die to cut window opening in the pink card front.  Adhere the vellum to back of pink card and then glue white window frame into window opening and onto vellum.  The door windows are created by sandwiching the vellum between the blue and pink doors. Glue the white door window frames to the front of blue and back of pink doors.

Cut two of the mail slots and four of the doorknobs from silver foil cardstock. Adhere the mail slots to each side of the door and three doorknobs to the front blue side and one knob to the pink side of door. Mark the door opening with pencil onto the background paper. This will let you figure out the placement of the bunny.

Once the lever pieces are double cut and glued together for strength, they can be linked used tiny brads. Using the assembled level to position the line die, cut the slit for the mechanism to slip into the backing paper.  Thread the level through the slot and add additional brads to affix the mechanism to front of card.

Adhere the bunny body first with foam strips and then the head. Cut the semi-circle notch on the top and background layers of the card as well as the card base before assembling the card front.

Using foam strips adhere the pink card with door to background piece avoiding the lever mechanism.

The door mat is colored brown cardstock with Aged Mahogany Distressed Ink with a black backing for the letters. Die-cut the half-circle for the pull lever on the card base before adhering front layered piece to card base.

The Easter baskets used the large eggshell from the Spring Together set with green foliage from the Open House Spring die set and freehand eggs and handles. The flowers are finished with dots of Nuvo Drops and a pink flower sequin.

Decorate the back of the card with scrap pieces.

Thank you for reading this blog post. Please like and leave comments 😊

Click here to see more dancing animals using these dies.

Click here to see see another door card using these dies.

Click here to see other door cards.

Materials Used:

Dies

  • Spellbinders – Open House Door Base Cutting Dies – S4-1131
  • Spellbinders – Open House Spring Cutting Dies – S4-1181
  • Spellbinders – March 2021 Large Die of the Month set Spring Together with Lever Pull Cutting Dies – DOML-MAR21

Stamping

  • Simon Says Stamp – So Talkative Clear Stamp Set – sss202385
  • Craft Consortium -English Garden Clear Stamps by Hackney & Co.
  • Stampin’ Up – Classic Stampin’ Pad – Pear Pizzazz
  • Simon Says Stamp – Pawsitively Saturated Ink – Sunbeam
  • Ranger – Tim Holtz Distress Ink – Aged Mahogany

Papers

  • Craftwork Cards- Flying High 8×8” Paper Pad
  • Colored cardstock scraps
  • Clear vellum scraps
  • A7 white card base and envelope

Miscellaneous