There is nothing like the burst of a sunrise from a dark morning sky.
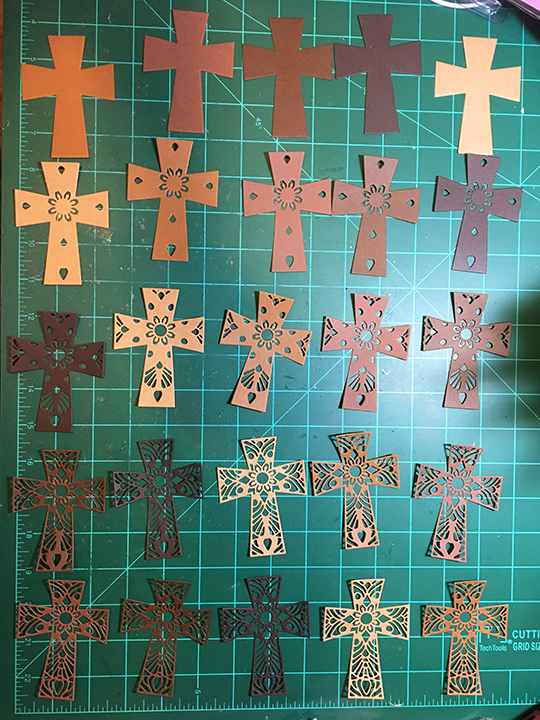
Using five different shades of browns from tan to espresso cut one of each of the cross dies in each color. Lay out the various layers so that when assembled no cross has two of the same color.
Glue the layers together to form five crosses.
Cut a 4 1/4 x 11 inch piece of white cardstock. Score and fold at 7 3/4 inches (valley fold) and at 2 1/4 inches (valley fold).
With a sun rise stencil, orange ink and a sponge dauber, ink in the sun on the back panel. Next ink the sun rays with yellow ink.
Let ink dry before stamping the “He is risen” sentiment in black onto back panel, spacing so it is hiden when the card is closed. On a white 2 x 4 1/4 inch piece of white paper stamp in black ink “Happy Easter.” Glue white paper on the inside panel of the card. (I used the paper to hide an inky mistake.)
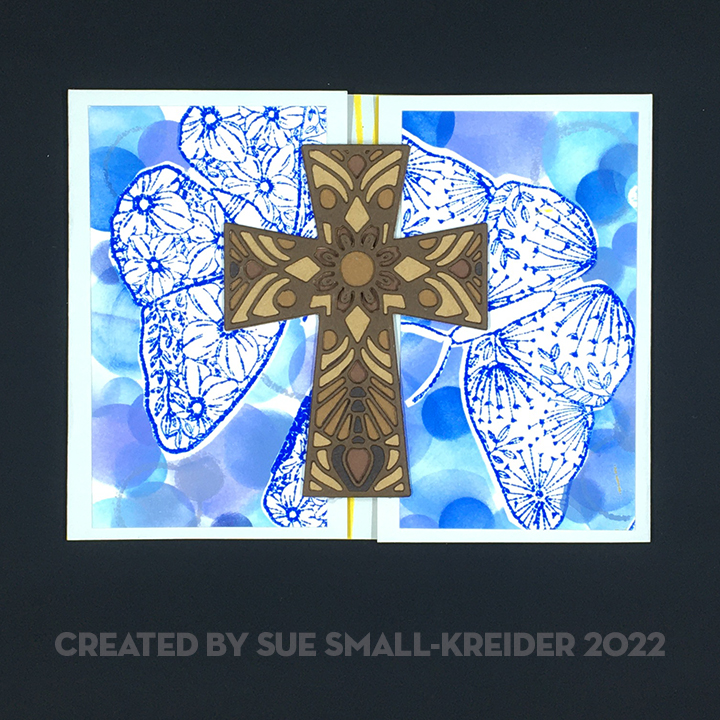
In my stash I found some experiements I had done trying out the bokeh stenciling method to create an interesting background for the Apple Blossom butterly stamps.( I know I used Distress Oxide inks for the stenciling and some blue ink cubes from a Papercrafting Society box to stamp the butterflies.) These panels were cut down to 2 x 4 inch pieces and adhered to the front gatefold panels.
Position and then glue the cross to the left half of the closed card.
To hint at the envelope’s contents, I stamped tulips onto the blue envelope with a yellow ink.
Thank you for reading this blog post. Please like and leave comments 😊
Sunrise means a new day and new beginnings. Using Divinity Designs layered cross die set and a stenciled sunrise, I hope to convey this elated feeling of gladness in this z-fold Easter card.
Using five different shades of browns from tan to espresso cut one of each of the cross dies in each color. Lay out the various layers so that when assembled no cross has two of the same color.
Glue the layers together to form five crosses.
Cut a 4 1/4 x 11 inch piece of sky blue cardstock. Score and fold at 5 1/2 inches (valley fold) and at 2 1/4 inches (mountain fold).
With a sun rise stencil, orange ink and a sponge dauber, ink in the sun on the folded shut card. Ink the sun rays on the left side of folded card with yellow ink. Open up card and ink in all the sun rays on back panel using the inked sun half to lineup stencil.
Let ink dry before stamping the “He is risen” sentiment in black onto back panel, spacing so it is hiden when the card is closed. On a white 2 x 4 inch piece of white paper stamp in black ink “Happy Easter.” Glue white paper on the inside panel of the card. Die-cut strips of green grass to adhere to the bottom of the stenciled sunrise panels of the card.
Position and then glue the cross to the left half of the closed card.
To hint at the envelope’s contents, I stamped tulips onto the blue envelope with a yellow ink.
Thank you for reading this blog post. Please like and leave comments 😊
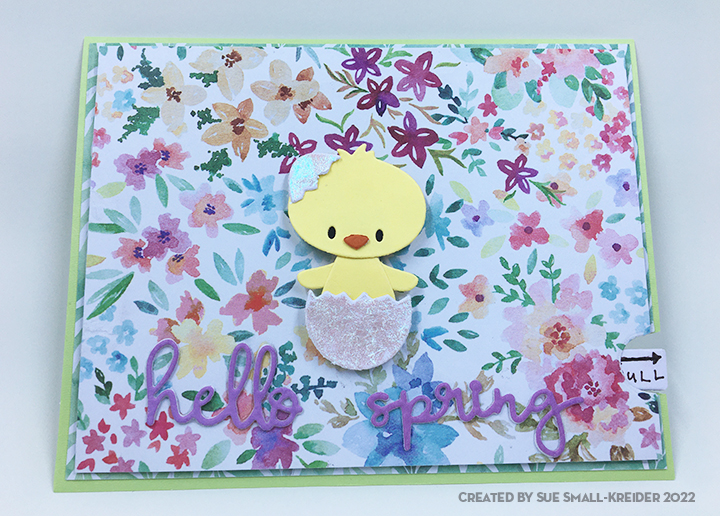
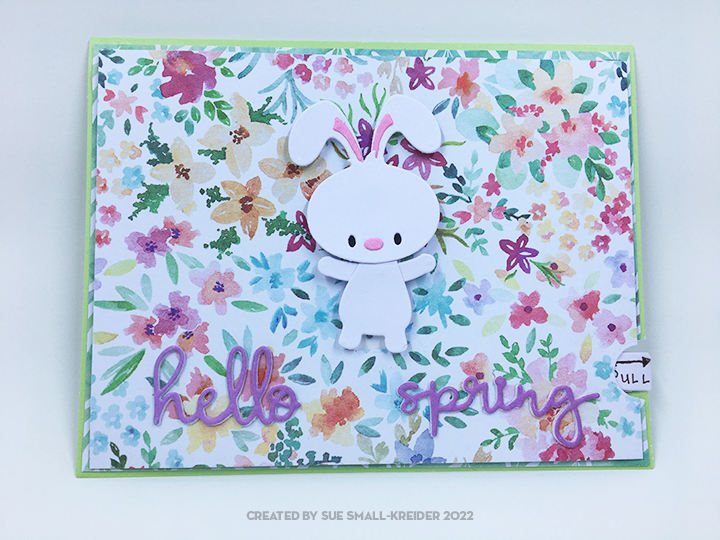
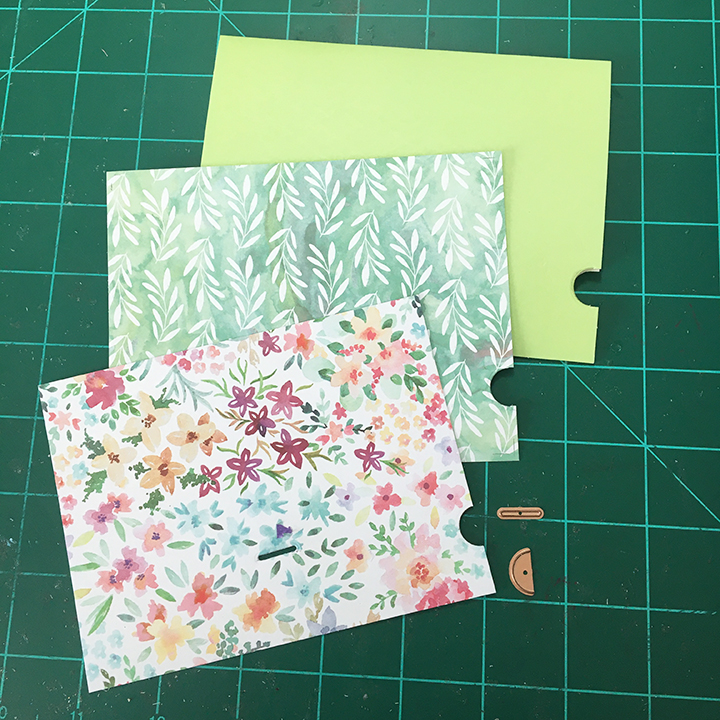
Nothing says “Hello Spring” like dancing bunnies and newly hatched baby ducks. These two cute interactive cards were made with the Spellbinders Spring Together with Lever Pull Cutting Dies set.
This is a great set of dies to use up those small pieces of cardstock scraps for the animals. I used a bluish opal polish on the eggshell to give it some luster. (I watched the assembly video for this die set before making these cards.)
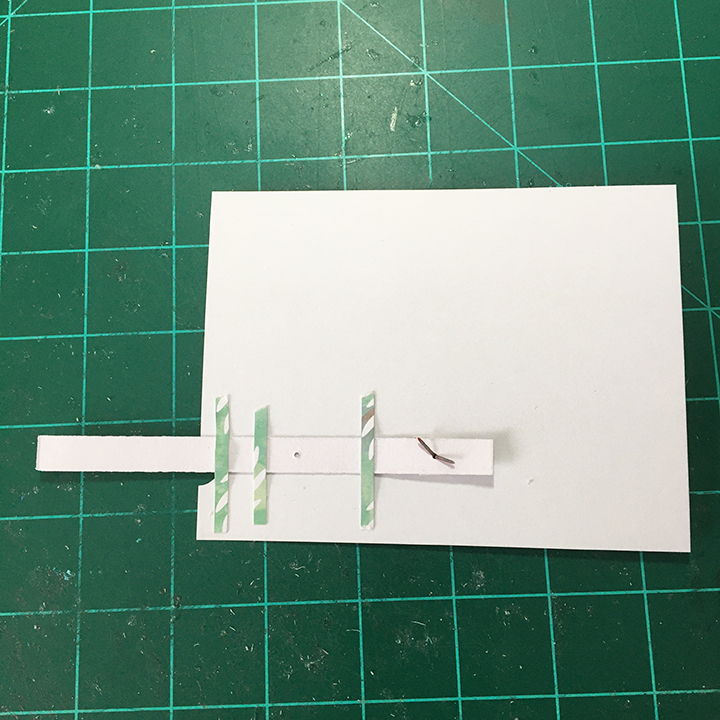
The levers/mechanism pieces are cut twice and glued together to be sturdy. For the Hello Spring sentiment, the words were cut twice from white and once from purple and then glued together.
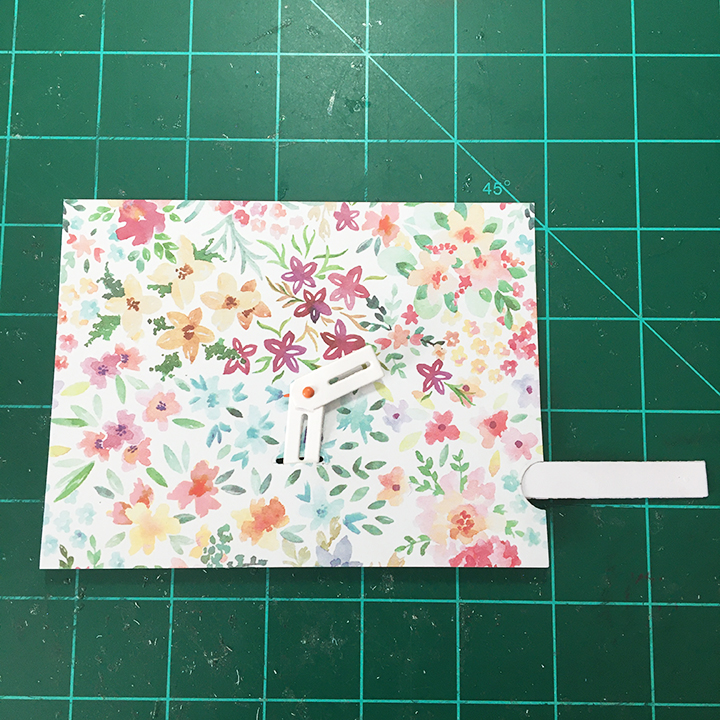
The printed leafy mat was cut an 1/8 of an inch smaller than the solid green card base and the floral top background is 1/4 of an inch smaller than the card base. Once the position of the lever mechanism was decided, the line slit and pull-tab notch were cut on the floral layer. The notches were then cut on the leafy green mat and cardbase using the floral layer to line up the notches.
The thin trimmings of the mat layer were used as lever guides using dots of glue at the ends of the strips.
Two additional brads are used to attach the slotted levers to the floral background. Foam strips were placed on the back to raise up the mechanism from the matting layer. The leafy green mat layer was glued directly to the card base.
Using the decorative scraps trimmed from the front card layers, the backs of the cards were finished.
The back flaps of the cards’ envelopes were stamped with a bunny stamp from Craft Consortium.
Thank you for reading this blog post. Please like and leave comments 😊
Materials Used:
Dies
Spellbinders – March 2021 Large Die of the Month set Spring Together with Lever Pull Cutting Dies – DOML-MAR21
Stamping
Craft Consortium -English Garden Clear Stamps by Hackney & Co.
Stampin’ Up – Classic Stampin’ Pad – Pear Pizzazz
Papers
Park Lane – 8.5in x11 in 100# smooth white core cardstock – Watercolor Floral
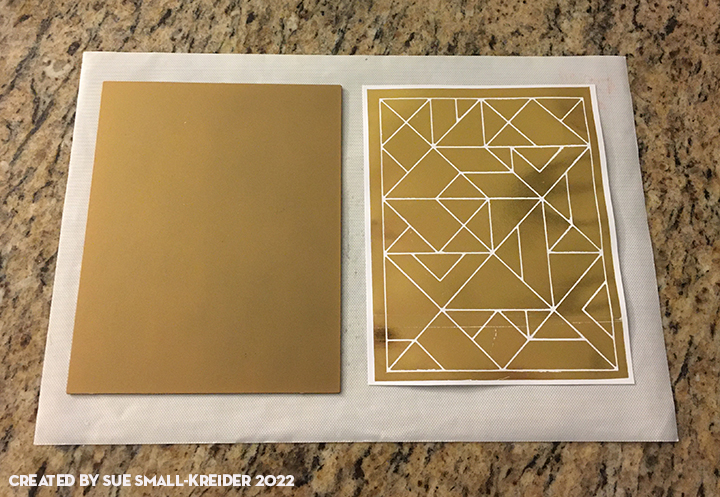
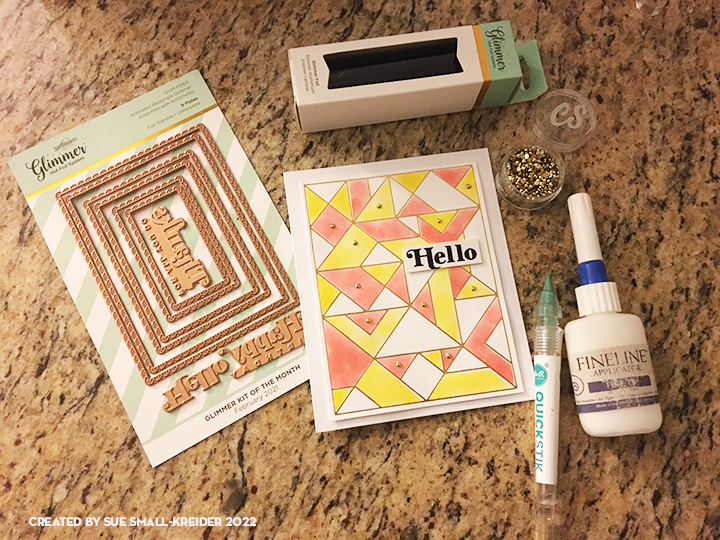
I hot foiled three backgrounds making two foiled lines and one solid foil using the foil leftover. (I accidentally foiled my solid hot foiling plate with the second solid foil piece. Make sure the foil has the backing side next to the paper, not the foiling plate!)
Using the three stencils I did two versions of coloring in the shapes on the foil lines backgrounds. On one background I took the stencil with mostly triangles and used the Citrine ink for the smaller triangles and the Sunbeam ink for the larger shapes. The nenext stencil I used the Poppy Red ink for all the shapes and left the remaining shapes white. For the second colored background, I used a different colored ink for each of the three stencils. Because the Citrine and Sunbeam inks are only one shade different, I feel like the background with the white shapes is more interesting.
For the two “Thanks” cards, I glued the backgrounds directly to the card bases. Next, I cut four of the circle Thanks from white scrap cardstock and glued three of the die-cuts together. The single layer thanks, I glued to the colored background, while the foiled background received the layered die-cut.
The “Hello” card uses a black foiled sentiment from a Spellbinder’s frames and sentiment set. The sentiment and the inked background are adhered with foam squares. To add more interest, I glued tiny gold flatback gemstones from my stash. (I think they may have been in an advent calendar from Craftstash or Crafter’s Companion.)(A sticky tip tool is great for adding small elements like these gemstones to your projects.)
Because I used A7 sized card bases (5 x 7 inches), I needed to trim the bases down for the 5 ¼ x 4 inches foiled backgrounds.
Thank you for reading this blog post. Please like and leave comments 😊
Iris, cosmos and cornflowers stitched around a golden “THANKS” makes for a simple, but heartfelt thank you.
I used another stitched flower die from Spellbinders, this time the Small Die of the Month for April 2021. The die comes with separate letters to die cut the word “THANKS” as well as the larger background die cut with stitching holes. Using very heavy pale blue cardstock, I die-cut the large piece to be stitched. I had a piece of junk mail that had large sections of matte gold and I die-cut the letters from that.
The larger flower petals and leaves were outline or chain stitched before filling in the centers of them using three strands of floss. The yellow stamens are French knots. While I knotted the floss ends when starting, I finished the flowers on the back side by adding dots of glue to seal the thread ends and add dimension to the stitched frame.
After gluing the gold letters on the front of the stitched piece, I added foam squares with glue to back side of the stitched piece behind the letters and attached to the front of the card base. The card base is an 8 x8 inches sheet of heavy white card stock folded in half using a scoring board.
If you enjoyed this stitched card, there are two more stitched card posts this week as well as pervious stitched cards:
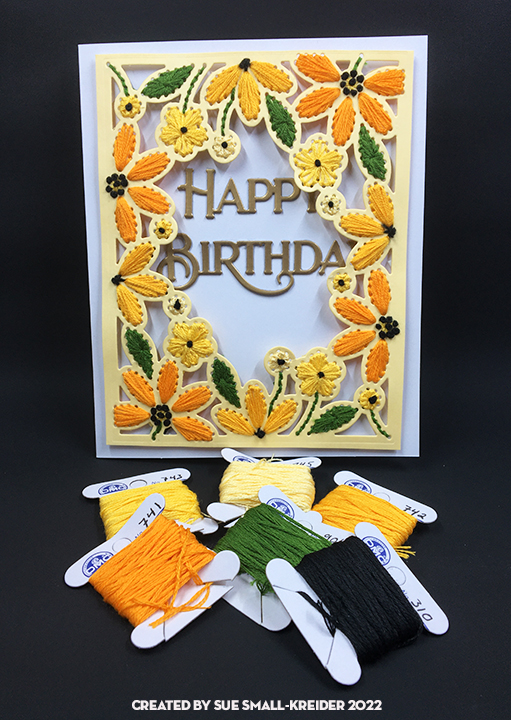
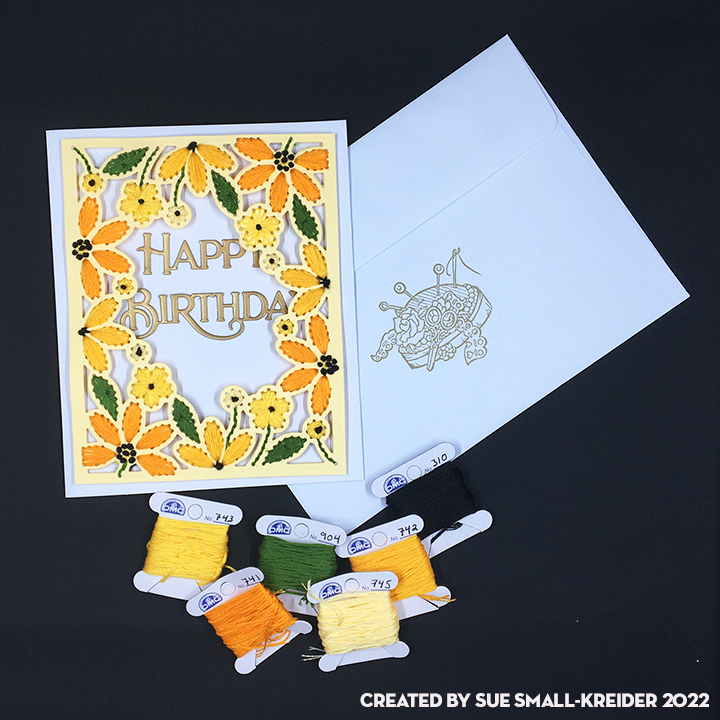
Bright yellow and orange flowers, stitched with shiny embroidery floss hoovering over a raised matte gold Happy Birthday make for a fun and cheery card.
I used a stitched flower die from Spellbinders that originally was part of their Large Die of the Month Club but is now available to everyone via their on-line shop. Initially I die-cut into an 8.5 x 5.5 inches sheet of pale-yellow heavy cardstock that was in my stash. I stitched it completely before trimming it down to the final 4.5 x 5.75 inches to fit on a 5 x 6 inches card base.
The larger flower petals and leaves were outline or chain stitched before filling in the centers of them using three strands of floss. The black stamens are French knots. While I knotted the floss ends when starting, I finished the flowers on the back side by adding dots of glue to seal the thread ends and add dimension to the stitched frame.
The Poppy Stamps “Happy Birthday – Poe Script” sentiment was cut three times from a gold piece of junk mail and glued together. The words were glued directly to the card base after determining the placement with the stitched frame. The frame was attached to the card base with thick foam squares.
For the envelope, I stamped the back with an older rubber stamp from Fun Stampers Journey using my favorite gold-like ink from Stampin’ Up called Crumb Cake.
If you enjoyed this stitched card, there are two more stitched card posts this week as well as pervious stitched cards:
Luscious purple, blue and lavender flowers, stitched with shiny embroidery floss hoovering over a raised matte gold Happy Birthday make for a simple yet elegant card.
I used a stitched flower die from Spellbinders that originally was part of their Large Die of the Month Club but is now available to everyone via their on-line shop. Initially I die-cut into an 8.5 x 5.5 inches sheet of pale blue heavy cardstock that was in my stash. I stitched it completely before trimming it down to the final 4.5 x 5.75 inches to fit on a 5 x 6 inches card base.
The larger flower petals and leaves were outline or chain stitched before filling in the centers of them using three strands of floss. The yellow stamens are French knots. While I knotted the floss ends when starting, I finished the flowers on the back side by adding dots of glue to seal the thread ends and add dimension to the stitched frame.
The Poppy Stamps “Happy Birthday – Poe Script” sentiment was cut three times from a gold piece of junk mail and glued together. The words were glued directly to the card base after determining the placement with the stitched frame. The frame was attached to the card base with thick foam squares.
If you enjoyed this stitched card, there are two more stitched card posts this week as well as pervious stitched cards:
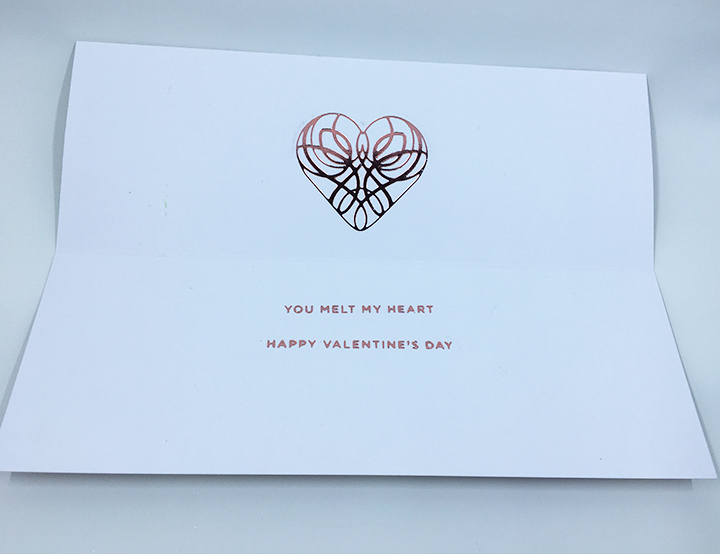
Valentine’s Day is coming and a handmade card in masculine colors with a bit of stitching and soft bling, maybe just the thing for your loved one.
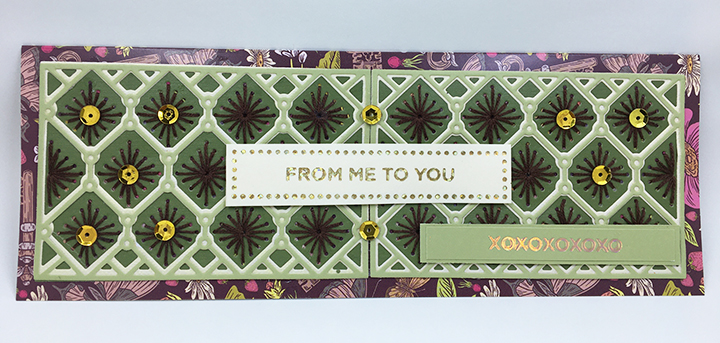
In playing around with the Spellbinder’s Layered Stitched Background dies, I realized that if put side-by-side, two of the backgrounds would fit on a slimline card for a #10 business envelope which would go well for the masculine card I needed to make for Valentine’s Day. The card is to be attached atop a chocolate bar.
I had enough large scraps of pearlescent coordinating green cardstock and a pale celery green textured paper to cut two each of the layers. (I saved all the out-cut pieces and tiny dots to use in other cards.) The card base is a brown flowery patterned cardstock with a white back cut into a 6 ½ inch x 9-inches rectangle, scored and folded in half.
The stitching was done with three strands of brown embroidery floss. Using clear tape on the backside to adhere the thread tails to the card.
A fine tipped glue bottle is the easiest way to apply glue to the fine lines of the top two layers of the die-cuts. (I cut the thicker, middle layer from the lightest color to add contrast to the two other shades of green and to make the medium green fine line detail pop.) Once the lattice layers were glued together it was easy to adhere them to the stitched layer.
Hot foiling the inside of the card needed to be done before the stitched panels could be adhered to the card base. Spellbinders calls their hot foiling system glimmering. (Here are two videos explaining the hot foiling process – Jennifer McGuire and Yana Smakula) I have found their Quick Trimmer to be much easier to cut the foil with than scissors. I usually do a batch of hot foiling when I get out the Glimmer Hot Foil System heating plate and my die-cutting machine as it takes time to heat-up and cool-down. (I use a die-cutting machine that can take an 8 1/2 x 11 inches sheet of paper but the system can use a smaller 6-inch wide machine too.)
I did some small sentiments first on scraps of the green cardstock and a piece of cream cardstock using scraps of different foils. Some worked well, but some had issues. (I do these as practice runs as I only had one shot at the card inside.) I positioned my foiling plates and rose blush foil on the inside of my card and taped them down using low tack tape. (The plates moved slightly when I ran them through the die-cutting machine and made the sentiments a bit wonky. I should have taped both sides of the plates down.) A sand eraser is good for removing errant foil bits but be careful when using white corded cardstock as the eraser will wear away the color to white.
Once the foiling was completed, the stitched card layers were glued to the front of the card base.
The front sentiments “FROM ME TO YOU” (in Speckled Aura foil on cream cardstock) and “XOXO” (in Aura foil on dark green cardstock) are glued to other scraps to give them some firmer stability before being adhered to the card front with foam squares. Ten gold sequins were added to the tops of the stitching and where the lattice frames meet for a bit of sparkle.
A gold heart rub-on transfer was added to the back of the brown envelope. A chocolate bar will be bundled under the card-stuffed envelope and tied with a white ribbon for presentation.
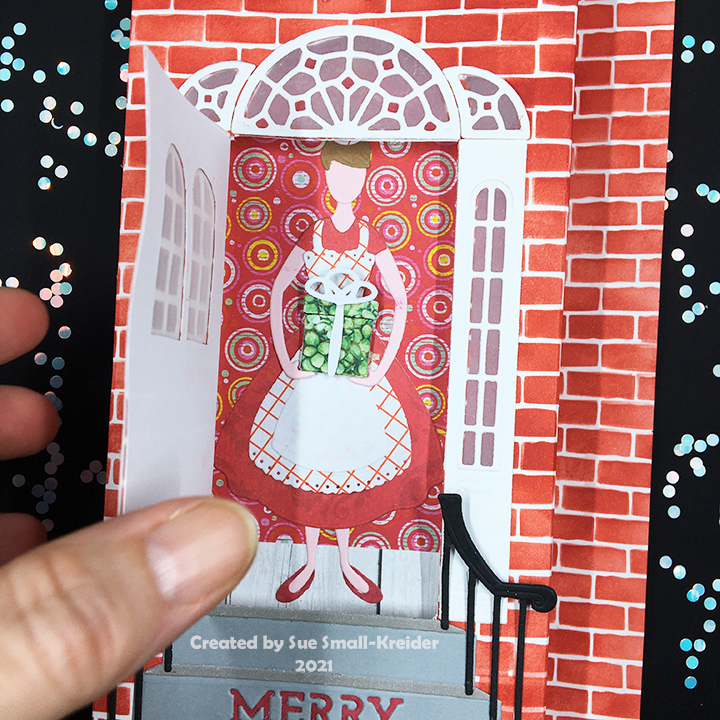
Spellbinder’s Open House collection has a number of add-on sets for various holidays, but none include a door wreath. (I had to use an older Lawn Fawn Mini Wreath from their door collection to complete my card.) I did use the side panel set to add more windows to the doorway.
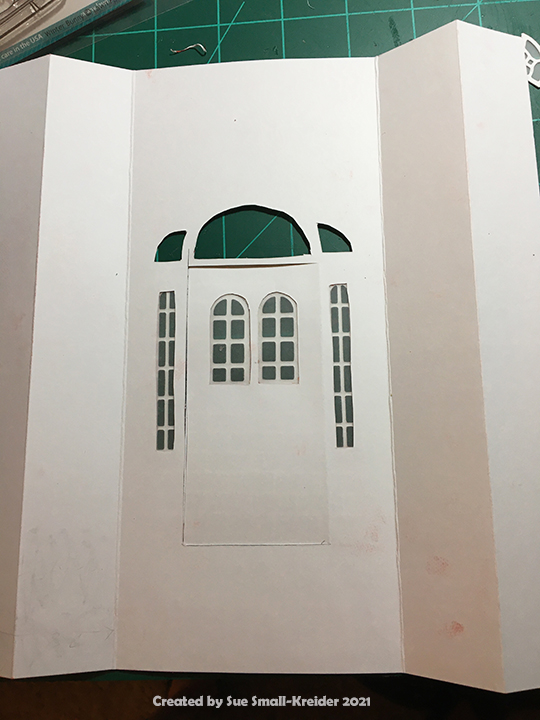
Card base: Using heavyweight white cardstock that is 8 ¾ inches tall x 8 ½ inches wide, I scored and folded at 1 1/8 inches, 2 2/8 inches, 6 1/8 inches and 7 3/8 inches. Next, I stenciled the card base with brick colored ink, a brick stencil and a small make-up brush (I find these inexpensive contour make-up brushes from Dollar Tree work as well as the expensive ink brushes.) The folds should go to the back of the card, to form a jut-out entryway often found on townhouses.
Stairs: A gray cardstock was used to cut the main steps with the sentiment “Merry Christmas.” The sentiment was backed with scraps of red paper. I found an old envelope that was just a shade darker gray that the cardstock for the step tops. The railing is cut from heavy black cardstock and glued only at the rod tips to the steps. The stairs where then adhered to the center of the card base, which when folded shut is 3 ¾ inches.
Door and Windows: The door was die cut with the windowpane dies in one pass. The side panels had to be cut and then cut with the window die. The top transom windows were also die cut from white cardstock.
I positioned the die cut door over the stairs and used a pencil to trace where the windows and the door edges.
Using the pencil lines, I cut out the windows and three side of the door with a craft knife.
Positioning the side panels next to the door, I traced the window positions with pencil and cut out and did the same with windows over the door and panels.
I saved the window frames to be glued in place to scrap pieces of clear vellum on the back side of the door and side panels and transom windows. Then I glued the vellum backed door onto the card base door. The vellum backed panels and transom windows where also glued in place so that the vellum was sandwiched between the case base and the white window and panel frames.
Inside Mechanism: To create the set-back house interior, I cut a 8 ½ inches tall x 5 ½ inches wide piece of lightweight white cardstock. I scored and accordion folded at ¼ inch, ½ inch ¾ inch, 1 inch, 4 ½ inches, 4 ¾ inches, 5 inches and 5 ¼ inches. Next, I cut a floor from some woodgrain paper and the wallpaper from a small, patterned paper. These piece where adhered to the center of the inside mechanism.
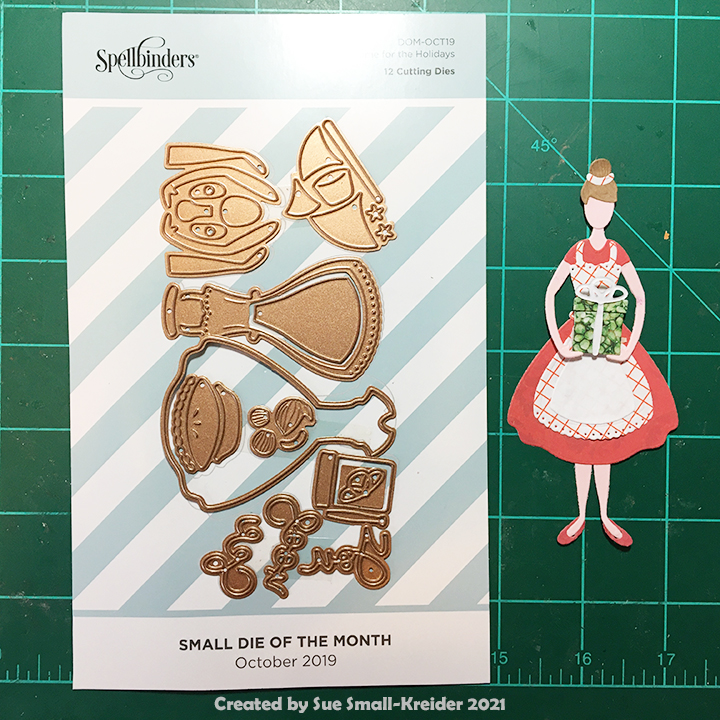
The woman is an older Spellbinder’s small die of the month that can hold a pie, a present or a small fir tree. I chose a present popped-up on a foam square. The woman is glued to the wallpaper and floor before the inside mechanism is glued onto the back side of the card base.
The finishing touches are a tiny wreath I had in my stash that is glued over the door and attaching the mail slot and doorknob (cut twice and glued together for depth) to the door front.
The back of the envelope is stamped in red using a Tim Holtz rubber stamp “Have Yourself a Merry Little Christmas.”
Thank you for reading. If you enjoyed this blog post, please like it and follow the blog. 😊