An Autumn Day in the Park

Sometimes spending a holiday alone in a place far from home means that one must adapt and make new traditions, friends and feasts.

This penta-fold aperture card opens out to form a park scene complete with a water fountain and squirrels sharing acorns. Karen Burniston dies are used for all but the 4 inch square apertures.

Card base: Cut four pieces of heavy weight cardstock 6 inches x 6 ¼ inches and one piece 6 inches by 3 inches. Score and fold all the 6 ¼ inches sides at ¼ inch to form tabs.

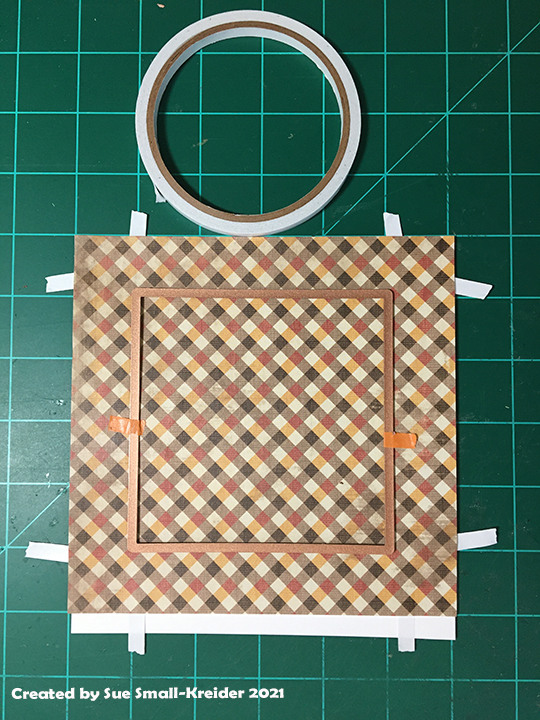
Adhere decorative papers to the front and back of two of the tabbed squares. (I used double-sided tape at the outer edges of paper.) Center a 4-inch square die over the patterned paper and secure with removable tape. (Remember if you are using different papers for the inside and outside of your card to test that you have the papers on the correct sides of your tabbed card base panels before you cut the apertures.) 

Glue the aperture side panels to the 6-inch sides of the back panel whose tab is glued to the floor panel. The floor panel’s tab is glued to the 6-inch side of the 6 inch x 3inch piece. Adhere decorative paper onto all panels on the card base.

Trees: Cut four tree trunks using Tree Pop-Up die set.  Cut four leaves dies. Glue trunks to leaves. Use a fence piece to position each tree trunk on the sides of the apertures, gluing the overlapping leaves together in the aperture opening. Repeat all steps for other aperture panel.

Fence: Cut ten fence panels from the Iron Fence Pop-Up die set. (I cut twelve fence piece incase I made a mistake in cutting, which I did.) Trim five fence panels at the sixth post from the left. Trim the remaining fence panels at the sixth post from the right. Trim off sixth post tip and scrolls at the right of post on left panel as shown in photo. Glue right panel over left panel. Take one elongated fence panel and adhere to the back panel. Glue fences over aperture panels front and back matching up fence tips. 

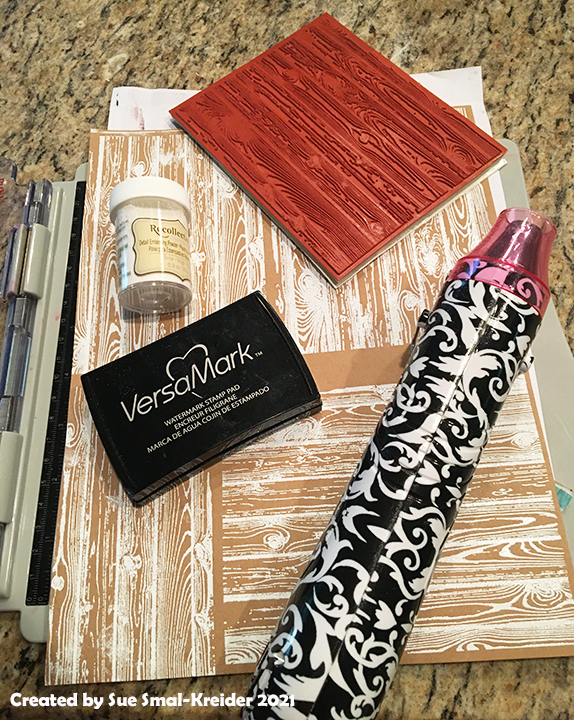
Bench: Stamp with woodgrain stamp onto brown kraft card stock and heat emboss with white embossing powder.

Die cut one whole bench using the Garden Bench Pop-Up die set. Cut the seat section again with the woodgrain going with the seat planks. Save two of the scrolling out-cuts from the bench back to glue onto the front of bench arms. Glue seat onto bench matching up planks. Follow package directions to attach the bench to the back and floor panels.

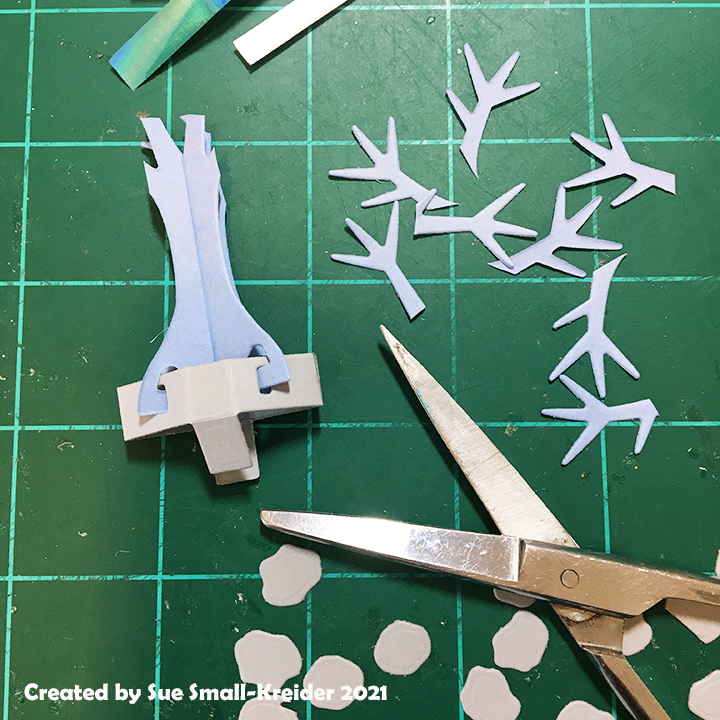
Fountain: Cut one of each of the two pieces of tree trunk from Tiny Trees Pop-Up die set of blue card stock. Cut tree base from gray card stock.  Cut two sets of rocks from Tent Pop Up die set.

Assemble tree as per package directions. Trim the tips of branches off

Trim two colors of mylar foil into 1/8 inch wide strips. (I used the Spellbinders Quick Trimmer) Glue two color strips to each side of the trimmed tree trunk.

Cut a circle of blue foil and glue to fold made by the floor panel and the 6×3 inch panel. Cover edges with gray rocks. Attach the tiny tree foundation per directions on package.

Squirrels: Cut two squirrels and the tummy fur from two different colors. Cut two acorns from a light brown and two acorn tops from a dark brown. Assemble squirrels and acorns per package directions.  Cut one of the long pop-up platforms from the bench pop-up die set. Attach to bench per directions on package. Glue squirrel to platform.

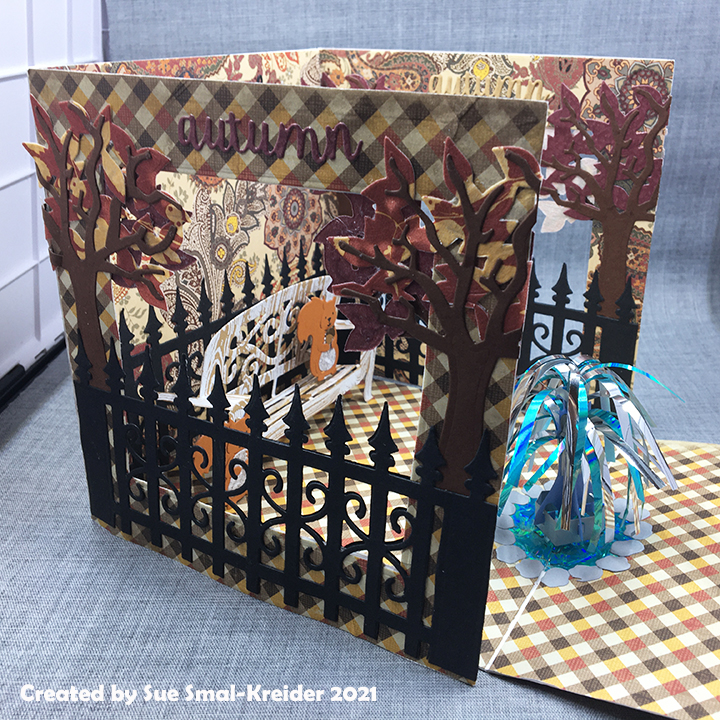
Sentiments: “autumn colors”, “happy autumn” , “Happy Thanksgiving” and “Thinking of you” are sentiments from two of Karen Burniston Word die sets – Greetings and Autumn Word Set.

Thank you for reading. If you enjoyed this blog post, please like it and follow the blog. 😊

Other Bench Cards

VALENTINE SWING

A SWINGING ANNIVERSARY

SWING GATE FOLD

The Secret Garden

Dies:

Stamps & Heat Embossing

  • VersaMark – Watermark Stamp Pad
  • Stampin’ Pad – Rubber Stamp – Hardwood
  • Recollections – Detail Embossing Powder – Snow

Papers

  • Heavy weight white card stock
  • The Paper Studio – traditions Floral paisley – 112094
  • Authentique – Pioneer Plaid – THA005
  • Brown kraft cardstock
  • Colored cardstock and specialty paper scraps from my stash

Additional Supplies:

Holly Jolly Santa Greetings

What a jolly feeling the “Ho Ho Ho” of Santa brings to anyone who hears or sees it. This 3D snow globe designed by Becca Feeken for Spellbinders makes you hear the jolly old elf.

This was my first time using these die sets. I focused on using just four colors of red, green, white and gold and mostly mirror or foiled cardstock.

My Santa and tree are based off of the picture on the packaging using Nuvo Drops instead of jewels. I die cut several layers of the Santa and tree using up scraps to fussy cut the various pieces of the scene which are glued onto a red base. The belt and boots are colored with a fined-tipped black permanent marker. The belt buckle is a freehanded square of gold paper.

The holly leaves are fussy cut and glued onto the sentiment and front layers. The red berries are red glitter glue. I added a thin green stripe at the bottom of the front layer for interest.

As is my style, I stamped the back of the envelope with hints of what’s inside using red and green ink and Christmas sentiment stamps from Paper Discovery. I used a new stamping tool with my stamping platform for an even and easy stamped image. I highly recommend the Stampendable Stamping Tool.

Thank you for reading. If you enjoyed this blog post, please like it and follow the blog. 😊

Dies:

Stamps & Ink

Papers

Additional Supplies Used:

Vested Tags

Cards for men can be fun to make when they use a small die set by Leane Creatief which includes a suit jacket, a vest, shirt collar, two ties and a BBQ apron as well as a tag box. The box makes up to a little over 4 ½ inches tall by 1 ¾ inches wide and 3/8 inches deep. Perfect for tucking a note, tickets to a sporting event, or folded money.

(I purchased this die from Dies R Us when they had one of their special European dies sales, but it sold out quickly. You can get some lovely dies from around the world in these sales, but you must act quickly when you see one you like.)

For the card background I used two Poppystamps border dies to create a layered set of circles using oatmeal cookie and a dark brown scrap of cardstock for the layers under the plaid paper. Oatmeal cookie was used to cut the tags out of and a cream piece of Recollections cardstock was used to make a mini slimline card base (5 ½ inches x 3 ½ inches).

The “Happy Birthday” sentiment was cut once from a light color and once from a dark brown scrap and glued together a bit off set to give depth. A third layer was cut and glued to the back not be seen, but to raise the words up.

The vest was cut from a plaid paper. The buttons and pockets were stenciled on through the die. The tag is attached using foam squares.

A mustache was stamped using an older Sizzix stamp set in a dark brown on the back of the envelope.

Thank you for reading this post. Please like, comment, and follow this blog. 🌞

Supplies:

Dies

Stamps

Papers

Inks

Miscellaneous

A Quick Thank You

Needing a unique and handcrafted Thank You card, I came up with this pop-in window card using double-sided patterned paper from Paper Heaven, the frame dies from the newest Die-cutting Essentials issue 75, and some word dies from Hunkydory’s Moonstone brand.

When the card is closed it look like a flat card, but when it opens, the window back mechanism opens and moves the window panel ¼ inch back from the card opening.

Because of the dark inside of the card, I cut two white labels from old envelope scraps in my stash to be able to write a message on them.

Need more ideas for Thank You cards?  Here is more inspiration:

Supplies:

Dies

Stamps

  • Inkadinkado – Clear Stamps – Modern Flower Flourish – 60-30380

Papers

Inks

  • Stampin’ Up – Blueberry Bushel

Miscellaneous

Thanks To A Colleague

An order came for a card for co-workers to sign for their office manager who was leaving to take a new job at a library.  A slimline card that would fit into a #10 business envelope was the size requested.

Decorative printed papers from the insides of “security” envelopes that bills came in was the theme for the outside of the card with the word “THANKS.” Three different envelope papers were used to mat and die-cut the word. Each mat layer was adhered with double-sided tape. A piece of double-sided adhesive sheet was attached to the back of the paper used for the letters before they were die-cut.

Inside the card was the small, heat embossed sentiment “Every job is a self-portrait of the person who does it. Autograph your work with excellence.”

Stamped on the back of the envelope is the phrase “The next chapter” to hint at what is to come as the colleague leaves to go work at a library. Knowing that the colleague liked books and coffee, they also were stamped on the envelope.

Thank you for reading this blog post. Please like and leave a comment. 😊

Materials Used:

Dies

Stamps

Ink

Papers

  • Heavy white cardstock 8 ¾ inches x 8 inches from my stash
  • Three printed insides of envelopes from my stash
  • Cream #10 business envelope from my stash

Miscellaneous

Crafty Friends

Crafty Friends are fun to have and making special cards for such friends is both challenging and rewarding. This slimline mini-sliders card was made for an animal lover who appreciates interactive cards.

Instead of using my split slider template for this 9 inches x 4 inches card, I hand drew the five mini sliders and cut using a craft knife and metal ruler. (I miss cut and ended up having to reinforce the narrow bars between the sliders with additional patterned cardstock bars.) The coated Dress My Craft patterned cardstock was my last sheet of this vintage leafy print, so I had to make the slider panel work. Assembly is very similar to the assembly of the split slider template.

The foliage and floral dies used to decorate are a mishmash of dies from my collection. The elephant is one that I had assembled when I made another elephant card.

The foiled sentiment strip is one I had made during batch foiling session a while back. I used a die from a different Glimmer plate set to die cut the decorative scalloped edges.

Scraps of holographic ribbon were added between sliders to add some subtle sparkle to the card.

Inside the card I added a vellum strip to hid some tears around the half circle cut for a finger grip on the pull panel. A personal note will be added inside.

I glued 1-inch circles on the two points where the card recipient needs to place their fingers to hold and pull the slider panel up. A CRX instruction sheet is enclosed with the card to explain how to use the card.

Stamped on the back flap of a #10 business sized envelope in blue ink is a small elephant from Bus Cubbies stamp set sitting under the sentiment “Hello Friend” from Hello Friend stamp set.

Thank you for reading this blog post. Please like and leave comments. 😊

If you enjoyed this card, check-out my original Split-Slider Slimline Series:

Day 1 – Split Sea Slider

Day 2 – Cloud Dreams

Day 3 – Triple Hearts

Day 4 – A Valentine for A Baseball Fan

Materials Used:

Dies

Stamps

Inks/Polish

Foiling

Papers

Miscellaneous

© Sue Small-Kreider 2021

Ship-In-A-Bottle II

This card can be for a birthday or another special day for a nautical person.

Ship -in-the-Bottle:  Using the Tutti Designs Ship in A Bottle die, cut four times from light blue, brown, white, and oatmeal. Only cut the whole die from blue. The other colors cut the sections needed from scraps. Using distress inks, color the various die-cut sections of the bottle and paper piece as needed. Glue bottle outline to a piece of acetate on the front side. Cut out the bottle shape. Glue rope to outside of bottle neck.

Background:  Die cut the rope background from oatmeal cardstock making such al the chads are removed from the image. Glue to a dark piece of wood grained cardstock cut to 4 inches x 5 ¼ inches.

Assembly of Card:  Position sentiment strip, ship and then the bottle on to rope background. Glue ship down followed by bottle. Adhere sentiment strip with foam squares. Attached front panel to bard base with foam squares.

Sentiments:  The foiled sentiment strip was one I had made during a batch foiling session using up scraps. It was die-cut into a ribbon. The inside stamp sentiment is from a favorite nautical stamp set by Sara Davies.

As is my style, I stamped the back of the envelope with the lighthouse image from the Sara Davies stamp set to hint as to what is inside.

Thank you for reading this blog post. Please like and leave a comment. 😊

Materials Used:

Dies

Stamps

Ink

Papers

Foiling Plates

Miscellaneous

Happy Easter!

This card is my second go at using the Spellbinders Spring Collection add-on dies for the Sunday Drive die set that makes a detailed classic convertible car. On this card I went with an Easter Bunny theme complete with colored eggs.

I used a tulip embossing folder from a recent issue of Simply Cards and Papercraft magazine for the background. It took me a number of tries to find the best sandwich pieces to make this embossing folder work. (I ended up using the Glimmer plate, shim and platform to get the right pressure for the embossing folder.) This green background panel was adhered to the white card base using foam tape after it was decorated.

The car goes together as usual except I left off the folded roof layer as you wouldn’t be able to see the baby bunnies.  The adult bunnies have separate arms, heads and body so their poses have lots of possibilities and could be used separately away from the car.  I also added a floral swag with carrots and eggs as well as flowers to the back of the car. For the license plate, I used a white scrap behind the green “Easter” to make it pop and coated Nuvo Glitter Gloss over the plate and the “HAPPY” pendant. The taillights have Nuvo Glow Drops Neon in Shocking Pink for that bit of glow.

A circle the same size as the embossed circle has been inked using a make-up brush and Distress Oxides. It is glued to the green panel.

Once the car was assembled, and a yellow organza ribbon wrapped and taped to the back of the green panel, I used a plastic spring affixed to the back of the car to raise and allow movement for the car.

The “Just for you” sentiment is also from the same Simply Cards and Papercraft free gift set. It is heat embossed and fussy cut. I adhered it with foam squares.

Inside the card, the sentiment is from Riley and Company’s Funnybones series and reads “Everybunny needs somebunny sometimes.” It is stamped on some scrap Hunkydory Christmas insert paper.

The envelope is stamped on the front lower corner and on the back flap with bunnies from the Craft Consortium’s English Garden collection.

Thank you for reading this blog post. Please like, leave comments and follow Ully’s World.😊

Other Sunday Drive cards:

Sunday Drive Celebration

A Snowy Sunday Drive with Santa

Santa Bauble

Santa Delivers to the Tropics

Being Spooky

Driving into a Spooky Sunset

The Best is Yet to Come

Hoppy Spring!

Happy Easter!

MATERIALS USED:

Dies/Embossing Folder

Stamps/Inks/Embossing Powders

Papers

Miscellaneous

© 2021 Sue Small-Kreider/Ully Cat Designs

Hoppy Spring!

If you have followed my blog, you will know I am enamored with the Spellbinders Sunday Drive die set and all its seasonal add-ons. The Spring collection has arrived with bunnies.

For this spring card I used a tulip embossing folder from a recent issue of Simply Cards and Papercraft magazine for the background. By using a white core cardstock with green top and bottom, I could sand the top of the embossing to make it white. (Great technique I learned in the magazine from Nicky Gilburt.)

The car goes together as usual except I left off the folded roof layer as you wouldn’t be able to see the baby bunnies.  The adult bunnies have separate arms, heads and body so their poses have lots of possibilities and could be used separately away from the car. For the license plate, I used a white scrap behind the green “SPRING” to make it pop and coated Nuvo Glitter Gloss over the plate and the “HOPPY” pendant.

A circle smaller that fits inside the embossed circle has been inked using a make-brush and Distress Ink.

The “Hello…” sentiment is also from the same Simply Cards and Papercraft free gift set. It is heat embossed on a die cut sentiment strip using a Spellbinder’s glimmer plate die. (Many papercrafting magazines include a free gift set that can really added to your craft stash and gives you inspiration on how to use the stamps, dies and other tools and papers.)

A sequin butterfly from my stash wings bent and adhered on foam squares is the final accent element to the front of the card.

Inside the card, the sentiment is from Riley and Company’s Funnybones series and reads “Everybunny needs somebunny sometimes.” It is stamped on some scrap Hunkydory Christmas insert paper.

The envelope is stamped on the front lower corner and on the back flap with bunnies from the Craft Consortium’s English Garden collection.

Thank you for reading this blog post. Please like and leave comments 😊

Other Sunday Drive cards:

Sunday Drive Celebration

A Snowy Sunday Drive with Santa

Santa Bauble

Santa Delivers to the Tropics

Being Spooky

Driving into a Spooky Sunset

The Best is Yet to Come

Hoppy Spring!

Materials Used:

Dies/Embossing Folder

Stamps/Inks/Embossing Powders

Papers

Miscellaneous

© 2021 Sue Small-Kreider/Ully Cat Designs