Last week I went to a cardmaking class taught by Donna Butler and had a chance to catch-up with some friends I hadn’t seen in a while. Here are the cards I made.
FRACTURED SHUTTER CARD
Here is a video that shows the Fractured Card or Faux Shutter technique.
SO REFRESHING CARD
Donna’s daughter Sarah designed this refreshing notecard.
IRRESISTIBLE BLOOMS CARD
Thank you for reading this blog post. I hope this inspires you and makes you smile. Please like and leave comments 😊
This is the eighth card in the Fireplace Christmas Card series.
Santa’s coming. Can you hear him on the rooftop? He’s sliding down the chimney.
For this card I used Karen Burniston dies to create an accordion card with a pop-out fireplace with Santa’s boots dangling in the fireplace opening. (Before starting, please watch the assembly video for the Fancy Label Accordion located near the bottom of the linked page.)
Cardbase: I cut three Fancy Label Accordion panels from heavy white cardstock. I also cut four of the same panels from red decorative paper and two panels from green decorative paper. The green paper panels I adhered to a cardstock panel. (I realized I needed to cut one more green panel to cover the tabs when all the panels are glued together.)
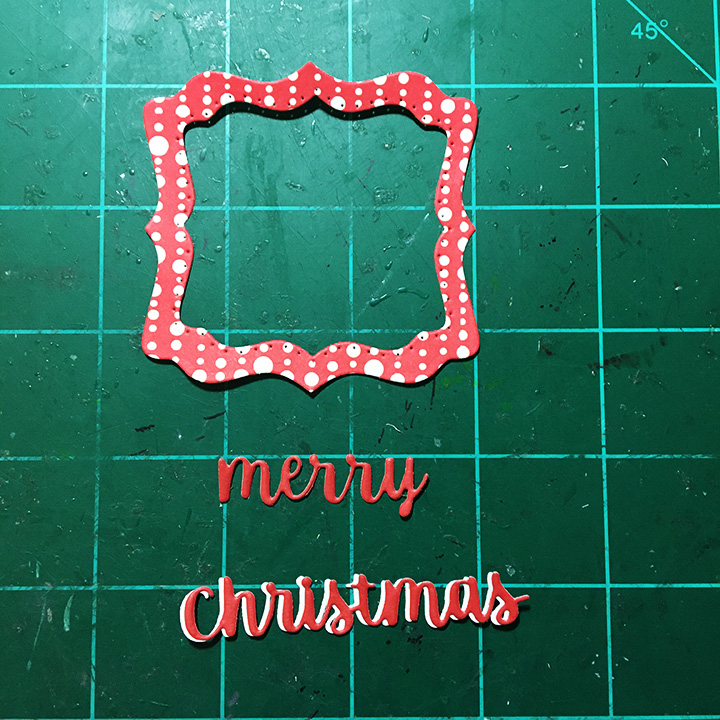
The red panels I trimmed out the center label at the pivot points. Using the largest and second largest label dies in the set to cut a frame, I cut borders from two of the red center labels. For the back personal message label I used the largest of the label dies to cut a frame that went to the edge of the white label.
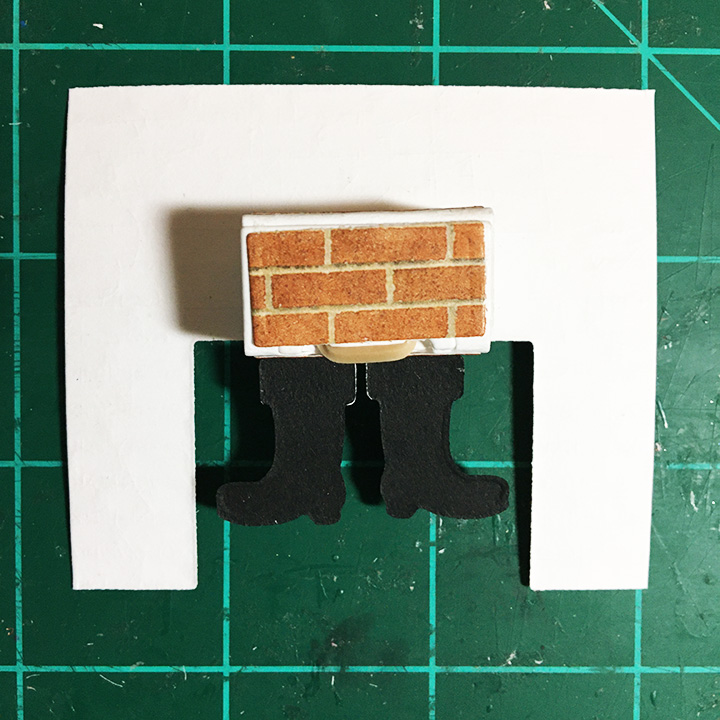
Fireplace: I cut the fireplace front and mantel pieces using the Fireplace Pop-Up. For the fireplace I glued a brick decorative paper to white cardstock and die-cut it using the embossing feature. I then trimmed off a 5/8-inch from each side of the fireplace so it would fit into the card. The mantel piece was cut from white and ink blended.
Bam Box and Boots: Because I was using a different mechanism than the fireplace mechanism, I recommend watching the assembly video for the small bam box. I tried both sizes of bam box, but you need to use the smaller one to get the fireplace to fit on the label and not catch when the card is folded closed. Glue three of the four decorative panels to the bam box. Before you add the rubber band to the bam box, cut the teardrop shaped holes for the boots (circled in red in photo below) using a sharp pointed piercing tool and scissors. (I used an old ice pick or awl.) If you plan to glue the bam box arched side to the fireplace, cut the holes in the panel just below it as shown in the photo circled in red. Attach the boots by slipping the tabs through the holes.
Assemble the bam box as usual.
I did not attach the fourth decorative panel on my card since I knew the arched side would be glued to the back of the fireplace. Test the placement of the bam box on both the fireplace and the pivot label before the glue sets. Once the fireplace is attached to the panel, attach the mantel with the wider side glued to the fireplace.
Card Back: Every time I make an accordion card, I forget to save the decorative frame papers to glue on last, to cover the tabs that get glued as the card is assembled. This time I did it to the middle green panel.
Sentiments: “Ho Ho Ho” comes from cutting down the “Hooray!” in Word Set 4 while “Merry Christmas” is from Word Set 3. The Santa face is from the Gnome and Santa die set.
To get the word” Christmas” to stand-out from the red border paper I cut an additional “Christmas” in white and off set it behind the red word.
Envelope: The red “Merry Christmas” on the envelope flap and its green border are stamps from Anna Griffin.
CRX Sheet: The card recipient experience (CRX) sheet explains how to close the fireplace. it is a free download.
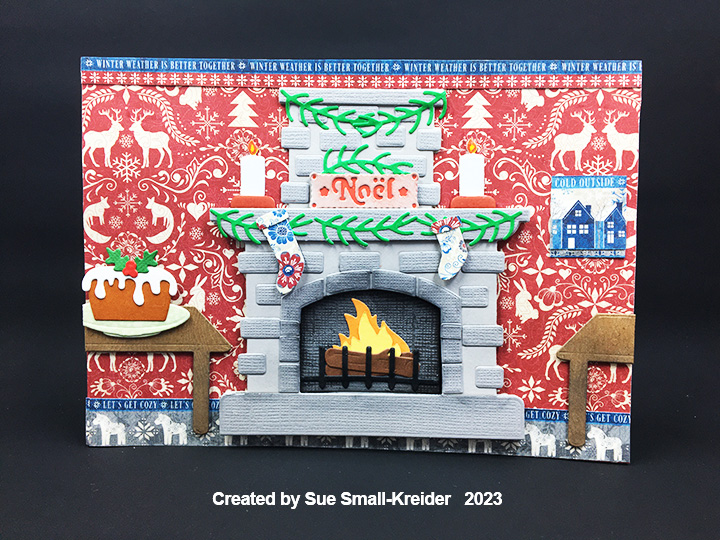
This is the second card in the Fireplace Christmas Card series.
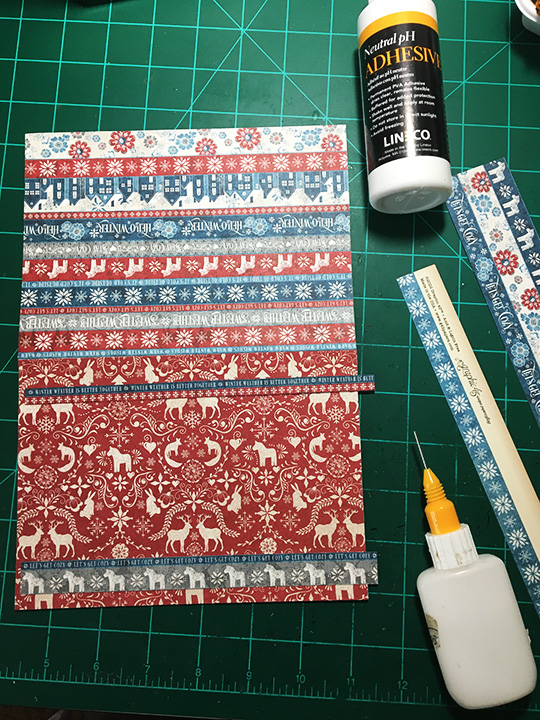
My inspiration for this cozy fireplace scene comes from the Graphic 45 paper collection Let’s Get Cozy and the Elizabeth Craft Designs Cozy Fireplace and Let’s Bake die sets.
Cardbase: A purchase A7 (5×7 inches) cardbase was covered with decorative papers on the two outside panels with leftover scraps used inside.
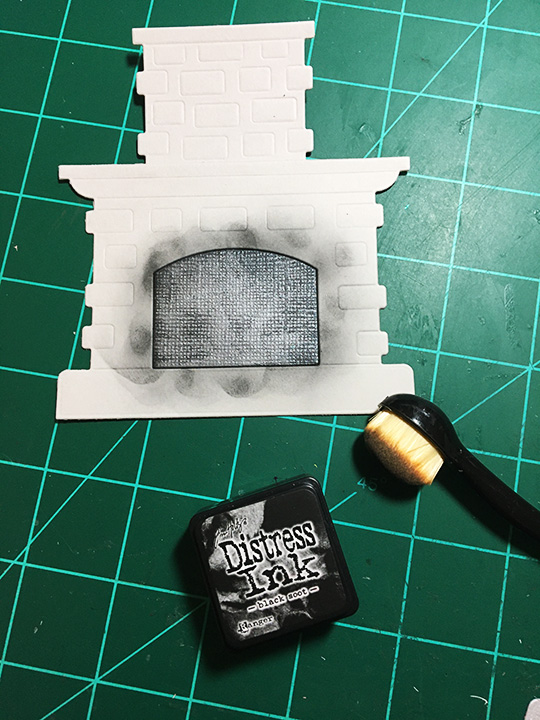
Fireplace: To create the stone fireplace, I cut two chimney pieces and two mantel pieces from the smooth side of the Bazzill cardstock and one mantel piece from the textured side of the same cardstock to get a textured firebox arch, mantel shelf and hearth stone. (The mantel shelf and hearthstone were fussy cut from the die-cut.) The individual stones (cut twice) and stones around the firebox were cut from the textured side of the gray cardstock. The top piece of the chimney was also cut from the textured cardstock. Glue individual stones to one fireplace piece then attach the stones around the opening. With black ink color the firebox piece if sooty.
Glue the two chimneys together. Glue the three chimney top strips together and then attach it to the chimney top. Center the chimney piece behind the fireplace piece with firebox. Using clear tape across the back of the fireplace piece without the stones attached, add the sooty firebox and with an inky blending brush add soot to the surrounding area of the firebox. Assemble the burning logs and glue onto firebox.
Add foam squares to the front of the fireplace with chimney, backsides of mantel shelf and hearthstone pieces. Attach the fireplace with stones onto base, then attach mantel shelf and hearthstone. Glue to front of cardbase.
Decorations: The Cozy Fireplace set comes with stockings, candles, and greenery. From the Let’s Bake set the table was cut from woodgrain embossed paper and ink blended with black ink. The Christmas pudding and its holly decoration comes from the same set with the cake stand cut down to a platter. The tiny NOEL plaque from an old Hunkdory set sits on the mantel shelf and was cut from gray cardstock, inked with red ink and a piece of red paper glued to the back. The candle flames were colored with markers. All decorations were popped-up on foam squares except the candles, greenery and picture which were glued in place.
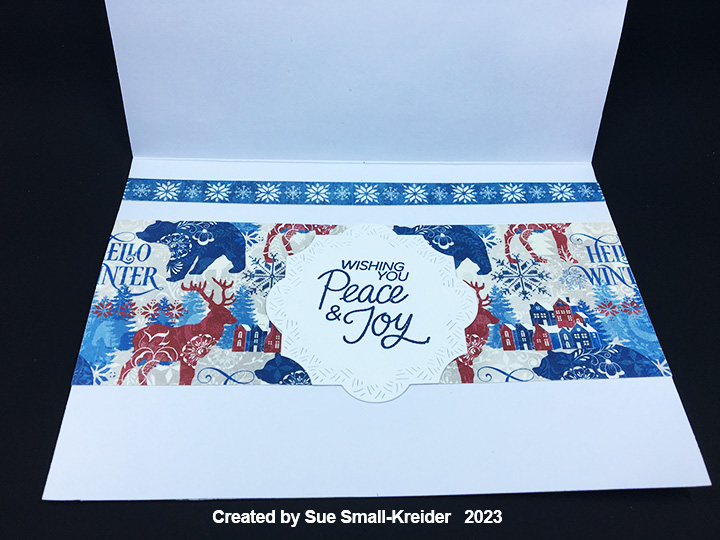
Sentiments: There is a whole sheet in the Graphic 45 Let’s Get Cozy collection of borders with sentiments like “Winter is better together,” “Let’s get cozy,” “It’s cold outside,” “Warm Winter Wishes,” “Sweater weather,” “Stay cozy” and “Hello winter.” Some of the thin word borders were used on the card front to set the tone of the card. Others are used to cover the card back. A tiny NOEL plaque from an old Hunkdory set, sits on the mantel shelf. Stamped in blue on a crosshatch label inside the card, is the main sentiment of “Wishing you Peace and Joy.”
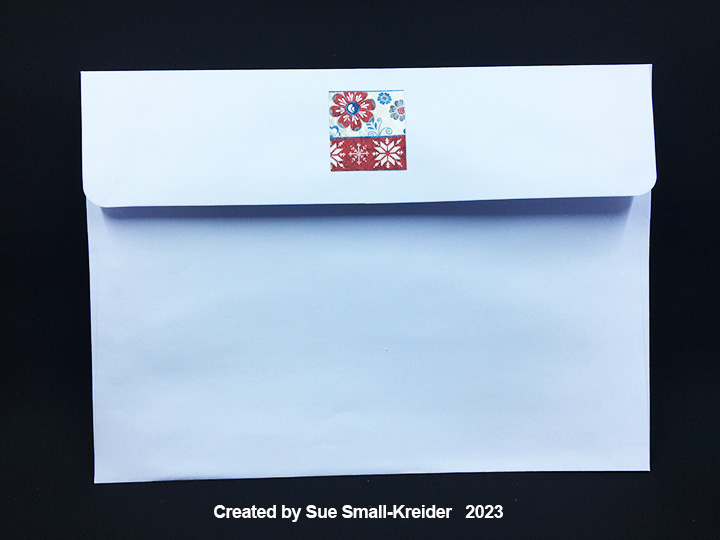
Envelope: A leftover decorative border scrap was glued to the envelope’s back flap as a subtle hint to what is inside.
Thank you for reading this blog post. I hope this inspires you and makes you smile. Please like and leave comments 😊
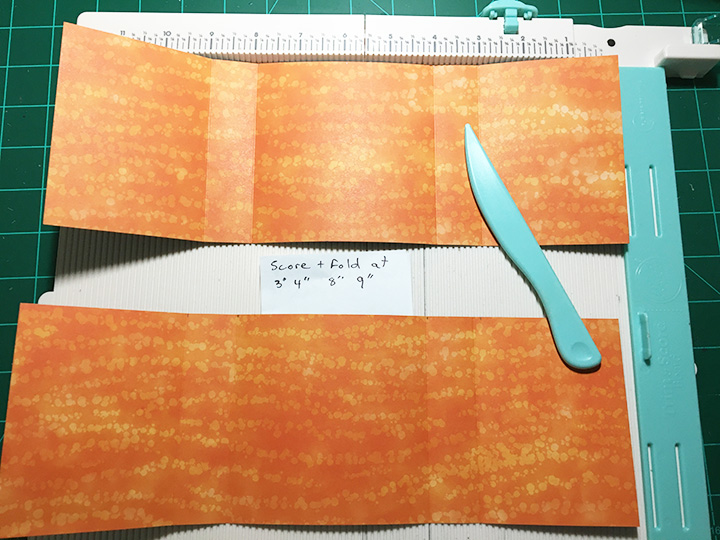
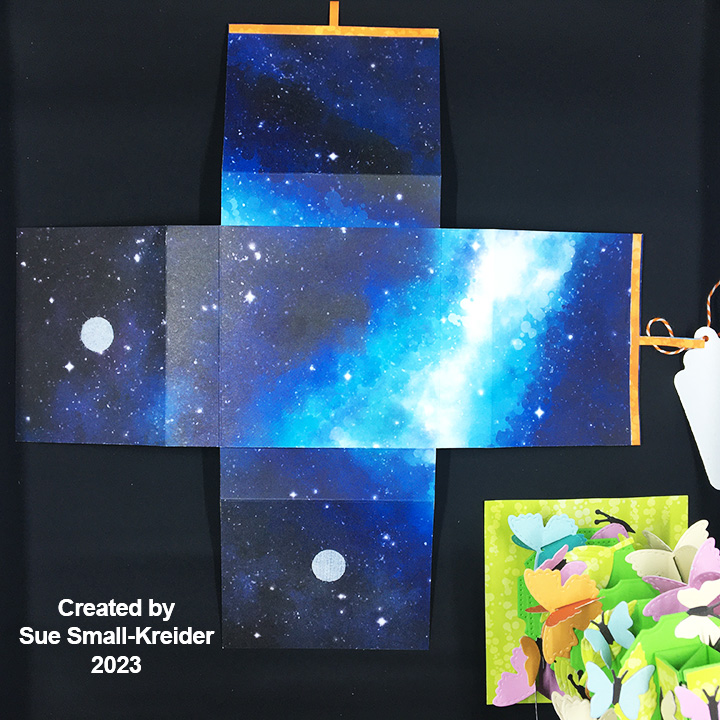
Box: The box is made of double-sided decorative cardstock cut into two 12 x 4 inches rectangles scored and folded at 3 inches, 4 inches, 8 inches and 9 inches. The middle squares are glued together to form a cross. Using strips of decorative paper for pull ribbons glued to the middle of each flap, I glued the remainder of the strips as a bottom flap border. Two adhesive-backed hook and ladder fasteners are the closures.
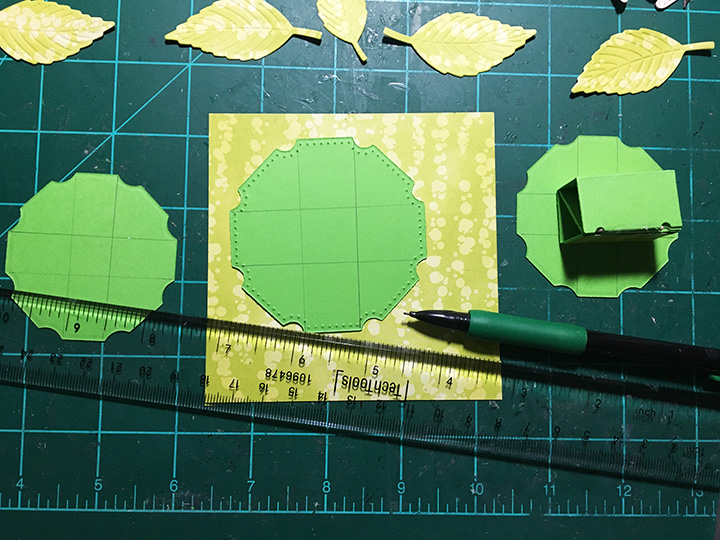
Tree: Utilizing the Bam Box die set, I cut six of the bam box strips, 13 of the bam box decorative rectangles and three each of the largest two fancy circles in the set from green cardstock. Because I like to let the glue dry before adding the rubber bands to bam boxes, I glue in stages. (See assembly video located at the bottom of the linked page and source of tiny rubber bands.)
Glue the decorative panels to the sides of each bam box for added thickness. (By sides I mean the sides that have the diagonal flap beside them. Not the side that has the smiley face or its parallel side.) These will be the sides seen between the layers of circles.
To assemble the tree, mark in pencil the location of the bam boxes on the bottom of each circle except one of the largest. Glue bam boxes to bottoms of five circles. The sixth bam box will be the top and the leftover, large circle will be the bottom.
To finish the tree assembly, alternate the direction of the diagonal inside flaps of the bam boxes, so that they make a zig-zag pattern when looked at from the side. By alternating the direction, the bam boxes will fold flat, and the tree will flatten into an oval shape. Use glue to attach each level. Once the tree is assembled, close or flatten the tree to position it on to a 4-inch square of green decorative paper that acts as the base for when the tree is in the box. Glue the tree to the square base.
Butterflies: (Watch the video at the bottom the linked page before starting.) Using the Butterfly Collage Add-ons die set, die cut all the dies from one color of doubled sided paper. Repeat with three other colors of paper. Die cut from black all non-moving butterflies four times.
Assembling the non-moving butterflies, use the black pieces as the base that the trimmed colored paper wings are glued to. On the double-winged one bend the wings up from the black body.
To attach the butteries to the tree, play with the positioning of the fluttering large butterflies on the tree in the closed position. If the butterfly stays within the green square base, it can be glued in place. I found that the flutter butterfly piece with the slot cut into it needs to be the piece glued to the tree, making sure the slot is not obstructed so the other piece can freely flutter.
I used green leaves cut from the decorative base paper to fill-in areas of the circles that were too close to the square’s edge when closed. Add in non-moving butterflies checking their position when tree is closed and that they are not creating catchpoints for fluttering butterflies.
Tag: My favorite gift tag to use for sentiments is in the Tag Book Pop-Up set. I stamped and heat embossed the sentiment. Baker’s twine was used to tie the tag onto the pull-up loop.
Thank you for reading this blog post. I hope it has provided some inspiration.
Every so often, I get a commission’s from cats for cards for their human family. This card was a birthday card for their cat mom.
My inspiration for the card is from the stamped image on the back of the card by Dominic Phillips called Bad Cats Club which has a preciously stacked set of wooden crates with cats perched on them. (I also drew engineering inspiration from Karen Burniston’s March 4, 2023 virtual class for the stacked cubes.) To recreate this image in a 3D form, I used Karen Burniston’s Surprise Cube Pop-Up and Bam-Box Pop-Up dies and cats cut from paper and washi tape. The card is a gusseted slimline card with string wrapped closure.
Card Base: Because I was using specialty cardstocks that were 5 1/2 x 8 1/2-inches, I cut two 3 3/4 x 8 1/2-inches pieces and one gusset strip of 3/4×8 1/2-inches. The gusset strip was scored and folded lengthwise at 1/4-inch and 1/2-inch. The 1/4-inch tabs on the gusset strip were glued to the long backsides of the bronze metallic piece and woodgrain piece. Next, I worked on the flap closure. The inside of the card base is covered with a wide map pattern washi tape.
Flap: I watched the assembly video for the Long Flap and Closure before I began the flap assembly. A long flap and six spacers were cut from brown cardstock using Karen Burniston’s Long Flap and Closure die set. A decorative flap inset piece was cut from the woodgrain cardstock and another for the inside of the flap from brown cardstock. I used two long brass brads that I had to trim the legs to make them fit the card using metal cutting snips. The star decorative piece under the brads is from the Surprise Cube Pop-Up and pushed up from the cardbase by three spacers glued together. (Remember to think through the assembly of the card so that you have papers to cover over the brad legs. Also remember to add your string before covering the brad legs with a decorative paper.)
Tower of Crates: For the pop-up cubes I watched the Surprise Cubeassembly video and Bam Box assembly video before starting. From discussion with Karen Burniston on her Pop-Up Peeps Facebook page, I learned that as long as the cubes would fit into the cardbase when folded flat, you could glue the cubes in any manner. (Let the glue set-up before you test your cube tower opening….I had to glue my tower a few times because I was impatient and the power of three rubber bands was pretty strong.) I cut the decorative woodgrain papers from scraps I had in my stash. The cats were fussy cut from some printed papers in my stash and from some washi tape. The top cat is glued to a Bam Box which is glued to the top cube. (I attached the tower with a brad through the bottom cube and card base, much like you would for a ball pop-up animal that you want to be able to turn.)
Sentiments: I used the Happy Birthday die set by Karen Burniston and the paw prints from the Doghouse Tiny House Add-ons for the inside sentiments. The stamped sentiments outside came from the Bad Cats Club set and a Happy Meowther’s Day set.
This card will be delivered in person, so no envelope was created for it.
Thank you for reading this blog post. I hope this gives you inspiration and makes you smile. Please like and leave comments 😊
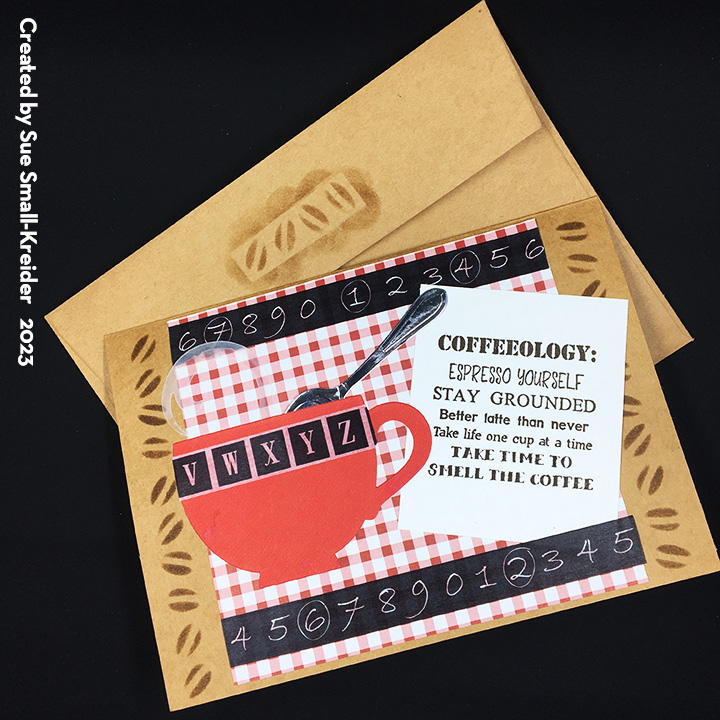
Do you have that favorite café with checkered tablecloths and oversized cups where you get that creamy cup of dark roasted coffee and while away the afternoon talking with friends? This card is for you.
Designed around two coffee themed Funny Bones rubber stamps, all the dies used to make this card are by Karen Burniston. (Please note the cup pop-stand, saucer, spoon and swirl of steam are from a die-set she designed for Elizabeth Craft Designs in 2015 and can be found on on-line craft resale shops.)
I recommend watching the assembly video for the cup pop stand before starting this card. To begin, I used a purchased A7 (5-inches tall by 7-inches wide) brown craft paper card base and envelope. I covered the two inside panels with thin red and white checked paper cut as 4 3/4-inches by 6 7/8-inches rectangles butted up almost to the fold, but not covering it. Next, I cut a black and white paper napkin into a 5-inch square and then cut it diagonally into two triangles. I cut and embossed the saucer as shown in the assembly video. Each napkin triangle is adhered to the card base with two pieces of double-sided tape forming a “T”. The saucer is attached using glue that will be absorbed into the napkin and adhering it to the card base.
To get a glossy red coffee cup, I used red cardboard packaging that I had saved from a child’s fast food meal box and cut three cups from it. The alphabet border on the cups is washi tape. The steam die cuts are made with clear vellum.
The humorous coffee spoon sentiment was stamped in brown ink onto a 1 1/2-inches by 3-inches piece of cream cardstock. The red rimmed circles (from the Coffee Cup Pop-Up die set) on the card are for personal messages. Washi tape borders and silver mirror card complete the inside decorations.
For the card front, I stamped the Coffeeology sentiment on a 3 1/4-inches x 2 3/4-inches rectangle and glued diagonally over a 5-inches x 5 1/4-inch piece of decorative paper after stenciling sides of the card using the coffee bean die from the Coffee Cup Pop-Up set with a mini cube of Distress Ink in walnut stain and adding washi tape. The third die-cut steaming coffee cup and another spoon cut from mirror cardstock complete the front.
As is my style, the envelope back flap has stenciled coffee beans in brown ink.
The tiny coffee cup on the card back comes from the coffee charms die set. (See charm assembly video.) White steam was added using a medium tipped opaque white marker with detailed swirls of a white gel pen. More washi tape and a strip of checked paper complete the back’s decorations.
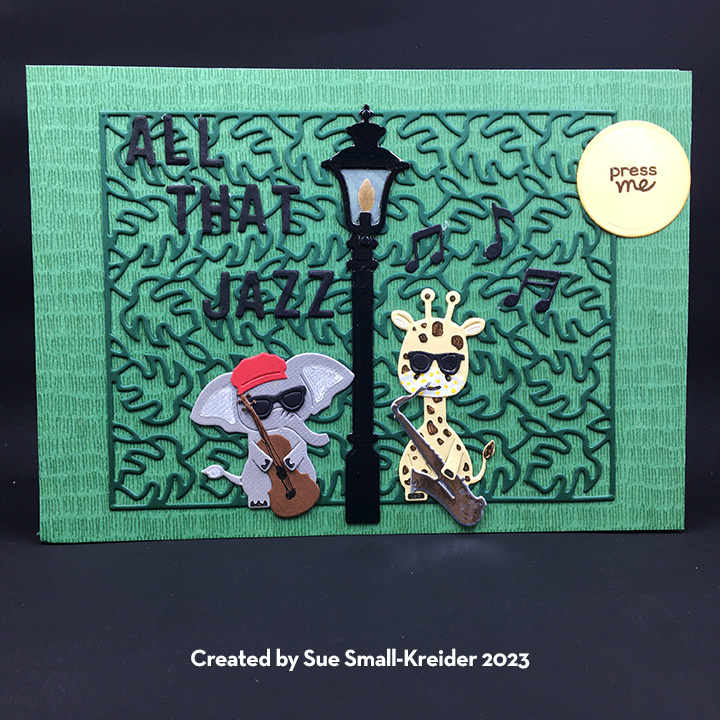
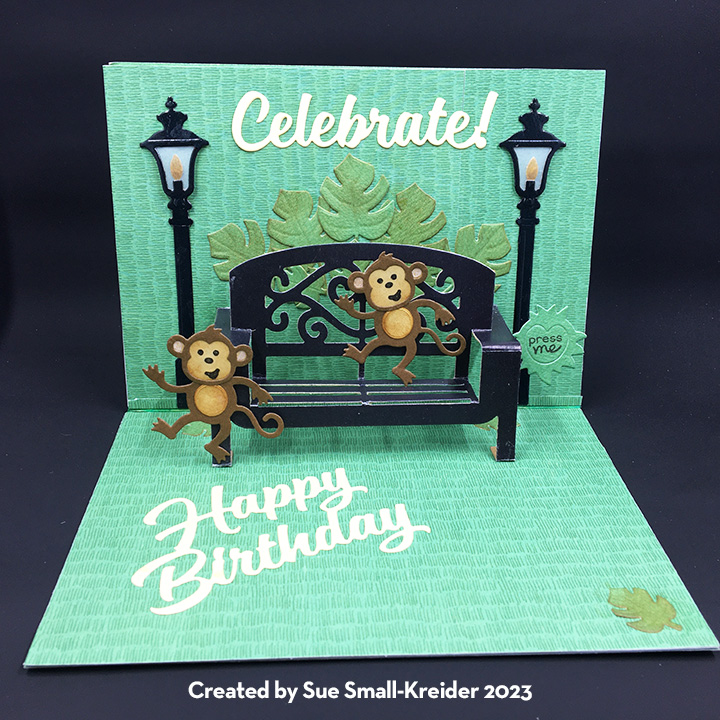
Needing a birthday card for a fun loving and jazz enthusiast gentleman who always supports concerts in the park, was the inspiration for this card.
It uses a variety of animals and scene dies as well as a pop-up bench by Karen Burniston. This was my first time using the Pear Blossom Press EZ-lights which are also available on the Karen Burniston website.
EZ-Lights: To start the card, I had to plan out how the lights were to be installed knowing that the switch/battery piece had to be surrounded by foam strips and that I wanted lights on both the front of the card and inside the card. I don’t like to have wires going across the card-fold, so everything needed to be above the fold on this top-fold A7 (5×7-inch) card. (I also watched some assembly videos on using the EZ-Lights.) I made my front decorative panel and added decorative papers to the inside of my card base before poking the holes for the one light on the card front and two lights on the inside top panel.
Front Panel: The front panel uses the fronds pattern plate cut from a dark green cardstock over a grass printed paper.
Lampposts: These are cut using the street lantern pop-up die set using a glossy black piece of cardboard packaging which gives nice dimension as well as highlighting the embossed features of the dies. The edges of the lampposts I colored with black markers. For the lamp itself I used both clear vellum and golden parchment to allow the light to show through. (Assembly video)
Bench: For the bench, I used the garden bench pop-up die set. I found a piece of glossy black paper that looks like metal, and I adhered it to some brown cardstock and then die-cut the bench. This pop-up is a glue-in pop-up, so I watched the assembly video several times to get the installation of the bench correct for this card. The monkeys are attached using foam squares.
Animals: The jazz duo of a bass playing elephant and a giraffe playing the sax are from the safari animals die set with a beret cut down from an engineer’s cap and sunglasses from the three tiny accessories die sets. The musical instruments come from a die set from Doxie Craft Supply. The monkeys are from the monkey and lion die set. All the animals have stencils within the dies to add details like hoofs, eyes, mouths, ears and tails.
Bushes: To create bush behind the bench, the large and small frond branches were cut from the landscape scene die set and inked with brown Distress ink. Three small fronds were used to cover up mistakes around the ground under the bench and for a decoration on the lower right corner.
Sentiments: In order to turn on the lights two “Press me” labels were created -a yellow moon on the front and a green bush on the inside. The moon come from the landscape scene die set while the bush is the lion’s mane from the monkey and lion die set. A stamp was used for the “press me” stamped in brown ink.
“All that jazz” uses the mini alphabet die set. A strip of paper tape was used to provide a straight edge to line up the letters when adhered to the card front.
“Celebrate” and “Happy Birthday” are die sets also from Karen Burniston cut from yellow and tan cardstock.
This card is to be hand delivered, so no envelope.
Thank you for reading this blog post. I hope it provides inspiration and joy. Please like and leave comments 😊
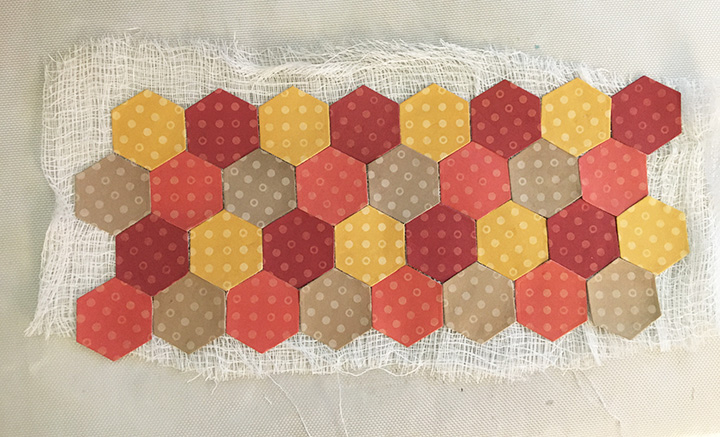
Quilts are cozy and so is this patchwork pop-up birthday card.
This card uses newly released Karen Burniston Hexagon Crosshatch dies to create both the patchwork both inside and outside. It also uses the pop-up mechanism from the Oval Frames Pop-up set. The sewing charms finish the card with decorative elements.
I wanted to create the effect of a flapping fabric quilt on the inside when the card opens. Cheese cloth is the inside patchwork’s backing. Glue stiffened the piece, but it has some movement. A white gel pen was used to add the stitching and sentiment of “Happy Birthday!”
Baker’s twine was threaded through the buttons from the charm set. The buttons are popped-up on foam dots to allow for motion from the twine.
The outside of the card is covered with large crosshatch hexagons and the overhanging pieces are trimmed and the scraps are used to fill in the other half hexagon edges of the card.
The front sentiment is one I used on another card that uses “word surgery” to create the word “sewing”.
I like to decorate the back panel of my cards using elements from the card.
As with all my cards that are sent in an envelope, I decorated the back flap with a birthday sentiment and a note that it was made with love.
Thank you for reading this blog post. Please like and leave comments 😊