Thanksgiving Pop-Up Room Scene Card

It’s time for the November 2024 Karen Burniston Design Team Challenge of Autumn or Christmas Cheer celebrating the season.

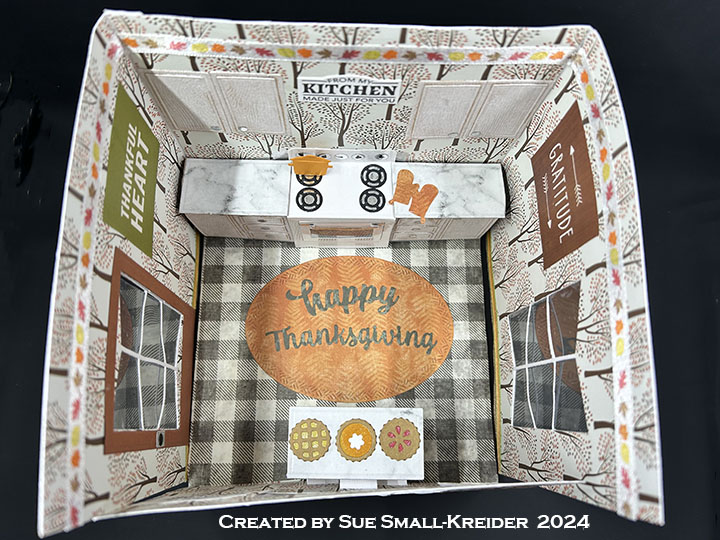
I’ve chosen to celebrate Autumn and Thanksgiving harvest foods with another 6×6-inch pop-up kitchen scene card featuring the new Sweet Treats clear stamp set along with the previously released Oven Pop-Up, Oven Extras, Baking Borders, Explosion Pop-Up and Bitty Ball and Mini Ball Double-Ups die sets.

Watch the process video to see how I made this card.

Here is a link to my Trimming the Christmas Tree room scene card similar to this kitchen card.

Cardbase: From 100 lb. cardstock cut two 6 x 6 1/2-inch rectangles, one 6 x12-inch rectangle, and one 6 x 5-inch rectangle. Watch video to see the order of assembly of pieces and when to cover pieces with decorative paper.

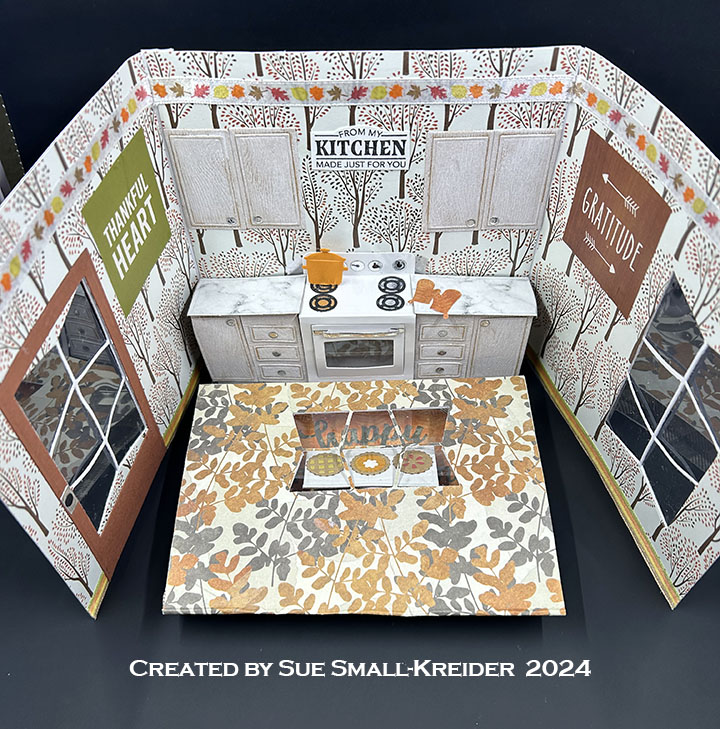
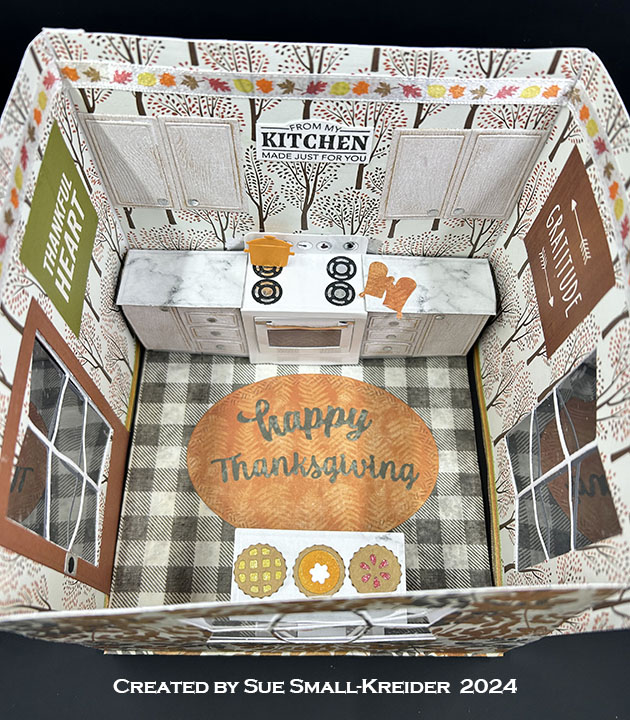
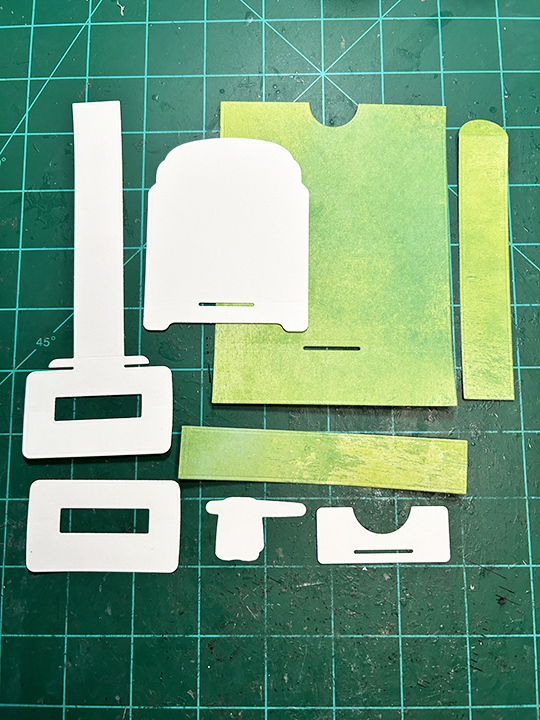
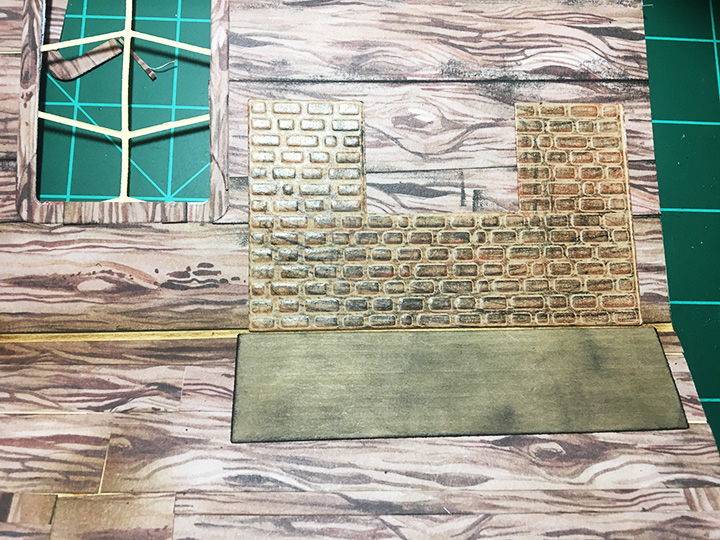
Windows: Using the Bitty Ball Double-Ups large die, cut windows into the two 6 x 6 1/2-inch rectangles of the card base. Use the Mini Ball Double-Ups to cut the rear window in the 4 1/2-inch tall wall panel. The door uses the RectanglesCrosshatch and the Long RectanglesCrosshatch as well as the leftover rectangles from the oven rack and black circle from the oven burner in the Oven Pop-Up set.

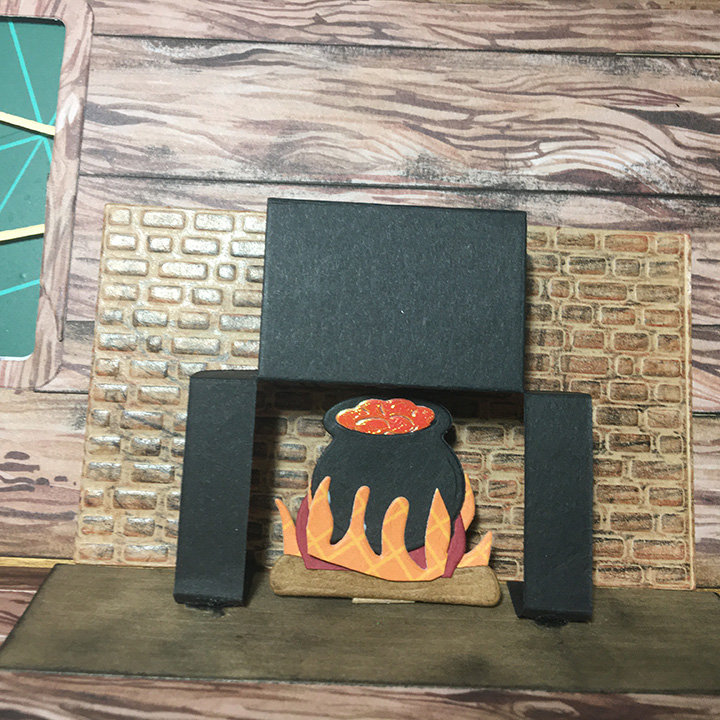
Oven: Cut two of the Oven Pop-Up base and cut one in half and assemble the base pieces as shown in the tutorial video above. Complete as shown in Karen Burniston’s assembly video. (Watch assembly video on the dies’ linked page.)

Cabinets: Cut eight of the cabinet doors from the Oven Extras set. (Watch assembly video on the dies’ linked page.) Add to the scene as shown in the tutorial video above. The double cabinet counter tops are cut using the second smallest rectangle in the Short Rectangles-Crosshatch. (While the tutorial video shows using the Explosion Pop-Up for the base of the island cabinets, you could just use a cut down oven base for this island.)

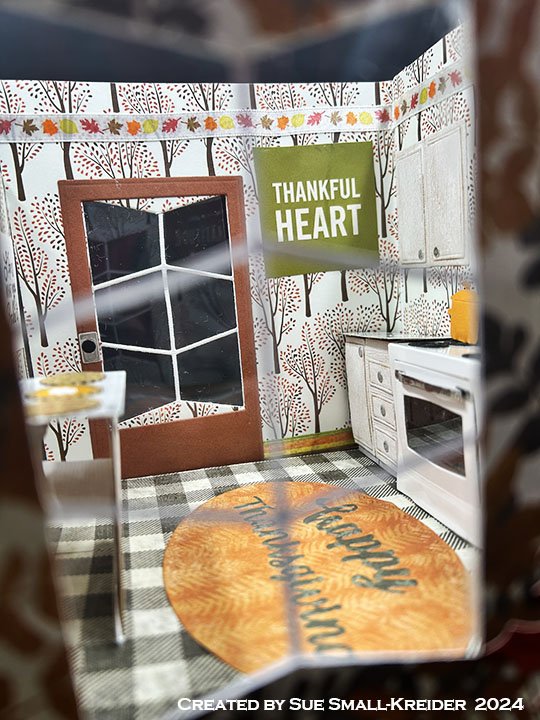
Decorations: The pies come from the Baking Borders set while the oven mitts are from the Oven Pop-Up set. The turkey in the roasting pan in the oven as well as the orange pot on the stove are from the Oven Extras set as is the pop-up cubes that animate them as the card opens. The pumpkins and leaves on the outside panels are from the Autumn Elements set.

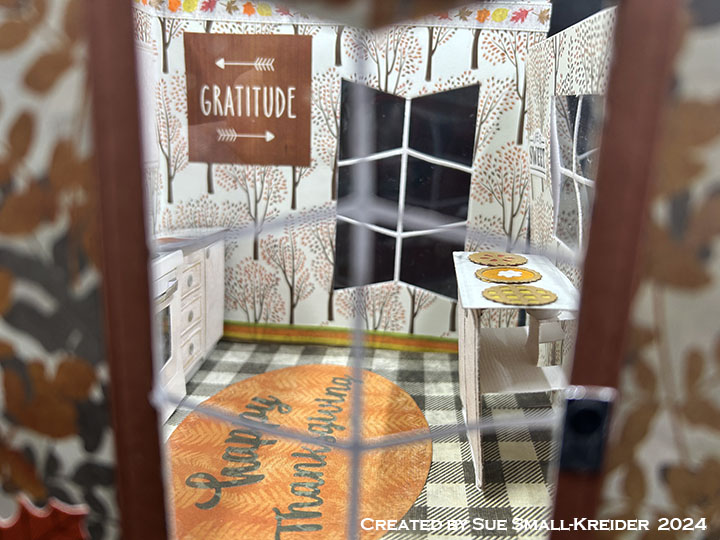
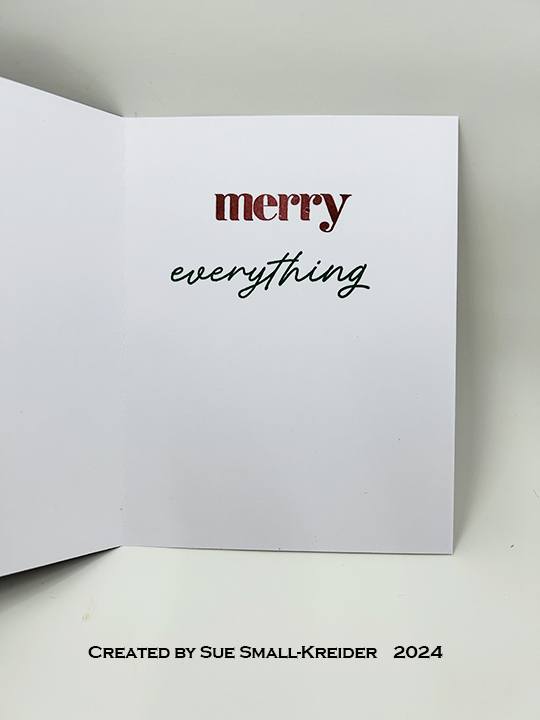
Sentiments: The card uses two sentiments from an American Crafts journaling card paper sheet as well as the Sweet Treats stamped sentiments. Die-cut “Happy Thanksgiving” and “Welcome Autumn” come from Word Set 7- Autumn.

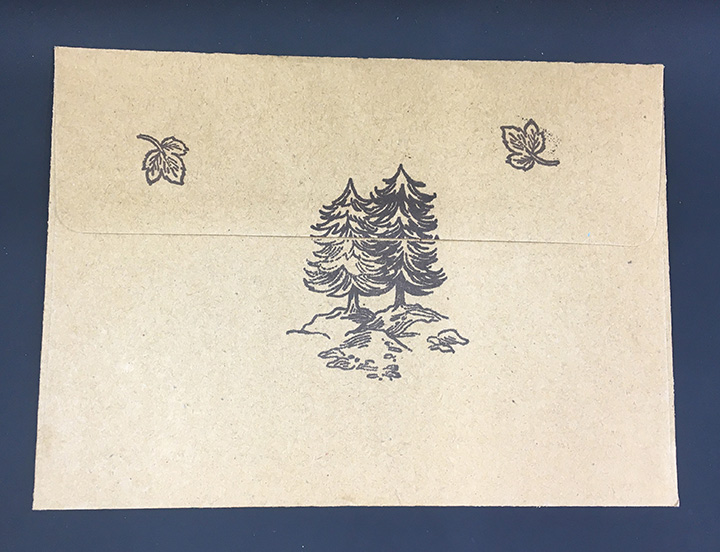
Envelope:  The card is thick, so a special padded envelope is needed to mail it.

___________________________________

Thank you for experiencing this blog post.

I hope this inspires you and makes you smile.

Please like and leave comments 😊

___________________________________

Disclaimer: Karen Burniston products are provided free of charge by the manufacturer for review and use. All other items were personally purchased. Compensated affiliate links used where or when possible, meaning I will receive a small percentage commission from these manufacturers at no cost to you. This will allow me to add more content to my YouTube channel and help out a lot. Thank you.

Materials Used:

Dies

Stamps

Papers

  • American Crafts – 12×12 inch Singled-Sided Paper – AutumnSentiment Squares & Autumn Trees
  • Bazzill – 12×12 Cardstock – Avalanche
  • Bazzill – 8.5×11 Cardstock – Tiara -18-1002
  • Grafix – 8.5×11 Dura-Lar Acetate .005 – Clear Film
  • DCWV– 4.5×6.5 Cardstock Matstack – The Spooky Time
  • Memory Box – 8.5×11 inch Textured Cardstock – Woodgrain – Kraft
  • Hot Off The Press – 12×12 inch Double-Sided Papers – North Country
  • Stampin’ Up – 8.5×11 Cardstock – Copper Clay
  • The Paper Cut – 8.5×11 Glossy 10 PT Kromekote Cardstock – White
  • Silver Foil Cardstock
  • Black, Brown and White Cardstock

Ink

  • Hero Arts – Alcohol-Marker Friendly Ink Pad – Intense Black
  • Simon Says Stamp – Preium Pigment Ink – White
  • Crafter’s Squares – Metallic Markers .05 in – Silver
  • Pigma – Mircon 005 Fine Tip Pen – Black
  • Sharpie – Permanent Marker – Fine Tip – Yellow
  • Sharpie – Permanent Marker – Ultra Fine Tip – Black

Adhesives

Tools

  • Die Cutting Machine
  • Paper Trimmer
  • Bone Folder
  • Score Board
  • Stamping Platform
  • LDRS – Stampendable Stamping Tool
  • Stamping Blocks used as paperweights
  • Scissors
  • Pencil
  • T-Ruler
  • Paper Masking Tape
  • We R Memories – QuickStick

Miscellaneous 

  • Autumn Themed Satin Ribbon 1/4-inch wide

Day 12 of 12 Days of Christmas Ovens

It’s Day 12 of my 12 Days of Christmas Ovens.

I’m using Spellbinders’ APG Die of the Month for May 2022 – Pop-Up 3D Vignette – What’s Bakin’ Oven and a Pear Blossom Press One Light to create this light-up oven.

Watch video above for a tutorial on how to make the card.

Sentiments: The banner greeting of “Happy Christmas” was made using a BetterPress plate and die set.

Envelope: The card fits into an A7 envelope stamped with a sentiment “Warm Wishes” from Hero Arts.

___________________________________

Thank you for experiencing this blog post.

I hope this inspires you and makes you smile.

Please like and leave comments 😊

___________________________________

Disclaimer: Karen Burniston products are provided free of charge by the manufacturer for review and use. All other items were personally purchased. Compensated affiliate links used where or when possible, meaning I will receive a small percentage commission from these manufacturers at no cost to you. This will allow me to add more content to my YouTube channel and help out a lot. Thank you.

Materials Used:

Dies

  • Elizabeth Craft Designs – Metal Dies – Let’s Bake – 1994
  • Hero Arts – My Monthly Hero Kit – May 2022 – Kitchen Dies
  • Spellbinders – APG Die of the Month -May 2022-Pop-Up 3D Vignette – What’s Bakin’ Oven
  • Spellbinders – BetterPress Press Plate & Die Set – Mistletoe Greetings

Stamps

  • Hero Arts – My Monthly Hero Kit – May 2022 – Clear Stamps
  • Pear Blossom Press – Clear Stamps – PBP-01
  • Spellbinders – BetterPress Press Plate & Die Set – Mistletoe Greetings

Papers

  • Bazzill – 8.5×11 Cardstock – Tiara -18-1002
  • Bazzill – 12×12 inch Solid Cardstock – Nautral
  • Grafix – 8.5×11 Dura-Lar Acetate .005 – Clear Film
  • Spellbinders – BetterPress – A2 Cotton Card Panels – Bisque
  • Spellbinders – 8.5×11 Cardstock 100 lb. – Pomegrante
  • Silver Foil Cardstock
  • Black, Green and Red Cardstock Scraps
  • Recollections – A7 Envelope – Cream

Ink

  • Stampin’ Up – Classic Ink Pad – Real Red
  • StazOn – Solvent Ink – Jet Black
  • Ranger – Tim Holtz – Distress Ink- Gathered Twigs
  • Spellbinders – BetterPress Ink – Strawberry
  • Pigma – Mircon 01 Fine Tip Pen – Black
  • Sharpie – Permanent Marker – Ultra Fine Tip – Black

Adhesives

Tools

  • Die Cutting Machine
  • Stamping Platform
  • Brutus Monroe – Stick & Stamp Mat
  • LDRS – Stampendable Stamping Tool
  • BetterPress
  • Stamping Blocks used as paperweights
  • Scissors
  • Pencil
  • We R Memories – QuickStick
  • Tweezers
  • Metal Ruler
  • Craft Knife
  • Sponge Dauber
  • Paper Masking Tape

Miscellaneous

Pear Blossom Press – One Light

Day 6 of 12 Days of Christmas Ovens

It’s Day 6 of my 12 Days of Christmas Ovens.

I’m using Hero Arts May 2022 My Monthly Hero Kit for this non-traditional colors holiday card.

Watch video above for a tutorial on how to make the card.

Cardbase: This card uses a side-fold A2 (4.25×5.5-inch) cardbase.

Sentiments: For the card front’s “May the season be merry & bright” and inside’s “merry everything” I used stamps from Scrapbook and Cards Today’s Jolly Holiday workshop kit. For the back of the card, Used the Hero Arts – My Monthly Hero Kit’s “Just something I whipped up.” The envelope’s “Cooking with Love” is from Paper Discovery.

Envelope: The card fits into an A2 envelope.

___________________________________

Thank you for experiencing this blog post.

I hope this inspires you and makes you smile.

Please like and leave comments 😊

___________________________________

Disclaimer: Karen Burniston products are provided free of charge by the manufacturer for review and use. All other items were personally purchased. Compensated affiliate links used where or when possible, meaning I will receive a small percentage commission from these manufacturers at no cost to you. This will allow me to add more content to my YouTube channel and help out a lot. Thank you.

Materials Used:

Dies

  • Hero Arts – My Monthly Hero Kit – May 2022 – Kitchen Dies

Stamps

  • Hero Arts – My Monthly Hero Kit – May 2022 – Clear Sentiment Stamps & Rubber Background Stamp
  • Paper Discovery – A5 Stamp Set – Cosy Kitchen – Simple Food
  • Scrapbook and Cards Today’s Jolly Holiday workshop kit – Clear Stamps

Papers

  • Bazzill – 8.5×11 Cardstock – Tiara -18-1002
  • Craft Consortium – 6×6 Double-Sided Cardstock – Over The Rainbow
  • Graphic 45 – 8×8 inch Double-Sided Papers – ‘Twas The night Before Christmas
  • Honey Bee Stamps – 6 x 8.5 inch Double-Sided Papers – Grain and Grunge
  • Silver Foil Cardstock
  • Black, Blue, Orange and White Cardstock
  • Fraser Papers for William House – A2 Envelope – Genesis Text Milkweed Smooth

Ink

  • Hero Arts – Alcohol-Marker Friendly Ink Pad – Intense Black
  • Ranger – Tim Holtz – Distress Ink- Vintage Photo
  • Stampin’ Up – Classic Ink Pad – Cherry Coble & Shaded Spruce
  • Creative Craft Products – Alcohol Markers – Dual Tipped – 33 Meion Yellow, 38 Pale Yellow, 52 Deep Green, 59 Pale Green, 76 Sky Pale, & WG1 Warm Grey
  • Gel Pens – Silver
  • Sharpie – Permanent Marker – Chisel Tip – Black
  • Sharpie – Permanent Marker – Ultra Fine Tip – Black & Red
  • Sakura – Gelly Roll Pen – Medium – White

Adhesives

Tools

  • Die Cutting Machine
  • Bone Folder
  • Stamping Platform
  • Brutus Monroe – Stick & Stamp Mat
  • LDRS – Stampendable Stamping Tool
  • Stamping Blocks used as paperweights
  • Scissors
  • We R Memories – QuickStick
  • Tweezers
  • Altenew – Detail Blending Brush- 5
  • Paper Masking Tape

Day 1 of 12 Days of Christmas Ovens

It’s Day 1 of my 12 Days of Christmas Ovens.

I’m using a stamp and die set by Diamond Press to create this interactive card that lets you pull the tab to open the oven door and reveal a Christmas turkey. (Because this kit doesn’t include any holiday sentiments, I had to use ones by other sources.)

Watch video above for a tutorial on how to make the card.

Cardbase: I used a purchased top-fold A2 size (2.25 x5.5-inch) gray cardbase and punched a half circle opening in the top center for a thumb hole to help with the pull tab. To help with the weight of the front, I added a 4×5.25-inch piece of the same green cardstock I had used for the front matching ups the thumb hole notches.

Oven: I watched an assembly video before I started my card. Then I cut the pieces I needed from green colored cardstock and white 65 lb. white cardstock.

Sentiments: For my original card, the outside “Merry Christmas” sentiment, I cut the words from a commercial Christmas card. For the card in my process video, I used stamps from the Greetery saying “Warmest Winter Wishes.” Inside both cards is “Happy Holidays, a die-cut sentiment by Karen Burniston in black.

Envelope: The card fits into an A2 envelope.

___________________________________

Thank you for experiencing this blog post.

I hope this inspires you and makes you smile.

Please like and leave comments 😊

___________________________________

Disclaimer: Karen Burniston products are provided free of charge by the manufacturer for review and use. All other items were personally purchased. Compensated affiliate links used where or when possible, meaning I will receive a small percentage commission from these manufacturers at no cost to you. This will allow me to add more content to my YouTube channel and help out a lot. Thank you.

Materials Used:

Dies, Punches & Stamps

Papers

  • Craft Consortium – 6×6 Double-Sided Cardstock – Over The Rainbow
  • Ranger – Perfect Cardstock – Wendy Vecchi Designer Series – Perfect Grey 4.25” x 5.5” top-Fold Cards
  • White and Black Cardstock
  • Fraser Papers for William House – A2 Envelope – Genesis Text Milkweed Smooth

Ink

  • Memento – Fade-Resistant Dye Ink – Tuxedo Black
  • Creative Craft Products – Alcohol Markers – Dual Tipped – 15 Geranium, GG3 Green Grey
  • Mont Marte – Dual Tip Art marker – E2 Raw Sienna
  • Gel Pen – Silver
  • Pigma – Mircon 01 Fine Tip Pen – Black
  • Sharpie – Permanent Marker – Fine Tip – Green
  • Sharpie – Permanent Marker – Ultra Fine Tip – Red
  • Sakura – Gelly Roll Pen – Medium – White

Adhesives

Tools

  • Die Cutting Machine
  • Stamping Platform
  • LDRS – Stampendable Stamping Tool
  • Stamping Blocks used as paperweights
  • Scissors
  • Pencil
  • Paper Masking Tape

Aquarium Holidays Card

This card was made for Craft Roulette #190 whose parameters included a fancy fold card, aquarium colors, November element and 3-item cluster.

My first thought with these parameters was to a card I had made may years ago featuring a cat looking through a goldfish bowl using Karen Burniston dies. My next thought was how to incorporate a November element. Turkey instead of cat was my answer. While the accordion/pivot card is a fiddly sort of card to assemble, I wanted a quicker version, hence the Z-fold cardbase with squares cut into them and fish with sequin shells and stars sandwiched in between sheets of acetate.

Cardbase: cut one 5 1/2-inch by 8 1/2-inch rectangle of blue cardstock and another rectangle from the same cardstock that is 5 1/2-inch by 4 3/4-inch. Score and fold the large rectangle in half to a 5 1/2-inch by 4 1/4-inch side fold card. Score and fold a 1/2-inch tab along the long edge of the smaller rectangle. Adhere the tab to one of the long edges of the other piece to form a z-fold three panel card.

Windows: Keeping the large rectangle piece of the card base fold in half, I used a 2.4-inch square die to cut through the first panel and mark where I needed to place the die to cut the second panel. I unfolded the cardbase and folded the tabbed panel back against the middle panel that had the markings of where the square die should go. Using the markings to place the die I cut the second panel’s window and made markings for where the die should be placed for the third panel’s window. After cutting the third panel, I took the square die and the next largest die with crosshatching and taped them together to form a die that would cut a frame to go around the windows. Cut six of these frames from darker blue cardstock.

Cut six squares of clear acetate or plastic film and adhere them with thin double-sided tape to the backsides of the frames. Attach frames to one side of the card base. Flip cardbase and adhere fish and decorations with glue dots to acetate making sure the placement works when the card is folded closed. When happy with the placement of aquarium items, attach the remaining three frames to sandwich the items inside the aquarium windows.

Fish: I used the fish from the Camping Charms to cut two fish from green cardstock. Then I traced their fins and scales with a green marker on both sides and then finished each side with a coat of glitter gloss. For the headwear I free-hand cut the yamaka from black and die cut the Santa hat from the Christmas Animals set.

Turkey: Because the turkey is seen from both the front and the back, I made sure to use colored cardstock that was the same on both the front and back. I only had to cut two of the decorative feather arch pieces. The beak and wattle are all cut with the same die, so I cut from orange and colored the wattle red with a marker. Textured metallic cardstock was used for the body, head and beak and wattle.

Lights: Since my family starts putting up Christmas light on Thanksgiving weekend, the light strands above the turkey and the fish with a Santa hat have multicolored lights while the lights above the fish with a black yamaka on his head has blue and white lights commonly used for Hanukkah in America. I used the light strand die from the Christmas Borders 1 set cutting the die in a variety of colors and using the black and green ones as my base strands and then snipping off other colors light blub part and gluing to the base strand. Finally, I covered the bulbs with Glossy Accents to make them look light glass blubs.

Sentiment: The sentiment is from Spellbinders and cuts in five separate pieces -H ol idays and H appy. The two words are on the front and back of each panel so that the is a continuous “Happy Holidays” being read. Thanksgiving panel in brown, Hanukkah in blue and Christmas in red.

Thank you for reading this blog post. I hope this inspires you and makes you smile. Please like and leave comments 😊

Materials Used:

Dies

Papers

  • My Colors – 12×12 Textured Metallic Cardstock – Black Bear
  • My Colors – 12×12 Textured Metallic Cardstock – Carrot Stick
  • Bazzill – 8.5×11 Textured Metallic Cardstock – Tiara
  • Blues, Green, Red, Black, Brown, Orange, Yellow and Cardstock
  • Grafix – 8.5×11 Acetate .0075 – Clear

Ink

  • Sharpie – Permanent Marker – Ultra Fine Tip – Red and Green
  • Pigma – Mircon 01 Fine Tip Pen – Black
  • Nuvo – Aqua Shimmer – Glitter Gloss

Adhesives

Tools

Miscellaneous

  • Buttons Galore & More – Shimmerz Embellishments – Splash -RZ109
  • Ranger – Glossy Accents

A Hunting Cabin Birthday

A cabin in the woods, good times with friends and family are what this card is about.

This simple log cabin scene pop-up card uses Karen Burniston’s new fireplace die set and a die designed to cut out trapazoids for pop-up balls, but here I use it to cut a 6-pane window.

Card Base with Window: Starting with a 10 x 7 inch piece of cardstock, scored and folded in half to create a 5 x 7 inch top folded card base. Position the Mini-Ball Double-Ups die so that it will look good from the outside as well as the inside next to the fireplace. The orientation of the widow will be up-side down from what is on the opposite side of the card. Die-cut the window with the card open on a die-cutting machine. (This is the only time you’ll need a wide platform die-cutting machine. If you only have a 6-inch-wide machine you can cut you card base in half, cut your window and glue a strip of paper as the card hinge.)

Cut “logs” from wood grain paper, ink the edges to create roundness and glue in place both on the outside of the card and the inside wall. Cut thinner strips of the woodgrain paper for the floor of the cabin, ink edges and glue in place alternating the seams as a real floor would be installed. (I had left over pieces of woodgrain paper from cutting Karen Burniston’s Landscape Rectangle Accordion that I used to frame the window.)

The back of the card is covered with leftover pieces from this and other cards made from the Craft Consortium papers In The Forest by Clare Therese.

Fireplace:  Watch the assembly video before assembling. Cut TWO of the fireplace fronts and emboss them both to show the bricks.  I tried several different crayons until I found a three color-mixed crayon in the Crayola True-to-Life series of crayons that blended brown, black and burnt orange to color the bricks.

I glued one of the brick fireplace fronts upside down as the back wall of the fireplace. Next is the hearth piece colored to be sooty sandstone that glued to the floor of the card.

I find it easier to attach anything hanging from the fireplace mechanism before I install the mechanism. After experimenting with how best to attach the pot from the Good Luck Charms set, I ended with gluing the charm circle loop to the part of the mechanism where the Santa boots would dangle. I glued some flames to the bottom of the pot to make the fire be all around the pot. The pot moves a little when opening and closing the card.

Glue together the fire and logs and then attach the cube-like pop-up strip into the card base and attach the fire. Glue the fireplace mechanism into card base. Then attach brick fireplace front and mantel. I use thin foam squares to attach the mantel to the brick fireplace front.

Accessories:  Fireplace tools and fender are from the Fireplace Extras 1 set. The lantern is cut from silver holographic cardstock colored with black permanent marker using the small lantern die from the Camping Charms set. The fish is also cut using a die from the camping charms and uses shimmer cardstock with distress inks. The metal plate the fish is on uses the circle from the snowman set. The rugs are from the oval crosshatch set and the deer head is the Christmas animals set on a plaque cut from the smallest crosshatch labels’ set covered in Glossy Accents. The only die that is not Karen Burniston is the fishing rod by Tayored Expressions.

Card Front:  Large tree is from the Christmas trees pop-up set with the center tree inked with Mowed Lawn Distress ink. The inked small trees are from the evergreen pivot panels set. The wee birds are from the tiny trees pop-up set and the turkey is from the feathered animals set.

Sentiments:  “Happy Birthday” is a single die while “DAD” is double cut from the large alphabet dies from green and black and then slightly over-laid for a shadow effect.

Envelope:  A brown kraft paper envelope completes the card with stamped images from the companion stamps of the patterned papers by Craft Consortium.

Thank you for reading this blog post. Please like and leave comments 😊

Materials Used:

Dies

Stamps

  • Craft Consortium – Clear Stamps – In The Forest by Clare Therese

Papers

  • Craft Consortium – Premium Quality Papers – 12” x 12” – In The Forest by Clare Therese
  • Craft Consortium – Premium Quality Papers – 6” x 6” – In The Forest by Clare Therese
  • American Crafts – Peebles – Spooky – 12 x12 Double-sided – Candy Toss – 736981
  • Colored Cardstock Scraps
  • Park Lane – 6×6 Paper Pad – Silver Holographic
  • 100 lb. Yellow cardstock 7 x 10 inches
  • American Crafts- A7 Envelope – Brown Kraft Paper

Pens, Crayons, Inks & Coatings

  • Sharpie – Permanent Marker –Fine Point – Black
  • Gelly Roll 08 Pen – White
  • Pigma Micron 05 – Archival Ink .045mm – Dark Brown
  • Crayola – True to Life Crayons -Grand Canyon
  • Ranger – Tim Holtz – Distress Ink – Mowed Lawn, Fired Brick, Black Soot, and Walnut Stain
  • Ranger – Glossy Accents
  • Nuvo – Aqua Shimmer – Glitter Gloss
  • Stampin’Up – Classic Stampin’ Pad – Early Espresso

Miscellaneous