Count Down to Santa – Part 1

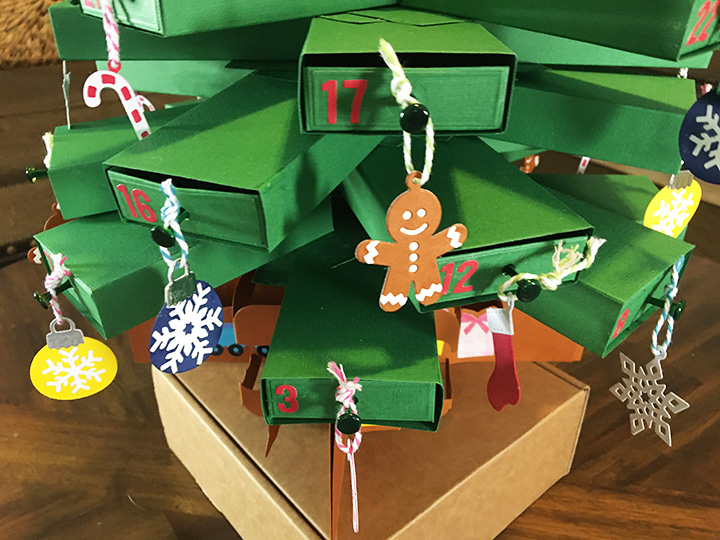
Counting down to when Santa comes can be a fun for little ones with a chest of numbered drawers full of surprises.

This non-traditional color schemed chest has 25 drawers that can be filled with treats, notes on an activity to do that day, etc. It is made with Karen Burniston’s newly released Slider Box die set and decorated with her Christmas themed dies.

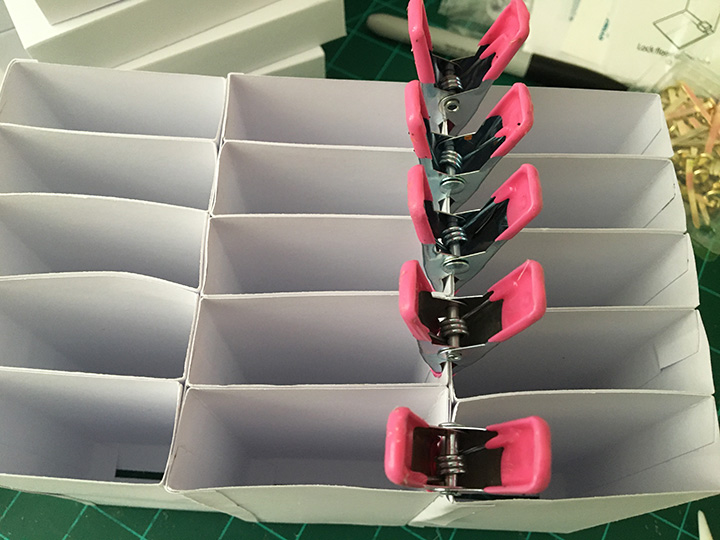
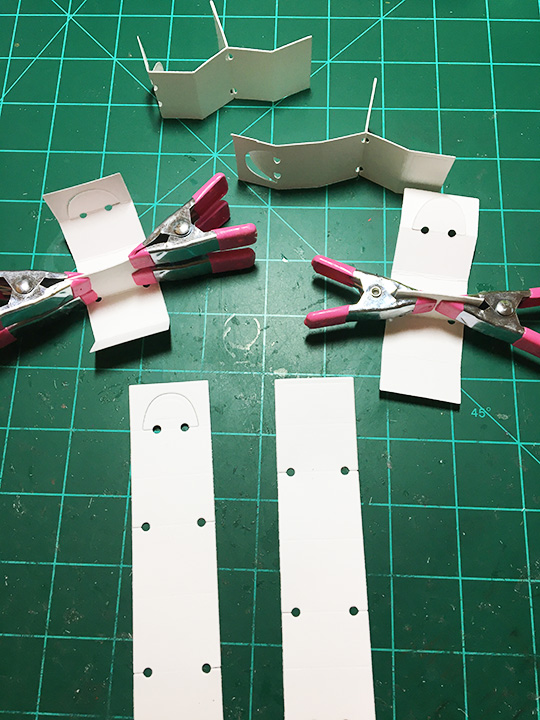
I used 16 sheets of 12×12 inch sheets of 85lb. cardstock to construct the chest with brass brads as drawer pulls. Using a large box as a jig to glue the slider sleeves together I found worked best when also adding a 5×4 3/8 inch siding strip to each tower.(Gluing up the slider sleeves around a drawer also helps to make them more uniform in size and shape.)

Once the five towers of five drawers each are made they can be glued together. To hide the unevenness of the towers, I covered the The base is 4 5/8×12 1/4 inches. The top is 4 1/2×12 1/4 inches. I covered the sides and top with a Snowflake patterned vellum which was only 12 inches wide, so I used 1/2 inch strips of silver glitter paper on the edges of the top to hide the gaps. I used the same silver glitter paper to cover the drawers. Karen Burniston’s Mini Alphabet’s numbers are the perfect size to fit on the drawer fronts.

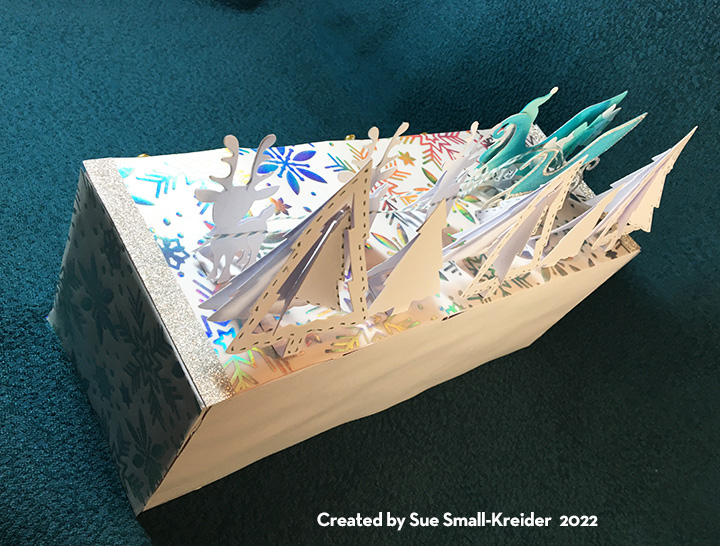
To create the snowy scene on top, I used four of Karen Burniston’s previously released die sets – Sleigh Pop-Up, Christmas Animals, Christmas Trees Pop Stand, and Gnome and Santa. I had to reverse the direction of the sleigh to make it work with the reindeer dies. The trees are assembled as usually, but with narrow strips of cardstock forming “U” shaped bases for the tree trunks to be glued onto. The reindeer are each made up of two die cuts that are glued together at their antlers and have the face colored on the front side only. the use the same “U” shaped bases as the trees.

I apologize for the wonkiness of the chest as it was my first attempt at constructing the towers of drawers. My suggestions to use a large box as a jig to shape the towers and a strong cardstock that does not absorb the glue as mine did may help you construct a chest that is more uniform.

Materials Used:

Dies

Papers

  • Recollections – Signature Especial 12×12 Foil Paper – Silver Glitter -220520
  • Spellbinders -8.5×11″ sheets of 100lb. Cardstock – Waterfall – CS-017
  • Stampin ‘Up – 12×12″ Specialty Vellum – Snowflakes
  • Brazzill – 12×12 Cardstock -Coconut Swirl
  • Pink, Black and Gold Cardstock Scraps

Pens, Crayons, Inks & Coatings

  • Farber Castell – Pitt Artist Pen – Black India Ink – 199
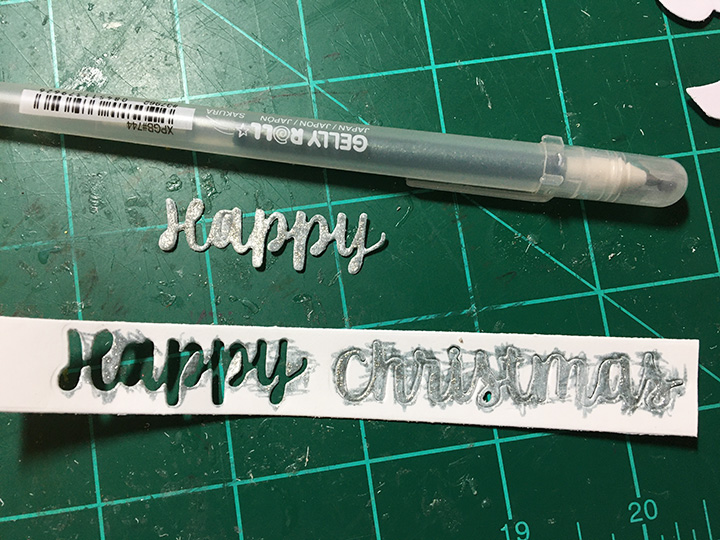
  • Sakura – Gelly Roll Pen – Silver -XPG#744
  • American Crafts – Metallic Marker – Silver – 82212
  • Ranger – Tim Holtz – Distress Ink – Salty Ocean

Miscellaneous

Holiday Card for A Bookworm

This is a holiday card for a booklover. It features the Bookworm and Bam Box dies from Karen Burniston’s December 2022 release. It also uses previously released die sets of the Fireplace Pop-up die set , Fireplace Extras 2 and Family Room die set.

Card Base:  The card base is an A6 size (4.5 x 6.25 inches) with a top fold. Decorative papers as well as the fireplace pop-up mechanism are glued to the base.

Bookworm and books:  The bookworm set comes with all the dies to create a bespeckled worm that fits on the sofa from the Karen Burniston Family Room die set. (See assembly video.) The book dies allow for creating books from most angles including open books. (I added book spines to the top of the fireplace and a stack of books to the base of the sofa hidden by the blanket.)

Bam Box:  The bam box is a rubber band powered spring box that allows the sofa to pop-up. Watch the assembly video before making. Heavy weight cardstock is recommended and allowing glue to dry at each step will make for the best working bam box.

Sofa:  A bam box is covered with the sofa from the Karen Burniston Family Room die set. The back of the sofa is just the seat portion left flat. I cut a rectangle to cover the front base of the sofa and hid the bam box. The pillows are attached as per assembly video directions. The bookworm is attached to the pillows with foam dots as is the stack of books to the base. The blanket is tucked around the worm’s body and attached under the foam square. (When laying out the position of the sofa in the card, I found that the lamp was too tall to be in the card when it was closed, so it was eliminated in the final card.)

Fireplace and accessories:  For the fireplace cut two of the fireplace brick front – one in white and one in black as well as two of the lined mantle/hearth pieces – one white and one gray. The black brick is colored with a white crayon and the fire and logs are also cut twice.

To assemble the fireplace, watch the assembly video first. You will need to attach the gray hearth and black brick pieces to the card base before adding the mechanism. There are two fireplace extra sets. I used the one with the clock, plant and basket of logs. The tiny pop-up mechanisms for the objects on top of the mantel are from the fireplace die set. The basket of logs is on a foam dot. I also add strips of white cardstock to the wall on either side of the fireplace as floor moldings.

Rugs and Wall Decoration:  Using patterned papers that suggest wallpaper or carpeting make this type of card pop. The picture molding strips above the fireplace are scraps trimmed off the patterned paper and the reverse side used. The large green oval rug is cut the second largest oval crosshatch die. The small white oval with a red heart is the cut out from the picture frame. It can be used to write a personal message.

Sentiments:  On the front of the card Karen Burniston’s Merry Christmas and its shadow are cut from contracting colors of patterned papers used on the inside of the card. The Happy New Year framed inside the card over the fireplace is a computer-generated sentiment. The frame is from the slim frames die set.

I used leftovers from decorating the inside of the card to complete the outside panels of the card which are covered using the reverse sides of the decorative papers used on the inside.

Envelope: The back flap of the envelope has a bookworm attached at the head to the flap and a stripe of double-sided tape on the back of its body for when the envelope is sealed.

Thank you for reading this blog post. Please like and leave comments 😊

Materials Used:

Dies

Papers

  • Echo Park Paper Co. – 12 x12 Double-sided coated cardstock – A Perfect Christmas by Lori Whitlock – Berry Merry Christmas – APC135003
  • Echo Park Paper Co. – 12 x12 Double-sided coated cardstock – The Story of Christmas by Lori Whitlock – Flowers – TSC94003
  • Colored scraps of cardstock
  • Computer and color printer
  • Park Lane Paperie – A6 Textured Card and Envelope – Ivory

Pens, Crayons & Inks

  • Green, Red and Black Fine-Tipped Markers
  • Gelly Roll 08 Pen – White
  • Ranger – Tim Holtz – Distress Ink – Walnut Stain
  • Ranger – Tim Holtz – Distress Crayon – White

Miscellaneous

Santa Stop Here

Fur babies can enjoy the winter holidays as much as their human parents. This little pup doesn’t want Santa to forget her. She’s got her Santa hat and lights on her house as well as a sign asking Santa to stop.

The card front uses the dog from the Dog House Tiny House Add-Ons cut three times to make her stand out from the busy background paper. Dog bones from this set were also added to hint at what is to come on the inside.

To create the dog house, cut out and assemble a red Tiny House. (See assembly video.) I used the same red lightweight cardstock for the side panels from the add-ons. I choose not to ink the dies to print the siding lines, but rather to emboss them and then, using a white ink cube, to add a powdery dusting of snow.

For the colorful lights, use the lights from the Holiday House die set. (I used shimmer paper and colored them with fine-tipped markers.) The wreath is also from the Holiday House. Pup is added to the front of the dog house with a thick foam dot.

The snowy look on the roof was created by painting a thick coating of glitter gloss and using Effect Snow around the edges. To hold up the “Santa Stop Here” sign, a grassy strip from the Mushroom Tiny House Add-Ons set was cut, Effect Snowed, and glued to the card base and dog house. The sign is made from three of the school signs from the Church and School Tiny House Add-Ons set.

White octagons from the Bam Box Pop-Up die set are placed in opposing corners like snowballs for personal messages. Snowflake borders cut from shimmer paper using the Long Nature Edges 2 set.

Card backs are just as important as fronts. This one is decorated with left over strips.

The back flap of the envelope hints at what’s to come with the Santa capped pup.

Thank you for reading this blog post. Please like and leave comments 😊

Materials Used:

Dies

Papers

  • Echo Park Paper Co. – 12 x 12 Double-Sided Cardstock – A Perfect Christmas by Lori Whitlock – Christmas Collage – APC135008
  • Red Light-Weight Cardstock – 8.5 x 11
  • Colored Cardstock Scraps
  • White A7 Envelope

Pens & Inks

  • Blue, Red, Yellow and Blue Fine-Tipped Markers
  • Gelly Roll 08 Pen – White
  • Pigma Micron 05 – Archival Ink .045mm – Dark Brown
  • American Crafts – Metallic Markers – Silver

Miscellaneous

Happy Christmas Basket

There is something magical about going to a Christmas Eve Candlelight church service on a frosty evening. That is the feeling this basket card is hoping to invoke.

This Christmas card features some of Karen Burniston’s December 2022 release die sets – Wide Woven Basket Box Card, Church School Tiny House Add-ons and Bam Box. All of the pieces were cut from two types of white cardstock with silver ink added to some pieces. Vellum was used behind the windows.

Church: The assembly of the church starts with the Tiny House base with its windows cut out while still flat. (Save the window frames to glue back into openings.) Cut rectangles of clear vellum to be glued on the inside of the church over the window openings. Trim excess vellum away from round window as needed. Coat the two roofs with glitter gloss. Coat window frames and door frame with glitter gloss. Using door die as a stencil, color door handles silver. Color the two crosses silver and glue together. Color the two halves of the tall charm holder on the church tower silver.

Assemble the tiny house as directed in assembly video. Don’t fold back bottom tabs, but rather trim off the tab on the house side, leaving the back or pointed side’s tab attached. Follow assembly video for the church tower. After adding the Bam Boxes, cut a rectangle to fit on the inside of the church to cover the other half of the church front. (This piece will stabilize the church when attached to the basket and will block light if you add LED lights.)

Wide Woven Basket: This die set makes it easy to create a rectangular pop-up basket. (Prior to this set you had to die cut an extra set of pieces to widen the basket sides and grass.

When used with the previously released Woven Basket Box Card, you cut two sets of the original size sides and two sets of the wide size sides. Follow the directions on the package or the assembly video to weave the basket and join the sides together. (I colored both sides of the ropes with silver metallic pen and then coated with a glitter gloss brush pen before attaching them.)

Adding Crossbars of Grass: The Wide Woven Basket Box Card includes the wide grass crossbars. (I cut four to make a full basket.) I trimmed away the grass leaves where the church would be. The front tab on the church is NOT attached to the crossbar, but rather acts as a guide for when the church and basket are folded closed.

Bam Boxes: To animate the basket when it comes out of the envelope and pops into shape, two small “Bam Boxes” were used. Watch the assembly video first. The church also uses two Bam Boxes. These easy to make rectangular boxes are powered by a small rubber band. (I used #8 size bands.) These go in diagonally opposite corners of the basket or church. Once glued in, the basket or church will only fold flat in one direction, so make sure both church and basket fold in the same direction. (I recommend using a heavy weight cardstock for bam boxes and letting each stage of gluing dry before moving onto the next step. I found that making a bunch of Bam Boxes at one time is useful for having some ready made to use on other projects.)

Tag, Bells, Holly and Berries: A tag is tied to the handle of the basket for a personal message. It is cut using the tag die from the Karen Burniston Tag Book die set. The bells are charms from the Church School Tiny House Add-ons colored with a silver gel pen. Karen Burniston’s Pattern Plate of Holly was coated a glitter gloss while the berries were colored with a silver gel pen. The holly leaves and berries were cut apart for decorations on the basket, tag and in the basket grass.

Sentiment: The “Happy Christmas” is from the Karen Burniston Word Set 3 -Holiday. It was cut three times from white, and the top layer was not weeded out of its original piece of cardstock while it was being colored with a silver gel pen. The three layers were glued together before being attached to the front of the basket.

Lights: I added an inexpensive string of LED fairy lights to the inside of the church. (You can find these at Dollartree and Poundland stores.) Because the lights restrict the movement of the Bam Boxes inside the church, the lights need to be removed to fold flat.

Thank you for reading this blog post. Please like and leave comments 😊

Materials Used:

Dies

Papers

  • Brazzill – 12×12 Smooth Cardstock – Coconut Swirl
  • White Heavy Weight Cardstock

Pens & Brushes

  • American Crafts Metallic Marker – Silver
  • Gelly Roll – Gel Pen – Silver
  • Nuvo – Aqua Shimmer Brush Pen – Glitter Gloss

Miscellaneous

Popping The Question

Hi Crafty Friends,

Welcome to our Karen Burniston Products – KB Riley LLC December Release Blog Hop. The Design Team have come together with Karen today for a fun blog hop to celebrate the release of 11 new dies. Sneak peeks of the new release started last week, and the dies are available to order NOW!

This proposal is literally popping the question!

Karen Burniston’s December 2022 release includes the Surprise Cube Pop-Up, Slider Box and Wedding Charms die sets used to make this proposal box.

Three decorated Surprise Cubes comfortably fit inside the slider drawer. (See assembly video for Surprise cubes.) Using the smallest crosshatch rectangle from the Slider Box set to hold the big question, it was glued to one side of a cube when flat. Placing this cube in the bottom of the drawer it tends to stay inside the drawer when the other cubes pop out. (Slider Box assembly video)

Four different charms- groom tux, bride wedding dress, double wedding rings and clicking champagne glasses – from the Wedding Charms set cover the sides of the cubes.

The tiny crosshatch squares and triangles included in the Surprise Cube set along with matting squares and triangles make for quick decorating. The Mini Alphabet letters spell out the proposal.

Not ready to pop the big question? Then try these die sets for asking someone to the prom, wishing a Happy Birthday or a Happy Christmas. The drawer will fit a gift card under the three cubes.

This release includes:

  • 2 new charm die sets
  • 1 new stand alone die set
  • 2 new Tiny House Add-Ons sets
  • 2 new Pop-up die sets
  • 1 new Woven Box Basket die set
  • 2 new Crosshatch die sets
  • 1 new Box die set

Dies are available to order now on the website.

GIVEAWAY:

To celebrate the release Karen Burniston and each of the Karen Burniston – KB Riley LLC Design Team members will be giving away a $25 Gift Certificate to some lucky person who comments on our blog posts, so make sure you join the hop and comment on everyone’s blog post. Winners will be randomly chosen from ALL of the blog hop comments received on our blog posts by Monday, 19th December 2022. Lots of chances to win some goodies, so just leave a comment on this post or any other blog hop posts to enter! Don’t forget to leave some way for us to contact you, in case you are a lucky winner!

Karen Burniston 

Lois Bak 

Sue Small-Kreider – YOU are HERE

Karen Aicken 

Jennifer Webster 

Frances Byrne 

Nicky Foden 

Sandy Diller  

Suzanne Smit

Fran Sabad 

Thank You To Our Mail Carrier

For all the packages and envelopes that our mail carrier has so carefully placed in our mail box or placed by our front door, I wanted to say thank you to her. So, a mail truck thank you ornament was created.

I primarily used Spellbinder’s Food Truck and Sunday Drive collection dies to create this mail truck.

I cut two of the food truck die from an 8.5 x 11-inch sheet of white cardstock. I next cut panels that were 2.75 inches wide and scored at 3/8 inches on each side. (See downloadable PDF file of templates.)

The top of the windshield strip is .25 inches tall which is not on the template. The front panel is scored across at .875 inches and the side tabs are cut away. This forms the front slanted hood.

Glue all the panels to one of the truck pieces as shown in the photo making sure that all panels are parallel to each other and tabs are all on the inside of the truck.

Glue up a mail carrier using people dies from the Sunday Drive collection (I used the Sunday Sunset Drive for this and freehand cut the hat which our mail carrier wears.) Attach mail carrier to seat panel. (It is easier at this point to letters and packages to the seat panel at this point than to add them once the truck side is attached to the panels.)

Glue the panels to the second truck piece starting at the front and working towards the back.

The roof panels as shown on the template have tow holes punched into them for a string to tie them shut and form a loop to hang the truck from.  I had to notch my tabs to fit over the cab panel. You could avoid this by attaching the roof panels first and then the other panels.

The truck is designed to fold flat, so allow enough string to allow for it being flat.

I decorated the truck using the circle dies in the Food Truck set and the steering wheel from the Sunday Drive set. The strips were cut from some scrap strips of red and blue papers. The headlights and taillights use the smallest circle die from the Food truck set. (I used yellow glitter cardstock for the headlights.)

The “US MAIL” on the sides and the “THANK YOU” on the back were cut using Karen Burniston’s Mini Alphabet.  (I cut three “O”s glued together to make a slider on the string to help keep the roof shut.)

Thank you for reading this blog. Please like and leave comments. 😊