Need a fun card? Make a tower card with a honeycomb paper feature. Using products purchased from Craftstash, this card was quick to make. The flamingo and green leaves are from a Creative Craft Products bundle which includes the dies and honeycomb paper.
The card base is made with the Terrific Tower die by Sam Calcott of Made to Surprise that creates an art deco feel for this elegant display card. The front sentiment was computer generated.
.The back of the card features a die-cut “Happy Birthday” by Chole’s Creative Cards.
The card will fit in an A5 size (7 x 5 inches) envelope that has a die-cut flamingo from Karen Burniston’s Beach Charms on its back flap.
Thank you for reading this blog post. Please like and leave comments 😊
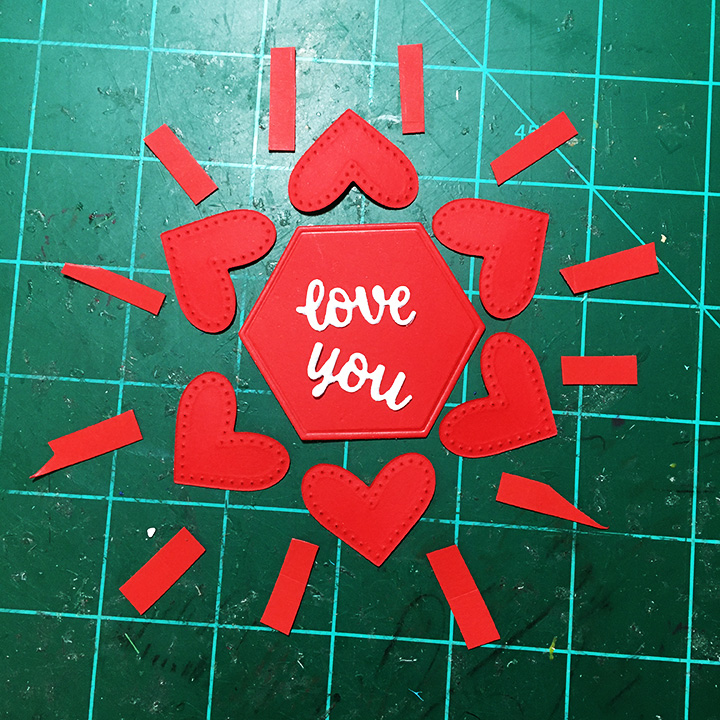
Center Layer: Cut one of the second smallest of the plain edged hexagon in the Hexagons Crosshatch set of red 65 lb. cardstock. Cut six of the hearts in the Circle Charm Pop-Up set in red 65 lb. cardstock. Cut 12 strips 1-inch by 1/4 inch in red 65 lb. cardstock. (Strips need one squared off end that will be visible when the card is open.) Cut in white cardstock “love you” from Word Set 13.
Adhere “love you” sentiment onto hexagon parallel to a straight edge. Glue squared ends of strips to back side of the rounded tops of hearts. (Each heart should have two strips.) Place heart face up over an edge of hexagon and fold under the attached strips and glue to the underside of the hexagon. Make sure the top of the heart is just at the edge of the hexagon and not overhanging. (Overhanging hearts will make catchpoints that will be hard to open when flower is assembled.) Repeat with the next five hearts.
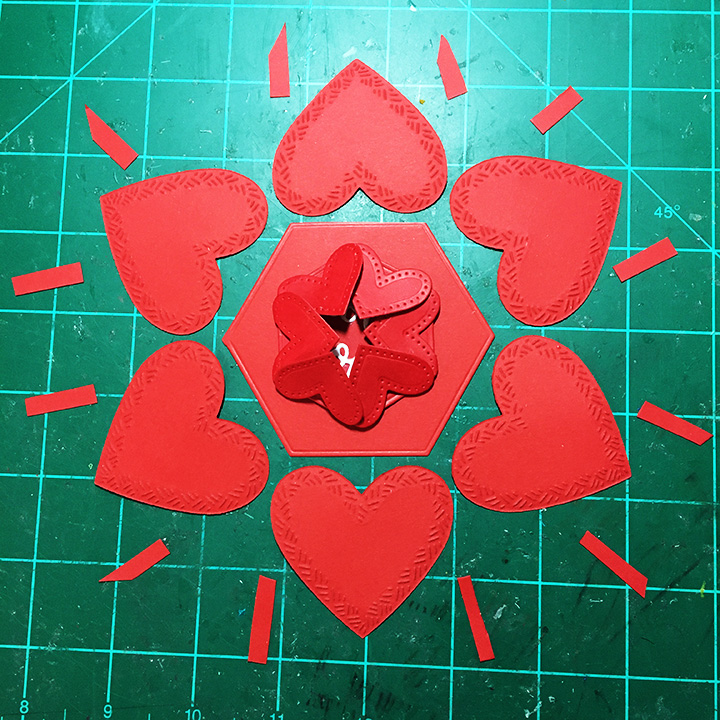
Fold hearts closed and test for catchpoints. Adjust attached hearts as needed to eliminate catchpoints.
Middle Layer: Cut one of the second largest of the plain edged hexagons in the Hexagons Crosshatch set in Pomegranate 100 lb. cardstock. Cut six of the smaller crosshatch heart in the Heart Crosshatch set in Pomegranate cardstock. Cut 12 strips 1-inch by 1/4 inch in Pomegranate cardstock. (Strips need one squared off end that will be visible when the card is open.)
Using thin foam squares, adhere center layer hexagon onto middle hexagon with points of smaller hexagon pointing towards the middle of each straight edge on larger hexagon. Glue squared ends of strips to back side of the rounded tops of hearts. (Each heart should have two strips.) Place heart face up over an edge of hexagon and fold under the attached strips and glue to the underside of the hexagon. Make sure the top of the heart is just at the edge of the hexagon and not overhanging. (Overhanging hearts will make catchpoints that will be hard to open when flower is assembled.) Repeat with the next five hearts.
Fold hearts closed and test for catchpoints. Adjust attached hearts as needed to eliminate catchpoints.
Outer Layer: Cut two of the largest hexagon in the Hexagons Crosshatch set – one red dotted Swiss and one white. Cut six of the scalloped heart in the Heart Crosshatch set in red dotted Swiss. Cut 12 strips 1-inch by 1/4 inch in red dotted Swiss. (Strips need one squared off end that will be visible when the card is open.)
Using thicker foam squares, adhere middle layer hexagon onto largest hexagon with points of smaller hexagon pointing towards the middle of each straight edge on larger hexagon. Glue squared ends of strips to back side of the rounded tops of hearts. (Each heart should have two strips.) Place heart face up over an edge of hexagon and fold under the attached strips and glue to the underside of the hexagon. Make sure the top of the heart is just at the edge of the hexagon and not overhanging. (Overhanging hearts will make catchpoints that will be hard to open when flower is assembled.) Repeat with the next five hearts.
Fold hearts closed and test for catchpoints. Adjust attached hearts as needed to eliminate catchpoints.
Glue white hexagon over the back of the red hexagon to cover-up strips and to provide a space to write a personal message.
Closing Band: Cut one strip of 12 inches by 3/4 inch in striped cardstock. Wrap loosely around widest part of closed flower. (Make such you can slide off the closed band before gluing closed.)
On white cardstock, trace around the “Happy Valentine’s Day” die to create a shadow for the words. Fussy cut the shadow. Die-cut the sentiment in red and use a pokey tool to weed out the words. Glue to shadow. Adhere the shadowed words to band.
The card will fit in an A2 size (4 3/8 x 5 3/4 inches) envelope. It may require extra US postage for its thickness.
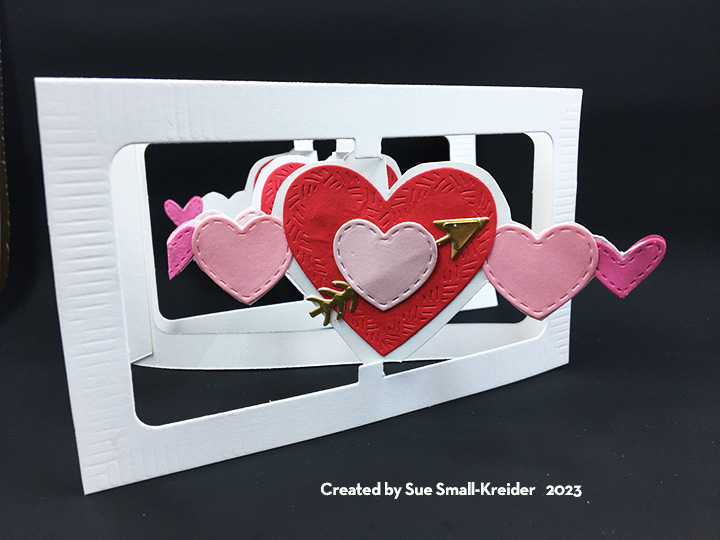
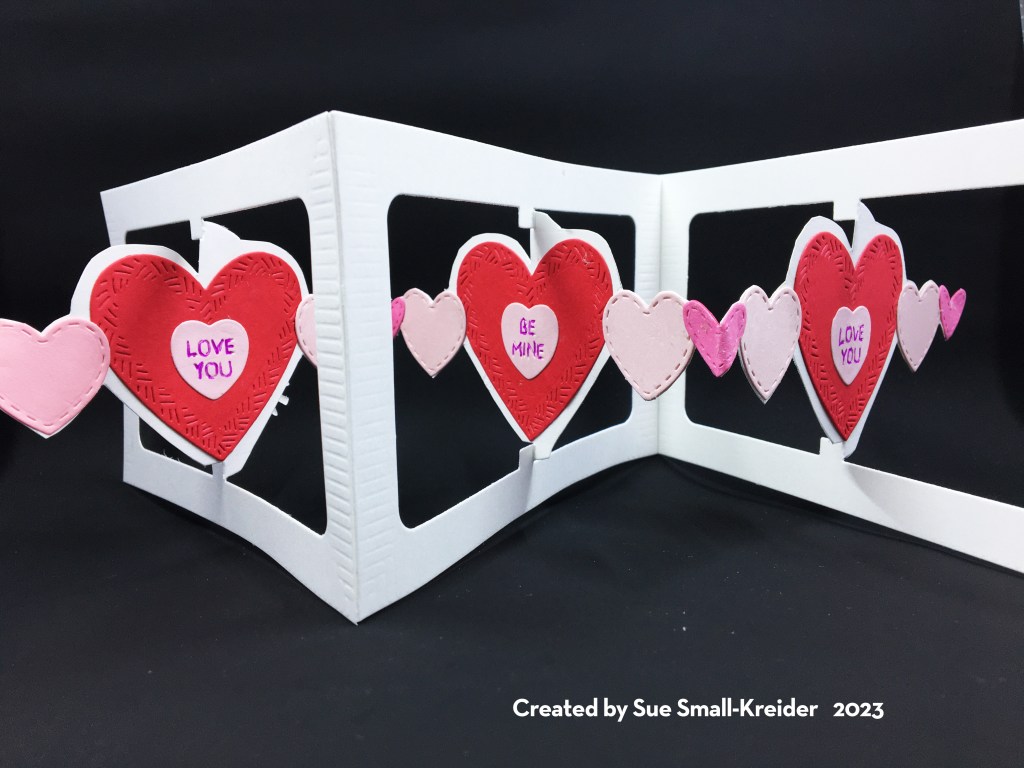
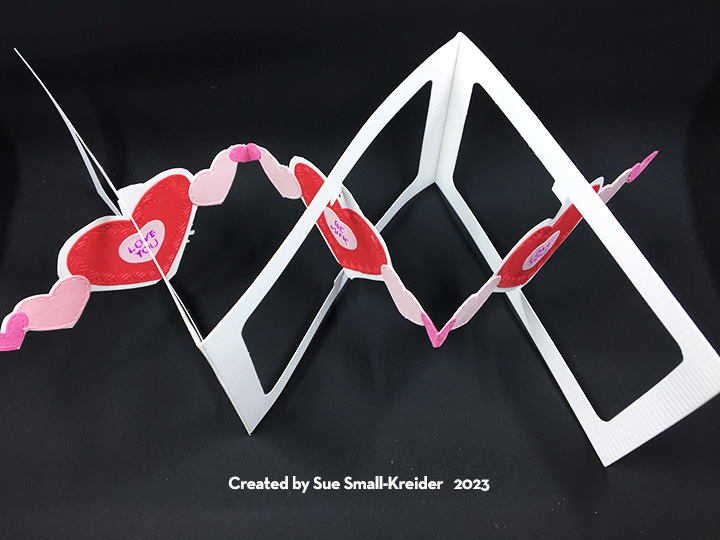
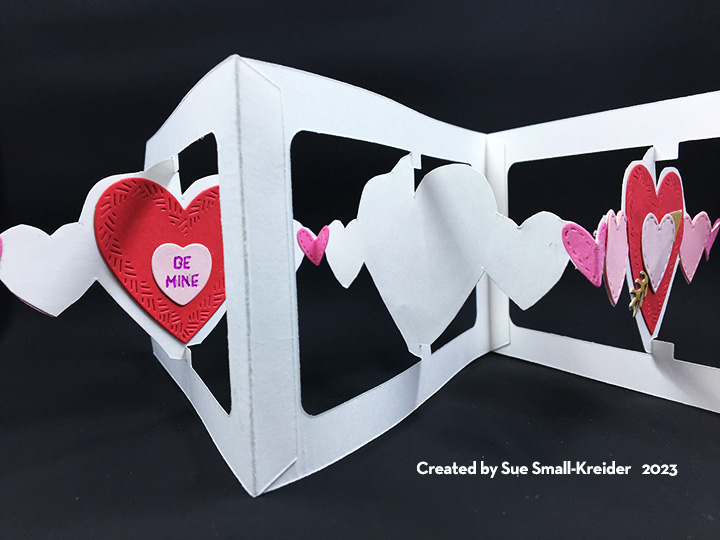
This is a quick fussy cut string of hearts using Karen Burniston’s Landscape Rectangle Accordion die. The large red hearts and smallest dark pink hearts are from the Hearts-Crosshatch set while the medium size pale pink hearts and hearts with sentiments and arrow are from the Love Charms set. (I used a purple gel pen to highlight the candy heart sentiments.)
Below is a PDF file which you can download for a basic template of how to fussy cut the panels which are connected by the smallest hearts.