2025 In Review

As I reflect on the 2025, I want to thank all of you who have been following my blog and YouTube channel and Instagram feed.

Your support is very much appreciated!

In 2025 there have been 140 blog posts on this website.

2024 saw the launch of my YouTube channel for process videos. I added 137 videos in 2025. The most viewed video of the year was Sailboat Pop-Up Card which was added in June of 2024. It was one of 107 videos added to the channel in 2024. (As of this writing on 12/31/2025, There are 419 subscribers for my YouTube channel. Aiming for 500+ subscribers in 2026! )

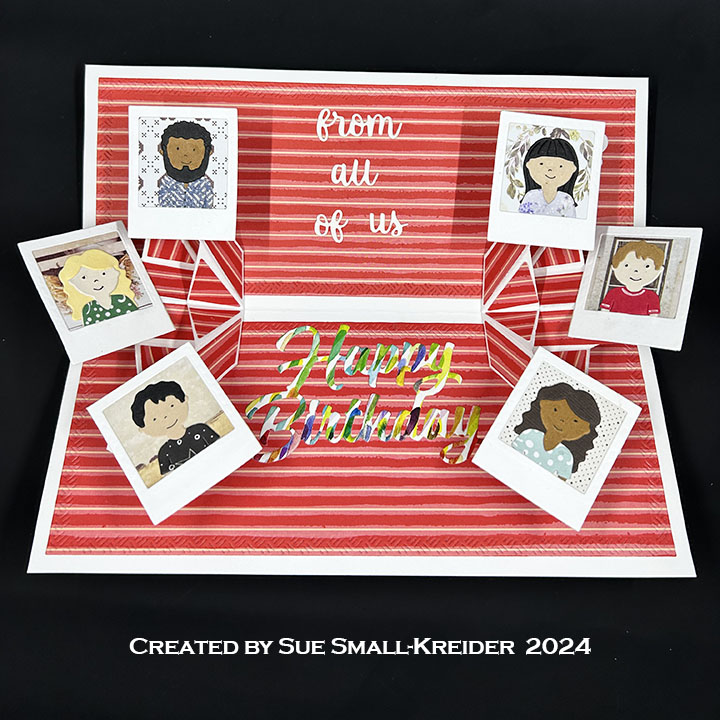
The most watch video added in 2025 was A Popcorn Lover’s Birthday Card From All of Us.

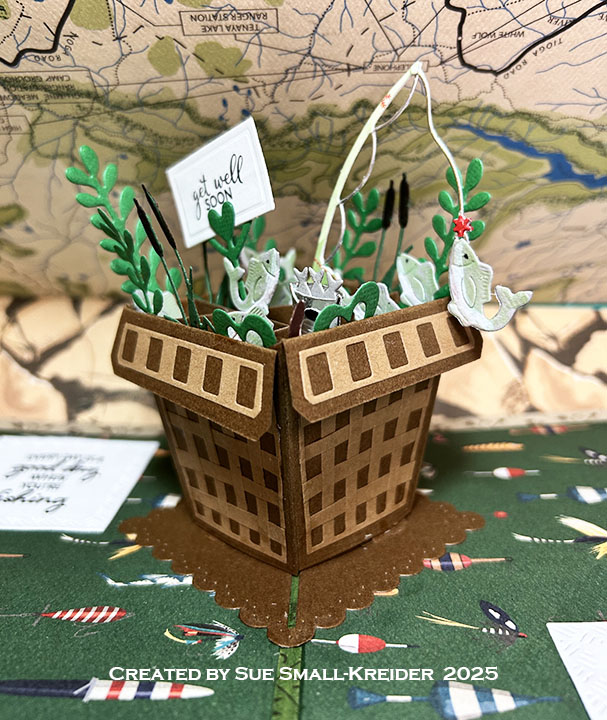
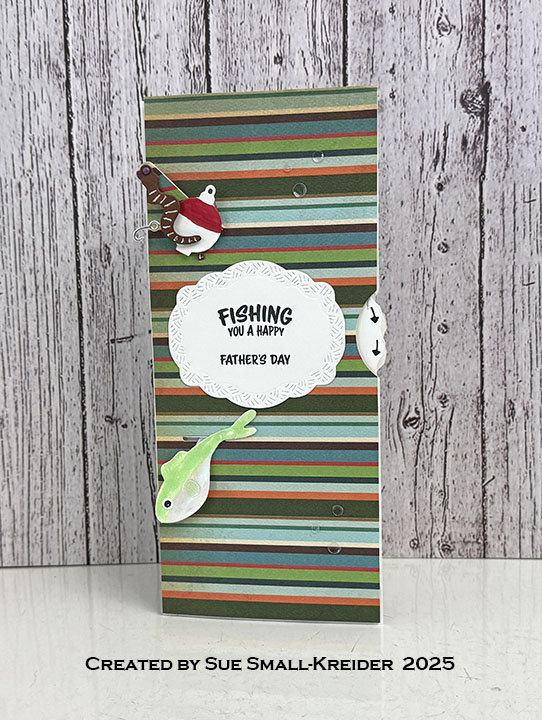
January 2025’s most viewed post was A Pop-Up Get Well Card – Fishing Themed.

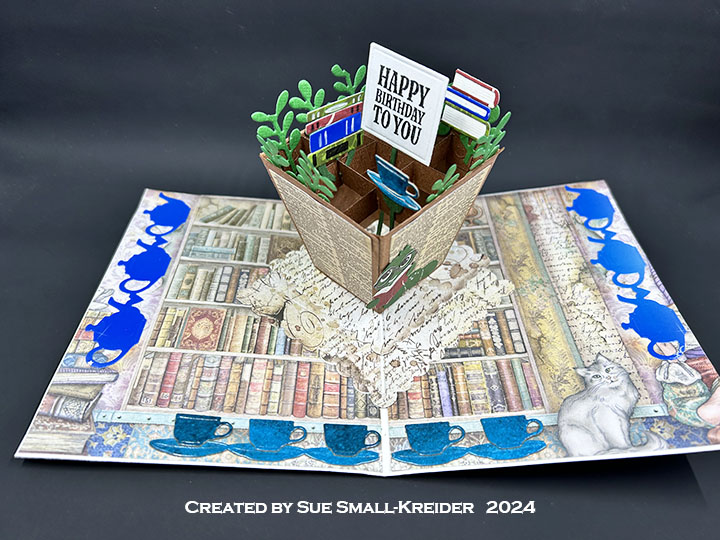
February 2025’s most viewed post was A Pop-Up Birthday Card for A Bookworm.

March 2025’s most viewed post was Pirate Themed Pop-Up Birthday Card.

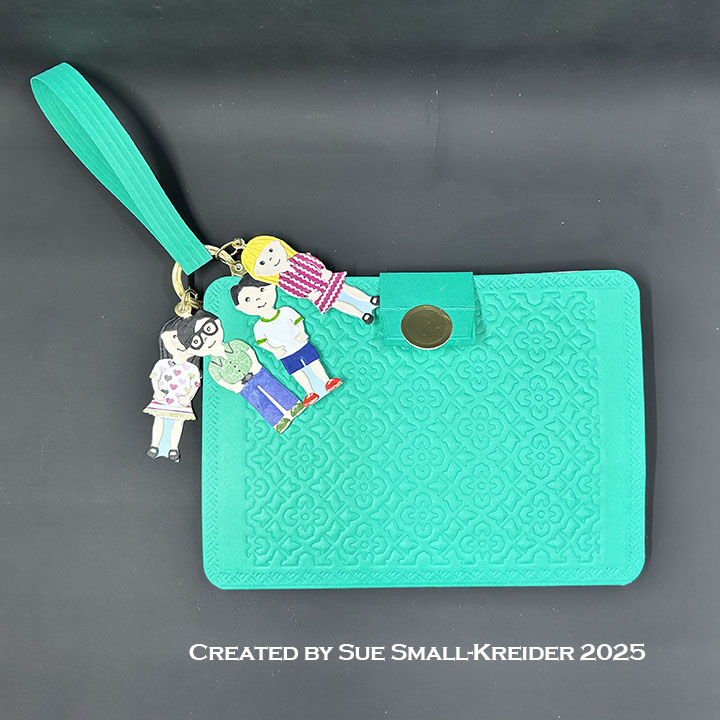
April 2025’s most viewed post was Waterfall Wallet for Mother’s Day.

May 2025’s most viewed post was Popcorn Lover’s Birthday Card From All of Us.

June 2025’s most viewed post was A Double Whirly Wheel Fishing Themed Father’s Day Card .

July 2025’s most viewed post was Happy Birthday Accordion Style.

August 2025’s most viewed post was Bottom Fold Purse Pop-Up Birthday Card .

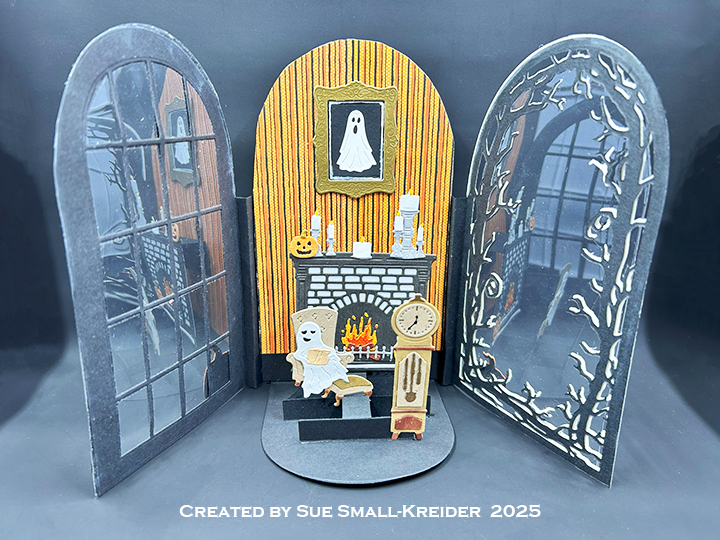
September 2025’s most viewed post was Halloween Tri-Fold Pop-Up Card .

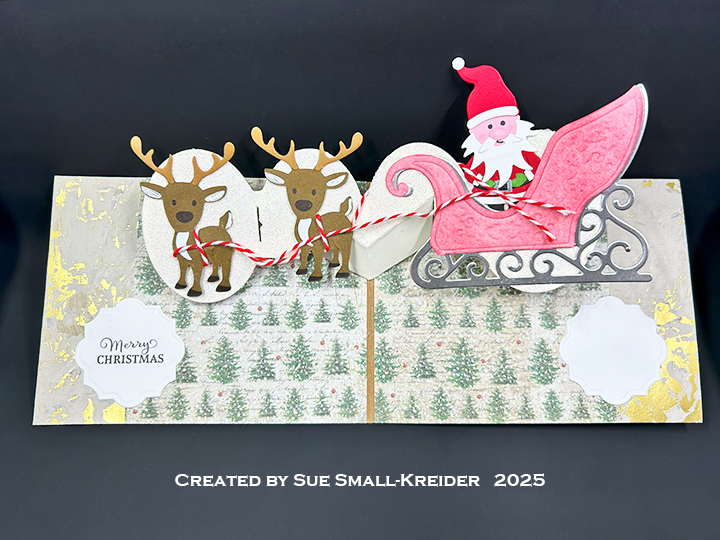
October 2025’s most viewed post was Sleigh Bells Pop-Up Christmas Card.

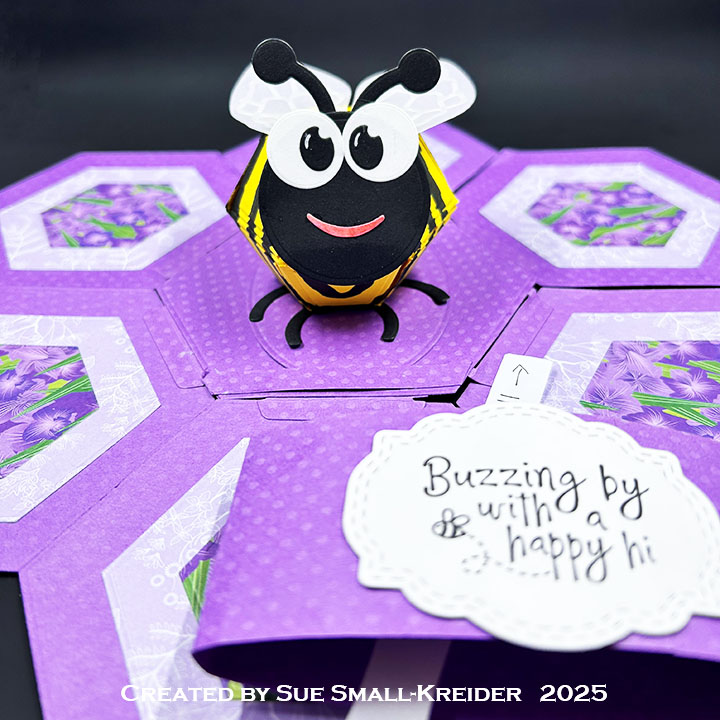
November 2025’s most viewed new post was Bee Pop-Up In A Flower Card

December 2025’s most viewed post was What’s New Kitty Cat

The top viewed post of 2025 was A Pop-Up Get Well Card – Fishing Themed.

________________________________________

If you haven’t already

started following

my blog (via email – see side bar)

or

my

YouTube channel,

please do.

Your Support is very

🌞Much appreciated!🌞

________________________________________

Train Birthday Card

This card was made for Craft Roulette #298 whose parameters were: an A6 card, Gummi Bear colors, rhymes with “-ack” element and tearing. I used Scrappy Tails dies and Honey Bee Stamps to create this card.

Watch the process video below to learn how this card was made.

Cardbase: I used a purchased American size A6 (4 5/8×6 1/4-inches) cream-colored, cardbase and matching envelope.

Train: The train and brick frame come from the Scrappy Tails Train Station Pop-Up Tunnel Card die set. Watch video above for details on assembly.

Sentiments: “Happy Birthday Wishes” on a train ticket stamped and die cut using the Honey Bee Stamps Ticket To Ride. Punch a small hole and thread some embroidery floss through the hole and tie.

Envelope: The panel card fits into an A6 (4 3/4×6 1/2-inches) size envelope with the back flap stamped with the train ticket in black.

___________________________________

Thank you for experiencing this blog post.

I hope this inspires you and makes you smile.

Please subscribe, like and leave comments 😊

___________________________________

Disclaimer: Karen Burniston products are provided free of charge by the manufacturer for review and use. All other items were personally purchased. Compensated affiliate links used where or when possible, meaning I will receive a small percentage commission from these manufacturers at no cost to you. This will allow me to add more content to my YouTube channel and help out a lot. Thank you.

Materials Used:

Dies

  • Scrappy Tails – Dies – Train Station Pop-Up Tunnel Card

Dies

  • Honey Bee Stamps – Clear Stamps & Dies – Ticket To Ride

Papers

  • American Crafts – Core’dinations – 8.5×11 inch Textured Glitter Cardstock – Black Tie
  • Stampin’ Up – 8.5×11 80 lb. Cardstock – Copper Clay
  • Silver Matte Cardstock.
  • Black, Red, Tan, White and Yellow Cardstock
  • Park Lane Paperie – Cardbase & Envelope – Cream

Ink

  • Memento – Fade-Resistant Dye Ink – Paris Dusk, Rose Bud, Tuxedo Black
  • Pigma – Mircon 01 Fine Tip Pen – Black
  • Sakura – Gelly Roll Pen – Medium – White
  • Sharpie – Permanent Marker – Ultra Fine Tip – Black
  • Stampin’ Up – Stampin’ Write Marker – Chocolate Chip

Adhesives

Tools

  • Die Cutting Machine
  • Scrapbook.com – Magic Mat
  • Paper Trimmer
  • Stamping Block as Paperweight
  • Bone Folder
  • Tweezers
  • Scrapbook.com – Mint Tape
  • Trinity Stamps – Pickup Stick Tool
  • Hole Punch – 1/8 inch

Miscellaneous

  • Embroidery Floss – Blue

Scrappy Tails – Nutcracker Tunnel Card

Welcome to Day 10 of my Nutcracker series using a variety of stamps and die sets to make some nutcracker themed cards. My card today uses dies by Scrappy Tails – Nutcracker , Snowflake Pop-Up Tunnel Card and Train Station Pop-Up Tunnel Card die sets.

Watch the process video below to learn how this card was made.

Nutcracker: Referring to the images of the nutcrackers on the packaging for the Nutcracker die set and the video above, cut out all the pieces using your own color scheme. (I cut out the entire body from flesh colored cardstock and then dressed the nutcracker.) The nutcracker is glued into the second layer of the tunnel card at the hat (onto the lattice work of the frame) and at the boots onto the snow piece. (The snow piece is glued to the back side of the frame. )

Tunnel Card: Using a pale blue cardstock, cut three of the tabbed frame pieces and one large solid arched piece from the Snowflake Pop-Up Tunnel Card die set. Cut from white, one frame without tabs, one arch with snowflakes and one snow piece. From white glitter cardstock cut one frame without tabs. Punch out all the decorative pieces from all the white frames and save for decorating the blue embossed frames. Glue the plain white frame onto the solid blue arch piece and then glue the smaller snowflake arch onto the blue arch inside the white frame. Glue the white glitter frame onto one of the embossed blue frames. Decorated the other two blue embossed frames with the snowflakes and swirls from the white frames. For the first and second frames fold the tabs toward the back and then fold the third frame’s tabs toward the front. Add 1/8 to 1/4-inch wide double-sided tape to the sides of the tabs that will be adhered to the side pieces. Cut two side pieces from white using the side piece from the Train Station Pop-Up Tunnel Card die set. (If you don’t have the Train Station set, cut two 1.25×5-inch rectangles.) Assemble the tunnel card as shown in the video.

Sentiments: The back sentiment of “Happy Winter Wishes to you” comes from the Snowflake Pop-Up Tunnel Card die set.

Envelope: The panel card fits into an A7 (5×7-inch) size envelope with the back flap decorations of snow from the Snowflake Pop-Up Tunnel Card die set.

___________________________________

Thank you for experiencing this blog post.

I hope this inspires you and makes you smile.

Please subscribe, like and leave comments 😊

___________________________________

Disclaimer: Karen Burniston products are provided free of charge by the manufacturer for review and use. All other items were personally purchased. Compensated affiliate links used where or when possible, meaning I will receive a small percentage commission from these manufacturers at no cost to you. This will allow me to add more content to my YouTube channel and help out a lot. Thank you.

Materials Used:

Dies

  • Scrappy Tails – Dies – Slimline Nutcracker Spinner
  • Scrappy Tails – Dies – Snowflake Pop-Up Tunnel Card
  • Scrappy Tails – Dies – Train Station Pop-Up Tunnel Card

Papers

  • Concord & 9th – 8.5×11 Cardstock – Powder
  • Gina K. – 8.5×11 100lb. Cardstock – Blue Raspberry
  • Pen + Gear – 8.5×11 104lb. Diamond Print Glitter Cardstock – White
  • Silver Matte Cardstock.
  • Black, Pink and White Cardstock
  • A7 (5×7-inches) Envelope – Cream

Ink

  • American Crafts – Metallic Marker – Silver
  • Nuvo – Aqua Simmer Brush – Glitter Gloss
  • Nuvo – Marker – 430 Ultramarine
  • OLO – Marker – Cotton Candy
  • Sakura – Gelly Roll Pen – Medium – White
  • Sharpie – Permanent Marker – Chisel Tip – Black
  • Stampin’ Up – Stampin’ Write Marker – Chocolate Chip

Adhesives

Tools

  • Die Cutting Machine
  • Scrapbook.com – Magic Mat
  • Paper Trimmer
  • Stamping Block as Paperweight
  • Bone Folder
  • Tweezers
  • Scrapbook.com – Mint Tape
  • We R Memories – QuickStick

Good Bye 2025 Hello 2026

This card was made for Craft Roulette #297 whose parameters were: a holiday card, forest colors, toy(s) element and wonky. I used Karen Burniston dies to create this card.

Watch the video below to see how this card was made.

Cardbase: Score and fold a 7.75×8.5-inch rectangle in half to form a 3.875×8.5-inch slimline card.

Interactive Fireworks: Make three Playful Pop-Up from mid-weight black cardstock. (I had trouble being able to adhere glitter cardstock into my cardbase, and ended-up just using plain black cardstock.) Cut out a variety of fireworks from colorful glitter cardstock using the Fireworks die set. and decorate the inside of the card. (I didn’t end up using most of the internal mechanisms for the Playful Pop-Up, but did use all the pop-out arms.) The large fireworks inside and out are on wobbler springs.

Sentiments: I used the Happy New Year and shadow for the inside sentiment. The “Good Bye” on the card front was made by combining words and letters from three die sets. The “Good” is from Good Luck The “B” is from Happy Birthday while the “ye” is from Happy Easter. The years are cut using the Numbers die set.

Envelope: This card fits into a #10 business size envelope.

___________________________________

Thank you for experiencing this blog post.

I hope this inspires you and makes you smile.

Please subscribe, like and leave comments 😊

___________________________________

Disclaimer: Karen Burniston products are provided free of charge by the manufacturer for review and use. All other items were personally purchased. Compensated affiliate links used where or when possible, meaning I will receive a small percentage commission from these manufacturers at no cost to you. This will allow me to add more content to my YouTube channel and help out a lot. Thank you.

Materials Used:

Dies

Papers

  • American Crafts – Core’dinations – 8.5×11 inch Textured Glitter Cardstock – Black Tie
  • DCWV – 6×6 Glitter Cardstock – Glitter Brights
  • Recollections – 4.5×7 inch Foil Cardstock – Yellow
  • Silver Matte Cardstock
  • Black Cardstock

Ink

Adhesives

Tools

  • Die Cutting Machine
  • Paper Trimmer
  • Bone Folder
  • Score Board
  • Stamping Blocks used as paperweights
  • Scissors
  • Tweezers

Miscellaneous

  • Art Impressions – Action Wobbles

Frantic Stamper- Nutcracker Trio Card

Welcome to Day 9 of my Nutcracker series using a variety of stamps and die sets to make some nutcracker themed cards. My card today uses dies by Frantic Stamper Inc. – Nutcracker and Spellbinders – Happy Holidays as well as the Hero Arts’ A Little Nuts stamp set.

Watch the process video below to learn how this card was made.

Cardbase: I used a purchased thank you cardbase with matching envelope and covered the card front with a patterned paper.

Nutcracker: Referring to the images of the nutcrackers on the packaging for the Nutcracker die set, cut out all the pieces using your own color scheme. (I cut out the face from pink and colored the eyes green with a white dot. The teeth were cut from white and the bottom colored with a pink marker. The belts, boots, drum and hat visors were colored with markers to change colors or to add trim to the boots.)

Sentiments: Using the Happy Holidays die set, cut from red the words “Happy Holidays” and glue inside the card.

Envelope: The panel card fits into an A2 size envelope with a nutcracker and “Nutcracker is my favorite season” on the envelope back using the Hero Arts’ A Little Nuts stamp set and blue ink.

___________________________________

Thank you for experiencing this blog post.

I hope this inspires you and makes you smile.

Please subscribe, like and leave comments 😊

___________________________________

Disclaimer: Karen Burniston products are provided free of charge by the manufacturer for review and use. All other items were personally purchased. Compensated affiliate links used where or when possible, meaning I will receive a small percentage commission from these manufacturers at no cost to you. This will allow me to add more content to my YouTube channel and help out a lot. Thank you.

Materials Used:

Dies

  • Frantic Stamper Inc. – Precision Cutting Dies – Nutcracker – FRA-DIE-10902
  • Spellbinders –Cutting Dies – Happy Holidays – S2-330

Stamps

  • Hero Arts – Clear Stamps & Dies- A Little Nuts

Papers

  • Matte Gold Cardstock
  • Craft Consortium – 12×12 Double-Sided 200gsm Papers – Tis The Season by Linsey Kelly
  • Black, Blue, Pink, Red and White Cardstock
  • Purchased Gingham A2 (4.25×5.5-inches) cardbase and white envelope

Ink

  • Memento – Fade Resistant Dye ink – Paris Dusk
  • American Crafts – Metallic Marker – Gold
  • OLO – Marker – Cotton Candy
  • Sakura – Gelly Roll Pen – Medium – White
  • Sharpie – Permanent Marker – Fine Tip – Black & Red
  • Sharpie – Permanent Marker – Ultra Fine Tip – Blue & Green

Adhesives

Tools

Honey Bee Stamps – Nutcracker card

Welcome to Day 8 of my Nutcracker series using a variety of stamps and die sets to make some nutcracker themed cards. My card today uses products by Honey Bee Stamps – Nutcracker die set as well as The Greetery’s 3D embossing folder – Shortbread Shapes Snowflake, Spellbinders’ Happy Holidays die set and Art Impressions Nutcracker stamp.

Watch the process video below to learn how this card was made.

Cardbase: (I used a purchased A7 (5×7-inches) cardbase and matching envelope in white for this card.) Emboss a 6×8-inch piece of lightweight white cardstock using The Greetery’s Shortbread Shapes Snowflake 3D embossing folder, misting the folder before inserting the cardstock to emboss, following the sandwich instructions for your die-cutting machine. Once embossed, let the piece dry under the weight of the embossing fold with a large stamping block on top. Next, trim the embossed piece down to its embossed edges. Placing the trimmed edge at the folded edge of the cardbase, glue the embossed piece to the card front. Trim off excess of the embossed panel.

Nutcracker: Using Honey Bee Stamps’ Nutcracker die set, create your nutcracker as shown on the packaging or in the video above.. (There are many tiny pieces, so I found it easiest to glue pieces together as I cut them so I wouldn’t loose them.)

Sentiments: The inside sentiment of “Happy Holidays” was die cut from red cardstock using the Spellbinders’ die set of the same name.

Envelope: The panel card fits into an A7 size envelope with a nutcracker on the envelope back using Hero Art’s Nutcracker stamp stamped in black ink.

___________________________________

Thank you for experiencing this blog post.

I hope this inspires you and makes you smile.

Please subscribe, like and leave comments 😊

___________________________________

Disclaimer: Karen Burniston products are provided free of charge by the manufacturer for review and use. All other items were personally purchased. Compensated affiliate links used where or when possible, meaning I will receive a small percentage commission from these manufacturers at no cost to you. This will allow me to add more content to my YouTube channel and help out a lot. Thank you.

Materials Used:

Press Plates & Dies

  • Honey Bee Stamps – Lovely Layers Dies – Nutcracker
  • Spellbinders – Scrapbook.com Dies – Happy Holidays

Embossing Folders

  • The Greetery – 3D embossing folder – Shortbread Shapes Snowflake

Stamps

  • Art Impressions – Unmounted Rubber Stamp – Nutcracker – 6139

Ink

  • Memento – Fade Resistant Dye ink – Tuxedo Black
  • OLO – Marker – Bubble Gum & Cotton Candy
  • Pigma – Mircon 01 Fine Tip Pen – Black
  • Sharpie – Permanent Marker – Fine Tip – Black

Papers

  • Black, Pink, Red, and White Cardstock
  • Matte Gold Junk Mail Scraps
  • Park Lane Paperie – A7 Cardbase and Envelope – White

Adhesives

Tools

  • Die Cutting Machine
  • Paper Trimmer
  • Stamping Platform
  • Riley and Company – Pick & Poke Tool
  • Tweezers
  • Stamping Blocks used as paperweights
  • Spellbinders – Mighty Mister Spray Bottle
  • We R Memories – QuickStick
  • Scissors

Scrapbook.com – Ballerina & Nutcracker Card

Welcome to Day 7 of my Nutcracker series using a variety of stamps and die sets to make some nutcracker themed cards. My card today uses products by Scrapbook.com – Nutcracker paper collection and Nutcracker and Ballerina die set as well as and Spellbinders’ 3D embossing folder – Waffle Cone, Simon Hurley’s Better Press press plates & dies set Nutcracker Trio and Art Impressions Nutcracker stamp.

Watch the process video below to learn how this card was made.

Cardbase: I turned a top-folding A2 (4.25×5.5-inches) cardbase in white on its side to make a short side-fold horizontal card. Start with an 8.5×4.25-inch rectangle and fold in half. Cover the front and back with panels of patterned paper embossed with the Spellbinders’ 3D embossing folder – Waffle Cone.

Nutcracker & Ballerina: Using Scrapbook.com’s Nutcracker and Ballerina die set, create your nutcracker and ballerina as shown on packaging or in the video above.. (There are many teenie tiny pieces, so I found it easiest to glue pieces together as I cut them so I wouldn’t loose them.)

Sentiments: The sentiments are from Simon Hurley’s Better Press press plates & dies set Nutcracker Trio printed in red BetterPress ink and cut out using the matching dies in the set.

Envelope: The panel card fits into an A2 size envelope with a nutcracker on the envelope back using Hero Art’s Nutcracker stamp stamped in red ink.

___________________________________

Thank you for experiencing this blog post.

I hope this inspires you and makes you smile.

Please subscribe, like and leave comments 😊

___________________________________

Disclaimer: Karen Burniston products are provided free of charge by the manufacturer for review and use. All other items were personally purchased. Compensated affiliate links used where or when possible, meaning I will receive a small percentage commission from these manufacturers at no cost to you. This will allow me to add more content to my YouTube channel and help out a lot. Thank you.

Materials Used:

Press Plates & Dies

  • Scrapbook.com – Shape Dies – Nutcracker and Ballerina
  • Spellbinders – Simon Hurley’s BetterPress Press Plates & Dies – Nutcracker Trio

Embossing Folders

  • Spellbinders – 3D embossing folder – Waffle Cone

Stamps

  • Art Impressions – Unmounted Rubber Stamp – Nutcracker – 6139

Ink

  • Gel Pens – Pink & Red
  • Memento – Fade Resistant Dye ink – Rose Bud
  • OLO – Marker – Cotton Candy
  • Pigma – Mircon 005 Fine Tip Pen – Black
  • Spellbinders – Dina Wakley Media’s BetterPress Ink – Ruby

Papers

  • Scrapbook.com – BetterPress – 6×8-inch Double-Sided Cardstock – Nutcracker
  • Spellbinders – BetterPress – 5.5 x 4.25” (A2) Cotton Card Panels – Porcelain & Pebble
  • Black, Pinks, Red, White and Yellow Cardstock
  • Fraser Papers for William House – A2 Envelope – Genesis Text Milkweed Smooth

Adhesives

Tools

  • Die Cutting Machine
  • Paper Trimmer
  • Bone Folder
  • Stamping Platform
  • Stamping Block
  • Tweezers
  • Stamping Blocks used as paperweights
  • We R Memories – QuickStick

Photoplay – Nutcracker Tags

Welcome to Day 6 of my Nutcracker series using a variety of stamps and die sets to make some nutcracker themed cards. My card today uses a die set by PhotoPlay – Nutcrackers Layered and Karen Burniston’s Topper Tags die set.

Watch the process video below to learn how this card was made.

Cardbase: Cut tags that will allow for a 4-inch figure using Karen Burniston’s Topper Tags die set. cut the decorative hole reinforcers in a contrasting color and thread a piece of baker’s twine through the hole and tie off.

Nutcrackers: Using PhotoPlay’s Nutcrackers Layered die set, create your nutcrackers as shown on packaging or create your own uniforms and hair styles.

___________________________________

Thank you for experiencing this blog post.

I hope this inspires you and makes you smile.

Please subscribe, like and leave comments 😊

___________________________________

Disclaimer: Karen Burniston products are provided free of charge by the manufacturer for review and use. All other items were personally purchased. Compensated affiliate links used where or when possible, meaning I will receive a small percentage commission from these manufacturers at no cost to you. This will allow me to add more content to my YouTube channel and help out a lot. Thank you.

Materials Used:

Dies

Papers

  • Scrapbook.com – BetterPress – 6×8-inch Double-Sided Cardstock – Nutcracker
  • Matte Gold Cardstock
  • Black, Blue, Pinks Cardstock

Adhesives

Tools

BetterPress-Nutcracker Christmas Card

Welcome to Day 5 of my Nutcracker series using a variety of stamps and die sets to make some nutcracker themed cards. My card today uses products by Spellbinders – Simon Hurley’s BetterPress press plates & dies set Nutcracker Trio and Dina Wakley Media’s BetterPress inks of Eggplant, Fir and Ruby.

Watch the process video below to learn how this card was made.

Cardbase: I used a purchased kraft paper A2 (4.25×5.5-inch) cardbase and matching envelope.

Nutcrackers & Plaid Background: The plaid background was created using the Spellbinder’s BetterPress of the Month – Design A Plaid press plate set using red and green ink. The nutcrackers and sentiment are from Simon Hurley’s Better Press press plates & dies set Nutcracker Trio printed in purple, red and green. The inside sentiment banner is from the Design A Plaid set.

Envelope: The panel card fits into an A2 size envelope with a nutcracker and “fa la la la la la la la la” on the envelope back using Karen Burniston’s Season of Cheer and Hero Art’s Nutcracker stamp.

___________________________________

Thank you for experiencing this blog post.

I hope this inspires you and makes you smile.

Please subscribe, like and leave comments 😊

___________________________________

Disclaimer: Karen Burniston products are provided free of charge by the manufacturer for review and use. All other items were personally purchased. Compensated affiliate links used where or when possible, meaning I will receive a small percentage commission from these manufacturers at no cost to you. This will allow me to add more content to my YouTube channel and help out a lot. Thank you.

Materials Used:

Press Plates & Dies

  • Spellbinders – Simon Hurley’s BetterPress Press Plates & Dies – Nutcracker Trio
  • Spellbinders – BetterPress of the Month Press Plates & Dies – Design A Plaid

Stamps

Papers

  • Spellbinders – BetterPress – 5.5 x 4.25” (A2) Cotton Card Panels – Porcelain & Pebble
  • Target – A2 Cardbase and Envelope – Kraft

Ink

  • Pigma – Mircon 01 Fine Tip Pen – Black
  • Spellbinders – Dina Wakley Media’s BetterPress Ink – Eggplant, Fir and Ruby

Adhesives

Tools

  • Die Cutting Machine
  • Spellbinders – BetterPress Letterpress System
  • Paper Trimmer
  • Stamping Blocks used as paperweights
  • Spellbinders – Best Ever Craft Tape