This card was made for Craft Roulette #240 whose parameters included a card for a helper, cereal box colors, jungle element, and a paper sack.
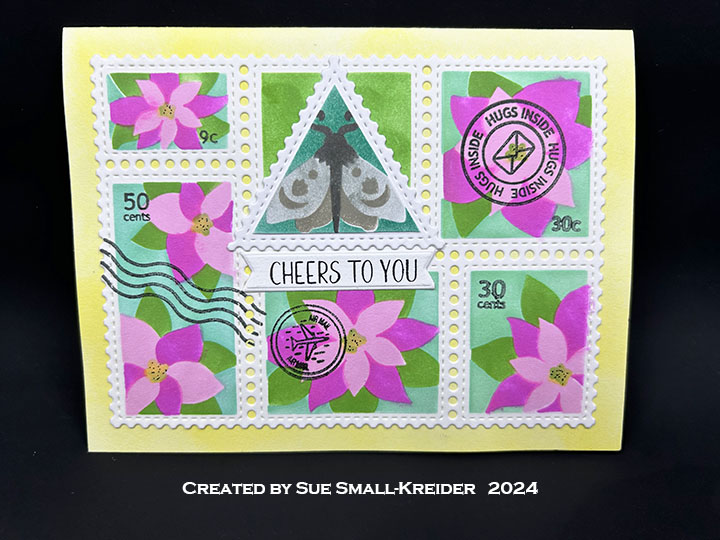
I choose to make a thank you card with a paper sack for an itty-bitty gift, stenciling tropical flowers and a large moth that you might see in a jungle. (Please note that after I completed the process video, I decided to add some cancellation stamps to the front of the card. So they are not mentioned in the video, but they are Waffle Flower stamps.)
Watch the process video to see how I made this card.
Cardbase: Cut a 5.5 x 8.5-inch piece of white cardstock and fold in half to form a 4.25×5.5 top-fold A2 size card.
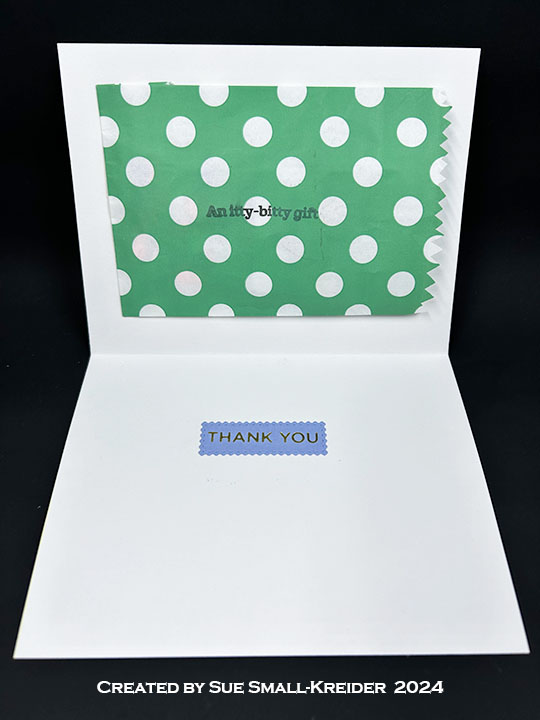
Sentiments: The front sentiment “Cheers to you” is from a BetterPress plate and die set while the inside foiled “Thank You” is a Spellbinders Glimmer plate die cut with a Waffle Flower Postage Collage rectangle die. The “Itty-bitty gift stamped on the paper sack is from the Craft Roulette Stamp set.

Envelope: The card fits into an A2 (4.25x 5.5-inches) size envelope with an extra moth stamp on the back flap.
___________________________________
Thank you for experiencing this blog post.
I hope this inspires you and makes you smile.
Please like and leave comments 😊
___________________________________
Disclaimer: Karen Burniston products are provided free of charge by the manufacturer for review and use. All other items were personally purchased. Compensated affiliate links used where or when possible, meaning I will receive a small percentage commission from these manufacturers at no cost to you. This will allow me to add more content to my YouTube channel and help out a lot. Thank you.
Materials Used:
Dies
- Spellbinders – Glimmer Plate – Everyday Sentiments – GOM-FEB19
- Spellbinders – BetterPress Plate – Cheers To You – BP-162
- Waffle Flower – Steel Craft Die – Postage Collage Die
- Waffle Flower – Steel Craft Die – Postage Collage Moth Die
Stamps
- Craft Roulette – Clear Stamps – Funn Sentiments #01
- Waffle Flower – Clear Stamps – Postage Collage
Stencil
- Waffle Flower – Plastic Stencil – Postage Collage Coloring Stencil
- Waffle Flower – Plastic Stencil – Postage Collage Moth Stencil
- Waffle Flower – Plastic Stencil – Postage Collage Poinsettia Stencil
Papers
- White Cardstock
- Fraser Papers for William House – A2 Envelope – Genesis Text Milkweed Smooth
Ink
- Simon Says Stamp – Premium Dye Ink – Mint
- Simon Says Stamp – Pawsitivity Saturated Ink – Aegean, Bubblegum, Fairway, Lemonade, Sweets
- Stampin’ Up – Classic Ink Pad – Basic Grey, Gray Granite, Smoky Slate
- Pigma – Mircon 01 Fine Tip Pen – Black
Adhesives
Tools
- Gel Plate
- Die Cutting Machine
- Spellbinders – BetterPress Letter Press System
- Spellbinders – Glimmer Hot Foil System
- Paper Trimmer
- Bone Folder
- Stamping Blocks
- Scissors
- Craft Mat
- Paper Masking Tape
- Blending Brush
- Detail Blending Brushes (Altenew & Kat Scrappiness)