I have been collecting and making oven cards for several years now. Here is a collection of all my ovens blog posts. Click on an image to see details of the oven.
(Images are posted from the earliest release of dies/stamps/kits 2016 to newest 2023.)
____________________________
Thank you for experiencing this blog post.
I hope this inspires you and makes you smile.
Please like and leave comments 😊
___________________________________
Disclaimer: Karen Burniston products are provided free of charge by the manufacturer for review and use. All other items were personally purchased. Compensated affiliate links used where or when possible, meaning I will receive a small percentage commission from these manufacturers at no cost to you. This will allow me to add more content to my YouTube channel and help out a lot. Thank you.
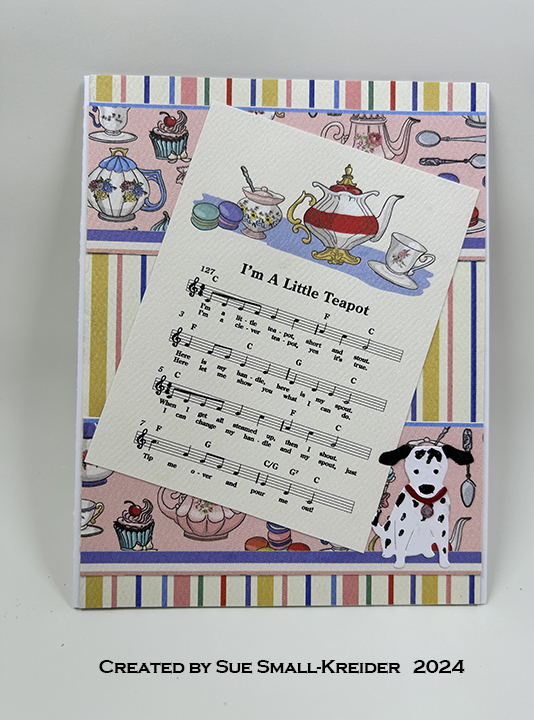
This card was made for Craft Roulette #225 whose parameters included an A2 project, tea party colors, a house pet(s) element and stripes.
Watch the video to see how I made the card.
___________________________________
Thank you for reading this blog post.
I hope this inspires you and makes you smile.
Please like and leave comments 😊
___________________________________
Disclaimer: Karen Burniston products are provided free of charge by the manufacturer for review and use. All other items were personally purchased. Compensated affiliate links used where or when possible, meaning I will receive a small percentage commission from these manufacturers at no cost to you. This will allow me to add more content to my YouTube channel and help out a lot. Thank you.
Sometimes you just need to go all out to say thank you to someone. This is one of those cards. It uses dies, stamps and stencils by The Greetery.
I designed this card to unfold and interact with the recipient in layers. First you open the gardening gloves gatefold flaps to reveal the gardening tools. Next you pull the ribbon up to reveal a personal message, but there are also good wishes underneath the slider easel.
Cardbase: Start with an 8 1/2 x – inch rectangle of white cardstock. Score and fold at 2 1/4-inches and 6 1/4-inches. These will be the gatefold flaps.
Sentiments: The stamped sentiment under the slider easel says “May your days be always in bloom.” I comes from the Always In Bloom stamp set. The “Way to Grow” on the envelope flap in from the In Spades stamp set. The Pull and arrow on the CRX tag giving directions on how to open the card, are from a Trinity Stamps set.
___________________________________
Thank you for reading this blog post.
I hope this inspires you and makes you smile.
Please like and leave comments 😊
___________________________________
Materials Used:
Dies
Karen Burniston in cahoots with Riley and Company – Topper Tags – 1253
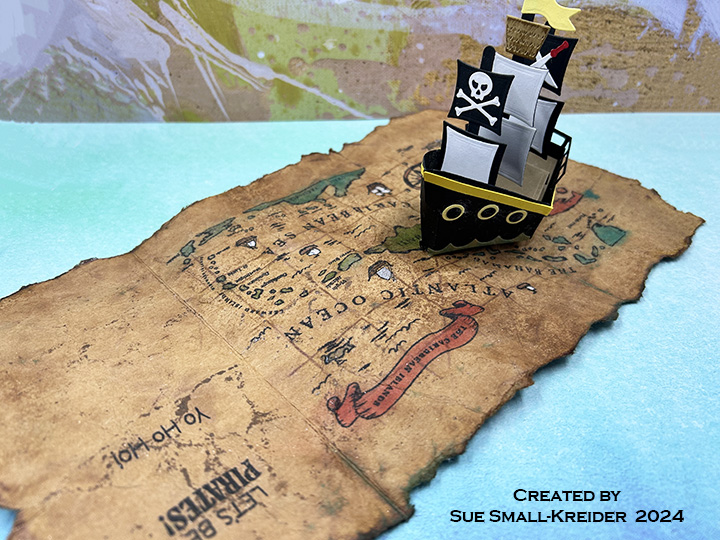
It’s time for the July 2024 Karen Burniston Design Team Challenge with the theme of SET SAIL.
“Let’s Be Pirates” is the theme of this card made withKaren Burniston’s June 2024 release ofnew dies andclear stamps. For this card (which could be used for birthdays, Father’s Day, and just for fun), I used several of the new sets including: Pirate Borders, Pirate Ship Add-Ons and Boat Pop-Up die sets and Pirate Sentiments clear stamp set.
Cardbase: Cut a piece of kraft card stock 7-inches x 12-inches. Score and fold at 3 1/2-inches and 8 1/2-inches to form a gate fold cardbase with overlapping flaps. Stamp map onto cardbase. Use map’s stencils to ink in map. Stamp sentiments using the new Pirate Sentiments stamp set. Tear off and distress the card edges. Crumple up the cardbase flatten and crumple again. Spritz the cardbase with water. Lightly spray brown inks and splatter watercolor paint onto cardbase. Spritz again to allow inks to soak into the cardstock. Crumble cardbase while still damp. Dry flat over paper towel. (You may want to practice all the distressing with ink and water on scrap kraft cardstock before distressing your cardbase. I sprayed water to the back of the map as it was colored with Distress Inks which would run.)
Pirate Characters: Watch the video above to see how the pirate characters were made. The pirate captain’s hat was switched out with one from the new Pirate Borders. The treasure chest and captain hat borders are also from the Pirate Bordersset.
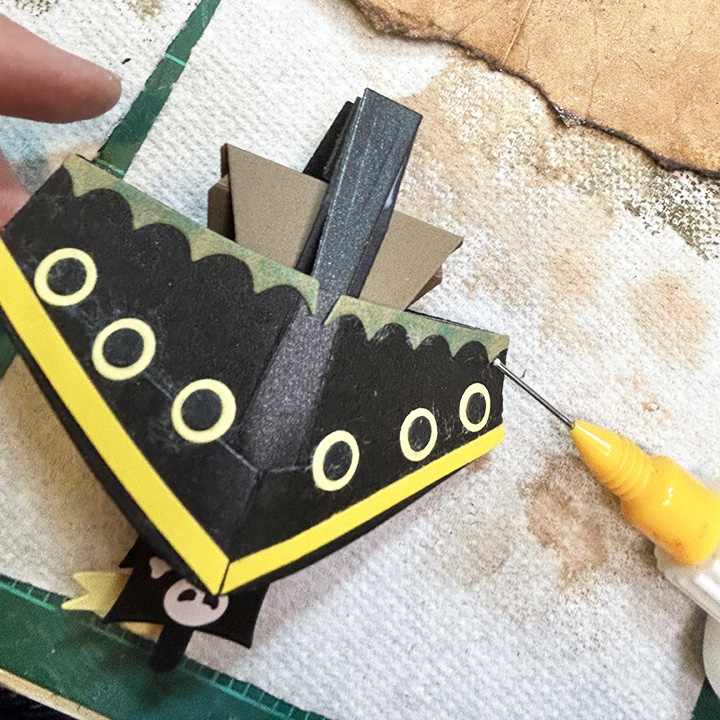
Train the folds on the ship’s body piece cut from the Boat Pop-Up die set in black. Glue the small side tab while the piece is folded flat. All of the following pieces are cut using the Pirate Ship Add-Ons set. Cut the boomerang shaped bow piece from black. Glue to the narrow-tabbed front of the ship while folded flat. Cut the back railing from black and glue to inside of ship back while folded flat. Cut 10 of the small circles in black and 10 of the larger circles in pale yellow. Glue small circles on top of large circles and attach them to ship body as show in photos.
Cut two sets of wave pieces. Ink blue. Glue to the sides of ship body, but not to the front or back flat panels. (The waves stick out in front to a point while the back jut out two wave points.) The tiny edge of the wave pieces match-up at the center side folds.
Cut the deck and seat pieces from the Boat Pop-Up die set in brown. Train folds. Trim off the front edge of the seat piece. (See red circle in photo.)
Cut two of the u-brace pieces from the Boat Pop-Up die set in black. Train folds and fold edges of tabs to fit through slots in the deck piece as shown in photos.
Cut two sets of masts from the Pirate Ship Add-Ons set in a thick back cardstock. Glue the mast pieces together matching up the different sizes to form two smaller masts and one taller mast. Slide the tallest mast through the center slot of the deck down between the two u-braces. (See red circled photo.) Glue to one of the u-brace sides. Add the second mast through one of the end slots and check alignment of the two masts in the folded position. Glue to u-brace. Repeat with third mast.
Test placement of seat (referred to as deck in photos) between center mast and back mast. Glue the deck front tab between the center tab and the mast. Glue back deck tab to back mast tab.
Cut three sets of the two sail dies from the Pirate Ship Add-Ons set in black. Cut three of the smaller sails from white and one of the large sail from white. Attach one of the small white sails to cover one small black sail. Do the same with the large white and black sails. Center the remaining two small white sails to the remaining two large black sails. (I used white label paper that had adhesive on the back.) Cut the sail decorations also from white and use the stencil feature of the skull die. Color the sword handles red. Attach decorations to smaller sails. Cut two of the crow’s nest basket from brown. Ink them brown. Cut the two flags from yellow. Starting with the tallest center mast, glue the flag at the top of the mast, the mast between the two pieces of flag then attach the basket in the same manner. Next attach the all-white small sail followed by the all-white large sail. For the smaller masts glue a decorated sail at the top and then a large sail.
Fold the deck up and add glue just to the front u-brace bottom. Slide folded deck into flatten ship body matching the front body narrow tab with u-brace. Repeat with back u-brace and body tab.
Test opening ship. You may have to help train it opening all the way. Flatten to glue into the cardbase. Add glue to one of the ship body tabs and attach with end of tab being in the cardbase fold. Add glue to other ship body tab and fold cardbase flap over to attach. Wait until glue has dried to open.
Sentiments: Stamp all sentiments before distressing the cardbase using Pirate Sentiments stamp set. On the front flaps are “It’s A Great Day to be a Pirate!” and “You arrr an absolute treasure.” Inside is “Let’s Be Pirates” and “Yo Ho Ho!” There is space inside for either a personal message or a die-cut sentiment such as Happy Birthday or Happy Father’s Day.
Envelope: This card will fit into an A7 (5 x 7-inch) envelope. (I choose to hand deliver the card because of the wax seal on the back of it.)
If you’ve read this far click here to go to yesterday’s Blog Hop Giveaway
Watch the YouTube video below to learn how the card was made.
Sailboat Pop-Up: This pop-up is made with two die sets – the base is the Boat Pop-Up and the sails, pendant, railing, life preservers and anchor are all in the Sailboat Add-Ons set.
Cardbase: The card base is made up of two rectangles On 4 x8 1/2-inches and the other 4 x 8 3/4-inches. The longer piece is scored at 8 1/2-inches for the tab to glue to back of the other piece. The card front scene is made from waving water paper brushed with glitter gloss and Distress Oxide ink and a large blending brush. The birds are hand-drawn. The porpoise is from the Set Sail Bordersdie set. On the card back is a border of shells from the Set Sail Bordersdie set and colored with alcohol markers.
Sentiments: The card front “waving hello” is die-cut letters from the Mini Alphabet and the “hello” is from the Just A Note Lorna Add-Ons. The stamped sentiments inside the card are from the Sail Awaystamp set. A white label inside is for a personal message and was cut from the Labels – Crosshatch die set.
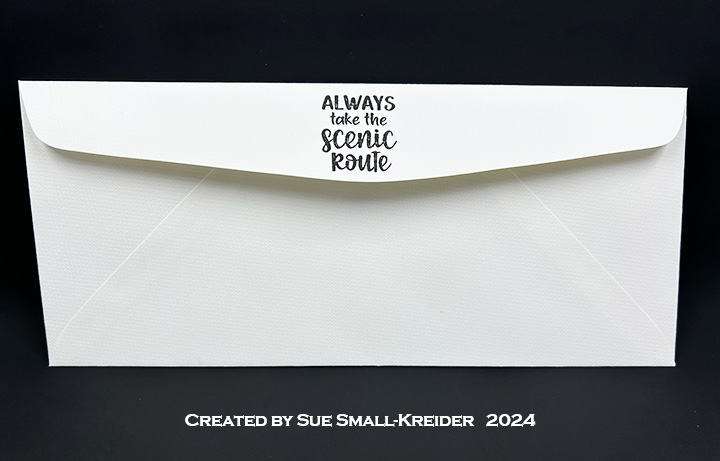
Envelope: The card fits into a #10 business envelope stamped with “Always take the scenic route” from the Sail Awaystamp set.
Cardbase: Cut an 11x 6-inches rectangle of lightweight cardstock and fold in half to create a 5 1/2 x 6-inches card base with a side fold. Cover with decorative paper on the outside and inside of front panel before cutting with largest square die from the Squares – Crosshatch. Once the square has been cut, attach inside back decorative paper matching front design.
Accordion Frame: Die-cut two Fancy Label Accordion frames from a decorative print cardstock as directed in PDF instructions. Make sure you add the decorative label die inside the pivot panel before you die cut, so that you will make the pivot panel into a frame.
Attach to card base as directed in PDF instructions. Use tree trunk and hearts dies to decorate tree panel.
Tree-Add-On Panel: Replace the Trees Add-Ons for the Hearts Add-Ons in the PDF instructions. I cut out tree frames on the first and third panels by first die cutting the whole panel and then die cutting twice more with the cloud shaped tree leaves dies and tree trunk dies in the Trees Add-Onsset. I cut two more of the tree shaped frames to cover and reinforce the back side of the tree panel.
Attach to pivot panel and card as shown in PDF instructions.
Sentiments & Decorations: I used printed sentiments and border strips from the paper collection to finish decorating the card covering all of the green cardbase.
Envelope: Fits into a 6×9 catalog envelope with a back flap decorated with decorative paper strip.
Today’s card is a simple one using Spellbinder’s BetterPress to create letterpress stamping elements.
I used press plates from two companies. The intricate zig-zag frames are from PinkFresh Studio and come with coordinating dies. I used the largest two printed frames in the set using Spellbinders BetterPress Ink in French Blue. (I ended up having to use bubble wrap packaging to get a good die-cut through the thick white watercolor paper that I printed them on.)
For the cardbase I used a purchased one with envelope from American Crafts. Stamped on the back flap of the envelope is a pincushion image from Fun Stampers Journey using Stampin’ Up Crumb Cake ink.
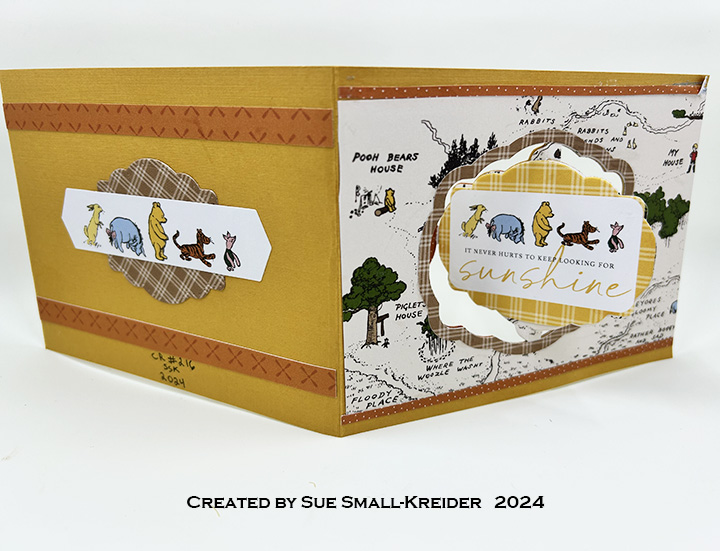
This card was made for Craft Roulette #216 whose parameters included for A2 project, baseball game colors, number(s) element and charm(s).
After I completed the process video I added thin strips of decorated paper to even out the borders of the front background paper as well as adding a second jump ring to the charm to have it hang more in the center of the frame.