An Art Deco Birthday card

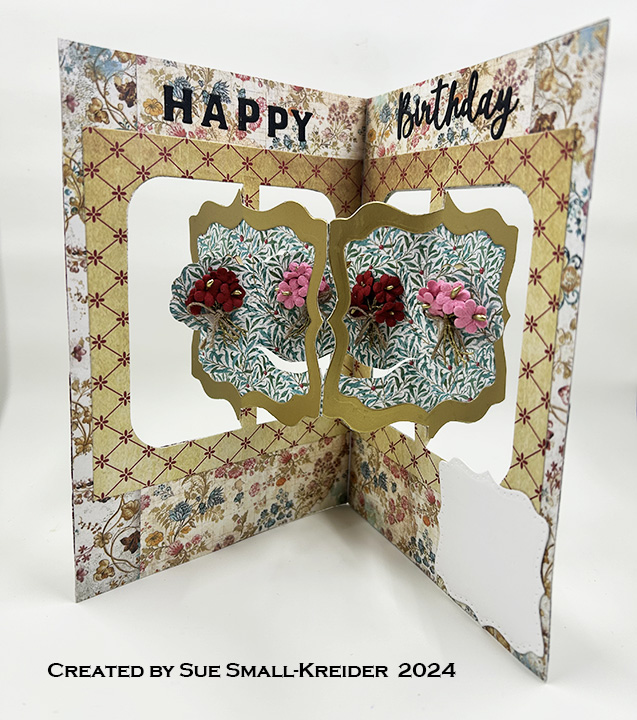
This card was made for Craft Roulette #230 whose parameters included shaped card, peacock colors, tall element and XOXO.

Watch the video below to learn how I made the card.

Cardbase: I made a side-fold A2 cardbase by folding a 4 1/4 x 5 1/2-inch rectangle in half and stenciled the front on a separate panel. The tiny gold gems where glued on as the last decoration.

Sentiments: The banner sentiments were made using the Spellbinders BetterPress letterpress system and Cheers to You press plates and dies. The inside of the card is blank for a personal message.

Envelope: Envelope flap was stenciled with the same stencil and inks.

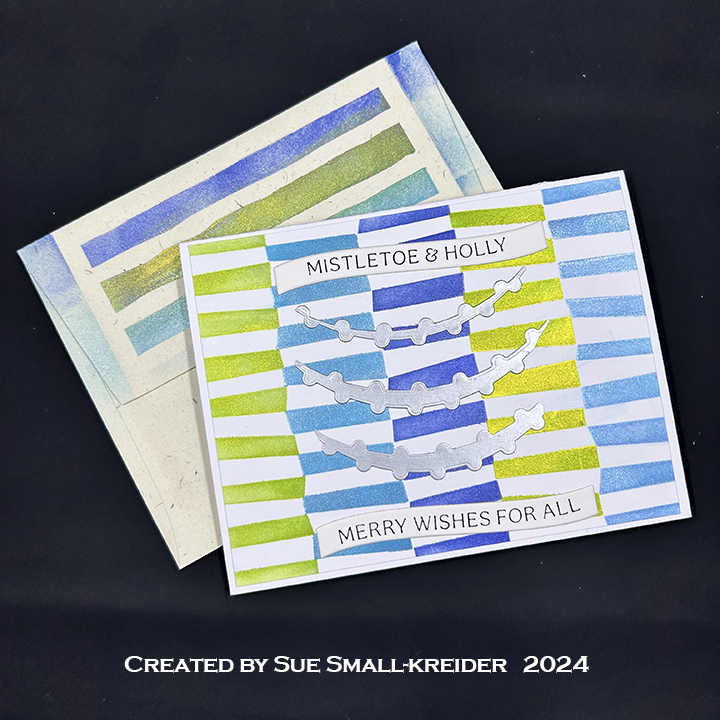
Here are two more cards I made at the same time using the same inks and stencil sets, but different BetterPress press plate – Mistletoe Greetings. (“Merry everything” sentiment inside is from Scrapbook and Cards Today’s Jolly Holiday workshop kit.)

___________________________________

Thank you for experiencing this blog post.

I hope this inspires you and makes you smile.

Please like and leave comments 😊

___________________________________

Disclaimer: Karen Burniston dies are provided free of charge by the manufacturer for review and use. All other items were personally purchased. Compensated affiliate links used where or when possible, meaning I will receive a small percentage commission from these manufacturers at no cost to you. This will allow me to add more content to my YouTube channel and help out a lot. Thank you.

Materials Used:

Dies

  • Spellbinders – BetterPress Press Plates & Dies – Cheers to You Sentiments
  • Spellbinders – BetterPress Press Plates & Dies – Mistletoe Greetings

Stencils

  • PinkFresh – Stencils – Art Deco
  • Spellbinders – Stencil of the Month – March 2024 – Dynamic Backgrounds

Press Plates

  • Spellbinders – BetterPress Press Plates – Cheers to You Sentiments
  • Spellbinders – BetterPress Press Plates – Mistletoe Greetings

Stamps

  • Scrapbook and Cards Today’s Jolly Holiday workshop kit – Clear Stamps

Papers

  • White Cardstock
  • Spellbinders -BetterPress Double Weight Cotton Card Panels – 220 lb. – Porcelain
  • Sliver Cardstock Scrap Swags
  • Fraser Papers for William House – A2 Envelope – Genesis Text Milkweed Smooth

Ink

  • Spectrum Noir – Shimmer Gold Series Pearlescent Pigment Ink – Secret Garden
  • Spectrum Noir – Shimmer Silver Series Pearlescent Pigment Ink – Starlight Sky & Tropic Blue
  • Spellbinders – BetterPress Ink – BetterPress Black
  • Pigma – Mircon 01 Fine Tip Pen – Black

Adhesives

Tools

  • Bone Folder
  • Stamping Platform
  • LDRS – Stampendable Stamping Tool
  • Paper Trimmer
  • We R Memories – QuickStick
  • Gel Plate
  • Blending Brush
  • Paper Masking Tape

Miscellaneous

  • Craftstash – Gold Half Gems

Oven Cards in Review

I have been collecting and making oven cards for several years now. Here is a collection of all my ovens blog posts. Click on an image to see details of the oven.

(Images are posted from the earliest release of dies/stamps/kits 2016 to newest 2023.)

____________________________

Thank you for experiencing this blog post.

I hope this inspires you and makes you smile.

Please like and leave comments 😊

___________________________________

Disclaimer: Karen Burniston products are provided free of charge by the manufacturer for review and use. All other items were personally purchased. Compensated affiliate links used where or when possible, meaning I will receive a small percentage commission from these manufacturers at no cost to you. This will allow me to add more content to my YouTube channel and help out a lot. Thank you.

Day 1 of 12 Days of Christmas Ovens

It’s Day 1 of my 12 Days of Christmas Ovens.

I’m using a stamp and die set by Diamond Press to create this interactive card that lets you pull the tab to open the oven door and reveal a Christmas turkey. (Because this kit doesn’t include any holiday sentiments, I had to use ones by other sources.)

Watch video above for a tutorial on how to make the card.

Cardbase: I used a purchased top-fold A2 size (2.25 x5.5-inch) gray cardbase and punched a half circle opening in the top center for a thumb hole to help with the pull tab. To help with the weight of the front, I added a 4×5.25-inch piece of the same green cardstock I had used for the front matching ups the thumb hole notches.

Oven: I watched an assembly video before I started my card. Then I cut the pieces I needed from green colored cardstock and white 65 lb. white cardstock.

Sentiments: For my original card, the outside “Merry Christmas” sentiment, I cut the words from a commercial Christmas card. For the card in my process video, I used stamps from the Greetery saying “Warmest Winter Wishes.” Inside both cards is “Happy Holidays, a die-cut sentiment by Karen Burniston in black.

Envelope: The card fits into an A2 envelope.

___________________________________

Thank you for experiencing this blog post.

I hope this inspires you and makes you smile.

Please like and leave comments 😊

___________________________________

Disclaimer: Karen Burniston products are provided free of charge by the manufacturer for review and use. All other items were personally purchased. Compensated affiliate links used where or when possible, meaning I will receive a small percentage commission from these manufacturers at no cost to you. This will allow me to add more content to my YouTube channel and help out a lot. Thank you.

Materials Used:

Dies, Punches & Stamps

Papers

  • Craft Consortium – 6×6 Double-Sided Cardstock – Over The Rainbow
  • Ranger – Perfect Cardstock – Wendy Vecchi Designer Series – Perfect Grey 4.25” x 5.5” top-Fold Cards
  • White and Black Cardstock
  • Fraser Papers for William House – A2 Envelope – Genesis Text Milkweed Smooth

Ink

  • Memento – Fade-Resistant Dye Ink – Tuxedo Black
  • Creative Craft Products – Alcohol Markers – Dual Tipped – 15 Geranium, GG3 Green Grey
  • Mont Marte – Dual Tip Art marker – E2 Raw Sienna
  • Gel Pen – Silver
  • Pigma – Mircon 01 Fine Tip Pen – Black
  • Sharpie – Permanent Marker – Fine Tip – Green
  • Sharpie – Permanent Marker – Ultra Fine Tip – Red
  • Sakura – Gelly Roll Pen – Medium – White

Adhesives

Tools

  • Die Cutting Machine
  • Stamping Platform
  • LDRS – Stampendable Stamping Tool
  • Stamping Blocks used as paperweights
  • Scissors
  • Pencil
  • Paper Masking Tape

Rowboat Campsite Pop-Up Card

This card was made for Craft Roulette #227 whose parameters included a 4×8 project mountain colors, float(s) or floating element and water.

___________________________________

Thank you for experiencing this blog post.

I hope this inspires you and makes you smile.

Please like and leave comments 😊

___________________________________

Disclaimer: Karen Burniston products are provided free of charge by the manufacturer for review and use. All other items were personally purchased. Compensated affiliate links used where or when possible, meaning I will receive a small percentage commission from these manufacturers at no cost to you. This will allow me to add more content to my YouTube channel and help out a lot. Thank you.

Materials Used:

Dies

Stamps

Papers

  • Bazzill – 8.5×11 Cardstock – Tiara -18-1002
  • Concord & 9th – 8.5×11 Single Color Cardstock – Sea Glass
  • Honey Bee Stamps- 6×8.5 Double-Sided Cardstock – Grain and Grunge
  • Keep It Simple – 12×12 Double-Sided Cardstock – Back to Basics Jade Collection
  • Colored and White Cardstock

Ink

  • Hero Arts – Alcohol-Marker Friendly Ink Pad – Intense Black
  • Ranger – Tim Holtz – Distress Ink- Vintage Photo
  • Ranger – Tim Holtz – Distress Oxide- Old Paper, Rusty Hinge & Tea Dye
  • Mont Marte – Dual Tip Art marker – E2 Raw Sienna
  • Gel Pens – White and Pink
  • Pigma – Mircon 01 Fine Tip Pen – Black
  • Sharpie – Permanent Marker – Fine Tip – Olive Green
  • Sharpie – Permanent Marker – Ultra Fine Tip – Black, Brown  and Red
  • Sakura – Gelly Roll Pen – Medium – White

Adhesives

Tools

  • Die Cutting Machine
  • Bone Folder
  • Stamping Platform
  • LDRS – Stampendable Stamping Tool
  • Stamping Blocks used as paperweights
  • Scissors
  • Pencil
  • We R Memories – QuickStick
  • Craft Mat
  • Craft Clips
  • Sponge Daubers
  • Blending Brush
  • Paper Masking Tape

Miscellaneous

  • Twine
  • Bamboo Cording

Just A Note To Say Hello

This card was made for Craft Roulette #225 whose parameters included an A2 project, tea party colors, a house pet(s) element and stripes.

Watch the video to see how I made the card.

___________________________________

Thank you for reading this blog post.

I hope this inspires you and makes you smile.

Please like and leave comments 😊

___________________________________

Disclaimer: Karen Burniston products are provided free of charge by the manufacturer for review and use. All other items were personally purchased. Compensated affiliate links used where or when possible, meaning I will receive a small percentage commission from these manufacturers at no cost to you. This will allow me to add more content to my YouTube channel and help out a lot. Thank you.

Materials Used:

Dies

Papers

  • Carta Bella – 12×12 inch Double-Sided Papers – Practically Perfect
  • Black, Pink and White Cardstock
  • Fraser Papers for William House – A2 Envelope – Genesis Text Milkweed Smooth

Ink

  • Pigma – Mircon 01 Fine Tip Pen – Black
  • Sharpie – Permanent Marker – Chisel Tip – Black

Adhesives

Tools

  • Die Cutting Machine
  • Stamping Blocks used as paperweights
  • Scissors
  • Paper Masking Tape

A Gardening Card

Sometimes you just need to go all out to say thank you to someone. This is one of those cards. It uses dies, stamps and stencils by The Greetery.

I designed this card to unfold and interact with the recipient in layers. First you open the gardening gloves gatefold flaps to reveal the gardening tools. Next you pull the ribbon up to reveal a personal message, but there are also good wishes underneath the slider easel.

Cardbase: Start with an 8 1/2 x – inch rectangle of white cardstock. Score and fold at 2 1/4-inches and 6 1/4-inches. These will be the gatefold flaps.

Sentiments: The stamped sentiment under the slider easel says “May your days be always in bloom.” I comes from the Always In Bloom stamp set. The “Way to Grow” on the envelope flap in from the In Spades stamp set. The Pull and arrow on the CRX tag giving directions on how to open the card, are from a Trinity Stamps set.

___________________________________

Thank you for reading this blog post.

I hope this inspires you and makes you smile.

Please like and leave comments 😊

___________________________________

Materials Used:

Dies

  • Karen Burniston in cahoots with Riley and Company – Topper Tags – 1253
  • The Greetery – Dies – Garden Gear – Gloves
  • The Greetery – Dies – Garden Gear – Tools

Stamps & Stencils

  • The Greetery – Stamps – Always In Bloom
  • The Greetery – Stencils – Garden Gear – Gloves
  • The Greetery – Stamps + Stencils – In Spades
  • Trinity Stamps – Clear Stamps – Papercrafting Magic

Papers

  • Anna Griffin – Card Insert 3 1/2 x 5 1/4-inches
  • White Cardstock
  • Anna Griffin – A6 Envelope – White with Gold Lining

Ink

  • Ranger – Tim Holtz – Distress Oxide- Barn Door, Crushed Olive, Ground Espresso, Mowed Lawn, Mustard Seed, Old Paper, Ripe Persimmon, Rusty Hinge, & Saltwater Taffy
  • StazOn – Solvent Ink – Jet Black
  • American Crafts – Metallic Marker – Silver
  • Pigma – Mircon 01 Fine Tip Pen – Black

Adhesives

  • Neutral PH Adhesive by LINECO
  • Fine-Tip Glue Bottle
  • Double-Sided Tape – 1/8-inch wide
  • Scrapbook.com – Foam Tape Strips

Tools

  • Die Cutting Machine
  • Bone Folder
  • Stamping Platform
  • LDRS – Stampendable Stamping Tool
  • Stamping Blocks used as paperweights
  • Scissors
  • Craft Knife
  • Pencil
  • T-Ruler
  • Tombow – Mono – Sand Eraser -512A
  • Craft Mat
  • Sponge Daubers
  • Paper Masking Tape

Miscellaneous

  • Thin Green Satin Ribbon

Accordion Cards – Combining Old and New

This past few weeks I’ve been playing with some of Karen Burniston’s accordion dies released under the Elizabeth Craft Designs (ECD) and combining them with her more recent dies branded under the KB Riley LLC label.

This July 4th accordion decoration features the Accordion Star and Star Fancy Frame Edges from ECD and the Fancy Label Accordion and Fancy Solid Frame sets which are currently available on Karen Burniston’s website. The patriotic stamped images and stamped border paper are from Honey Bee Stamps.

For this pirate birthday card, I used the Ring Accordion and Ring Frame Edges 1 from ECD. The pirates are made from Set Sail Borders, Pirate Borders, Monkey and Lion, Gnome and Santa, Cruise Charms and Tiny Accessories 1. The stamped sentiments are from Karen Burniston’s June 2024 release Pirate Sentiments and Birthday Belated.

___________________________________

Thank you for experiencing this blog post.

I hope this inspires you and makes you smile.

Please like and leave comments

___________________________________

“UP” – A Pop-Up Card

This card was made for Craft Roulette #223 (craftroulette.live) whose parameters included a smaller/larger project, planet colors, house(s) element and white border.

Watch the process video above for how the card was made.

Cardbase: Fold an 8.5×11-inch sheet of white cardstock in half to form a side fold 5.5×8.5-inch A9 cardbase. Cover with decorative papers leaving a white border around each card panel.

Sentiments: The sentiments are stamped in black ink except for the “Home is wherever I am with you” which was stamped in blue ink before the clouds were inked blended on using a Distress oxide blue ink onto plain copier paper. All sentiments are from the two Kindred Stamps sets listed below.

Envelope: The card fits into a catalog size 6×9-inch envelope.

___________________________________

Thank you for experiencing this blog post.

I hope this inspires you and makes you smile.

Please like and leave comments 😊

___________________________________

Materials Used:

Dies

Stamps

  • Kindred Stamps – Clear Stamps – Together Forever
  • Kindred Stamps – Clear Stamps – Fly Away
  • Craft Roulette – Clear Stamps – The Basics

Stencil

  • Craftin Desert Divas – 6×6 Stencil – Clouds and Paths

Papers

  • Bazzill – 8.5×11 Textured Cardstock – Tiara -18-1002
  • Stampin’ Up – 8.5×11 Thick Basic White Cardstock
  • The Paper Studio – 8.5×11 Printed Paper – Blue/Green Watercolor
  • Clear Plastic Packaging
  • Catalog (6×9) Envelope – White

Ink

  • Ranger – Tim Holtz – Distress Oxide –Tumbled Glass
  • Stampin’ Up – Classic Stampin’ Pad – Balmy Blue
  • Stampin’ Up – Stampin’ Blends Markers – Light Daffodil Delight
  • StazOn – Solvent Ink – Jet Black
  • Crafter’s Squares – Metallic Markers .05 in – Blue and Silver
  • Mont Marte – Dual Tip Art Marker – E2 Raw Sienna
  • Pigma – Mircon 01 Fine Tip Pen – Black
  • Sharpie – Permanent Marker – Fine Tip – Light Indigo
  • Sharpie – Permanent Marker – Ultra Fine Tip – Black, Blue, Green and Brown, Red
  • Nuvo – Highly Pigmented Watercolour Pencils – Elementary Midtones and Hair & Skin Tones

Adhesives

Tools

  • Die Cutting Machine
  • Bone Folder
  • Stamping Platform
  • LDRS – Stampendable Stamping Tool
  • Stamping Blocks used as paperweights
  • Scissors
  • We R Memories – QuickStick
  • Tweezers
  • Metal Ruler
  • Craft Mat
  • Blending Brush
  • Paper Masking Tape
  • Waterbrush

Shabby Chic Birthday Card

Shabby Chic is the theme of this card made with Karen Burniston’s June 2024 release of new dies. For this card, I used two of the new sets – Happy Birthday Lorna Add-Ons and Tree Add-Ons.

Cardbase:   Use the Fancy Label Accordion die set for this step. Using a die cut frame with the inside pivot panel cut-out, trace the inside the frame onto the outside of the card base where you want the accordion frame to be. Cut out the opening and trace the opening onto the inside panel and cut that opening out too. Cover the inside of your cardbase with decorative papers. Cut out the openings out of the decorative papers. Cut the opening wider that the pencil marks as the decorative frames will cover it. Cover outside with decorative papers and cut the opening from the decorative papers.

Accordion Frame: Die-cut two whole Fancy Label Accordion frames from a decorative print cardstock. Cut two more whole frames from decorative paper but cut out the pivot panels in them. (Save cut -out pivot panels for other projects.)

Tree-Add-On Panel: Watch the assembly video for the Hearts Add-Ons to see how to cut the pivot panels and how to adhere the tree panel to them. (I used the half pivot panels to decorate the back side of the pivot panels that stayed.)

To finish the inside tree panels, I cut using a label die taped inside the pivot panel die to get a frame cut from gold matte cardstock. I cut two of these frames and glued the to the outside edges of the tree panel.

I decorated the tree shaped pop-out spaces with tiny handmade flower bouquets popped -up on foam squares.

Sentiments: I die cut the sentiments from black cardstock using the Celebrate and Happy Birthday Lorna Add-Ons. Cut a small white label using the small, dotted label die in Fancy Label Accordion die set for a personal message space. (I use double-side tape on the back of the label but wait to attach it after I have written my message.)

Envelope:  Fits into an A7 envelope.

___________________________________

Thank you for reading this blog post.

I hope this inspires you and makes you smile.

Please like and leave comments 😊

___________________________________

Materials Used:

Dies

Papers

  • Stamperia – 8×8 Double-Sided Papers – Backgrounds – Christmas Greetings
  • Dress My Craft – 12×12 inch Single-Sided Cardstock – Teenie Weenies
  • Gold Matte Cardstock
  • Black Cardstock
  • Park Lane Paperie – A7 Cardbase and Envelope – White

Ink

  • Pigma – Mircon 01 Fine Tip Pen – Black

Adhesives

Tools

  • Die Cutting Machine
  • Stamping Blocks used as paperweights
  • Scissors
  • Pencil

Miscellaneous

  • Little Birdie – Handmade Flowers – Red and Pink