This isthe Bonus Day in the Week of Good Cheer Christmas Card series featuring cups and mugs of winter cheer as beverages. Today’s card and gift box features Simply Made Crafts die set and a template by Hot Off The Press made up as a cup of coffee with cream.(GIVEAWAY opportunity near end of post.) This also was made for Craft Roulette episode #282.
Watch the video below to see how the card and gift box were made.
The spoon is a tiny shaped card while the cream is a gift box inside the cup.
___________________________________
Thank you for experiencing this blog post.
I hope this inspires you and makes you smile.
Please subscribe to the email notices, like and leave comments 😊
___________________________________
GIVEAWAY
I’m cleaning out my dies and stamps and will be giving away crafting bundles to 8 lucky crafters who follow, subscribe and comment on my Week of Good Cheer Christmas Cards posts on Facebook, Instagram, YouTube and my website. (If you comment on all 4 platforms, each day, you have over 28 opportunities to be picked for a crafting bundle.)
Tell me why you like each cup or which is your favorite cup. Winners will be picked by September 2, 2025.
This card was made for CRAFT ROULETTE #281 whose parameters included a 4×6-inch card, coffee aisle colors, from a tree element, and outside the line. I chose to make a Christmas card with a Funn surprise inside this pop-up card using dies by Karen Burniston and stamps by Tim Holtz.
Watch the video below to learn how this card was made.
Cardbase: The cardbase is made from 65lb kraft colored cardstock cut into two pieces of 6×8-inch rectangles and one 4×6-inch rectangle. The two large pieces are scored at 4-inches along the 8=inch side to form two 4×6 side-fold cards. The 4×6-inch panel is scored along the short side at 1/4-inch to form a tab. Assemble the card base as shown in the video above. The two apertures were die cut using Karen Burniston’s Squares – Crosshatch set.
Pop-Up Mechanisms: Two Katherine Label Pop-Up mechanisms were used to animate the tree branches to reveal the cat laying in the Christmas tree. See the video above or watch the assembly video at the bottom of this linked page to understand how the mechanisms are cut out and installed. The moving tree branches are made with five or more of the fir branches from Karen Burniston’s Holiday Charmsdie set.
Decorations: The Holiday Charms are used to create the double sided ornament and fir tree branch window decorations. Stampers Anonymous Tim Holtz Collection Snarky Cats Halloween stamp set was used for the cat.
Sentiments: “I know right from wrong. Wrong is the fun one.” on the inside drop down panel hints at what’s to come. It was stamped using Stampers Anonymous Tim Holtz Collection Snarky Cats stamp set. Merry Christmas is a die cut using Karen Burniston’s Merry Christmas set. The white square diamond label is for a personal message is cut using Karen Burniston’s Squares – Crosshatch set.
___________________________________
Thank you for experiencing this blog post.
I hope this inspires you and makes you smile.
Please subscribe to get email notices of new posts, like and leave comments 😊
___________________________________
Disclaimer: Karen Burniston products are provided free of charge by the manufacturer for review and use. All other items were personally purchased. Compensated affiliate links used where or when possible, meaning I will receive a small percentage commission from these manufacturers at no cost to you. This will allow me to add more content to my YouTube channel and help out a lot. Thank you.
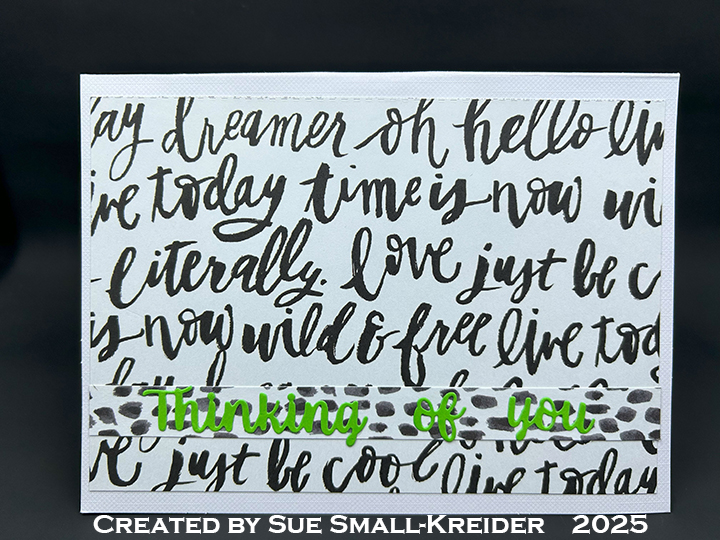
This card was made for CRAFT ROULETTE #280 whose parameters included a thinking of you project, hometown colors, cup or glass element, and add a doodle. Today’s card uses Karen Burniston dies and stamps along with a pop-up die set from Paper Discovery.
Watch the video below to see how this card was made.
Cardbase: I started with a purchased A6 sized (4.625×6.25-inches) cardbase and matching envelope. I covered the four panels with decorative paper from a 6×8-inch paper pad from American Crafts.
Teacup Pop-Up: Watch the video above to see how the teacup and saucer were assembled. They were die cut from white cardstock using Paper Discovery dies by Olga Direktorenko – Teacup Fairies Timeless Tea Set Pop-Up Die Set. (This die set came out in 2020.) The flowers are from the Flowers and Bee die set.
Sentiments: “Thinking of you” on the card front is die cut in green using Word Set 1 – Greetings. The label for a personal message is the is from the Rectangles – Crosshatchdie set. The smaller label cut using the label die in the Bouquet Bits die set and is stamped in black brown ink using theBouquet Sayingsstamp set.
Envelope: The back flap is stamped with “Craft Roulette”.
___________________________________
Thank you for experiencing this blog post.
I hope this inspires you and makes you smile.
Please like and leave comments 😊
___________________________________
Disclaimer: Karen Burniston products are provided free of charge by the manufacturer for review and use. All other items were personally purchased. Compensated affiliate links used where or when possible, meaning I will receive a small percentage commission from these manufacturers at no cost to you. This will allow me to add more content to my YouTube channel and help out a lot. Thank you.
Needing a lot of cards, I decided to stencil some A7 size card bases to make some special pop-up birthday cards for a card exchange. Here are the 10 cards I made using purchased card bases with matching envelopes.
Watch the video below to see how I made these cards.
Cardbase: I used five white cardbases and envelopes by Park Lane and five kraft paper cardbases and envelopes by American Crafts.
Pop-Up Mechanism: The pop-up mechanism that lifts the “Happy Birthday” and balloons is Karen Burniston’s Katherine Label Pop-Up. (Watch an assembly video for it by clicking on the die name and scrolling down to the bottom of the linked page.)
Stenciling: I used three different stencils and two different colors of stencil pastes. First, I taped down the cardbase to a piece of packing paper (think brown craft paper/newsprint) next I taped the stencil to the scrap paper over the cardbase and applied the stencil paste using a disposable plastic knife left from a take-out meal. Between each card, I washed the stencil and knife.
Sentiments: The “Hello” and “Happy Birthday” die cut sentiments, balloons and pop-up mechanism are all by Karen Burniston. The stamped birthday verse is by Craft Roulette and stamped in brown ink.
___________________________________
Thank you for experiencing this blog post.
I hope this inspires you and makes you smile.
Please like and leave comments 😊
___________________________________
Disclaimer: Karen Burniston products are provided free of charge by the manufacturer for review and use. All other items were personally purchased. Compensated affiliate links used where or when possible, meaning I will receive a small percentage commission from these manufacturers at no cost to you. This will allow me to add more content to my YouTube channel and help out a lot. Thank you.
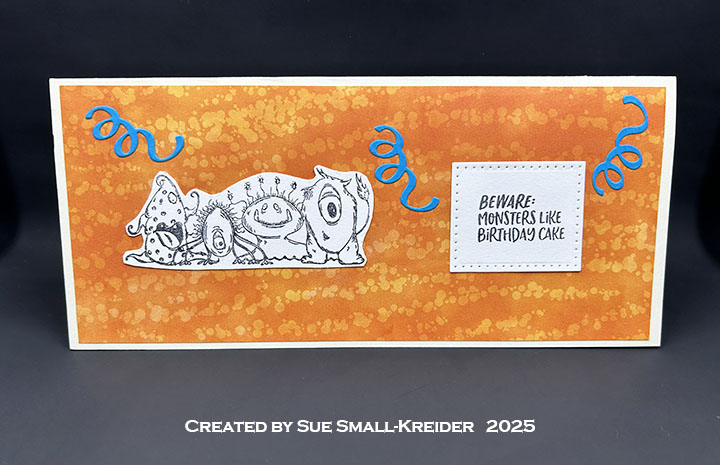
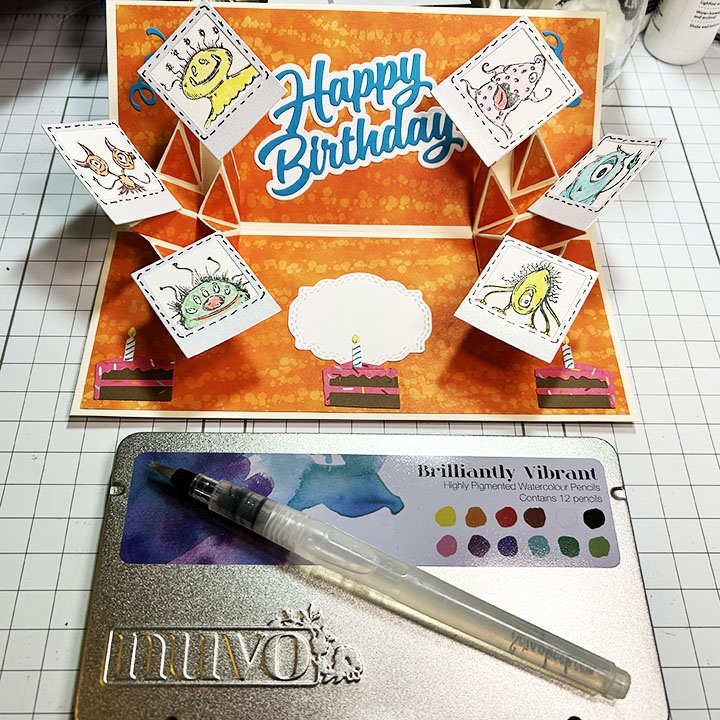
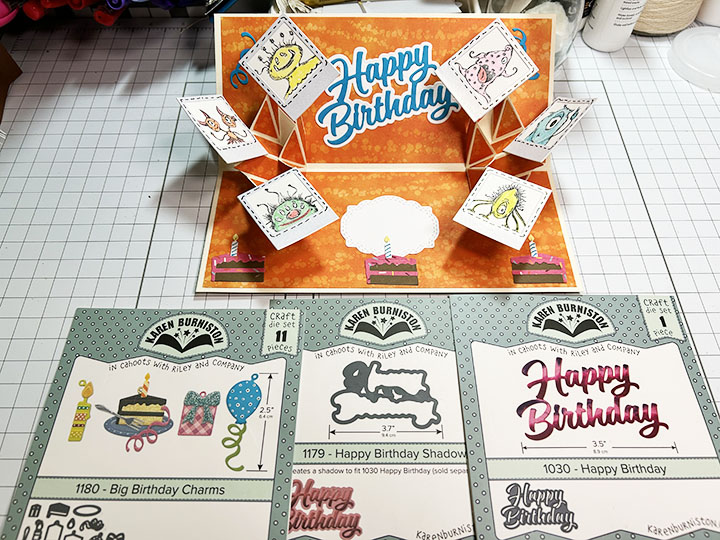
This card was made for CRAFT ROULETTE #279 whose parameters included a kid’s card, theater colors, picture(s) element, and half & half. I chose to make a monster themed slimline pop-up card using dies by Karen Burniston and stamps by Picket Fence Studios and Craft Roulette.
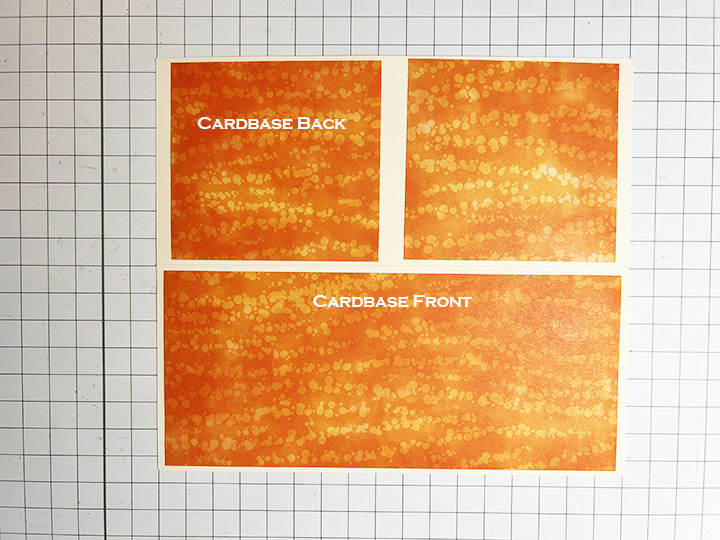
Cardbase: The cardbase is a 110 lb. cream cardstock 8.5×7.5-inch rectangle scored and fold in the center to make a 3.75x 8.5-inch top fold card. Three 3.5×8.25-inch rectangles of an orange patterned paper were used to cover the front and two inside panels of the card base. Two off-cut squares of the same paper was used to cover the cardbase back panel.
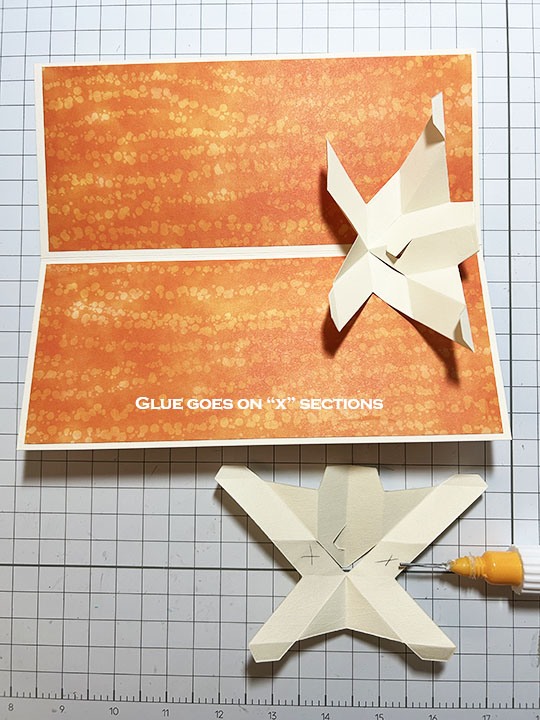
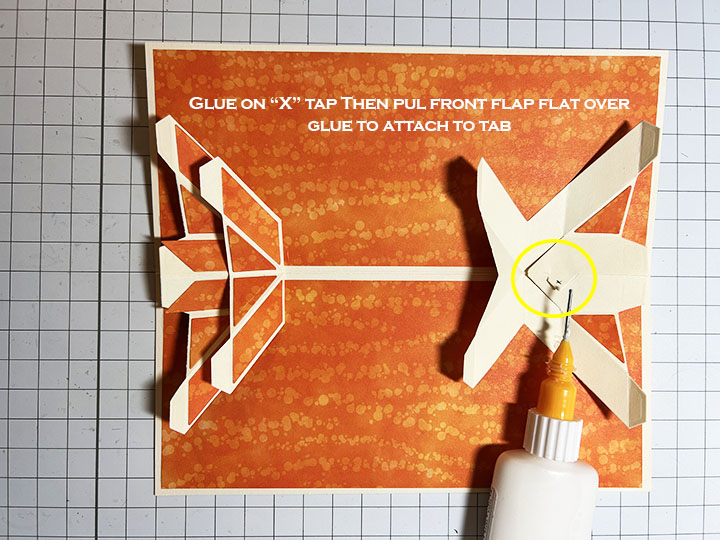
Triple Platform Pop-Ups: Two Triple Platform Pop-Ups are what make the monster pictures pop-up as the card opens. Watch the assembly video on the linked page. (Video is at the bottom of the linked page.) The base piece was cut from thin cream cardstock, while the trim pieces were cut from the orange paper used as the decorative panels on the card.
Monsters: The monsters were stamped on a thin creamy cardstock in black and the colored and die cut using the rectangle base dies from thePhoto Collage Pop-Up set. The frames were cut from the same die set using shimmer cardstock.
Sentiment: “Beware: Monsters like birthday cake” was stamped in black from Picket Fence StudiosYou Creep Me Out set. “Happy Birthday” and its shadow are dies by Karen Burniston. The white stitched label is from the Triple Platform Pop-Up die set. The slices of cake and streamers are from the Big Birthday Charms die set. The card back is stamped with “Inspired by Craft Roulette, made by” in blue ink on to a white rectangle from the Triple Platform Pop-Up die set.
Envelope: The card fits into #10 business envelope (4.125x 9.5-inches) which was stamped with “HBD” on its back in red ink using the Craft Roulette Funn Sentiments #01 stamp set.
Disclaimer: Karen Burniston products are provided free of charge by the manufacturer for review and use. All other items were personally purchased. Compensated affiliate links used where or when possible, meaning I will receive a small percentage commission from these manufacturers at no cost to you. This will allow me to add more content to my YouTube channel and help out a lot. Thank you.
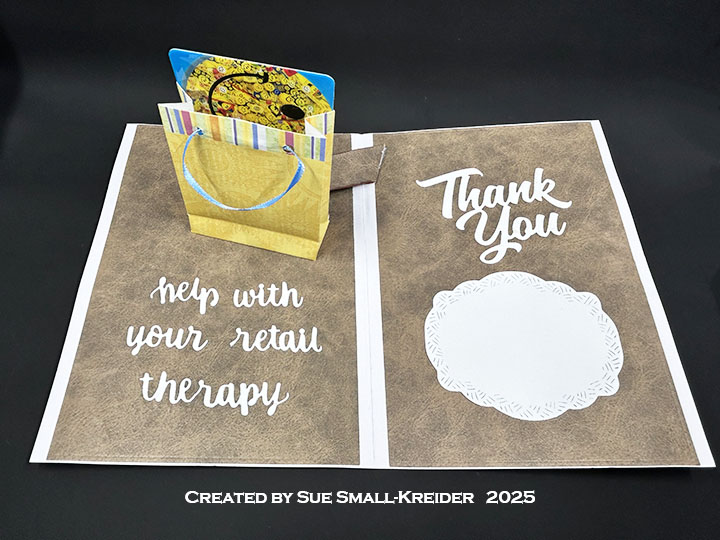
This card was made for CRAFT ROULETTE #278 whose parameters included a thank you card, bakery colors, shop (s) (ing) element, and ombre. I chose to make a a pop-up gift bag card that holds gift card using Karen Burniston dies.
Watch the process video to see how I made this card.
Cardbase: I started with a purchase A2 (4 5/8×6 1/8-inch) cardbase with matching envelope. The four panels are covered with the second and third larges rectangles and the scalloped die in the Rectangles and Labels– Crosshatch die set.
Gift Bag Pop-Up: Watch the assembly videos for the Flip Frame Pop-Upand Mini Gift Baglocated at the bottom of each of the linked pages. Follow the directions in the video above to added to this card.
Disclaimer: Karen Burniston products are provided free of charge by the manufacturer for review and use. All other items were personally purchased. Compensated affiliate links used where or when possible, meaning I will receive a small percentage commission from these manufacturers at no cost to you. This will allow me to add more content to my YouTube channel and help out a lot. Thank you.
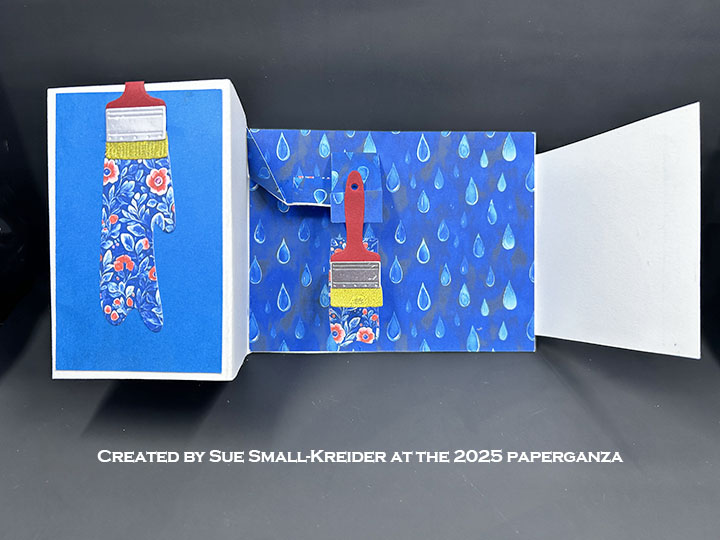
I made this card for Craft Roulette episode #277 while I was at Paperganza, the first in-person version of Craft Roulette. The parameters were a zoyfold card, local sports colors, Craft Roulette as an element, and up-to-date as the random.
What the video below to learn how and why I created the card using all but two items from the Paperganza swag bag/classes. (The two items were the cardbase cardstock and the pop-up mechanism that I had die-cut at home before going to the event.)
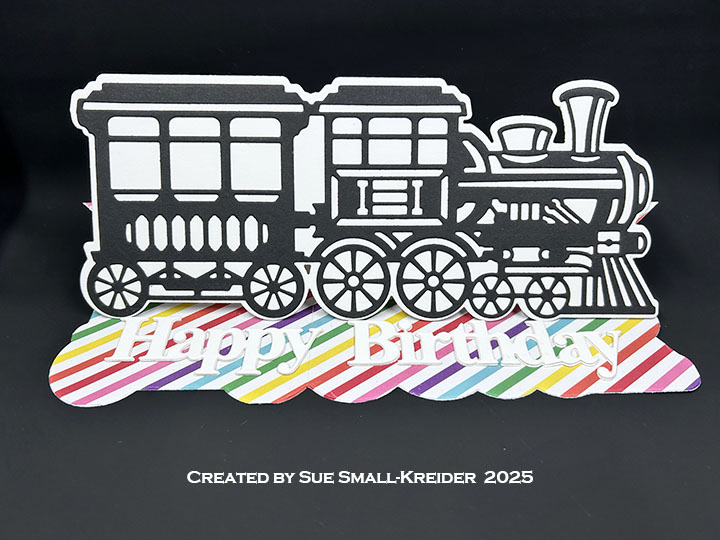
This card was made for CRAFT ROULETTE #276 whose parameters included an easel card, rainbow colors, western element, and black and white image. I chose to make a shaped, slimline easel card using dies by Anna Griffin and Sue Wilson.
Watch the process video to see how I made this card.
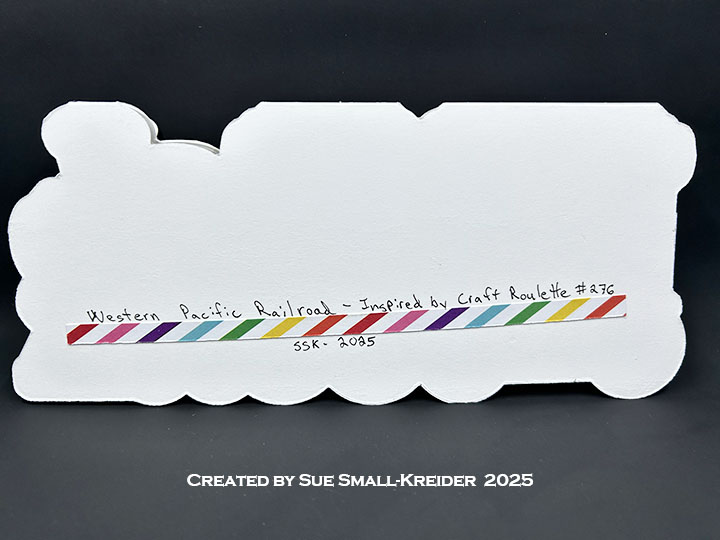
Cardbase: The cardbase is cut from 110 lb. white cardstock using Anna Griffin’s Antique Train Slimline Easel dies to cut out the two cardbase pieces. Rainbow striped paper was added to the card base and the excess was fussy cut off. (You could die cut the piece again if you don’t like to fussy cut.)
Train: The detailed train image is cut in black and glued to the shaped outline of the train before it is attached to the card base.
Sentiment: Cut three sets of Sue Wilson’s “Happy Birthday” from the scraps of white cardstock used for the cardbase. Glue the layers together. Let dry under a paperweight to have the dry flat. Adhere to cardbase to be used as the easel stop.
Envelope: The card fits into #10 business envelope (4.125x 9.5-inches) which was stamped with “HBD” on its back in red ink using the Craft Roulette Funn Sentiments #01 stamp set.
___________________________________
Thank you for experiencing this blog post.
I hope this inspires you and makes you smile.
Please like and leave comments 😊
___________________________________
Disclaimer: Karen Burniston products are provided free of charge by the manufacturer for review and use. All other items were personally purchased. Compensated affiliate links used where or when possible, meaning I will receive a small percentage commission from these manufacturers at no cost to you. This will allow me to add more content to my YouTube channel and help out a lot. Thank you.
Materials Used:
Dies
Anna Griffin – Metal Dies – Antique Train Slimline Easel
Creative Expressions – Craft Dies by Sue Wilson – Noble Expressions – Happy Birthday
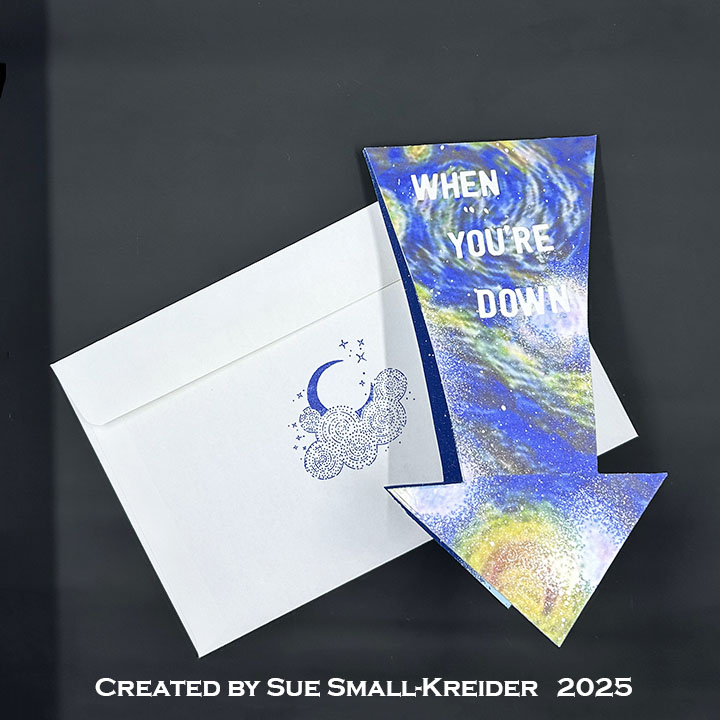
This card was made for CRAFT ROULETTE #275 whose parameters were include an ATC, starry night colors, down element, and white dots. I chose to make a shaped card that includes an ATC (Artist Trading Card.)
Watch the process video to see how I made this card.
Cardbase: I started with two pieces of 4.125×11-inch white cardstock. Traced around the arrow pattern I made from scrap paper and cut both of the arrows at the same time. I trimmed one arrow, at the wide end, off by .5-inch to let the other arrow have a tab to connect the the two pieces together. (After I completed the card, I found it was a little too long to fit in an 6×9-inch catalog size envelope, so I trimmed the arrow tip a little to made it fit.)
Sentiments: I used Karen Burniston’s Mini Alphabet to make the “When you’re down, Look up to the stars” sentiment. (I lined the letters up on my grid mat and used low tack tape the pick them up in line and then added glue, pressed in place on the card and finally lifted the tape off, pressing letters onto card.)
Envelope: The card fits into an catalog size envelope (6x 9-inches).
___________________________________
Thank you for experiencing this blog post.
I hope this inspires you and makes you smile.
Please like and leave comments 😊
___________________________________
Disclaimer: Karen Burniston products are provided free of charge by the manufacturer for review and use. All other items were personally purchased. Compensated affiliate links used where or when possible, meaning I will receive a small percentage commission from these manufacturers at no cost to you. This will allow me to add more content to my YouTube channel and help out a lot. Thank you.