Square Pop-Up Birthday Card

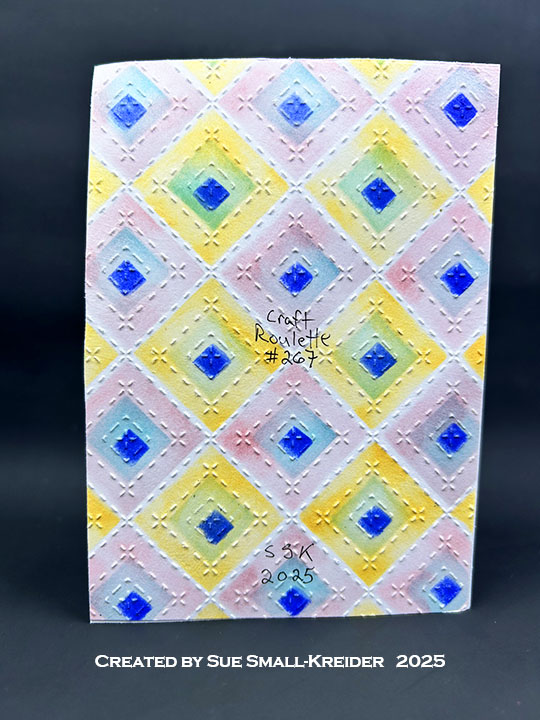
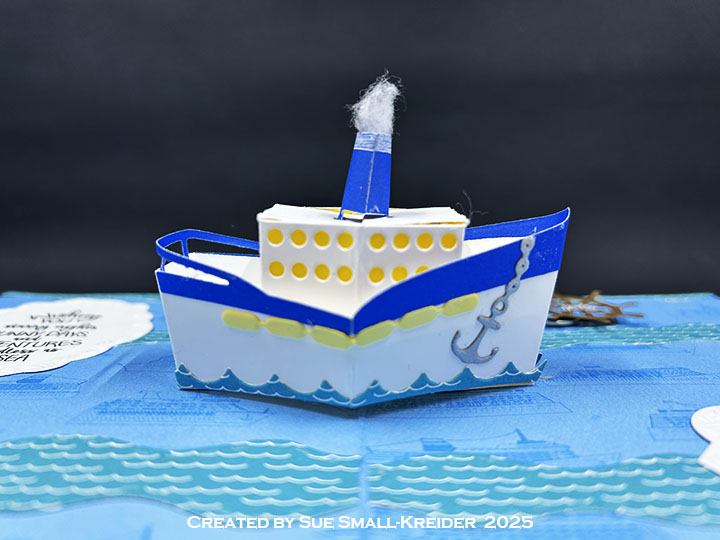
This card was made for Craft Roulette #269 whose parameters included a square card, butterfly colors, cloud element, and tied.

Front of Card

Watch the process video to see how I made this card.

Back of Card

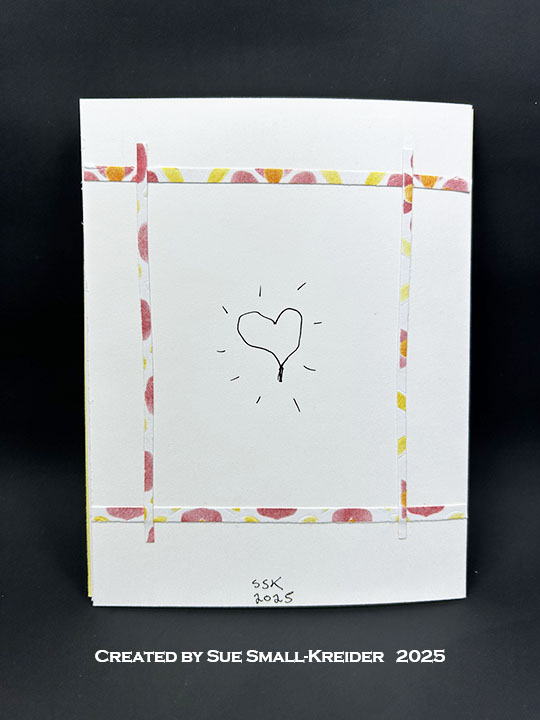
Cardbase: Start with a 4 x 8-inch piece of double-sided patterned cardstock and fold in half to form a top-fold 4-inch square card.

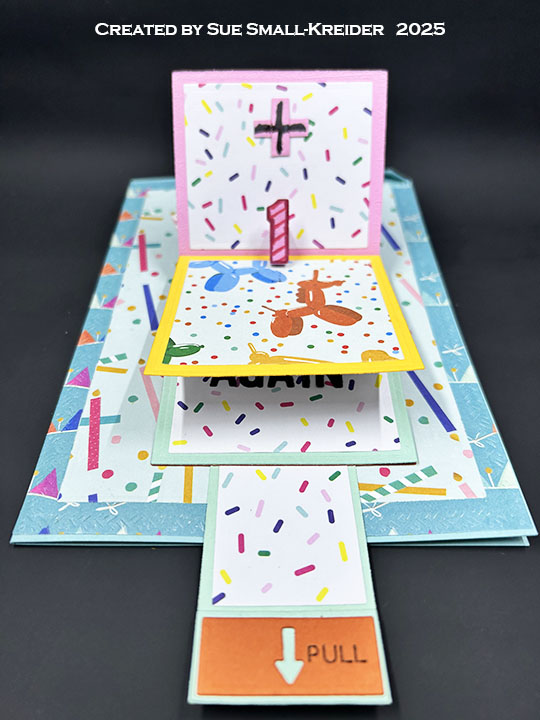
Pop-Up:  Watch the assembly videos for the Little Twist Panel Pop-Up. Cut from double-sided patterned paper one of the pop-up base, two large, rounded corners panel, one of the strip panel and the two flag banner pieces. Add flag banner pieces to strip panel before attaching the strip panel to pop-up base arms. Stamp and decorate large panels before attaching them to strip panel.

Sentiments:  All the sentiments used on the card come from the Bouquet Sayings stamp set except for the card front’s “Celebrate your big awesome super day” which is from the Photo Memories set. All are stamped in black ink. Clouds and hearts come from the Long Nature Edges 2 die set.

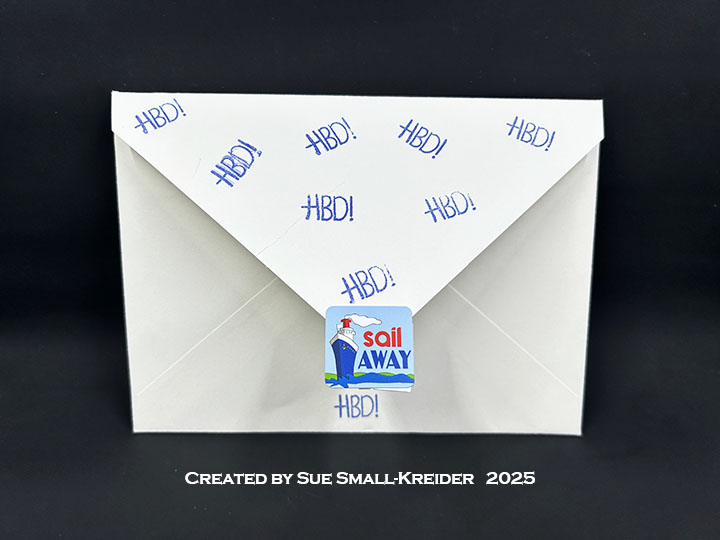
Envelope:  The card fits into an A2 (4.25x 5.5-inches) size envelope. A piece of decorative paper and stamps from the Craft Roulette Basics stamp set decorate the back of the envelope.

___________________________________

Thank you for experiencing this blog post.

I hope this inspires you and makes you smile.

Please like and leave comments 😊

___________________________________

Disclaimer: Karen Burniston products are provided free of charge by the manufacturer for review and use. All other items were personally purchased. Compensated affiliate links used where or when possible, meaning I will receive a small percentage commission from these manufacturers at no cost to you. This will allow me to add more content to my YouTube channel and help out a lot. Thank you.

___________________________________

Materials Used:

Dies

Stamps

Papers

  • Carabelle Studio – 12×12 Double-Sided Cardstock – Sorbet designed by Azoline
  • Pale Gray Cardstock
  • Fraser Papers for William House – A2 Envelope – Genesis Text Milkweed Smooth

Ink

  • Memento – Fade Resistant Dye ink – Gray Flannel and Tuxedo Black
  • Pigma – Mircon 01 Fine Tip Pen – Black

Adhesives

Tools

  • Die Cutting Machine
  • Paper Trimmer
  • Bone Folder
  • Score Board
  • Stamping Blocks
  • Scissors
  • Pencil
  • Paper Masking Tape
  • We R Memories – QuickStick
  • We R Memories – Piercing Tool
  • Pear Blossom Press – Cardmaker’s T-Square A2 Ruler

Miscellaneous

  • Yellow Satin Ribbon Bow

Small Quilt Themed Pop-Up Birthday Card

This card was made for Craft Roulette #267whose parameters included a 4 Bar card, craft store colors, se(s)/(ing)/sewn element, and stencil. I made a birthday card using dies by Karen Burniston and PinkFresh and sentiment stripes by Waffle Flower

Watch the process video to see how I made this card.

Cardbase:  Score and fold a 7×5-inch piece of heavy white cardstock into 3.5×5-inch side fold card. 

Stenciled Quilt Top Background:  Follow directions in video to stencil the background. To create the stencils use 6×8.5-inch sheets of 100lb cardstock that have the stitched diamond die cut into the center of each of the four sheets. Using the stitch marks as your guide, cut the stencils using a craft knife and a metal straight edge or ruler.

Pop-up Twist Panel:  Watch the assembly video at the bottom of the linked page. Stamp the quilt stamp onto medium weight cardstock. Die-cut the large mechanism from the Little Twist Panel Pop-Up set out of the stamped cardstock. Cut the panel from white cardstock. Cut decorative panels using the dies in set with your stamped cardstock.

Sewing Charms:  Assemble as directed in Karen’s assembly video located at the bottom of the linked page for the Sewing Charms.

Envelope:  The card fits into an A2 (4.25x 5.5-inches) size envelope.

___________________________________

Thank you for experiencing this blog post.

I hope this inspires you and makes you smile.

Please like and leave comments 😊

___________________________________

Disclaimer: Karen Burniston products are provided free of charge by the manufacturer for review and use. All other items were personally purchased. Compensated affiliate links used where or when possible, meaning I will receive a small percentage commission from these manufacturers at no cost to you. This will allow me to add more content to my YouTube channel and help out a lot. Thank you.

___________________________________

Materials Used:

Dies

Stamps

  • Spellbinders – Cling Stamp Set – Stephanie Low – Designer Series – Cool Vibes – SBS-150

Papers

  • Waffle Flower – Sentiments – Birthday Die Cut– SCP240
  • Waffle Flower – Sentiments  – View Die Cut – SCP253
  • White 100lb. Cardstock

Ink

  • Ranger – Tim Holtz – Distress Ink – Blueprint Sketch, Dried Marigold, Saltwater taffy, Salvaged Patina

Adhesives

Tools

  • Die Cutting Machine
  • Paper Trimmer
  • Scissors
  • Paper Masking Tape
  • Tweezers
  • Blending Brushes
  • Craft Knife
  • Metal Ruler or Straight Edge

Pop-Out Birthday Tag Card

This card was made for Craft Roulette #265 whose parameters included gift card, train colors, science element, and add a flower. I used a Craft Roulette stamp set and three Karen Burniston dies die sets.

Watch the process video to see how I made this card.

Cardbase:  Using Karen Burniston’s Tag Book Pop-Up die set, I cut two of the large tag frames from oxidized blue mirror cardstock and two more from oxidized copper-colored mirror cardstock. The rectangular hinge die I cut once from white cardstock.

Pop-Up Panels: I glued my thin decorated paper to a piece of thin white cardstock and let dry before cutting out the Flower Pivot Panels piece. (Follow the assembly instructions in her video on the die set’s linked page.) The six small flowers are cut from solid colored cardstock scraps using the dies from the same die set as the panels.

Sentiments:   The framed “Happy Birthday” on the tag front is from the Happy Birthday Lorna Add-Ons die set. The stamped “itty bitty gift” on the back tag pocket is in brown ink using the Craft Roulette Funn Sentiments #01 stamp set.

Envelope:  The card fits into a purchased A6 (4.5x 6-inches) size envelope or larger.

___________________________________

Thank you for experiencing this blog post.

I hope this inspires you and makes you smile.

Please like and leave comments

___________________________________

Disclaimer: Karen Burniston products are provided free of charge by the manufacturer for review and use. All other items were personally purchased. Compensated affiliate links used where or when possible, meaning I will receive a small percentage commission from these manufacturers at no cost to you. This will allow me to add more content to my YouTube channel and help out a lot. Thank you.

Materials Used:

Dies

Stamps

  • Craft Roulette – Funn Sentiments Clear Stamps – #01

Papers

  • Hunkydory – A4 Mirri Sheets of Cardstock – Oxidised Metals Collection
  • Hot Off The Press – Paper Pizazz – 12×12 Single-Sided Paper – Burgundy Collage
  • My Favorite Things – 8.5×11 65 lb. Cardstock – White
  • Green, Orange, Red and Yellow Cardstock

Ink

  • Memento – Fade Resistant Dye ink – Rich Cocoa
  • Pigma – Mircon 005 Fine Tip Pen – Black
  • Sharpie – Permanent Marker – Fine Tip – Black

Adhesives

Tools

  • Spellbinders – Platinum Die Cutting Machine
  • Scrapbook.com – Magic Mat
  • i-crafter – Shim
  • Paper Trimmer
  • Stamping Platform
  • LDRS – Stampendable Stamping Tool
  • Stamping Blocks used as paperweights
  • Scissors
  • Paper Masking Tape
  • Tweezers
  • We R Memories – QuickStick

Miscellaneous

  • Cording or Twine 8-inches long

FUNN Museum of Cards Zoyfold Card

This card was made for Craft Roulette #264 whose parameters included a card for an influencer, dreamy colors, crafts/crafters, and off center.

Watch the process video to see how I made this card.


Cardbase: Cut an 8.5×11-inch piece of heavy white cardstock into two pieces that at 4.25×11-inches. Score and fold in half at 5.5-inches both pieces. On one piece score and fold at 2.75-inches. Glue the two cards together with the large rectangle panels overlapping as shown in the video.
Cards: Because this card is going to Mary Gunn, I used images from her Craft Roulette Community Showcase gallery, picking cards that are iconic to the show. I tried to recreate some of the fun folds and bookmark cards.


Guide Sheet to Cards: This sheet is folded and tucked in a pocket on the back of the card.


Envelope: The card fits into an A2 (4.25x 5.5-inches) size envelope.

________________________________


Thank you for experiencing this blog post.

I hope this inspires you and makes you smile.

Please like and leave comments 😊

______________________________


Disclaimer: Karen Burniston products are provided free of charge by the manufacturer for review and use. All other items were personally purchased. Compensated affiliate links used where or when possible, meaning I will receive a small percentage commission from these manufacturers at no cost to you. This will allow me to add more content to my YouTube channel and help out a lot. Thank you.

____________________________


Materials Used:
Dies

Karen Burniston in cahoots with Riley and Company – Holiday House – 1144
Karen Burniston in cahoots with Riley and Company – Mini Alphabet and Numbers – 1197
• Riley and Company – Cool Dies – Speech Bubbles


Papers
• Craft Consortium – 6×6 Double-Sided Cardstock – Brick Texture
• Brown, Red, Tan and Yellow Cardstock
• White 100lb. Cardstock
• White Computer Printer Paper


Adhesives
Neutral PH Adhesive by LINECO
Fine-Tip Glue Bottle
• Foam Dots


Tools
• Die Cutting Machine
• Paper Trimmer
• Scissors
• Paper Masking Tape
• Tweezers

Toaster of Thanks

This card was made for Craft Roulette #262 whose parameters included a thank you card, 1950s colors, toast(s)/bread(s), and brown paper.

Watch the process video to see how I made this card.


Cardbase: Score and fold in half a8.5x 5.5 rectangle of silver mirror cardstock. From the Trinity Stamps Toaster Card die set, cut the toaster shaped die with its feet just slightly over the fold of the silver folded cardstock to form a toaster shaped card hinged at its feet.


Toaster: Cut one whole toaster from silver and another from gray cardstock. Cut enough of the toaster lever knob to have two knobs that are black on both sides. Glue the knobs to the inside of the toaster card’s left side near the feet. Using 1mm thick foam tape, place tape around the inside of the folded shaped toaster card to form a U shape with the opening is where the slot is. Attach the silver toaster over the foam tape to form a pocket with the slot as its opening. Repeat gluing in knob, adding foam tape and attaching the gray cardstock toaster to the other inside side of the card. Add double-sided tape to the back of some shiny black cardstock or junk mail before cutting out two of the spiraling squiggle from the Elizabeth Craft Designs Karen Burniston Merry Christmas Pop-Up and three of the toaster feet bar from Trinity Stamps Toaster Card die set. Adhere the squiggle stickers to the inside center of the silver toaster and to the back of the card’s toaster. Adhere the feet bar to the silver toasters. The gray cardstock should be without decorations.


Toast Cards: From brown kraft paper, cut two bread shaped cards using the die from the Trinity Stamps Toaster Card die set. Cut two small bread shapes using the smaller die in the set from white. Ink the inside edges and the whole outside of the brown cards with a dark brown ink. Lightly ink the edges of the white pieces. Stamp sentiments onto the front outside of cards and tops of white pieces before gluing the white to the inside of cards.


Sentiments: The toast cards’ sentiments were all stamped in brown ink using the Rubbernecker Thanks Set and Lawn Fawn’s Push Here stamps. The toaster card front has die cut letters cut from black cardstock/shiny junk mail backed with double-sided tape to form stickers. The “TOAST” word shadow was cut from white and adhered to silver mirror card with double-sided tape. All the die-cut sentiment is cut using the Trinity Toaster Card set.


Envelope: The card fits into an A7 (5x 7-inches) size envelope stamped on its flap a piece of bread with a heart using the Lawn Fawn Let’s Toast stamp set.

___________________________________________


Thank you for experiencing this blog post.

I hope this inspires you and makes you smile.

Please like and leave comments 😊


___________________________________________

Disclaimer: Karen Burniston products are provided free of charge by the manufacturer for review and use. All other items were personally purchased. Compensated affiliate links used where or when possible, meaning I will receive a small percentage commission from these manufacturers at no cost to you. This will allow me to add more content to my YouTube channel and help out a lot. Thank you.

___________________________________________


Materials Used:


Dies

• Elizabeth Craft Designs – Karen Burniston Pop It Ups – Merry Christmas Pop-Up
• Trinity Stamps – Metal Dies – Toaster Card


Stamps
• Lawn Fawn – Clear Stamps – Let’s Toast
• Lawn Fawn – Clear Stamps – Push Here
• Rubbernecker – Clear Stamps – Thanks Set


Papers
• Concord & 9th – 8.5×11 80lb Cardstock – Dove
• My Favorite Things – 8.5×11 100lb Cardstock – Mirror – Silver
• Black Coated Junk Mail
• Brown Kraft Cardstock
• White Cardstock
• Recollections – A7 Envelope – White

Ink
• Memento – Fade Resistant Dye ink – Rich Cocoa
• Sharpie – Permanent Marker – Ultra Fine Tip – Black

Adhesives
Neutral PH Adhesive by LINECO
• Fine-Tip Glue Bottle
• Scrapbook.com – Double-Sided Tape – 1/8″ and 4″ wide
• Scrapbook.com – Foam Tape – 1mm thick

Tools
• Die Cutting Machine
• Paper Trimmer
• Stamping Platform
• Scissors
• Paper Masking Tape
• Sponge Daubers
• Microfiber Cloth
• Tweezers
We R Memories – QuickStick

A Waterfall Card with Birthday Math

This card was made for Craft Roulette #259 whose parameters included a card with two folds, jelly bean colors, math element, and markers.

Watch the process video to see how I made this card.

Cardbase: Start with a 7 x 10-inch piece of cardstock and fold in half to form a side-fold A7 (7×5-inch) card. Cover the front and back panels with decorative papers. (I used the two largest rectangle dies in the Rectangles and Labels-Crosshatch die set to cut out a frame and two panels for the outside of the card.) Once the panels are covered, die-cut the thumb hole at the bottom center of both front and back panels.

Waterfall Pop-Up: Watch the assembly video for the Waterfall Card located at the bottom of the linked page. Cut four base squares, one base piece and pull strip from heavy solid color cardstock. Cut four large decorative squares, three larger decorative rectangles and one pull strip decorator stripe from decorative papers. Assemble as shown in video.

Sentiments: All the sentiments used on the card Spellbinders BetterPress sentiment strips. Numbers and Happy Birthday are from Karen Burniston’s Numbers, Happy Birthday and Shadow. “Again” is spelled using Karen’s Mini Alphabet.

Envelope: The card fits into an A7 (5x 7-inches) size envelope stamped with a sentiment from Karen Burniston’s Photo Memories stamp set on the back flap in black ink.

___________________________________

Thank you for experiencing this blog post.

I hope this inspires you and makes you smile.

Please like and leave comments 😊

___________________________________

Disclaimer: Karen Burniston products are provided free of charge by the manufacturer for review and use. All other items were personally purchased. Compensated affiliate links used where or when possible, meaning I will receive a small percentage commission from these manufacturers at no cost to you. This will allow me to add more content to my YouTube channel and help out a lot. Thank you.

Materials Used:

Dies

Press Plates & Dies

  • Spellbinders – BetterPress Press Plate & Die Set – Cheers To You Sentiments
  • Spellbinders – BetterPress Press Plate & Die Set – Make A Wish Sentiments

Stamps

Papers

  • Concord and 9th – 8.5×11 inch 100lb Cardstock – Sea Glass
  • Spellbinders – 8.5×11 inch 100lb Cardstock – Saffron
  • Spellbinders – 8.5×11 inch 100lb Cardstock – Terra Cotta
  • Recollections – 8.5×11 inch 100lb Cardstock – Pinks
  • Recollections – 8.5×11 inch 100lb Cardstock – Blues
  • Roobee by Mara-Mi – – 8.5×11 inch Single-Sided Paper – Celebrations
  • Recollections – A7 Envelope – Cream

Ink

  • Memento – Fade Resistant Dye ink – Tuxedo Black
  • Pigma – Mircon 01 Fine Tip Pen – Black
  • Sharpie – Permanent Marker – Ultra Fine Tip – Black
  • Spectrum Noir – Tri-Blend Alcohol Markers – Dark Red Blend & Purple Blend

Adhesives

Tools

Miscellaneous

  • Nuvo – Aqua Shimmer – Glitter Gloss

Stenciling Fun

I played with the March 2025 Spellbinders’ Stencil of the Month set – Mosaic & Quilted Memories and the Embossing Folder of the Month – Mosaic Memories to create some birthday cards.

Watch the process video to see how I made these cards.

All cards are A2 size (4.25×5.5-inches).

Voilet Mosaic: This card used – Stencil of the Month – Mosaic Memories – SOM-MAR25, Embossing Folder of the Month – Mosaic Moments – EOM-MAR25, BetterPress Press Plate & Die Set – Cheers To You Sentiments, BetterPress Press Plate & Die Set – Make A Wish Sentiments, Distress Inks – Shaded Lilac & Wilted Violet, Purple gems, Lilac cardstock and White cotton paper.

Blue Violet Mosaic: This card used – Stencil of the Month – Mosaic Memories – SOM-MAR25, Embossing Folder of the Month – Mosaic Moments – EOM-MAR25, BetterPress Press Plate & Die Set – Make A Wish Sentiments, Distress Inks – Shaded Lilac & Wilted Violet, Blue gems, Light Blue & Lilac cardstock and Grey cotton paper. (Blue sentiment strip “Have the best day ever” is a heat embossed with a blue sparkle powder. Stamp set unknown.)

Violet Quilted:  This card used – Stencil of the Month – Quilted Memories – SOM-MAR25, BetterPress Press Plate & Die Set – Fancy Sentiment Strips, Distress Inks – Shaded Lilac, Yellow gems, Lilac cardstock and White cotton paper.

Posey Quilted:  This card used – Stencil of the Month – Quilted Memories – SOM-MAR25, BetterPress of the Month Press Plate & Die Set – Paint The Town-BPOM-NOV24, Distress Inks – Milled Lavender, Yellow gems, Lilac & Purple cardstock and White cotton paper. (Purple sentiment banner is hot foiled in black foil using an unknown “Happy Birthday” Glimmer plate but cut using Fancy Sentiment Strips die.)

Red Quilted:  This card used – Stencil of the Month – Quilted Memories – SOM-MAR25, BetterPress Press Plate & Die Set – Make A Wish Sentiments, Distress Inks – Lumberjack Plaid, Mustard Seed & Spiced Marmalade, Yellow cardstock, White cotton paper and a red satin bow.

___________________________________

Thank you for experiencing this blog post.

I hope this inspires you and makes you smile.

Please like and leave comments 😊

___________________________________

Disclaimer: Karen Burniston products are provided free of charge by the manufacturer for review and use. All other items were personally purchased. Compensated affiliate links used where or when possible, meaning I will receive a small percentage commission from these manufacturers at no cost to you. This will allow me to add more content to my YouTube channel and help out a lot. Thank you.

Materials Used:

Press Plates & Dies

  • Spellbinders – BetterPress Press Plate & Die Set – Cheers To You Sentiments
  • Spellbinders – BetterPress Press Plate & Die Set – Fancy Sentiment Strips
  • Spellbinders – BetterPress Press Plate & Die Set – Make A Wish Sentiments
  • Spellbinders – BetterPress of the Month Press Plate & Die Set – Paint The Town-BPOM-NOV24

Stencils

  • Spellbinders – Stencil of the Month – Mosaic & Quilted Memories – SOM-MAR25

Embossing Folders

  • Spellbinders – Embossing Folder of the Month – Mosaic Moments – EOM-MAR25

Papers

  • Blue, Lilac, Purple, White and Yellow 65 lb. Cardstock
  • Crafter’s Companion – 4.25×5.5 250 gsm Cotton Paper – Cream, Grey, White
  • Scrapbook.com – 8.5×11 110 lb. Cardstock – Neenah Solar White
  • Fraser Papers for William House – A2 Envelope – Genesis Text Milkweed Smooth

Ink

  • Pigma – Mircon 01 Fine Tip Pen – Black
  • Ranger – Tim Holtz – Distress Ink – Milled Lavender, Shaded Lilac, Wilted Violet
  • Spellbinders – BetterPress Ink – BetterPress Black

Adhesives

Tools

  • Die Cutting Machine
  • Paper Trimmer
  • Gelli Arts – 8×10-inch Gel Plate
  • Bone Folder
  • Score Board
  • Scissors
  • Pencil
  • Paper Masking Tape
  • We R Memories – QuickStick

Miscellaneous

  • Red Satin Ribbon Bow
  • Adhesive Backed Gems- Blue, Purple, Yellow

A February Birthday Card

This card was made for Craft Roulette #255 whose parameters included an A2 card, Valentine colors, February element, and metallic/foil.

Watch the process video to see how I made this card.

Cardbase: I used a purchased cardbase and envelope. The cardbase had a pink plaid exterior with was covered with decorative paper on the card back and a frame mat was cut from red using the Karen Burniston rectangle die so that some of the pink plaid would show.

Sentiments:  The “Sweet” sentiment on the card front is front a journaling card from the 12×12 Memory Place paper collection. Inside, a Craft Roulette sentiment stamp was used for “Happy Birthday.”

Envelope:  The card fits into an A2 (4.25x 5.5-inches) size envelope with decorative paper strips glued to the back flap.

___________________________________

Thank you for experiencing this blog post.

I hope this inspires you and makes you smile.

Please like and leave comments 😊

___________________________________

Disclaimer: Karen Burniston products are provided free of charge by the manufacturer for review and use. All other items were personally purchased. Compensated affiliate links used where or when possible, meaning I will receive a small percentage commission from these manufacturers at no cost to you. This will allow me to add more content to my YouTube channel and help out a lot. Thank you.

Materials Used:

Dies

Stamps

  • Craft Roulette – Clear Stamps – The Basics
  • Craft Roulette – Clear Stamps – Funn Sentiments #01

Papers

  • Memory Place – 12×12 inch Double-Sided Paper – Peter’s Garden
  • Memory Place – 6×6 inch Double-Sided Paper – Peter’s Garden
  • Memory Place – 6×6 inch Collage Origami Paper – Peter’s Garden
  • Craft Smart – A2 Printed Card and Envelope – Pastel Plaids

Ink

  • Memento – Fade Resistant Dye ink – Tuxedo Black
  • Pigma – Mircon 01 Fine Tip Pen – Black
  • Nuvo – Aqua Shimmer Brush Marker – Glitter Gloss
  • Nuvo – Glitter Marker – Lemon Drizzle

Adhesives

Tools

  • Die Cutting Machine
  • Paper Trimmer
  • Stamping Platform
  • Stamping Blocks
  • Detail Scissors
  • Trimming Scissors
  • Paper Masking Tape

Cruising On Your Birthday!

This card was made for Craft Roulette #252 whose parameters included a card for a teenager, morning colors, fairy (fairies), and bow(s). I choose to interpret fairy as fairy lights and bow as a bow of a ship.

Watch the process video to see how I made this card.

Cardbase: My double sided paper from Carta Bella was cut into a 6.5×10-inch rectangle and folded in-half. The wave decorations were cut using Karen Burniston’s Ocean Edges die set.

Cruise Ship Pop-Up: The cruise ship is made with two die sets by Karen Burniston – Boat Pop-Up and Cruise Ship Add-ons. (You can watch assembly videos for both sets by clicking on their links and going to the bottom of the linked pages.)

Pear Blossom Press Twinkle Lights were used to light-up the ship and the ship’s wheel (from Karen Burniston’s Cruise Charms die set with Pear Blossom Press’ “push” stamp) covers the battery and indicates where to press to turn on the lights.

Sentiments:  The “Wishing you…” sentiment is from Karen Burniston’s Cruise Greetings stamp set and the “HBD!” is from Craft Roulette’s Funn Friends #02 stamp set. The sentiments are stamped in black ink on labels cut from Karen Burniston’s Rectangles and Labels – Crosshatch and Labels – Crosshatch die sets. You can download the paperclip slip.

Envelope:  The card fits into an A7 (5x 7-inches) size envelope with “HBD!” stamped all over the back flap and sealed with a sticker from the paper collection.

___________________________________

Thank you for experiencing this blog post.

I hope this inspires you and makes you smile.

Please like and leave comments 😊

___________________________________

Disclaimer: Karen Burniston products are provided free of charge by the manufacturer for review and use. All other items were personally purchased. Compensated affiliate links used where or when possible, meaning I will receive a small percentage commission from these manufacturers at no cost to you. This will allow me to add more content to my YouTube channel and help out a lot. Thank you.

Materials Used:

Dies

Stamps

Papers

  • Carta Bella – 12×12 inch Double-Sided Textured Cardstock – Bon Voyage by Steven Duncan
  • Bazzill – 8.5×11 Cardstock – Tiara -18-1002
  • Your Paper Insider – 8.5×11 Cardstock 100# Smooth – UltraWhite
  • Yellow Vellum
  • Blue Cardstock
  • Recollections – A7 Envelope – Cream

Ink

Adhesives

Tools

  • Die Cutting Machine
  • Paper Trimmer
  • Bone Folder
  • Score Board
  • Stamping Platform
  • LDRS – Stampendable Stamping Tool
  • Stamping Blocks used as paperweights
  • Scissors
  • Craft Knife
  • Pencil
  • Paper Masking Tape
  • Metal Ruler

Miscellaneous

  • Pear Blossom Press – Twinkle Lights