Movie Themed Pop-Up Birthday Card

This card was made for Craft Roulette #222 whose parameters included Dutch door, gnome colors, movie element and building blocks.

Watch the process video for a tutorial on how the card was made.

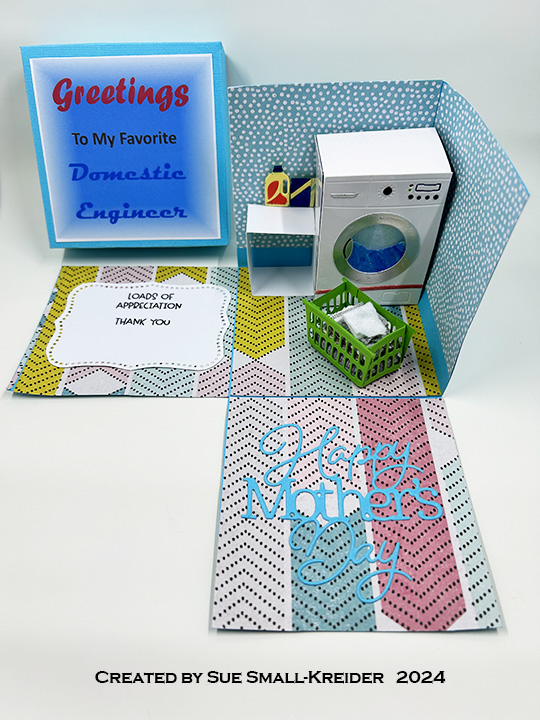
Cardbase: Starting with an 8 1/2-inch square that is scored at 3 1/2, 7, and 7 1/2-inches. Thin magnets are added to the flap and back of front panel before being covered with decorative paper.

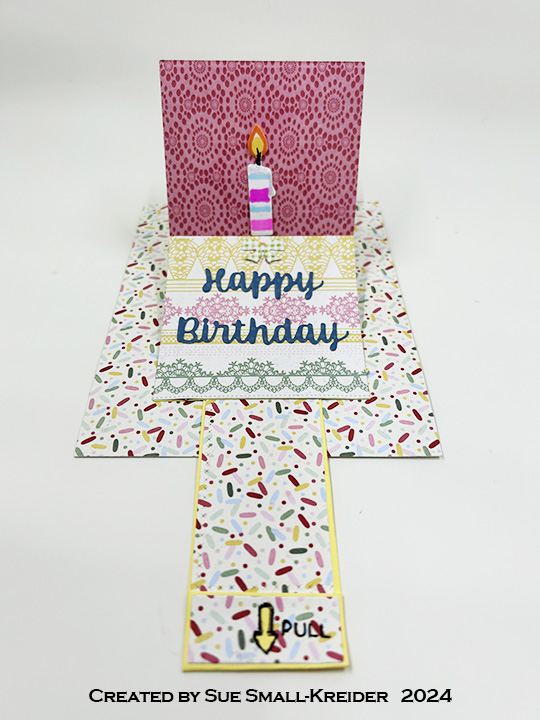
Sentiments: The front “You are the STAR of your Life Story” was computer generated while the “Happy Birthday” inside used two Karen Burniston dies – Happy Birthday and Happy Birthday Shadow.

Card Front: Drive-in movie die cuts and stamps are by My Favorite Things. the 3D embossing folder is by Spellbinders.

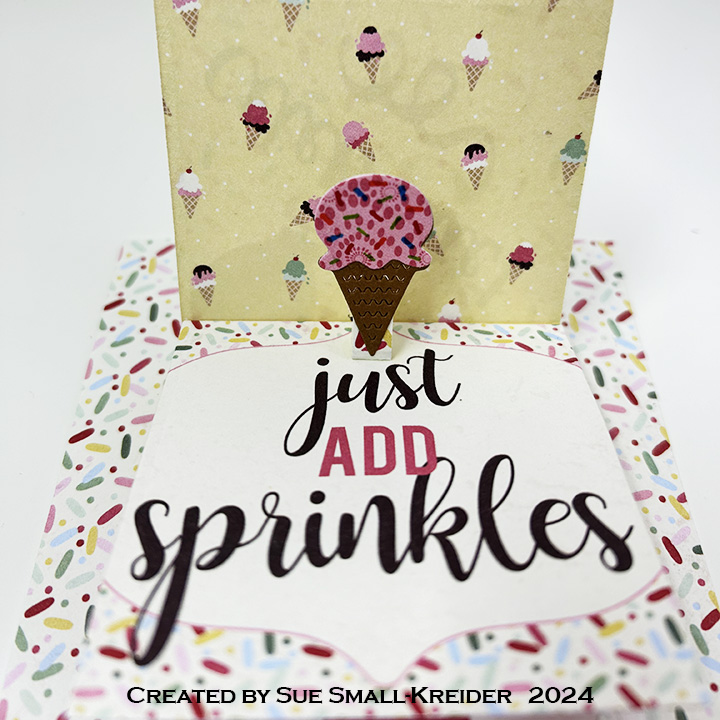
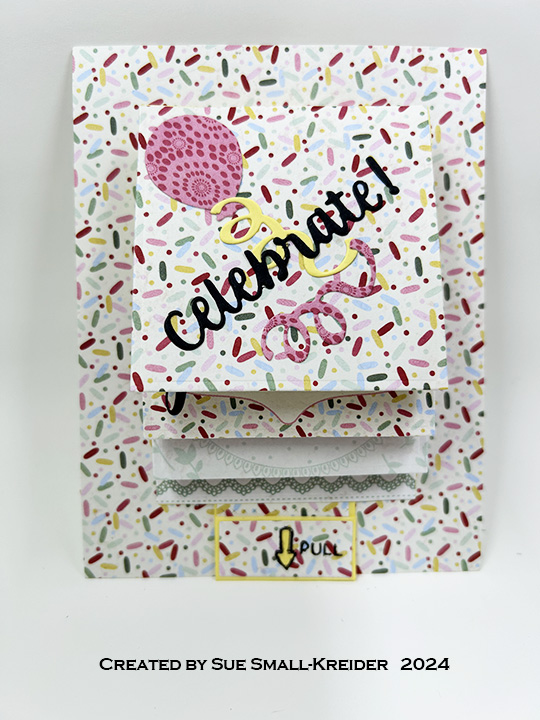
Pop-Up Blocks: Watch Karen Burniston’s assembly video for her Surprise Cube Pop-Up before assembling them. (Assembly video near bottom of linked page.)

___________________________________

Thank you for reading this blog post.

I hope this inspires you and makes you smile.

Please like and leave comments 😊

___________________________________

Materials Used:

Dies & Embossing Folder

Stamps

  • Craft Roulette – Clear Stamps – The Basics
  • My Favorite Things – Clear Stamps – At The Movies – Romance

Papers

  • American Crafts – 12×12 Singled-Sided Paper – 32307 Fireworks
  • Hunkydory – A4 -Printable Parchment Paper (Vellum)
  • Keep It Simple – 6×6 Double-Sided Cardstock – Back to Basics Ruby Collection Pack
  • Kindred Stamps – 6×6 Double-Sided Cardstock – At The Movies
  • Silver Foil Cardstock
  • Blue, Read and White Cardstock

Ink

  • StazOn – Solvent Ink – Jet Black
  • Crafter’s Square – Metallic Marker .005 in Point – Silver
  • Pigma – Mircon 01 Fine Tip Pen – Black
  • Sharpie – Permanent Marker – Chisel Tip – Black
  • Sharpie – Permanent Marker – Ultra Fine Tip – Red

Adhesives

Tools

  • Die Cutting Machine
  • Bone Folder
  • Stamping Blocks
  • Scissors
  • We R Memories – QuickStick
  • Paper Masking Tape

Miscellaneous

  • #8 Rubber Band
  • Velcro Dots/Hook & Ladder Fasteners
  • Scrappy Tails – Thin Magnets

Sewing Just For You

Today’s card is a simple one using Spellbinder’s BetterPress to create letterpress stamping elements.

I used press plates from two companies. The intricate zig-zag frames are from PinkFresh Studio and come with coordinating dies. I used the largest two printed frames in the set using Spellbinders BetterPress Ink in French Blue. (I ended up having to use bubble wrap packaging to get a good die-cut through the thick white watercolor paper that I printed them on.)

The sewing themed piece of thread card, scissors and thimble (on card back) came from the Spellbinders BetterPress of the month club for April 2024 – Stitched for You stamped in Tawny Brown ink on gray Spellbinders BetterPress Cotton Card Panel. The circle sentiment is another Spellbinder press plate and die set – Sealed Cord & Faux Seal Sentiments printed Spellbinders white cotton card panel with the same brown ink.

For the cardbase I used a purchased one with envelope from American Crafts. Stamped on the back flap of the envelope is a pincushion image from Fun Stampers Journey using Stampin’ Up Crumb Cake ink.

___________________________________

Thank you for reading this blog post.

I hope this inspires you and makes you smile.

Please like and leave comments 😊

___________________________________

Orange Ornament Card

This card was made for Craft Roulette #219 whose parameters included an anniversary project, salad colors, “new” element and a folded corner.

___________________________________

Thank you for experiencing this blog post.

I hope this inspires you and makes you smile.

Please like and leave comments 😊

___________________________________

Materials Used:

Dies

  • Altenew – Die Set – Orange Blossom
  • Spellbinders – Cutting Dies – Fluted Classics Circles

Stamps

  • Altenew – Clear Stamp and Die – Mini Delight: Bee Kind
  • Craft Roulette – Clear Stamps – The Basics
  • Riley & Co – Funny Bones – Rubber Stamp – Creativity is Intelligence Having Fun

Papers

  • Greens, Oranges and White Cardstock

Ink & Embossing Powder

  • Simon Says Stamp – Pawsitivity Saturated Ink – Sunbeam
  • StazOn – Solvent Ink – Jet Black
  • Pigma – Mircon 01 Fine Tip Pen – Black

Adhesives

Tools

  • Die Cutting Machine
  • Stamping Platform
  • Stamping Blocks used as paperweights
  • Scissors
  • We R Memories – QuickStick

Miscellaneous

  • Green and White Gingham Ribbon
  • Florist Wire

Tropical Santa Card & Ornament

This card was made for Craft Roulette #218 whose parameters included for a holiday project, tropical colors, wheel(s) element and geometric shape(s).

Envelope: This card fits into an A7envelope.

See other Cards made with the Spellbinder’s Sunday Drive die sets:

___________________________________

Thank you for experiencing this blog post.

I hope this inspires you and makes you smile.

Please subscribe, like and leave comments 😊

Follow my YouTube channel, Instagram and Pinterest as well.

___________________________________

Materials Used:

Dies

Stamps

  • Rubbernecker – Clear Stamps – Winter Wonderland – 3338
  • Craft Roulette – Clear Stamps – The Basics

Papers

  • Spellbinders – 8.5×11 inch Color Essentials 100 lb Cardstock  – Peridot
  • Silver Foil Cardstock
  • Coated Colored Packaging
  • Colored Cardstock Scraps
  • A7 Envelope – Ivory

Ink

  • Ranger – Tim Holtz – Distress Ink- Mowed Lawn
  • Simon Says Stamp – Pawsitivity Saturated Ink – Doll Pink
  • StazOn – Solvent Ink – Jet Black
  • Creative Craft Products – Alcohol Markers – 183 Phthalo blue
  • Pigma – Mircon 01 Fine Tip Pen – Black
  • Sharpie – Permanent Marker – Chisel Tip – Black

Adhesives

Tools

  • Die Cutting Machine
  • Bone Folder
  • Stamping Blocks
  • Scissors
  • We R Memories – QuickStick
  • Craft Mat
  • Sponge Dauber

Birthday Treats

This card was made for Craft Roulette #215 whose parameters included for Project – Happy Birthday, petting zoo colors, scoop element and tab(s).

This card uses Karen Burniston’s die sets of Big Birthday Charms, Waterfall Card, Sweet Treats Charms, and Word Set 2 – Birthday. The Confection paper collection by Authentique is also a star of this card.

Cardbase: Use a 5.5 x4.25-inch white piece of cardstock and cover front with confetti sprinkles patterned paper. Die cut half round notch from Waterfall Card die set at center bottom of short side of card.

Waterfall: Watch the assembly video at the bottom of the linked page for the Waterfall Card. I cut the mechanism pieces (pull strip and base) from yellow cardstock. The largest square die was used to cut four double-sided patterned paper pages. Assemble waterfall as shown in video.

Food Pop-Ups: Cut and assemble the ice cream cone from the Sweet Treats Charms set. The slice of cake and large candle are made using the Big Birthday Charms set. Cut off the charm loops on both. Cake icing has Glossy Accents clear gel on it. Candle flames have glitter gloss on them.

Cut small strips of patterned cardstock and fold in half and then fold the ends to the center fold to form a pop-up cube to glue into the first two pages. Once these pop-up cubes’ glue has dried, attach the food elements to cubes. The large candle is popped-up with two strips of cardstock behind it.

Sentiments: “Celebrate!” and “Happy Birthday” are from Word Set 2. The balloons and streams are from the Big Birthday Charms set. The quote by Iris Murdoch was in the paper collection. The back of the pull tab was stamped with “Inspired by Craft Roulette. Made by” and signature and CR episode listed.

Envelope: The back flap of the envelope is decorated with leftover strips of patterned paper.

__________________________

Thank you for reading this blog post.

I hope this inspires you and makes you smile.

Please like and leave comments 😊

__________________________

Materials Used:

Dies

Stamps

  • Craft Roulette – Clear Stamps – The Basics

Papers

  • Authentique – 12×12 Double-Sided Cardstock – Confection Paper Pack
  • Black, Blue, Brown, White and Yellow Cardstock
  • Silver Mirror Cardstock
  • A2 Envelope – Cream with flecks

Ink

  • Hero Arts – Alcohol-Marker Friendly Ink Pad – Intense Black
  • Creative Craft Products – Dual Tip Alcohol Markers -mWG1 – Warm Grey
  • Pigma – Mircon 01 Fine Tip Pen – Black
  • Sharpie – Permanent Marker – Ultra Fine Tip – Blue, Green, Orange and Red
  • Spectrum – Tri-Blend Alcohol Markers – Bright Pink, Ice Blue and Orange
  • Stampin’ Up – Stampin’ Blends Markers – Light Daffodil Delight
  • Nuvo – Aqua Shimmer – Glitter Gloss

Adhesives

  • Neutral PH Adhesive by LINECO
  • Fine-Tip Glue Bottle

Tools

  • Die Cutting Machine
  • Stamping Blocks
  • Scissors
  • We R Memories – QuickStick
  • Craft Clips

Miscellaneous

  • Nuvo – Cream Drops – Golden Shimmer
  • Ranger – Glossy Accents

A Laundry Explosion Box Card for mother’s Day

This card was made for Craft Roulette #213 whose parameters included for hello project, robust colors, workplace element and mixed media. It is intended for young children to give to their mother.

I wanted to use a new Craft Roulette inspired laundry die and stamp set from Trinity Stamps called Loads of Fun.

Box: From a 12 x12-inch square of cardstock, draw lines every 3 7/8-inches on all sides. Draw a 1/4-inch tab on one side flap. Cut as shown on video. On a 6-inch square of cardstock draw lines 1-inch from edge on all sides. Cut lid as shown on video. Assemble as directed on video.

Washing Machine: Cut from glossy white cardstock one washing machine from the laundry die set. Cut the knobs and buttons from black and silver and glue in place. For the box piece the forms the 3D washing machine, cut a piece 8 1/2 x 2-inches. Fold at 3 1/8-inches, 4 1/2-inches and 7 1/2-inches. Cut a piece that will cover the side of the box from glossy white cardstock. Cut another piece of glossy cardstock the width of the top of the washing machine and the length of the top of the box, plus 1/2-inch for the two 1/4-inch tabs. Assemble as shown in video.

Table: Cut a piece of white cardstock 1×6-inches. Score and fold at 1/4-inches, 1 5/8-inches, 3 1/4-inches, and 4 5/8-inches. Glue tab to other end to form cube. Glue onto washer side and floor.  Die-cut, color and assemble laundry soap bottle and box. Using foam squares, attach them to wall atop table.

Basket: Cut four of the laundry basket from the laundry die set in green. Trim off the sides from two of the baskets, fold sides into tabs and glue onto sides of other two basket pieces to form a four-sided box. Cut fabric scraps and form into folded laundry. Glue laundry onto box base and then add glue to inside of basket before placing around folded laundry.

Sentiments: “Loads of Appreciation” and “Thank You” were stamped in black on a white die cut fancy label before being glued onto a box flap. “Happy Mother’s Day” was die cut from a scrap of the blue box cardstock. The “Greetings To My Favorite Domestic Engineer” on the box lid was computer generated.

____________________________________________

Thank you for experiencing this blog post.

I hope this inspires you and makes you smile.

Please like and leave comments 😊

____________________________________________

Materials Used:

Dies

Stamps

Papers

  • American Crafts – 12×12 inch Single-Sided Papers – 341467
  • Core’dinations – 12×12 inch Textured 80lb. Cardstock – Candy Shop Canvas
  • The Paper Cut – 8.5×11 Glossy 10 PT Kromekote Cardstock – White
  • The Paper Studio – 8.5×11 Printed Paper – Random Dot – Robin’s Egg Blue
  • Silver Matte Cardstock
  • Clear Plastic Packaging
  • Black, White and Yellow Cardstock

Ink

  • StazOn – Solvent Ink – Jet Black
  • Scrapbook.com – Glitter Brush Marker –Deep Blue, Frosty Blue, Red Shimmer
  • Sharpie – Permanent Marker – Fine Tip – Black
  • Sharpie – Permanent Marker – Ultra Fine Tip – Black, Green, Red

Adhesives

  • Neutral PH Adhesive by LINECO
  • Fine-Tip Glue Bottle
  • Double-Sided Tape – 1/8-inch wide
  • Foam Squares
  • Clear Tape

Tools

  • Die Cutting Machine
  • Bone Folder
  • Stamping Blocks
  • Scissors
  • Pencil
  • We R Memories – QuickStick
  • T-Ruler
  • Tombow – Mono – Sand Eraser -512A
  • Craft Clips

Miscellaneous

  • Red & White Checkered Ribbon

Time Flies When You Are Having Fun

This card was made for Craft Roulette #211 whose parameters included good tidings, summer colors, mechanical element and tie closure.

This is a retirement card for someone who loves working with mechanical action.

(Please note that the Tonic Craft Kit 59 used in this card is no longer available. The Karen Burniston dies however are still available and links are provided to them.)

Cardbase: I used a purchased A7 (5×7-inch) cardbase and matching envelope. Each of the four panels were covered with coordinating papers in either watermelon pink or rind green. The circle was cut thru the front panel using the clock dial circle die.

Clock: Using three different green cardstock, they were cut with the main clock base die from the Tonic Craft Kit 59. The darkest green was trimmed to just the bottom and side trims, while the green patterned paper had the clock dial circle cut out and two bottom art-deco corner die-cut as well. Matching up the patterned green piece with the light green piece, the clock dial circle was cut in the light green piece. The dark green trim was attached to the patterned green piece before having a piece of clear plastic packaging adhered with thin double-sided tape to its backside. Sandwiching the plastic between the patterned green piece and light green piece by using double-sided tape again. The clock was glued onto the card front matching up the circle apertures.

Moving Gears: I watched Karen Burniston’s Double Spinner video at the bottom of her Mailbox Pop-Up page before adding the spinning gears pop-up to my card. I switched out gear dies from the Tonic Craft Kit 59 set for her fancy labels and gardening charms, but I followed her technique exactly to create the spinning gears. Gears were cut from steel blue and cooper oxidized foil cardstock.

Sentiments: All the sentiments on the front of the card “Time flies when you’re having fun,” and “Happy Retirement” are from the Tonic Craft Kit 59. All stamped in black ink. The sentiments were stamped before the inside mechanical pop-ups were added. The personal message circle uses a large gear cut in blue oxidized metal foil cardstock (Tonic Craft Kit die) and a circle of pale gray cardstock using Karen Burniston’s Crosshatch Circles die set.

Envelope: The back flap was stamped in black ink “TIME to celebrate.”

Thank you for reading this blog post. I hope this inspires you and makes you smile. Please like and leave comments 😊

Materials Used:

Dies

Stamps

  • Tonic Studios – Tonic Craft Kit 59 – Clocks & Cogs

Papers

  • Bazzill – 8.5×11 Textured Cardstock – Easter Grass and Gumdrop
  • Core’dinations – 12×12 inch Single-Sided Paper – Light Green Crosshatch
  • Craft Consortium – A4 Solid Colour Double-Sided Paper – Gardener’s Delight
  • Hunkydory – A4 Single-Sided Mirri Cardstock – Oxidised Metals Collection
  • Keep It Simple – 6×9 Double-Sided Cardstock – Back To Basics Collection Pack – Ruby
  • Keep It Simple – 12×12 Double-Sided Cardstock – Jade Collection Pack – Spearmint: Linen
  • Gold Foil cardstock
  • Green Cardstock
  • Plastic Packaging
  • Park Lane Paperie – A7 Cardbase and Envelope – White

Ink

  • StazOn – Solvent Ink – Jet Black
  • Scrapbook.com – Glitter Brush Marker – Key Lime Green and Pretty Pink
  • Pigma – Mircon 01 Fine Tip Pen – Black

Adhesives

Tools

  • Die Cutting Machine
  • Bone Folder
  • Stamping Platform
  • LDRS – Stampendable Stamping Tool
  • Tweezers
  • Stamping Blocks used as paperweights
  • Scissors

Miscellaneous

  • Organza Ribbon – 1/4-inch wide – Green

Potted Pets Baby Pop-up Card

This card was made for Craft Roulette#206 whose parameters included Project type of card with a heart, vintage colors, plant(s) element and lace on the base.

In honor of Craft Roulette’s host Mary Gunn’s new grandchild, I made a new baby card using the parameters listed above.

Cardbase: I used a 5×7-inch purchase cardbase and covered all four panels with vintage green patterned paper. The decorative stripes and lacy decorations were scraps from the opposite side of the paper.

Potted Plants: I decorated the panels with potted animal planters that were made from solid color cardstock using My Favorite Things Potted Pets die set.

Pop-Up Twist Panel: I used Karen Burniston’s Twist Panel Pop-Up die set. Watch video below for instructions.

Sentiments: I used Karen Burniston Welcome and Baby Charms die sets to create the “Welcome Baby.” In the video above I explain how I used Karen Burniston’s Connectors word set dies to perform “word surgery” to create the phrase “oh baby.”

_____________________________________

Thank you for experiencing this blog post. I hope this inspires you and makes you smile.

Please like and leave comments 😊

____________________________________________

Materials Used:

Dies

Papers

  • Hot Off The Press – 12×12 Double-Sided Paper Pack – Spice Market
  • Bazzill – 8.5×11 Textured Cardstock – Tiara -18-1002
  • Black, Browns, Greens, Pink and White Cardstock
  • Park Lane Paperie – A7 Cardbase – White

Ink

  • Sharpie – Permanent Marker – Ultra Fine Tip – Black
  • Spectrum Noir – Tri-Blends – Orange Blend
  • Stampin’ Up – Stampin’ Blends Marker – Dark Daffodil Delight

Adhesives

Tools

  • Die Cutting Machine
  • Bone Folder
  • We R Memories – QuickStick
  • Tweezers
  • Craft Clips
  • Stamping Blocks used as paperweights
  • Corner Punch
  • Scissors
  • T-Ruler
  • Pencil

Waving Hello For Valentine’s Day

This card was made for Craft Roulette #201 whose parameters included an easel card, quiet colors, sweets element and bokeh.

Cardbase: Cut one rectangle 3 3/4x 8 1/2-inches from heavy white cardstock. Cut a second white rectangle 3 3/4x 8 3/4-inches. On the largest rectangle score at 1/4 inch at one end and 3-inches at the opposite end. (The 1/4-inch is the tab folded under as the card hinge to card back. The 3-inch tab is the ease for the paper doll.)

Thank you for reading this blog post and watching the video. I hope this inspires you and makes you smile. Please like and leave comments 😊

Materials Used:

Dies

  • Karen Burniston in cahoots with Riley and Company – Hello – 1166
  • Karen Burniston in cahoots with Riley and Company – You’re Sweet – 1087
  • Karen Burniston in cahoots with Riley and Company – Ice Cream Sundae Pop-Up – 1082
  • Studio Light – Misses Dies & Stamps by Karin Joan – Betty
  • Studio Light – Misses Dies & Stamps by Karin Joan – Tasha

Stamps

  • Studio Light – Misses Dies & Stamps by Karin Joan – Betty
  • Studio Light – Misses Dies & Stamps by Karin Joan – Tasha

Papers

  • PhotoPlay – 12×12 Double-Sided Cardstock Collection Pack by Becky Moore – Snail Mail
  • Pink, Brown, Cream Cardstock
  • Heavyweight White 100lb Cardstock
  • Clear Vellum
  • #10 Business Envelope – White

Ink

  • VersaMark Ink – Watermark
  • Simon Says Stamp – Pigment Ink – White
  • Gel Pens – White and Pink
  • Black Glossy Embossing Powder

Adhesives

  • Neutral PH Adhesive by LINECO
  • Fine-Tip Glue Bottle

Tools

  • Die Cutting Machine
  • Bone Folder
  • Scoring Board
  • Stamping Platform
  • LDRS – Stampendable Stamping Tool
  • We R Memories – QuickStick
  • Craft Clips
  • Sponge Dauber
  • Stamping Blocks used as paperweights
  • Kat Scrappiness – Anti-Static Tool
  • Heat Tool
  • Scissors
  • Paper Cutter

Miscellaneous

  • Mini Woobler Spring