Karen Burniston’s December 2022 release of new dies has a lot of pop in it. This hexagon flower card is a cross between an explosion box and a flower bud slowly opening.

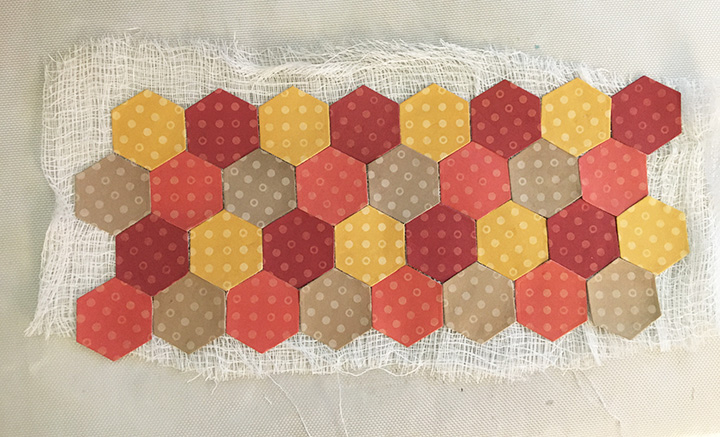
To make cut eight of the largest hexagons in the Hexagons – Crosshatch die set and six hinges from the Tag Book Pop-Up set which are 1 x 2 inch rectangles. Fold the hinges at the score lines.

Pick one hexagon to be the flower center. Begin gluing one hinge to the underside of the center hexagon matching the edge of the hexagon to the lowest fold on the hinge. Glue a petal hexagon to the hinge matching the petal edge to the highest fold of the hinge. Continue attaching hinges and petals to center hexagon until all sides are completed. Glue the remaining hexagon over the hinges on the underside of the center hexagon. (This will be where a personal message can be written.)
Using the smaller crosshatch hexagon dies, cut decorative papers to attach to the petals and center hexagons.
Make a Mini Ball Pop-Up in yellow. Glue to center hexagon. Make and attach a bee from Flutter Charms die set.

The sentiment uses both the Happy Birthday and its shadow die cut in the polka-dot paper. I used some Nuvo Aroma Drops to cover the words and to add some scent to this flower card.
For the sentiment band I used two pieces of decorative cardstock one piece long enough to wrap around the closed flower and the second piece cut to the width of the closed flower.
Thank you for reading this blog post. Please like and leave comments 😊
Materials Used:
Dies
- Karen Burniston in cahoots with Riley and Company – Hexagons Crosshatch – 1225
- Karen Burniston in cahoots with Riley and Company – Mini Ball Pop-Up – 1201
- Karen Burniston in cahoots with Riley and Company – Flutter Charms – 1196
- Karen Burniston in cahoots with Riley and Company – Happy Birthday Shadow – 1179
- Karen Burniston in cahoots with Riley and Company – Happy Birthday – 1030
- Karen Burniston in cahoots with Riley and Company – Tag Book Pop-Up – 1023
Papers
- American Crafts – The Color of Memories – 12×12 patterned paper -320473
- Crafter’s Companion – Vintage Tea Party from Cardmaking & Papercraft magazine
- Hot Off The Press – 12 x12 double-sided paper – Dotted Duos #2 – pink
- Echo Park – Happy Easter by Laura Passage and Nicole Seitler – Easter Eggs
- Pink lightweight cardstock
- Yellow heavyweight cardstock
Miscellaneous
- Neutral PH Adhesive by LINECO
- Fine-Tip Glue Bottle
- Die Cutting machine
- Alliance – Pale Crepe Gold – Softest Stretch Rubber Bands – size #12
- Nuvo Aroma Drops – Strawberry Tart