Counting down to when Santa comes can be a fun for little ones and older ones with a tree of ornaments that are stored in their numbered drawers until their day to be opened and hung on their drawer knob. The drawers are big enough to hold a treat, note or gift card as well as their ornament. The large star is for December 25 and is a 2-inch box that opens from the top to reveal a larger gift.
The tree is made with Karen Burniston’s newly released Slider Box die set and decorated with her Winter and Holiday Charm sets. Her pivot train and gift pivot cards form the tree base. The star box is based on Karen Burniston’s crosshatch squares.

I used 16 sheets of 12×12 inch sheets of 80lb. textured cardstock to construct the slider boxes and the layer bases.
Construct the slider boxes as shown in assembly video, except use a metal brad instead of ribbon for the drawer pull. (I sprayed the brads green before assembling drawers.)

Once all 24 slider boxes and drawers are assembled, they will be assembled in to six layers of four boxes each, using the crosshatch rectangles in three sizes.


Cut four rectangles from each of the three largest crosshatch dies. I pinched the center points on each side of the rectangles to line them up as shown in the photograph. Glue together each pair.


Using a grid work surface, Line up the four boxes with drawers opening away from the crosshatch rectangles. Apply glue to the edge of the rectangle and the box bottom. Place a weight such as a stamping block or cell phone on top of boxes until the glue is set. (I cooked dinner and did a load of laundry while gluing the six layers together and letting them dry enough to move.)


Play with the positioning of the layers before you glue them. I used the crosshatch borders to help me know where to place glue. The bottom layer will have the boxes spaced the furthest out while the top layer will have the boxes almost butted up against each other.
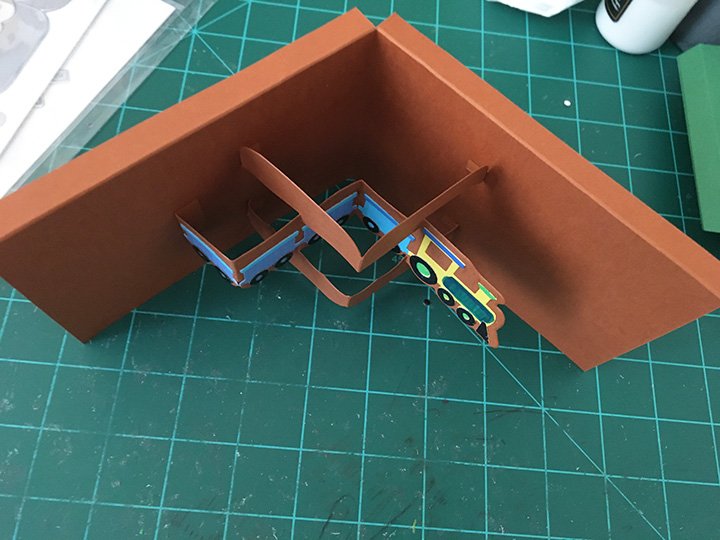
For the tree base, make four pivot panel cards – two trains and two gifts. For the base fold an 11 x 4.25-inch piece of heavy cardstock in half and scored the long top edge at 3/8 inches. Snip the scored tab at the center fold. Assemble pivot cards and then glue to the tree bottom forming an “X”.


Make 24 ornaments from the winter and holiday charm sets. (I made four of six different designs and colors.)


Download the box and star tip patterns. Cut six of the 2-inch crosshatch squares, one of the box pattern and 12 of the star tip patterns.
Download pdf patterns
Glue two of the star tip pieces together to form a 4-sided pyramid. Repeat with the rest of the star tip pieces to create 6 pyramids. To assemble the box, glue crosshatch squares to sides of box while flat. Glue only “TAB X”s to adjacent square edges to form a box with a hinged lid. Attach star tips to box with glue or double-sided tape.

Die cut the 3-inch crosshatch square from green to cover the hole on the top layer. Mark the center and die cut using the smallest crosshatch square die, a square in the center of the large square. Glue large square over hole on top layer. Added glue to bottom tip of star and slide into hole in the top.
Materials Used:
Dies
- Karen Burniston in cahoots with Riley and Company – Slider Box – 1227
- Karen Burniston in cahoots with Riley and Company – Mini Alphabet and number – 1197
- Karen Burniston in cahoots with Riley and Company – Holiday Charms – 1143
- Karen Burniston in cahoots with Riley and Company – Gift Pivot Panels – 1115
- Karen Burniston in cahoots with Riley and Company – Train Pivot Panels – 1106
- Karen Burniston in cahoots with Riley and Company – Squares – Crosshatch – 1056
- Karen Burniston in cahoots with Riley and Company – Rectangles – Crosshatch – 1054
- Karen Burniston in cahoots with Riley and Company – Winter Charms – 1018
Papers
- Fun Stampers Journey – 8.5×11 Cardstock – Pumpkin Bread – CS-0098
- American Crafts – 12×12 Heavy Weight Glitter Cardstock – Sunflower – 71429
- American Crafts – 12×12 – 80lb. Weave Cardstock – Evergreen – 71056
- Colored, Foiled and Print Cardstock Scraps
Pens
- Farber Castell – Pitt Artist Pen – Black India Ink – 199
- Sharpie Marker – Medium Tip – Black
Miscellaneous
- Neutral PH Adhesive by LINECO
- Fine-Tip Glue Bottle
- Die Cutting Machine
- Pokey Tool
- Metal Brads – 1.5 inch (38mm) shank – .25 inch (9mm) head
- Baker’s Twine
- Krylon – Colormax Paint & Primer – Gloss Hunter Green

WOW!!!!!!!!!!!!!!!!!! That’s impressive.
LikeLiked by 1 person