Love Notes – A Pop-Up Valentine

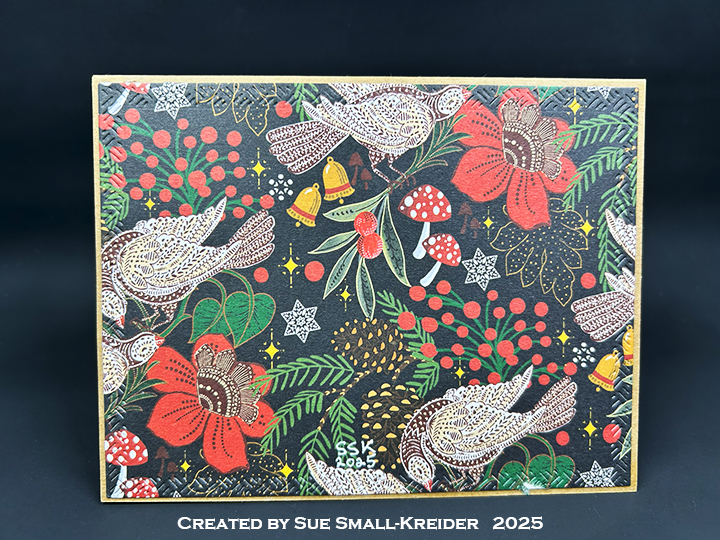
IT’S TIME for the Karen Burniston Products – KB Riley LLC January 2026 Release Blog Hop. (See GIVEAWAY details at the end of this post for blog hop list.) The Design Team have come together with Karen today for a fun blog hop to celebrate the release of 10 new dies and 5 new stamp sets. Sneak peeks of the new release started last week, and the dies are available to pre-order NOW!

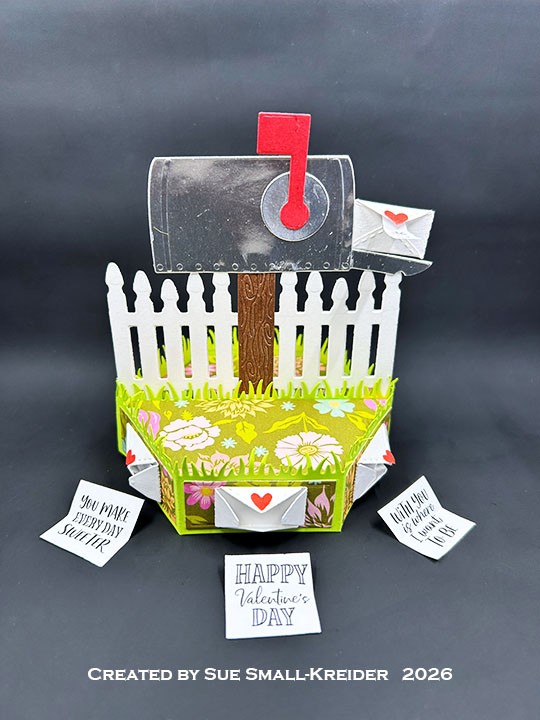
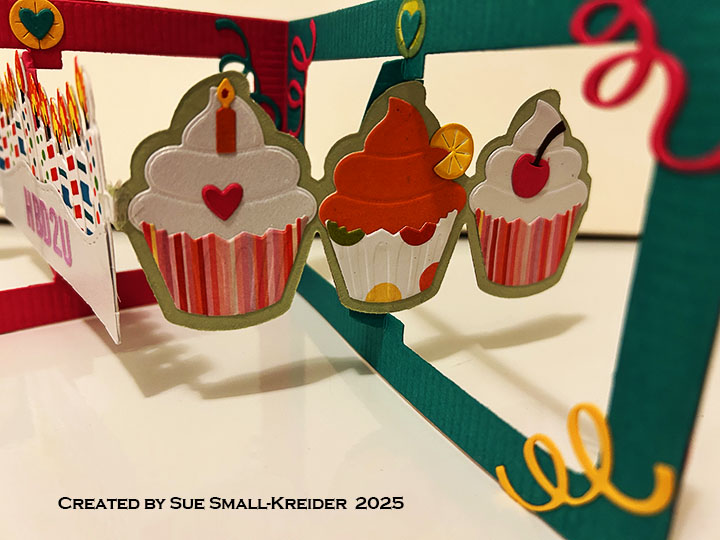
Today’s card uses the new dies of Stage Pop-Up and Grass Stage Add-Ons and two new stamp sets – Love Notes and Stage ScenesThe card also uses previously released die sets of Mailbox Pop-Up, Fence Add-Ons and Greeting Labels.

Watch the process video to see how I made these cards.

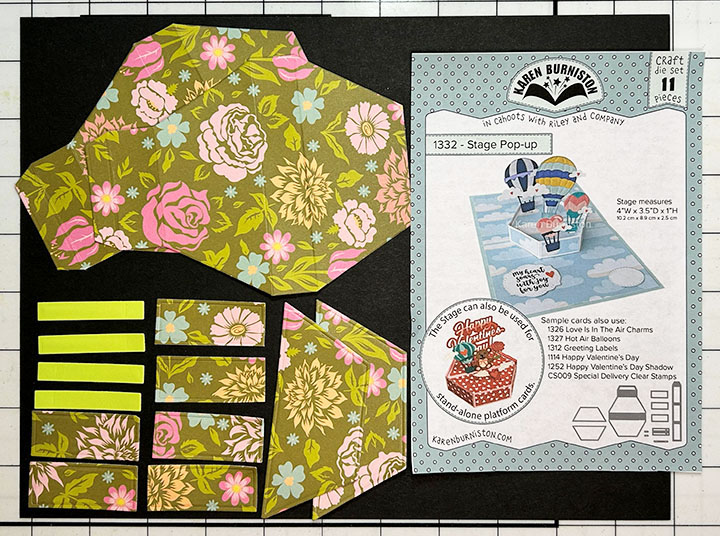
Stage Pop-Up Base: Using the Stage Pop-Up die set, cut two of the largest die from patterned cardstock. Cut six of the rectangle decorator dies from the same patterned paper. From green cardstock cut two of the grassy stage-side strips and two of the smaller grass strip from the Grass Stage Add-Ons die set.  Glue the decorator rectangles on to the front panels of the grassy stage-side strips.  Assemble the stage platform as shown above in the video.

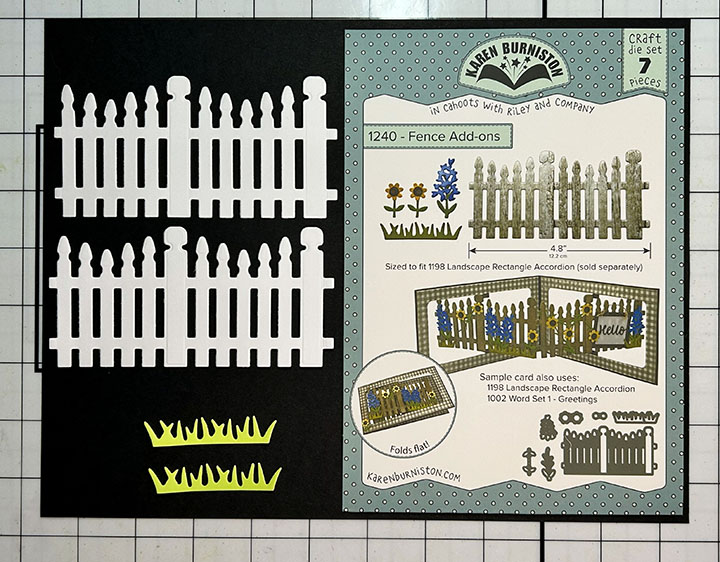
Fence: Cut two of the fence pieces from the Fence Add-Ons die set. Trim off the right end large post and small tabs on each end to create a symmetrical fence with a large center post that is 4-inches wide. Repeat with second piece. Glue the pieces together matching up the fence pickets.

From green cut twice the short grass die from the Mailbox Pop-Up set and then cut each of them in the middle. Glue these pieces to the ends of the grass strips cut from the Grass Stage Add-Ons. Center and adhere the grass strips on the bottom edge of both sides of the fence. Trim the grass flush with the fence edge.

Mailbox: Cut the mailbox, lid and circle dies in the Mailbox Pop-Up set from silver cardstock. Cut the same pieces from the back side of the silver cardstock so you will have the reverse set of pieces. (A suggestion that I should have done when I cut my reverse pieces, is to lay a thin piece of paper on your cutting mat then then the sliver cardstock silver side down. Then the dies and top plate. This will help eliminate all the scratches that will be embossed onto the reverse silver side.)

Cut from brown, two mailbox posts and glue them to the center post of the fence on each side. Glue the Two lid pieces back-to-back. Glue the front mailbox piece onto the top of the brown post. Adhere the back mailbox piece back-to-back with the front mailbox with no glue on the front edge where the lid will be slid into it. Trim if necessary and glue the lid into the mailbox.  Add silver circles to the mailbox sides to cover the holes. Add the red flag to the front.

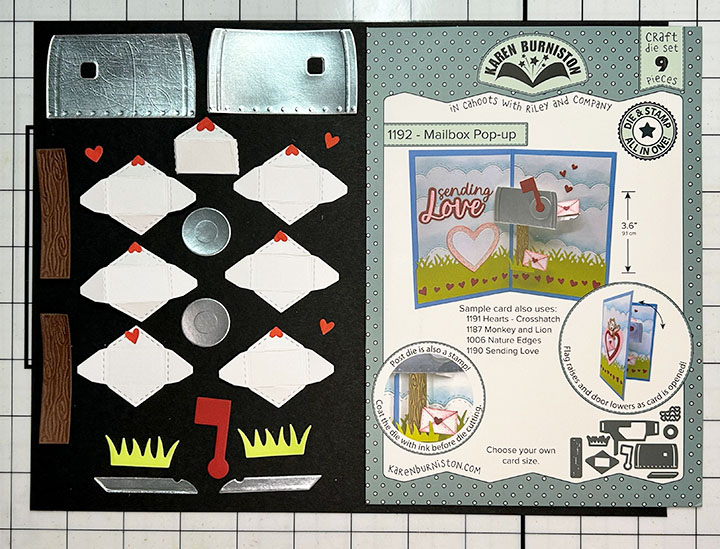
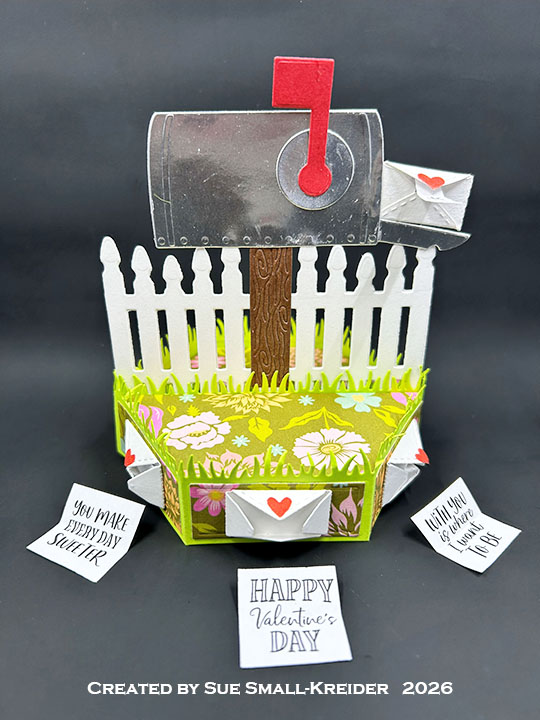
Tiny Envelopes: Cut seven of the envelopes in the Mailbox Pop-Up set from thin white cardstock. Fold on the side stitch lines. Glue one envelope together as shown in the video above. Cut one set of the tiny hearts in the same die set from red. Glue hearts to envelopes top flaps with a dot of glue.

Sentiments: Stamp seven of the Love Notes sentiments on thin paper and cut out with a square die and trim to fit into the envelopes. (I used the stitched 1 1/8-inch square die in the Greeting Labels set and trimmed on the stitched lines to get a 1-inch square.) Add a ΒΌ-inch strip of thin paper to the back of the note to go in the mailbox envelope as shown in the video. Write β€œLift” on one side and β€œPull” on the other side of the strip. From Stage Scenes the “Push” with arrows was stamped on white and glued to the bottom of the stage to help the card recipient know how to open the stage card.

Envelope: The card fits into an A7 (5x 7-inches) size envelope with one of the Love Notes sentiments stamped on the back flap.

___________________________________

Thank you for experiencing this blog post. I hope this inspires you and makes you smile.

Please subscribe, like and leave comments. 😊

Follow my YouTube channel, Instagram and Pinterest as well.

___________________________________

Disclaimer: Karen Burniston products are provided free of charge by the manufacturer for review and use. All other items were personally purchased. Compensated affiliate links used where or when possible, meaning I will receive a small percentage commission from these manufacturers at no cost to you. This will allow me to add more content to my YouTube channel and help out a lot. Thank you.

Materials Used:

Dies

Stamps

Stencil

  • Waffle Flower – Plastic –  Birthday Puppies

Papers

  • Simple Stories – 12×12 inch Double Sided Cardstock – Garden Party Collection – Tea Garden
  • Thin White Copier Paper
  • Silver Foil Cardstock
  • Brown, Green, Red and White Cardstock
  • Park Lane Paperie – A7 Envelope – White

Ink

  • Memento – Fade Resistant Dye ink – Tuxedo Black
  • Pigma – Mircon 01 Fine Tip Pen – Black

Adhesives

Tools

  • Die Cutting Machine
  • Paper Trimmer
  • Bone Folder
  • Stamping Platform
  • LDRS – Stampendable Stamping Tool
  • Stamping Blocks used as paperweights
  • Scissors
  • Paper Masking Tape
  • Tweezers
  • We R Memories – QuickStick

GIVEAWAY

To celebrate the release Karen Burniston and each of the Karen Burniston – KB Riley LLC Design Team members will be giving away a $25 Gift Certificate to some lucky person who comments on our blog posts, so make sure you join the hop and comment on everyone’s blog post. Winners will be randomly chosen from ALL of the blog hop comments received on our blog posts by Monday, February 9, 2026. Lots of chances to win some goodies, so just leave a comment on this post or any other blog hop posts to enter! Don’t forget to leave some way for us to contact you, in case you are a lucky winner!

Karen Burniston – https://karenburniston.com/blog/january-2026-release-blog-hop/

Lois Bak – https://clownmomcreations.blogspot.com/2026/02/karen-burniston-new-release-blog-hop.html

Sue Small-Kreider – YOU ARE HERE

Frances Byrne – https://stampowl.blogspot.com/2026/02/karen-burniston-kb-riley-llc-january.html

Jennifer Webster – https://www.jlwebstercreations.com/2026/01/karen-burniston-kb-riley-llc-january.html

Suzanne Smit – https://knutselsuus.blogspot.com/2026/01/kb-riley-llc-januari-2026-release-blog.html

Nicky Foden – http://mymessycraftroom.me/2026/01/28/little-bitty-pretty-one-karen-burniston-january-release-blog-hop/

Sandy Diller – https://sandydiller.blogspot.com/2026/01/new-release-blog-hop-2026.html

A Halloween Pop-Up Fence Card

This Halloween card is based off a pop-up picket fence card that Karen Burniston made for her design team challenge for April 2025. (You can see her video here.)

Watch the process video to see how I made this card.


Cardbase: Start with an 8.5 x 11-inch piece of patterned cardstock and fold in half to form a side-fold A9 (5.5×8.5-inch) card. Mark on the inside fold 4.75-inches up from the bottom edge.


Iron Fence: Cut two of the fence piece, using the Iron Fence Pop-Up die set, from heavy black cardstock. Watch the video below to see how to cut the two fence pieces into the gate, and the left and right fence pieces.


Pop-Up Mechanisms: Watch the assembly video above on how to cut-out, fold and attach the three mechanisms. Cut two of the Katherine Label Pop-Up L-shaped mechanism and one of the smallest angle pop-up from the Mini Pops Pop-Up die set.


Decorations: The Halloween Borders die set was use for all the outside decorative borders as well as the bats inside the card. The raven is from the Iron Fence Pop-Up die set. The hands are from the Halloween Elements die set.


Sentiments: β€œBoo!” on the card front is cut using the Halloween Elements die set while the β€œHappy Halloween” inside is from the Halloween Charms set.

Envelope: The card fits into a catalog (6×9-inch) size envelope stamped with sentiments from the Queen & Co. stamp set. The cobwebs are from the Tim Holtz stamp set and the dancing skeleton is from Riley & Company.


_________________________________________
Thank you for experiencing this blog post.

I hope this inspires you and makes you smile.

Please like and leave comments 😊
_________________________________________


Disclaimer: Karen Burniston products are provided free of charge by the manufacturer for review and use. All other items were personally purchased. Compensated affiliate links used where or when possible, meaning I will receive a small percentage commission from these manufacturers at no cost to you. This will allow me to add more content to my YouTube channel and help out a lot. Thank you.
_________________________________________

Materials Used:
Dies
β€’ Karen Burniston in cahoots with Riley and Company – Halloween Borders – 1247
β€’ Karen Burniston in cahoots with Riley and Company – Fence Add-Ons – 1240
β€’ Karen Burniston in cahoots with Riley and Company – Iron Fence Pop-Up – 1172
β€’ Karen Burniston in cahoots with Riley and Company – Mini Pops Pop-Up – 1146
β€’ Karen Burniston in cahoots with Riley and Company – Halloween Charms – 1058
β€’ Karen Burniston in cahoots with Riley and Company – Halloween Elements – 1013
β€’ Karen Burniston in cahoots with Riley and Company – Katherine Label Pop-Up – 1011

Stamps
β€’ Queen & Co. – Clear Stamps – Fright Fest Kit
β€’ Riley & Company – Funny Bones Red Rubber Stamp – RWD-492 Dancing Skeleton
β€’ Stampers Anonymous – Tim Holtz Collection – Clear Stamps/Stencils – Halloween

Papers
β€’ Martha Stewart Crafts – 12×12 inch Double-Sided Paper – Gothic Manor
β€’ Black, Oranges and White Cardstock
β€’ Catalog Envelope (6×9-inch) – White

Ink
β€’ Memento – Fade Resistant Dye ink – Tuxedo Black
β€’ Pigma – Mircon 05 Fine Tip Pen – Black
β€’ Sakura – Gelly Roll Pen – Medium – White

Adhesives
β€’ Neutral PH Adhesive by LINECO
β€’ Fine-Tip Glue Bottle
β€’ Double-Sided Tape – 1/4-inch wide

Tools
β€’ Die Cutting Machine
β€’ Paper Trimmer
β€’ Bone Folder
β€’ Score Board
β€’ Stamping Platform
β€’ Scissors
β€’ Pencil
β€’ Paper Masking Tape

Day 5 – Week of Good Cheer Christmas Cards

This is Day 5 in the Week Of Good Cheer Christmas Card series featuring cups and mugs of winter beverages like hot cocoa, tea and coffee. Today’s card uses Karen Burniston’s die sets. (GIVEAWAY opportunity near end of post.)

Watch the video below to see how this card was made.

Cardbase:  The cardbase is a purchase A2 (4.25×5.5-inch) brown kraft paper one with matching envelope. The four panels are covered with decorative paper using rectangles cut by the largest die in the Rectangles – Crosshatch set.

Pop-Up Ball Cup:  Watch the assembly video for the Mini Ball Pop-Up located at the bottom of the linked page. Cut two of the ball pieces from red coated cardstock. Cut from the Mini Ball Add-ons 2 – Monkey and Lion die set, two of the curled tail piece – one on the coated side and one on the reverse side of coated cardstock – and glue together with paper tape addition as shown in the video above. Stamp the brown cocoa design onto a scrap of white cardstock and cut out using the Bitty Ball decorator hexagon die from either the Bitty Ball Double-Ups or the Bitty Ball Pop-Up. Cut out two white and one red hexagon frames using the Bitty Ball and Mini Ball decorator hexagon dies. (Mini Ball Double-Ups or the Mini Ball Pop-Up sets both have this die.) Assemble as shown in the video above. The white saucer is cut using the Hexagons – Crosshatch set.

Sentiments:  All the sentiments stamped in brown ink using the Karen Burniston stamp set – Winter Hugs. The labels on which they are stamped were cut using label dies in the Rectangles and Labels – Crosshatch set.

Envelope:  The card fits into an A2 envelope whose back flap is has stamped “Winter Hugs” in brown ink from the Winter Hugs stamp set.

___________________________________

Thank you for experiencing this blog post.

I hope this inspires you and makes you smile.

Please subscribe to the email notices, like and leave comments 😊

___________________________________

GIVEAWAY

I’m cleaning out my dies and stamps and will be giving away crafting bundles to 8 lucky crafters who follow, subscribe and comment on my Week of Good Cheer Christmas Cards posts on Facebook, Instagram, YouTube and my website. (If you comment on all 4 platforms, each day, you have over 28 opportunities to be picked for a crafting bundle.)

Tell me why you like each cup or which is your favorite cup. Winners will be picked by September 2, 2025.

___________________________________

Disclaimer: Karen Burniston products are provided free of charge by the manufacturer for review and use. All other items were personally purchased. Compensated affiliate links used where or when possible, meaning I will receive a small percentage commission from these manufacturers at no cost to you. This will allow me to add more content to my YouTube channel and help out a lot. Thank you.

Materials Used:

Dies

Stamps

Papers

  • Craft Consortium – 12×12 Double-Sided 200gsm Papers – Tis The Season by Linsey Kelly
  • Scrapbook.com – 6×8 Glossy Cardstock – Rainbow
  • White Cardstock
  • A2 (4.25×5.5-inch) Cardbase and Envelope – Brown Kraft

Ink

Adhesives

Tools

  • Die Cutting Machine
  • Stamping Platform
  • Paper Trimmer
  • Scissors
  • Tweezers
  • Scrapbook.com – Mint Paper Tape

Day 3 – Week of Good Cheer Christmas Cards

This is Day 3 in the Week Of Good Cheer Christmas Card series featuring cups and mugs of winter beverages like hot cocoa, tea and coffee. Today’s card uses Karen Burniston’s Tea and Coffee Pop-Up and Topper Tags die sets. (GIVEAWAY opportunity near end of post.)

Watch the video below to see how this card was made.

Cardbase:  The card base is four tags cut using the Topper Tags die set. Each tag has a clear packing tape hinge at the bottom edge. Watch the video above for tape placement. Use decorator pieces from the tag die set. Add baker’s twine once the card is fully decorated to each tag hole.

Mug Pop-Up:  Watch the assembly video for the Tea and Coffee Pop-Up located at the bottom of the linked page. Cut one mug from a decorative cardstock. From cardstock that matches the base tag, cut one mechanism piece. Cut a spoon from silver mirror cardstock. Cut the steam from clear vellum. Assemble as shown in the video above.

Sentiments:  All the sentiments are fussy cut from the Stamperia Classic Christmas paper collection.

Envelope:  The tags card fits into a #10 business envelope whose back flap is covered with leftover strips from the paper collection.

___________________________________

Thank you for experiencing this blog post.

I hope this inspires you and makes you smile.

Please subscribe to the email notices, like and leave comments 😊

___________________________________

GIVEAWAY

I’m cleaning out my dies and stamps and will be giving away crafting bundles to 8 lucky crafters who follow, subscribe and comment on my Week of Good Cheer Christmas Cards posts on Facebook, Instagram, YouTube and my website. (If you comment on all 4 platforms, each day, you have over 28 opportunities to be picked for a crafting bundle.)

Tell me why you like each cup or which is your favorite cup. Winners will be picked by September 2, 2025.

___________________________________

Disclaimer: Karen Burniston products are provided free of charge by the manufacturer for review and use. All other items were personally purchased. Compensated affiliate links used where or when possible, meaning I will receive a small percentage commission from these manufacturers at no cost to you. This will allow me to add more content to my YouTube channel and help out a lot. Thank you.

Materials Used:

Dies

Papers

  • Red #10 Business Envelope
  • Silver Foil Cardstock
  • Stamperia – 8×8 Paper Collection – Classic Christmas
  • The Paper Studio – 8.5×11 Vellum – Clear

Ink

  • Pigma – Mircon 05 Fine Tip Pen – Black

Adhesives

Tools

  • Die Cutting Machine
  • Paper Trimmer
  • Scissors
  • Paper Masking Tape

Miscellaneous

  • Red and Yellow Baker’s Twine

Day 1 – Week of Good Cheer Christmas Cards

This is Day 1 in the Week Of Good Cheer Christmas Card series featuring cups and mugs of winter beverages like hot cocoa and mulled cider. Today’s card uses Karen Burniston’s Flower Pot Pop-Up die set and Winter Hugs stamp set. (GIVEAWAY opportunity near end of post.)

Watch the video below to see how this card was made.

Cardbase:  I started with a purchased A6 sized (4.625×6.25-inches) cardbase and matching envelope. Use the large journaling cards in the paper collection to cover the front and back panels of the cardbase. Die cut two scalloped rectangles from the Rectangles and Labels – Crosshatch die set for the inside of the card.

Cocoa Mug Pop-Up:  Watch the assembly video for the Flower Pot Pop-Up located at the bottom of the linked page. Cut and emboss the napkin from the Coffee Cup Pop-Up. Tape napkin pieces together to form a square, leaving a thin gap between the pieces. Die cut the tabs in the Flower Pot Pop-Up into the napkin. Cut two sets of the candy cane (reversing the paper on one set) from white and red cardstock using the dies from the Stocking Pop-Up. Cut several large marshmellows using the Camping Charms die set. Cut a spoon from silver mirror cardstock using the die in the Tea and Coffee Pop-Up set. Using the same set, cut the mug handle twice positioning the die so that it cuts just a thin strip of the mug.

Sentiments:  The front sentiment is a journaling card from the paper collection. Inside are Fancy labels die using the Rectangles and Labels – Crosshatch die set. The smaller label is stamped in pink and brown ink using the Winter Hugs stamp set.

Envelope:  The back flap is covered with stickers from the Simple Stories Paper Collection.

These are two additional Christmas mugs of good cheer that I made using the same technique for the Flower Pot Pop-Up.

___________________________________

Thank you for experiencing this blog post.

I hope this inspires you and makes you smile.

Please subscribe to the email notices, like and leave comments 😊

___________________________________

GIVEAWAY

I’m cleaning out my dies and stamps and will be giving away crafting bundles to 8 lucky crafters who follow, subscribe and comment on my Week of Good Cheer Christmas Cards posts on Facebook, Instagram, YouTube and my website. (If you comment on all 4 platforms, each day, you have over 28 opportunities to be picked for a crafting bundle.)

Tell me why you like each cup or which is your favorite cup. Winners will be picked by September 2, 2025.

___________________________________

Disclaimer: Karen Burniston products are provided free of charge by the manufacturer for review and use. All other items were personally purchased. Compensated affiliate links used where or when possible, meaning I will receive a small percentage commission from these manufacturers at no cost to you. This will allow me to add more content to my YouTube channel and help out a lot. Thank you.

Materials Used:

Dies

Stamps

Papers

  • Brown Cardstock
  • Echo Park – 12×12 A Perfect Christmas Collection – Snowflake Swirl
  • Park Lane Paperie – A6 (4.625×6.25-inches) Cardbases and Envelopes – Textured White
  • Silver Foil Cardstock
  • Simple Stories – 12×12 Collection Kit – Snow Pine Lodge
  • White Cardstock

Ink

  • Memento – Fade Resistant Dye ink – Rich Cocoa & Rose Bud
  • Pigma – Mircon 005 Fine Tip Pen – Black

Adhesives

Tools

  • Die Cutting Machine
  • Paper Trimmer
  • Stamping Platform
  • LDRS – Stampendable Stamping Tool
  • Stamping Blocks used as paperweights
  • We R Memories – QuickStick
  • Scissors
  • Plastic Knife
  • Paper Masking Tape

Miscellaneous

  • Cotton Ball

Pop-Up Floral Bouquet Teacup Card

This card was made for CRAFT ROULETTE #280 whose parameters included a thinking of you project, hometown colors, cup or glass element, and add a doodle. Today’s card uses Karen Burniston dies and stamps along with a pop-up die set from Paper Discovery.

Watch the video below to see how this card was made.

Cardbase:  I started with a purchased A6 sized (4.625×6.25-inches) cardbase and matching envelope. I covered the four panels with decorative paper from a 6×8-inch paper pad from American Crafts.

Teacup Pop-Up:  Watch the video above to see how the teacup and saucer were assembled. They were die cut from white cardstock using Paper Discovery dies by Olga Direktorenko – Teacup Fairies Timeless Tea Set Pop-Up Die Set. (This die set came out in 2020.) The flowers are from the Flowers and Bee die set.

Sentiments: Β “Thinking of you” on the card front is die cut in green using Word Set 1 – Greetings. The label for a personal message is the is from the Rectangles – Crosshatch die set. The smaller label cut using the label die in the Bouquet Bits die set and is stamped in black brown ink using the Bouquet Sayings stamp set.

Envelope:  The back flap is stamped with “Craft Roulette”.

___________________________________

Thank you for experiencing this blog post.

I hope this inspires you and makes you smile.

Please like and leave comments 😊

___________________________________

Disclaimer: Karen Burniston products are provided free of charge by the manufacturer for review and use. All other items were personally purchased. Compensated affiliate links used where or when possible, meaning I will receive a small percentage commission from these manufacturers at no cost to you. This will allow me to add more content to my YouTube channel and help out a lot. Thank you.

Materials Used:

Dies

Stamps

Papers

  • American Crafts – 6×8 in Paper Pad – Everdyday Papers
  • Park Lane Paperie – A6 (4.625×6.25-inches) Cardbases and Envelopes – Textured White
  • Silver Envelope Scrap
  • White Cardstock

Ink

  • Memento – Fade Resistant Dye ink – Tuxedo Black
  • Pigma – Mircon 03 Fine Tip Pen – Black
  • Sharpie – Permanent Marker – Fine Point – Black

Adhesives

Tools

  • Die Cutting Machine
  • Paper Trimmer
  • Stamping Blocks
  • Piecing/Pick-Up Tool
  • Scissors
  • Paper Masking Tape

Happy Birthday Accordion Style

This card was made for a Scapp’n Savvy Card Challenge for KB Bundlers June 2025 using Karen Burniston’s Landscape Rectangle Accordion, Cupcake Add-Ons, Fence Add-Ons, Big Birthday Charms and Birthday Candle Add-Ons die sets.

Watch the video for instructions on the construction of the card.

Read more below on specifics of this card.

Cardbase:Β  Cut three of the Landscape Rectangle Accordion base frames. Cut from decorative paper, three to six frames. (Cut the frame base and cut out the inside panel and side tab.)

Cupcakes: Β Watch the assembly video for the Cupcake Add-Ons located at the bottom of the linked page.

Candles: Β The candles are cut from two die sets – Big Birthday Charms and Birthday Candle Add-Ons. Watch the video above for coloring details. The candles are glued to the Fence Add-Ons.

Sentiments: Β The printed paper provides much of the sentiments, while the Mini Alphabet and Numbers were used to cut from pink glitter paper “HBD2U” (Happy Birthday to You.) The Streamer ribbons come from the Big Birthday Charms and Cupcake Add-Ons die sets.

Envelope: Β This card fits into an A7 (5×7-inch) envelope.

___________________________________

Thank you for experiencing this blog post.

I hope this inspires you and makes you smile.

Please like and leave comments 😊

___________________________________

Disclaimer: Karen Burniston products are provided free of charge by the manufacturer for review and use. All other items were personally purchased. Compensated affiliate links used where or when possible, meaning I will receive a small percentage commission from these manufacturers at no cost to you. This will allow me to add more content to my YouTube channel and help out a lot. Thank you.

Materials Used:

Dies

Papers

  • Scapp’n Savvy – Card Challenge Paper Pack
  • 12X12-inch Solid Cardstock – Fuchsia, Teal Blue and Celery Green
  • PhotoPlay – 12×12 Double-Sided Cardstock – Birthday Sparkle
  • Recollections – 8.5×11 Shimmer Cardstock – White Gold
  • Pink Glitter Cardstock
  • Brown, Green, Orange, White & Yellow Cardstock Scraps

Ink

  • Pigma – Mircon 005 Fine Tip Pen – Black
  • Sharpie – Permanent Marker – Fine Tip – Lime Green, Pink, Red & Yellow
  • Sharpie – Permanent Marker – Ultra Fine Tip – Black, Blue, Green, Orange, Red & teal

Adhesives

Tools

A Reminder- Teacup of Flowers

This thinking of you card was based off of Karen Burniston’s May 2025 Virtual class card #2 which uses her Coffee Cup Pop-Up as the base for the pop-up teacup with elements from her Tea and Coffee Pop-Up, Tea and Coffee Borders and Flowers and Bee die sets.

Watch the assembly video to see how I made this card.

Cardbase: The cardbase is a 5×12-inch piece of double-sided Maja Designs cardstock folded in half to form a 5×6-inch top-fold card. Inside two decorative panels were added near the fold. Four pieces of blue ribbon were attached to the outside panels using double-sided tape. The teacup on the back panel is from the Tea and Coffee Borders die set.

Teacup Pop-Up: Watch the assembly video for the Coffee Cup Pop-Up located at the bottom of the linked page. Then watch the video above to see how I modified the construction of the teacup using elements from the Tea and Coffee Pop-Up and Flowers and Bee die sets.

Sentiments: The card front sentiment was stamped in blue ink using a Scrapbook.com stamp. Inside are Karen Burniston die cuts of β€œHappy Spring” and a fancy label for a personal message. The tiny die-cut hearts throughout the card were made with a die from the Tea and Coffee Borders set that cuts three hearts at a time.

Envelope: The card fits into an A7 (5x 7-inches) size envelope with a die-cut teapot from the Tea and Coffee Borders glued to the back flap.

_____________________________________________

Thank you for experiencing this blog post.

I hope this inspires you and makes you smile.

Please like and leave comments 😊

_____________________________________________

Disclaimer: Karen Burniston products are provided free of charge by the manufacturer for review and use. All other items were personally purchased. Compensated affiliate links used where or when possible, meaning I will receive a small percentage commission from these manufacturers at no cost to you. This will allow me to add more content to my YouTube channel and help out a lot. Thank you.

_____________________________________________

Materials Used:

Dies
β€’ Karen Burniston in cahoots with Riley and Company – Tea and Coffee Borders- 1270
β€’ Karen Burniston in cahoots with Riley and Company – Tea and Coffee Pop-Up – 1269
β€’ Karen Burniston in cahoots with Riley and Company – Rectangles and Labels – 1233
β€’ Karen Burniston in cahoots with Riley and Company – Happy Spring – 1084
β€’ Karen Burniston in cahoots with Riley and Company – Coffee Cup Pop-Up – 1040
β€’ Karen Burniston in cahoots with Riley and Company – Flowers and Bee – 1026

Stamps
β€’ Scrapbook.com – Clear Stamps – A Little Reminder

Papers
β€’ Maja Design – 12×12 Double-Sided Cardstock – Enjoying Outdoors – Woodlands
β€’ Maja Design – 12×12 Double-Sided Cardstock – Mum’s Garden – Memories
β€’ Maja Design – 12×12 Double-Sided Cardstock – Seaside – Sea Thrift
β€’ Blue, Cream, Green, Pink, White and Yellow Cardstock
β€’ Recollections – A7 Envelope – Ivory

Ink
β€’ Memento – Fade Resistant Dye ink – Paris Dusk

Adhesives
β€’ Neutral PH Adhesive by LINECO
β€’ Fine-Tip Glue Bottle
β€’ Double-Sided Tape – 1/4-inch and 1/2-inch wide

Tools
β€’ Die Cutting Machine
β€’ Paper Trimmer
β€’ Bone Folder
β€’ Score Board
β€’ Stamping Platform
β€’ Scissors
β€’ Pencil
β€’ Paper Masking Tape
β€’ We R Memories – QuickStick
β€’ Excel Blades – K71 Fingertip Craft Knife

Miscellaneous
β€’ Blue Organza Ribbon – 1/4-inch wide

Letting Sleeping Dogs Lie

It’s the Karen Burniston design team challenge for May 2025 using the theme of fluffy. I chose to make a card celebrating the three-headed dog, Fluffy, from the book and movie Harry Potter and the Sorcerer’s Stone using the Heart Collage Pop-Up, Cat and Dog as well as the Paper People die sets.


Watch the process video to see how I made this card.

Cardbase: Start with a 8.5×5.5-inch piece of cardstock and fold in half to form a side-fold A2 (4.25×5.5-inch) card. Cover the four panels with decorative papers. (I used Ciao Bella’s Wizard Academy paper pad.)


Fluffy Pop-Up: Watch the assembly video for the Heart Collage Pop-Up. Cut out one of the collage mechanism from black cardstock as well as three dogs using the Cat and Dog die set. Assemble as instructed in the video above. Use a white gel pen to add eyes, nose and mouth to the dog’s heads before attaching.

Ron, Harry & Hermione: Watch the video above to see how I transformed the Paper People into these well-known characters. Harry’s glasses come from the Tiny Accessories 1 die set. (My academic robe pattern is pictured above.)


Sentiments: All the sentiments used on the card are stamped using brown ink and Crackerbox Stamps.


Envelope: The card fits into an A2 (4.25x 5.5-inches) size envelope stamped with a Crackerbox Stamps castle and an owl post stamp on the back in brown ink.

_________________________________________


Thank you for experiencing this blog post.

I hope this inspires you and makes you smile.

Please like and leave comments 😊


________________________________________

Disclaimer: Karen Burniston products are provided free of charge by the manufacturer for review and use. All other items were personally purchased. Compensated affiliate links used where or when possible, meaning I will receive a small percentage commission from these manufacturers at no cost to you. This will allow me to add more content to my YouTube channel and help out a lot. Thank you.

______________________________________


Materials Used:
Dies
β€’ Karen Burniston in cahoots with Riley and Company – Paper People – 1299
β€’ Karen Burniston in cahoots with Riley and Company – Heart Collage Pop-Up – 1193
β€’ Karen Burniston in cahoots with Riley and Company – Tiny Accessories 1 – 1025
β€’ Karen Burniston in cahoots with Riley and Company – Cat and Dog – 1024


Stamps
β€’ Crackerbox Stamps – Rubber Stamps – Harry Potter Collection


Papers
β€’ Bazzill – 8.5Γ—11 Cardstock – Tiara -18-1002
β€’ Ciao Bella – 8×8-inch Double-Sided Paper –Wizard Academy
β€’ Concord & 9th – 8.5Γ—11 Cardstock – Dove
β€’ Craft Consortium -6×6-inch Double-Sided Paper – Wood textures
β€’ Black, Blush, Browns, Orange and White Cardstock
β€’ Fraser Papers for William House – A2 Envelope – Genesis Text Husk Smooth


Ink
β€’ Memento – Fade Resistant Dye ink – Rich Cocoa
β€’ Pigma – Mircon 005 Fine Tip Pen – Black
β€’ Sakura – Gelly Roll Pen – Medium – White
β€’ Sharpie – Permanent Marker – Ultra Fine Tip – Green, Red, Yellow


Adhesives
β€’ Neutral PH Adhesive by LINECO
β€’ Fine-Tip Glue Bottle
β€’ Temporary runner dot tape


Tools
β€’ Die Cutting Machine
β€’ Paper Trimmer
β€’ Bone Folder
β€’ Score Board
β€’ Stamping Platform
β€’ LDRS – Stampendable Stamping Tool
β€’ Stamping Blocks
β€’ Scissors
β€’ Pencil
β€’ Paper Masking Tape
β€’ We R Memories – QuickStick