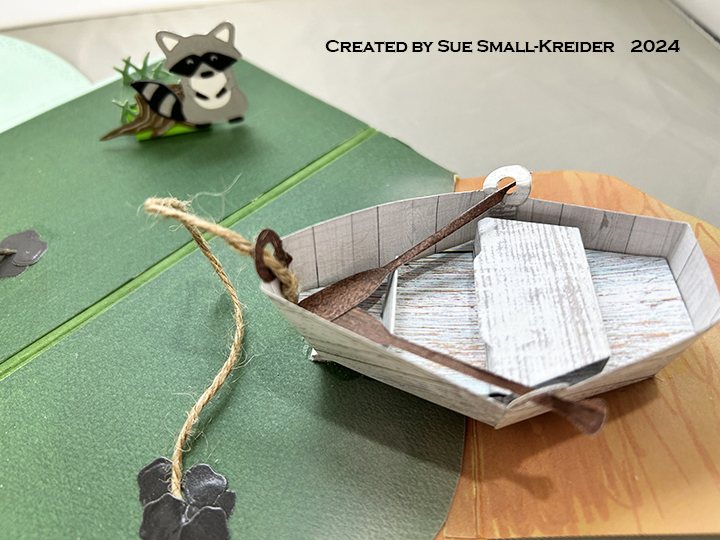
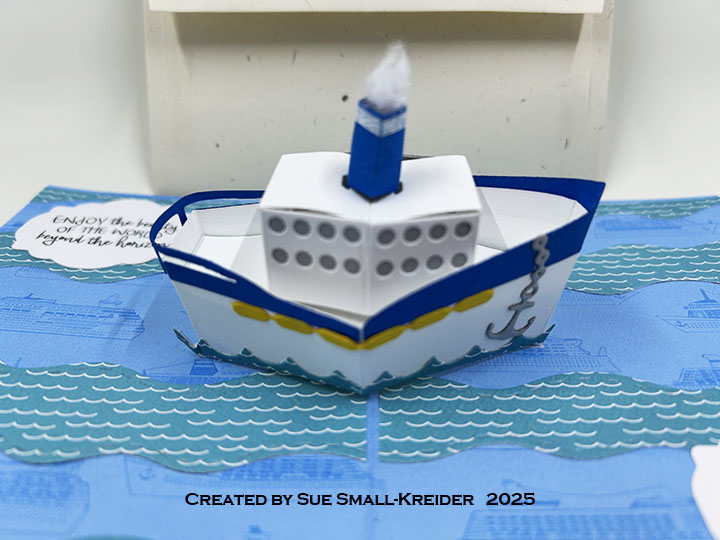
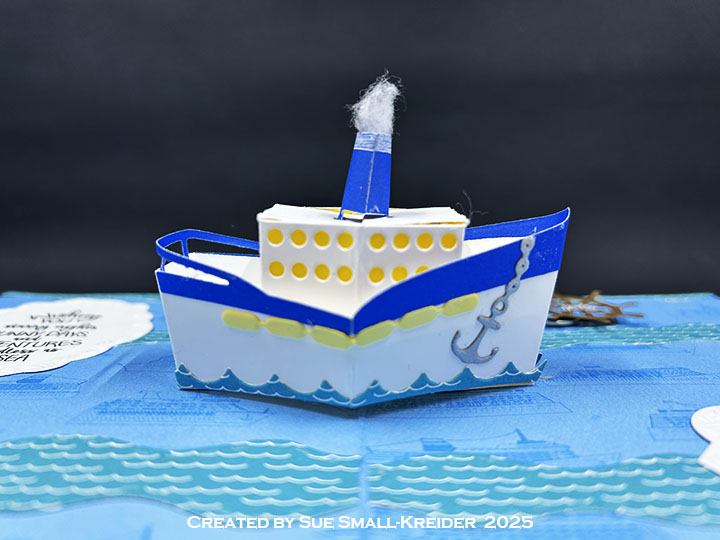
Karen Burniston’s Boat Pop-Up can become many different types of boats and ships using her different add-on sets. In her January 2025 there are two new add-on sets – Fishing Boat Add-Ons and Cruise Ship Add-Ons. There is also a new Paper People so you can add people to your cards.
Click on the pictures to see their posts. The last image will have will be posted in March.
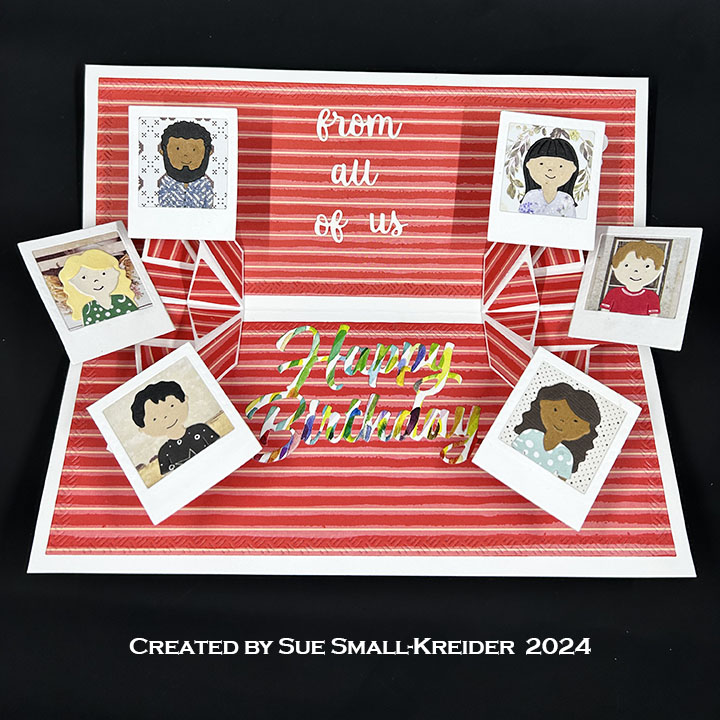
It’s Sneak Peek Week for Karen Burniston’s January 2025 release of eight new dies and four new clear stamps. For this Birthday card I used several of the new sets including: Popcorn, Paper People andTriple Platform Pop-Up die sets and the Popcorn Phrases clear stamp set. The new release will be available on January 27, 2025.
Watch the video below to see how this card was made.
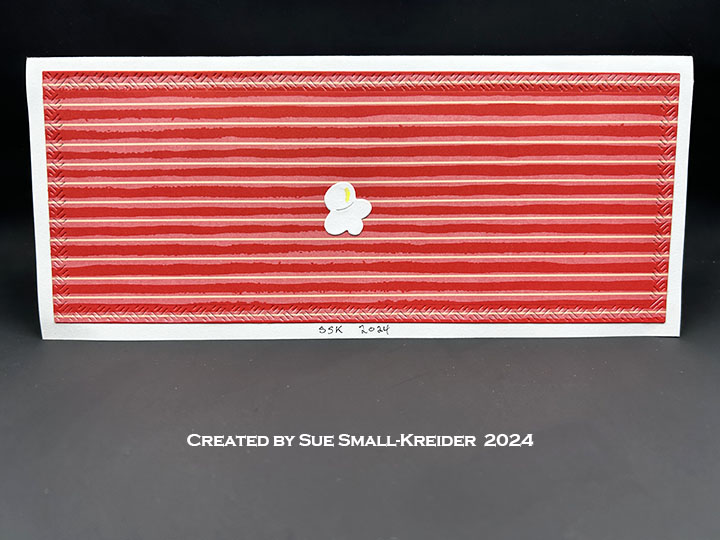
Cardbase: I started with a white 65lb cardstock rectangle that was 7.5 x 8.75-inches and folded it in half to form a top-fold horizontal 3.75 x 8.75-inch slimline card. Next, I cut four of the largest die in the Long Rectangles – Crosshatch set from striped red paper and cover each of the card panels.
Snapshots of People: Using the Paper Peopledie set create six people from the waist up. Cut six white photo frames and back rectangles using the Photo Collage Pop-Up die set. Follow the instructions in the video on how to make the snapshots of people and how to install them onto the pop-up platforms.
Triple Platform Pop-Up: Using the Triple Platform Pop-Up die set, cut two of the large mechanism die from lightweight white cardstock. Cut six sets of the parallelograms and four sets of the triangles from pattered paper and two additional sets of parallelograms from white cardstock. Watch the video for how to assemble and install the mechanisms into the cardbase.
Sentiments: There are three sentiments on the card – “Hope your Birthday is poppin”, “from all of us” and “Happy Birthday.” The first was stamped using the Popcorn Phrasesclear stamp set with black ink onto white cardstock and die cutting it using the fancy stitched label in the Triple Platform Pop-Up die set. The second phrase was die cut from the Word Set 18 – Connectorswhile the third was cut using the Happy Birthday die. All the die-cut words were cut from upcycled cardboard packaging/junk mail. Popcorn kernels (highlighted with a yellow marker) were added as decorations to the front and back of the card from the Popcorn die set.
Envelope: The card fits into a #10 business size envelope which was stamped with another sentiment from the Popcorn Phrasesstamp set – “You make everything Butter!”
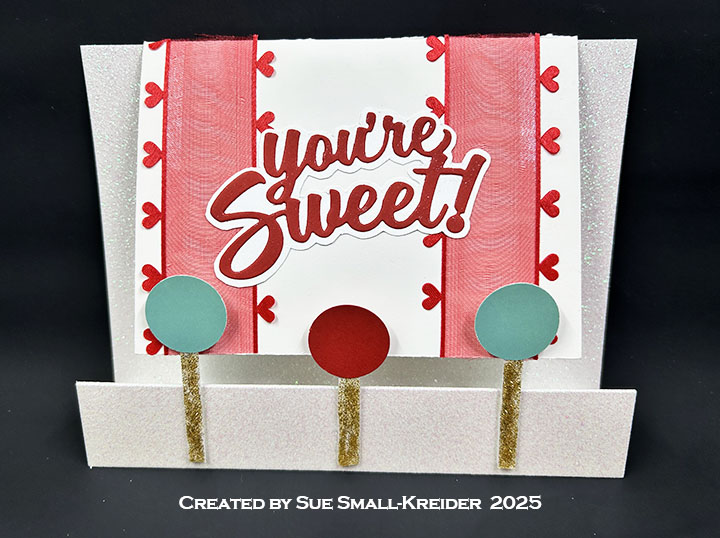
This card was made for Craft Roulette #249 whose parameters included a zoyfold card, elegant colors, front door and three circles. (This is my second zoyfold card. Click here to see my first.)
Watch the process video to see how I made this card.
Details and supplies used are below.
Cardbase: The cardbase is really a blend of two cardbases together. The larger card is a 5×7-inch landscape/horizontal z-fold card with an almost square 4 1/2x 5 1/2-inch card for a joyfold card Hence the newly coined card fold – the zoyfold (The term was coined by Mary Gunn Funn and Irene “Hattrick” Smith on the Craft Roulette Members Show #244.) Watch the process video for assembly instructions. The back of the card is covered with striped paper and a scalloped rectangle from the Karen Burniston’s Rectangles and Labels – Crosshatch die set.
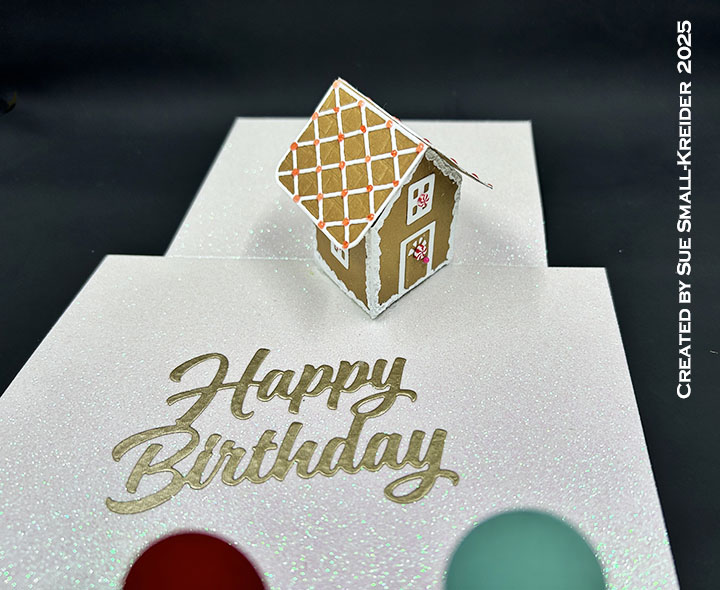
Gingerbread House: (Watch the assembly videos for the Tiny House Pop-Up and Gingerbread Tiny House Add-ons at the bottom of each of the linked pages.) I used Nuvo Jewel Drops, Nellie’s Choice Snow Effects and adhesive backed peppermint candies to decorate the gingerbread house before attaching the house to the card with hot glue.
Sentiments: All sentiments are by Karen Burniston. ”You’re Sweet!” and “Happy Birthday” die cuts. The envelope sentiment is from the Sweet Treats stamp set.
Envelope: The card fits into an A7 (5x 7-inch) size envelope.
___________________________________
Thank you for experiencing this blog post.
I hope this inspires you and makes you smile.
Please like and leave comments 😊
___________________________________
Disclaimer: Karen Burniston products are provided free of charge by the manufacturer for review and use. All other items were personally purchased. Compensated affiliate links used where or when possible, meaning I will receive a small percentage commission from these manufacturers at no cost to you. This will allow me to add more content to my YouTube channel and help out a lot. Thank you.
It’s the Karen Burniston design team challenge for January 2025 using the theme of First 100 Craft Dies of KB Riley LLC. We were asked to make a card using any of the die sets with item numbers between 1001 and 1100. For this challenge I chose to make a six panel Charm Accordion birthday card based off one Karen Burniston made in 2018. (You can watch her video of this card at the bottom of this linked page for the Charm Accordion die set.)
Watch the process video to see how I made this card.
Card FrontCard Back
Cardbase: The finished cardbase folds down to 3 1/2-inches wide by 4 1/2-inches tall by 3/8-inch thick. To make the cardbase, cut three of the Charm Accordion double panel die from heavy cardstock. Cut the double panels in half to separate the panels. Cut five 3/4-inch wide by 4 1/2-inches tall strips of the same cardstock. Die cut five of the tabbed square connector pieces from heavy cardstock. Watch the video on how to assemble. Cut decorative papers to create frames for each panel as directed in the video.
Charms: Two different die sets were used for the charms that dangle in the connector frames. The present with a bow, the party hat and the cupcake are from the Birthday Charms set while the butterflies are from the Charm Accordion set. I used the stencil feature of the cupcake die to color in the sprinkles with fine tipped markers.
Sentiments: The letters that spell the word “HAPPY” were cut using the Alphabet set while the word “birthday” comes from Word Set 2 -Birthday.
Envelope: Because of the thickness of this card, it would have to be hand-delivered or mailed in a padded envelope as a package.
___________________________________
Thank you for experiencing this blog post.
I hope this inspires you and makes you smile.
Please like and leave comments 😊
___________________________________
Disclaimer: Karen Burniston products are provided free of charge by the manufacturer for review and use. All other items were personally purchased. Compensated affiliate links used where or when possible, meaning I will receive a small percentage commission from these manufacturers at no cost to you. This will allow me to add more content to my YouTube channel and help out a lot. Thank you.
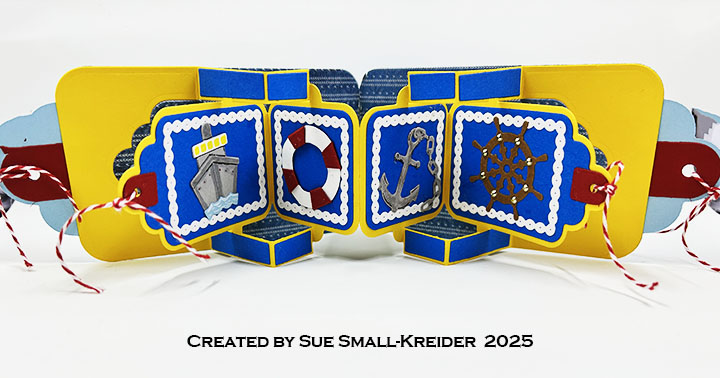
This card was made for Craft Roulette #248 whose parameters included a tag(s) , Disney colors, January element, and branch (es) or (ing). I used a Craft Roulette stamp set and two Karen Burniston dies die sets.
Watch the process video to see how I made this card.
Cardbase: Using Karen Burniston’s Tag Book Pop-Up die set, I cut two of the large tag frames from heavy weight light blue cardstock and two more from darker blue lightweight cardstock. The rectangular hinge die I cut once from light blue cardstock. The dark blue pieces I trimmed a 1/16-inch off all edges and then glued the dark blue on top of the light blue. The hinge was glued onto the inside of the light blue panels. (Watch Karen’s assembly video for her Tag Book Pop-Up.) You can cut two of the large tags from patterned paper to cover over the hinge on the inside. (It is easier to do the patterned paper background now than after you’ve glued in the yellow pop-up piece as I show in the process video above.) There are a number of decorator dies that come in the Tag Book Pop-Up Set such as the chain rope and hole protectors.
Pop-Up Panels:Cut two of the inside die piece from lightweight yellow cardstock. Cut two sets of the decorating strips die from dark blue. Follow the assembly instructions in her video.
Nautical Elements: The nautical elements of a ship, life preserver, anchor and ship’s wheel are all die cut and stenciled using dies from Karen Burniston’s Cruse Charms. (You can watch Karen’s assembly video for these charms at the bottom of this linked pageCruse Charms.) The chain rope borders and dark blue background mats are all dies in the Tag Book Pop-Up die set. The tags have red and white baker’s twine tied to them.
Sentiments: The “Happy Birthday” and HBD sign are stamps in the Craft Roulette Funn Friend #1 stamp set. The “HBD” letters and yellow shade were cut using the stamp set’s coordinating dies.
Envelope: The card fits into a purchased A6 (4.5x 6-inches) size envelope or larger.
Below is the Craft Roulette Community Showcase show on which I originally made this card.
___________________________________
Thank you for experiencing this blog post.
I hope this inspires you and makes you smile.
Please like and leave comments 😊
___________________________________
Disclaimer: Karen Burniston products are provided free of charge by the manufacturer for review and use. All other items were personally purchased. Compensated affiliate links used where or when possible, meaning I will receive a small percentage commission from these manufacturers at no cost to you. This will allow me to add more content to my YouTube channel and help out a lot. Thank you.
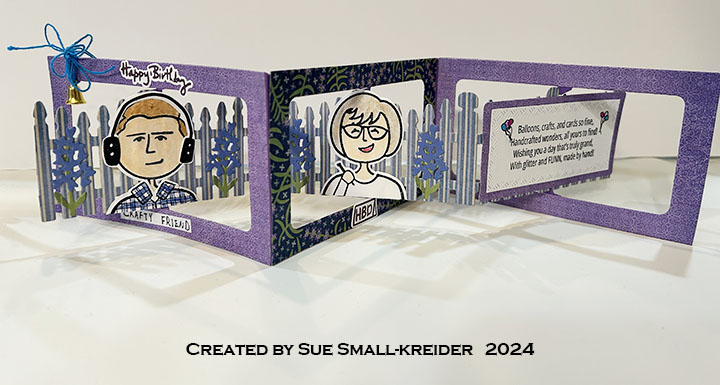
This card was made for Craft Roulette #247 whose parameters included a card for a crafty friend, pretty paper colors, bell(s) or belle(s) element, and something gold. I used Craft Roulette stamp sets and Karen Burniston dies.
Watch the process video to see how I made this card.
Cardbase: Cut three of the large die from the Landscape Rectangle Accordion die set from heavy weight cardstock. Cut three of the same die from thin decorative papers. Trim out the center pivot panel and side tab to form the decorative frames. Glue frames onto the larger panels. (I used a pretty patterned paper of blue, lavender and green for the center frame and coordinating lavender paper for the other two frames.)
Fence: Watch the assembly video at the bottom of this linked page Fence Add-Ons for a how-to on adding the fence into the accordion frame. (I used coordinating striped paper to cover gray cardstock fence pieces before i glued the fence in place.) The bluebell flowers are from the Fence Add-Ons die set.
People: The people were stamped using Craft Roulette’s Funn Friend stamp sets #1 and #2. They are colored with blended watercolor pencils. Using some teal colored twine, I tied a multi-looped bow with a small gold bell onto the card frame.
Sentiments: On the third panel is the poetic crafty birthday sentiment which was embellished with hand-drawn balloons and a hint of glitter gloss. The sentiment is from the Craft Roulette Funn Sentiments #1 stamp set. The “Happy Birthday” and HBD sign are stamps in the Funn Friend #1 stamp set. “Crafty Friend” was hand written.
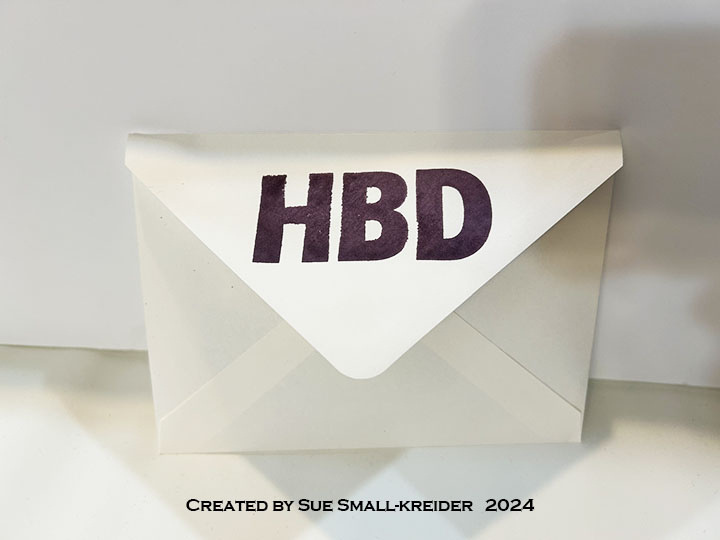
Envelope: The card fits into a purchased A7 (5x 7-inches) size cream envelope. The back flap of the envelope was stamped with “HBD” (Happy Birthday) in a plum colored ink.
___________________________________
Thank you for experiencing this blog post.
I hope this inspires you and makes you smile.
Please like and leave comments 😊
___________________________________
Disclaimer: Karen Burniston products are provided free of charge by the manufacturer for review and use. All other items were personally purchased. Compensated affiliate links used where or when possible, meaning I will receive a small percentage commission from these manufacturers at no cost to you. This will allow me to add more content to my YouTube channel and help out a lot. Thank you.
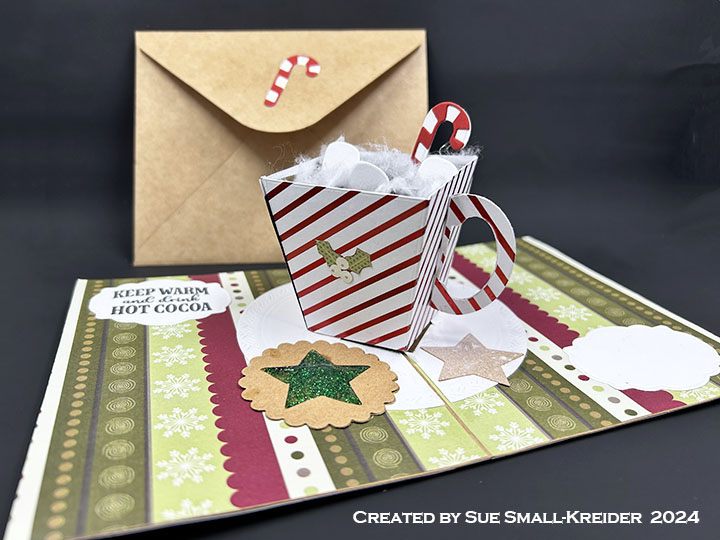
This card was made for Craft Roulette #246 whose parameters included for a holiday card, tree colors, drinking vessel(s), and something from the floor. (Watch the video to find out what was from my floor.)
Watch the process video to see how I made this card.
Cardbase: I used a purchased kraft paper cardbase that measures 4.25×11-inches when open and folded is an A2 side-fold card measuring 4.25-inches wide and 5.5-inches tall. The four panels were covered with decorative papers from my stash (Sorry, I don’t know the manufacturer of either paper.)
Card FrontCard Back
Pop-Up Mug: I modified the Flower Pot Pop-Up by cutting off the folder over flaps on the flower pot and added a handle cut from the mug die from the Tea and Coffee Pop-Up set. (See the video for how the mug was assembled.) Marshmallows are from the Camping Charms while the candy cane comes from the Stocking Pop-Up.
Cookies: The round, jam-filled two-layer Linzer cookie is cut using a scalloped circle die and small star die. The jam is made with Nuvo Glitter Drops and Glossy Accents. The star cookie was cut with an embossing die using an embossing sandwich on my die-cutting machine. The powdered sugar is white spray ink.
Sentiments: On the card front is a die-cut “Merry Christmas” made using just the word shadow and words from the Merry Christmas Lorna Add-Ons set. Inside the card two fancy labels were cut from white cardstock using the Rectangles and Labels – Crosshatch and one was stamped in black with “Keep Warm and drink Hot Cocoa” from the Winter Hugs stamp set.
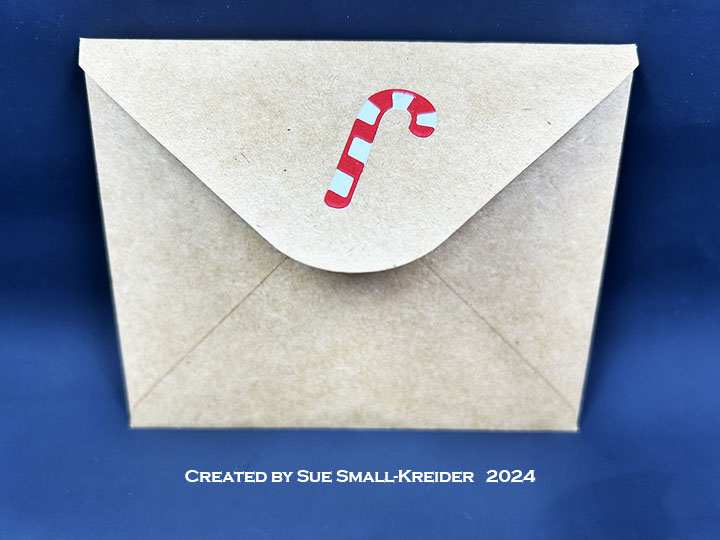
Envelope: The card fits into a purchased A2 (4.25x 5.5-inches) size kraft paper envelope. Another candycane was glued to the back flap of the envelope.
___________________________________
Thank you for experiencing this blog post.
I hope this inspires you and makes you smile.
Please like and leave comments 😊
___________________________________
Disclaimer: Karen Burniston products are provided free of charge by the manufacturer for review and use. All other items were personally purchased. Compensated affiliate links used where or when possible, meaning I will receive a small percentage commission from these manufacturers at no cost to you. This will allow me to add more content to my YouTube channel and help out a lot. Thank you.
Getting ready for the Christmas rush by making Thank You cards using my Spellbinders’ BetterPress and Karen Burniston’s Postage Pop-Up and Thank You dies.
Watch the process video to see how I made this card.
Cardbase: All the cards are made from purchased A7 (5×7-inches) kraft cardstock bases with matching envelopes.
Sentiments: The outside sentiments are all Spellbinders BetterPress plates and inks. The “I’m so Grateful for you” is printed in Clay and Coastal inks using the So Grateful for You plates and die set. The inside pop-up sentiment uses Karen Burniston’s Postage Pop-Up, Thank you and Thank You Shadow die sets.(See video above for assembly.) Thank You very much” cards use the same inks and the Thank You Very Much plates and template.
Envelope: The card fits into an A7 (5×7-inches) size envelope with hand-drawn hearts on the back flaps.
___________________________________
Thank you for experiencing this blog post.
I hope this inspires you and makes you smile.
Please like and leave comments 😊
___________________________________
Disclaimer: Karen Burniston products are provided free of charge by the manufacturer for review and use. All other items were personally purchased. Compensated affiliate links used where or when possible, meaning I will receive a small percentage commission from these manufacturers at no cost to you. This will allow me to add more content to my YouTube channel and help out a lot. Thank you.
It’s the Karen Burniston design team challenge for December 2024 using the theme of “Happy New Year.” For this challenge I chose to make a top-fold A2 size card with pop-up fireworks and the sentiment “Happy New Year” on a wobble spring.
Watch the process video to see how I made this card.
(Most of the instruction on how to make this card is in the video, but I’ve listed some measurements and sets used below.)
Card Back
Cardbase: Take an 11×4.25-inch rectangle and fold in half to create an A2 size top-fold card. Cover all four panels with decorative paper.
Sentiments: “Good Bye 2024” was made using four different sentiment die sets –Good Luck, Happy Birthday, Happy Easter and Mini Alphabet and Numbers. (See video for the word surgery used to create Good Bye.) “Happy New Year” has separate dies to cut out each word and a shadow die. I used four different foil and glitter cardstocks.
Envelope: The card fits into an A2 (4.25x 5.5-inches) size envelope. To decorate, cover the back flap with matching card papers and stamp with the “Made with Love” from the Special Delivery stamp set. (I wasn’t paying attention and stamped the sentiment with the “Love” upside-down on my envelope.)
Disclaimer: Karen Burniston products are provided free of charge by the manufacturer for review and use. All other items were personally purchased. Compensated affiliate links used where or when possible, meaning I will receive a small percentage commission from these manufacturers at no cost to you. This will allow me to add more content to my YouTube channel and help out a lot. Thank you.