Autumn Forest Birthday

Autumn Forest -inside

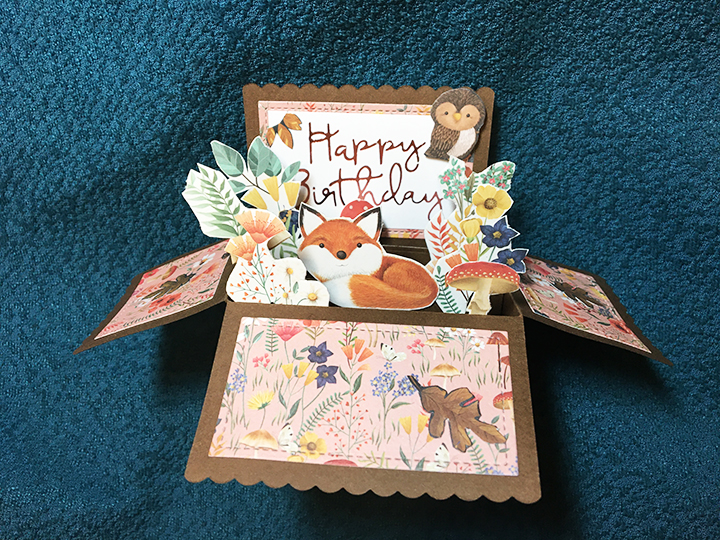
I am a paper hoarder and have been looking at this lovely set of forest animals Craft Consortium paper for months, taking it out thinking about what I could make from it. Putting it aside to see if the muse strikes.

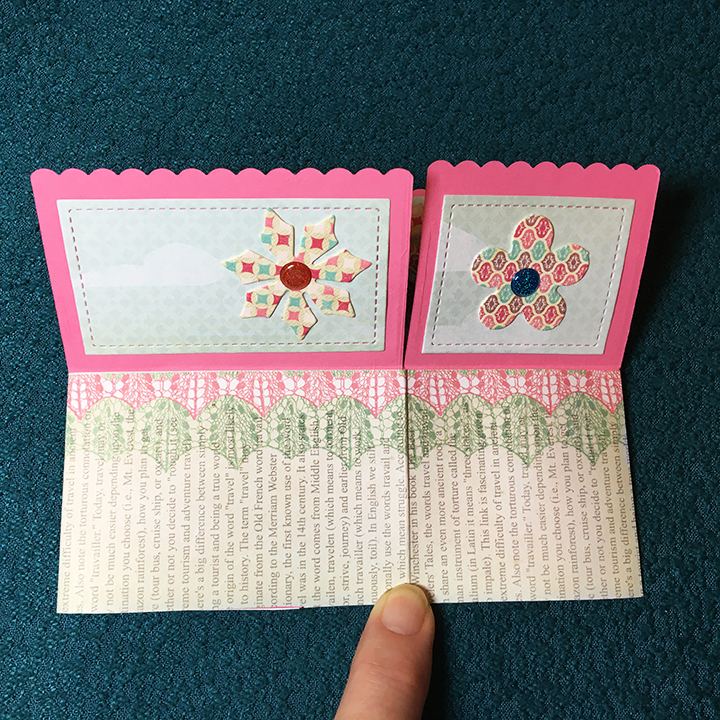
A fall birthday for an animal lover became my muse. I used my favorite Lawn Fawn Scalloped Box Card Pop-up die set to cut the base and decorative squares for the card.  The papers are double-sided so I was able to mix and match the squared to be just flowers or flowers with the fox. I fussy cut the owl and oak leaves from another sheet in the collection. The birthday girl’s special day falls at that time of the year when some flowers are still blooming, but the occasional autumn leaf my drift down.

The main elements are cut from the inside covers of the 6×6 paper pad.

Autumn Forest-assembly -outside

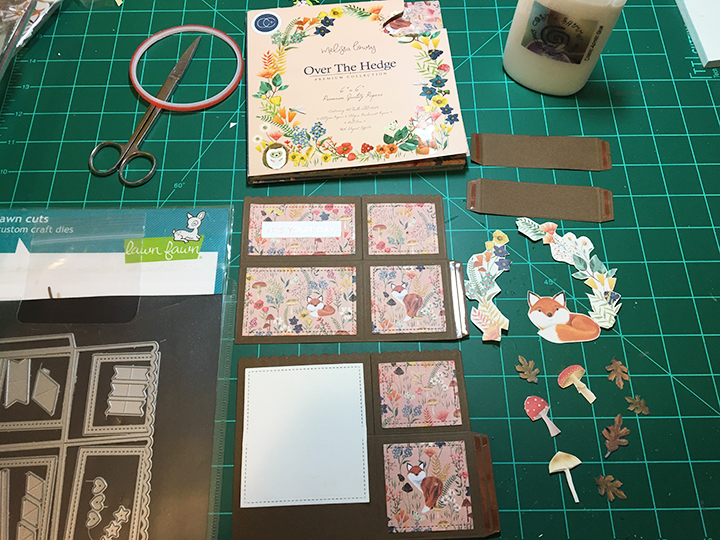
Because I have made this box a lot, I have taken to use the largest stitched die in the set and extend cut a large square to make a stiffer back to the box and as a place to write a personal message.  To extend cut using a die cutting machine, simply place one edge of the die just off the edge of the cutting plat so it won’t cut when going through the machine.  Move the die to cut the other side of the square again placing the die edge just off the cutting plates. It may take you a few tries to master this technique, but once mastered you can expand the uses of your die collection.

To assemble the box I decorate the front and back sides of the flaps before I connect the tabs using red double-sided tape. (See assembly video) If you follow the steps in the video, you should have a perfect box.

Hot Foiling

I am just learning to do hot foiling using a Spellbinders Glimmer Hot Foiling System. Having watched a number of videos on how to hot foil, I tried out a number of sentiments in rose gold foil. I used two of my first attempts on this card.

Autumn Forest -inside-CU

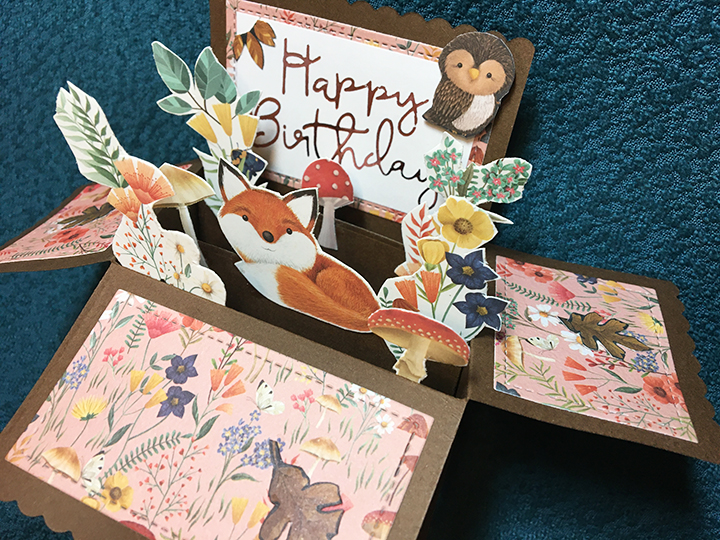
I used glue to adhere my elements on to the cross bars and a foam square to give some dimension to the owl.

Autumn Forest -front-Flat

When decorating always remember you can add elements to be seen only when folded closed.

Autumn Forest -back-Flat

If you want to have the full experience of opening up this card, click here to see video of the box card being opened.

https://spark.adobe.com/video/HnJo2aUX5ZHal

Supplies

Dies

Foiling

Paper

Miscellaneous

Stable Happy Mail

7 Stable-front-opened

Everyone likes Happy Mail and this one is made for a family of horse lovers. After making a z-fold card using a gate and fencing, I envisioned this horse paddock card.

5 Stable-folded envelope

The card is designed to fit folded into a #10 slimline envelope.

I laid-out the fence first on a 2 ½ inch x 12-inch strip of textured cardstock folding it long-ways in half and then scored at 3 inches and 9 inches. Draw pencil lines for the fence posts at: 1/4 inch, 1 7/16 inches, 1 9/16 inches, 2 7/8 inches, 3 inches, 3 1/8 inches, 4 7/16 inches, 4 9/16 inches, 5 7/16 inches, 6 1/16 inches, 7 7/16 inches,, 7 9/16 inches, 8 7/8 inches, 9 inches,, 9 1/8 inches, 10 7/16 inches, 10 9/16 inches, and 11 ¾ inches. Next, I evenly spaced three boards long-ways and colored in the spaces to be cut out. Using an Xacto craft knife and metal ruler I cut out the colored spaces on the folded over strip measuring 1 ¼ x 12 inches. (I recommend coloring in the cutout spaces as it gets very confusing, and like me, you have to start over again.)  (If you have the Karen Burniston Farm Edges die set or another fence die set, you could piece together the fence rather than cutting it as I did.)

3 Stable-Fence cut

The last cutting is to trim one half of the endposts off (See photo). Once the fence is done being cut, glue the wrong sides together to form a sturdy fence. I used distress inks to color the fence.

4 Stable-Fence endpost

The stable doors are sized to fit the Karen Burniston horse die. I cut three horses and decorated them differently using a black fine tipped pen and watercolor pencils. (Watch the assembly video for decoration ideas and tips). The doors are loosely based of the retired Stampin’ Up barn door set. I cut pieces of woodgrain paper to form the trim pieces and glued. The sliding door hardware is from the Stampin’Up set. Because the door is smaller than the die set door, I had to do a modified cutting of the slots that the door slides on.  I followed the door assembly method described in this video by The Creativity Cave.

6 Stable-front-unopened

The sentiments are from the barn door set. You will need to cut two pieces of wood grained paper for the stable at 4 x6 inches. Once you have cut the door slots out of the front piece, and assembled the door, you can adhere the backing piece with the grain sided facing the back side of the front. (The grain will camouflage the slot cuts. Make sure you don’t glue your acetate door mechanism to the backing piece. Test your door before the glue dries if you need to make adjustments. Stamp and cut out your sentiments and adhere behind the doors. Glue one horse head to be peaking out from the stall door and the glue door onto stable.

7 Stable-front-opened

Glue the fence endposts to the front of the stable once the doors and decorations have been added to the front of the stable. Add the horses to your paddock by gluing one to the back of the front fence and the other by using a strip of clear plastic from packaging (It needs to be sturdier than acetate.) to glue the acetate in place, first glue one side the inside of the side fencing. Fold the paddock flat to one side and see where the plastic strip folded tab ends up on the fence and, then glue to that spot.

You can write your personal message on the back of the stable.

Supplies

Stamps/Dies

Inks/Watercolors

Paper

  • Textured 12 x12 off white card stock from my stash
  • All other papers were from my scrap bin

Miscellaneous

Work Bench

WOrk Bench-inside

Not every dad has a work bench, but many do and the recipient of this Father’s Day card was a carpenter when his family was young.

Much of my inspiration for this card has come from a variety of Pinterest posts of 3D workbenches and some tool bench and tool box posts on Craftworld.com.

To make the bench, I stamped the Stampin’ Up hardwood stamp twice on light kraft paper. I cut the stamped pieces out to their edges of 5 inches x 5 ½ inches. Next, I scored down the long side at 1/2 inches, 2 ½ inches and 4 ½ inches. Using a pencil on the back side of the scored paper, I drew a line at 3 1/8 inches (5/8 inches below the 2 ½ inch score line). I also drew lines ½ inch parallel to the short edge from the 5-inch edge to the 3 1/-inch pencil line on each side. These pencil marks should form a smaller rectangle that needs to be cut out to from the lower center portion to form the table legs. Save the rectangle to cut two drawer fronts. I punched holes for black button shaped tiny brads to go thru to form the drawer pulls. (And then used foam tape to adhere the drawers to table front after it was all folded and glued to card.) Age the edges of drawers and table top with some Distress ink and a sponge or brush before gluing table into card.

Mean back to the table. All the score lines should be mountain folds with the woodgrain facing up and pencil marks hidden underneath. From the second stamped piece cut the lower shelf 2 ¾ inches by 5 ½ inches. And then score at ½ inches and 2 ½ inches down long side and make into mountain folds. Make pencil marks on back of each leg 3/8 from bottom foot flap. You will glue the edge of shelf at these marks. Once the shelf is glued on to legs the bench is ready to install on card. Mark the inside back of card at 3/8 inches and 2 inches from center fold. These marks are what you will use to glue the tale top and shelf flaps to on inside card back. Once the table is glued to card securely, glue the table leg flaps down.

Because I used dies by three different brands, none matched the others in scale, so I adapted the Divinity Designs pegboard and hooks to work with the tiny Tayored Expressions tools set. The picture frames are scraps from the table that I darkened with Distress inks. The tiny photos are of photos of the recipient’s family reduced in Photoshop to ¾ inches wide and printed on computer printer. The “Happy Father’s Day” was die cut from two die sets. Foam tape was used to adhere all items to the table top. All the tools were cut once from silver card and then again from colored or stamped card scrap to cut handles which were then glued onto silver base tools.

The front of the card was made using a mat of graph paper, a computer printed sentiment given to me by the card giver and the die cuts of hammer, nails and saw were from the larger set of tool dies by Sunny Studio.

WOrk Bench-Front-Envelope

I used the matching stamps from Sunny Studio to stamp the hammer and saw “x” on the envelope flap. The hammer was stamped first and then, using a post-it tape mask over the saw, I stamped the hammer.

Other Father’s Day cards on my blog

A Tool Box Father’s Day

A Fishing Father’s Day

A Father’s Day Waterfall Pop-Up

A Work Bench Father’s Day Card

In-Vested Father’s Day Card

Supplies used:

Dies

Stamps

Papers

  • AC Cardstock – 5 x 7 in set of 8 kraft cardstock cards & envelopes
  • Computer paper
  • Colored and silver matte metallic cardstock from my stash
  • Graph paper

Inks

Miscellaneous

Balloons and Flowers Pop-Up

Hot Air Balloon-side view

My challenge to make a sweet and up-lifting birthday card for someone who was not happy about celebrating her birthday alone. I had the “Flying High” Craftwork Cards paper collection which has muted neon colors along with pinks and turquoise blue. It is cheery with it has hot air balloons and loads of cute die-cuts and foiled sentiments.

I decided on a box pop-up and used the low and wide shape of the Lawn Fawn Scalloped Box die set which fits into an A2 envelope. Th box was cut from the second darkest pink shade of lightweight cardstock in the Recollection’s Pink Buttons paper pack.

Hot Air Balloon-flat

I punched out the flower die-cuts and shaped them with my fingers and adhered pearls and dots embellishments to their centers. Next, I adhered the flowers to long strips of clear acetate from leftover packaging.

Hot Air Balloon-CU

I assembled the box following the video instructions by Kelly Marie, using strips of clear acetate for the crossbars adhering them in place with clear tape which bends well. All the decorative papers are from one sheet of paper from the “Flying High” collection as well as all the decorations.

The finished card folds flat. A small hot air balloon from the Tim Holtz Collection Little Things stamp set was stamped on the back flap of the envelope.

Hot Air Balloon-open

Materials Used:

Dies

Stamps

Inks

Papers

Miscellaneous

Stick-on pearls and dots from Dollar Tree and

A Trout Fishing Kind of Day

After 63 years of marriage and numerous fishing and mountain trips, I knew this couple deserved a special anniversary card that evoked all the things they love.

Hot Air Balloons-front

Hunkydory’s Moments in TimeLove is In the Air” die set and matching paper pad had the perfect pop-up card with a pond, mountains, hot air balloons and a couple taking it all in siting at the edge of the pond. The die took a couple of passes through a die cutting machine and then the tricky part of working all the folds. This die is one of the less intricate dies in the Moments in Time series but using a paper piercing tool helped with shaping all the trees on the mountains and puffing out the clouds. There is an instruction sheet on the Hunkydory’s website that is useful when doing the folding.

Hot Air Balloons-inside Wide

The front of the card’s paper and label topper came from the “Flying High” Craftwork Cards paper collection. “On Your Special Day” die cut sentiment is from Creative Dies by Sue Wilson and the jumping trout is from Stampin’Up’s “Best Catch” stamp set stamped in brown ink and fussy cut and adhered with foam pads.

Hot Air Balloons-inside

The inside “Happy Anniversary” sentiment was cut from two die sets in the Gemini Expressions series by Crafter’s Companion. The additional bird on flower and best wishes banner came from the aforementioned “Flying High” paper collection. The back side of the card is finished with more of the paper from the front.

Hot Air Balloons-back

The front and back flap of the envelop are stamped with images that give a hint of what the card is inside.


Materials Used:

Dies

Stamps

Inks

Papers

Miscellaneous

Hot Air Balloons-inside CU

May Flowers

Blue teacup-inside-side
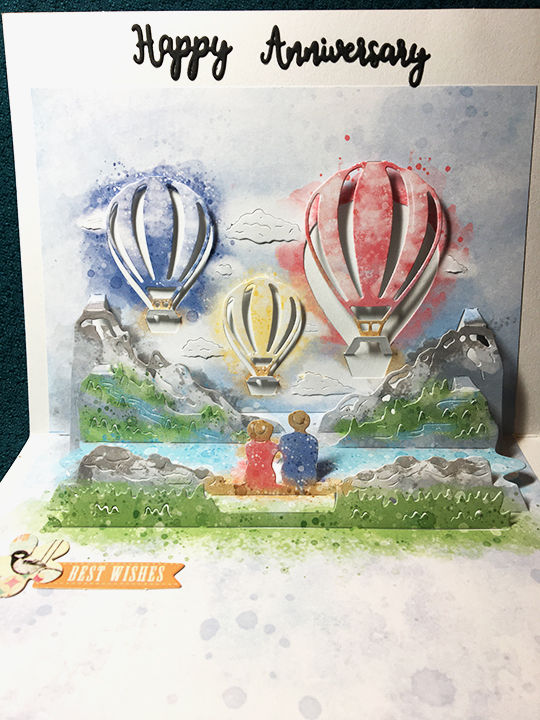
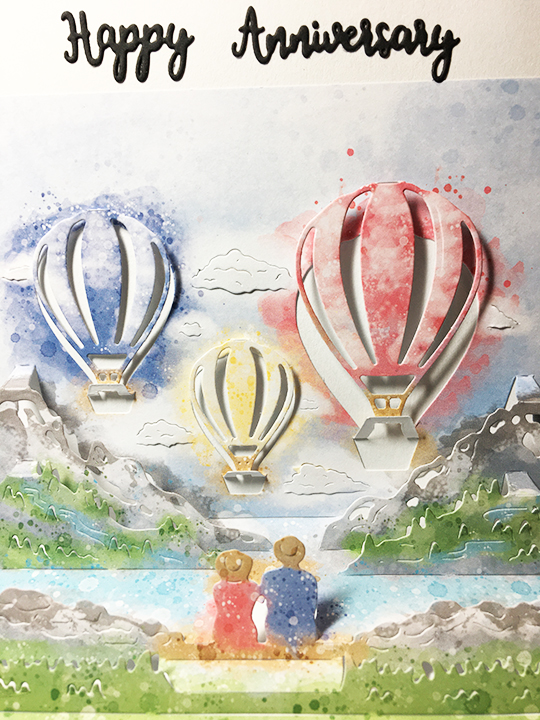
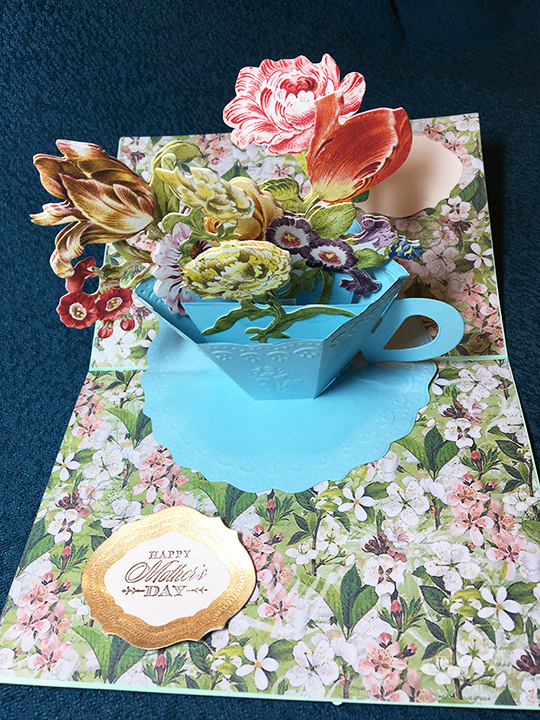
Celebrating Mother with May flowers is a tradition. I was happy to see that Anna Griffin’s new teacup die set includes the ability to emboss flowers onto the edges and side of the cup and saucer.

This was my first try at using the new die set as well as some of Anna’s sentiment stamps. The teacup goes together easily following the enclosed instructions. I embossed the cup and saucer first using an embossing mat/plate and then die cut all the pieces.

Blue teacup-front

By using a preprinted card base from a card kit by Punch Studio that has been in my stash for a while, along with some of the butterfly toppers and pink flatback gems, the front of the card came together quickly. The inside paper is from Graphic 45. I cut two pieces so as not to cover the fold and used a green marker to color the inside edges of the card as a border to the floral paper.

Blue teacup-inside

I ended up heat embossing the decorative border on the gold metallic sentiment base with clear embossing powder. I learned that the metallic card I used is heat sensitive and had a minor curling effect happen.

To fill the cup I used flower embellishments from Anna Griffin as well. This vintage teacup card is perfect for celebrating Mother’s Day.

Wishing all mothers, a Happy Mother’s Day.


Materials:

Dies

Stamps

Papers

Miscellaneous

Simple with a Twist

Farm House BDay-inside CU2

Inspiration can be as simple as seeing something that reminds you of another thing. It was a simple as that when I looked at the 6 x6 paper pad in Prima’s Spring Farm House collection.  I saw the 12 rectangular images on one page and my mind wondered if they were the same size as the photo frames in Karen Burniston’s Photo Collage Pop-Up die. They were close enough in size to make the mechanism work.

The mechanism is where the twist comes in to play. It has four arms that you can attach flat images to that explode out as you open the card. From the folded close position, the mechanism twists out to display the images. (I watched KB’s assembly video several times to understand how the mechanism works and its assembly before I made my test mechanism to play with and keep stored with the die set.)

Farm House BDay-inside closing

It was trial and error when placing the images on the four arms. I used a tape runner as recommended in the assembly video to place the images, test the placement when folded up, move the image several times, rub off adhesive and start over with the placement.

Farm House BDay-inside W

For the front of the card I used on of the journaling postcards that I trimmed down and glued a die-cut “Happy Birthday.”

Farm House BDay-Front


SUPPLIES USED:

Dies

Stamps

Paper

Miscellaneous