Embossed Hearts Birthday Card

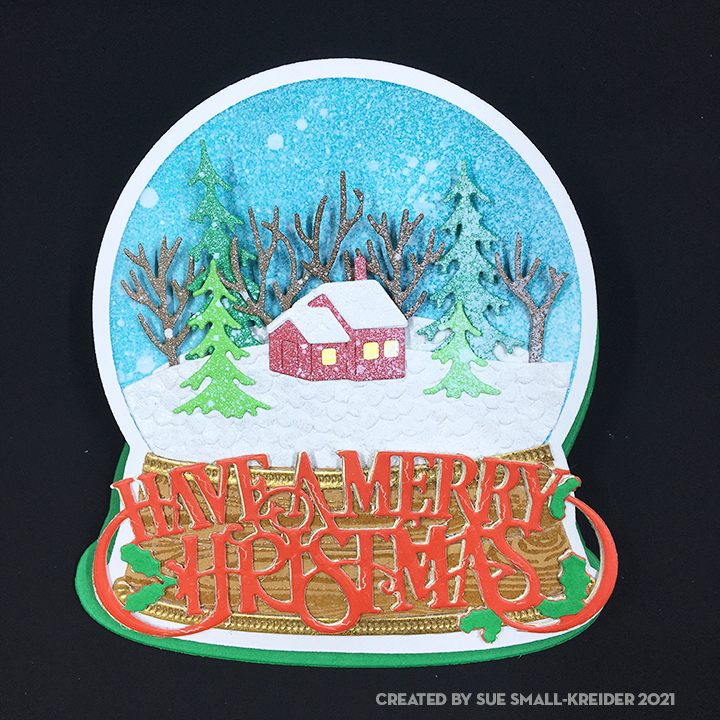
A sweet, heart-felt birthday card made with The Greetery’s Shortbread Shapes: Rectangle Hearts 3D embossing folder and Poppystamps Modest Banner Greetings foil and cut die set.

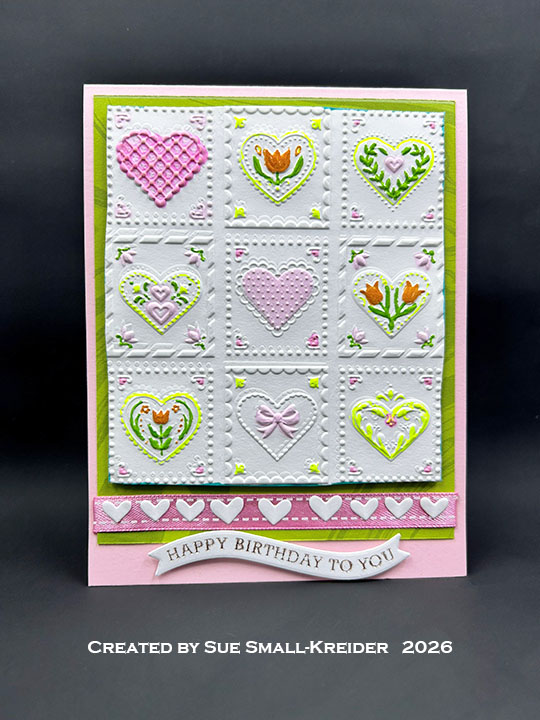
Cardbase: I folded an 4.25×11 sheet of pink 100lb. cardstock in half to create a top-fold 4.25×5.5-inch card. The green mat is a marbled cardstock cut 4×4.875-inches. The embossed piece was trimmed down to 3.75x 4.25-inches and colored with markers and a gel pen. A pink ribbon is under the white hearts that were leftover from another card. (I don’t know what the die was, but it cut hearts in two sizes.)

Sentiments: The “Happy Birthday to You” is a foiled sentiment That I had batch-produced some time back using the Poppystamps Modest Banner Greetings foil and cut die set.

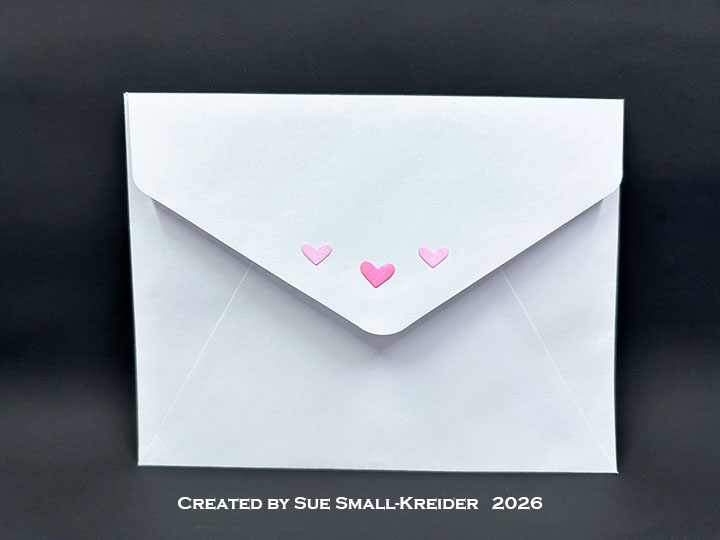
Envelope:  The card fits into an A2 (4.25x 5.5-inches) size envelope decorated with some of the colored hearts.

___________________________________

Thank you for experiencing this blog post.

I hope this inspires you and makes you smile.

Please subscribe, like and leave comments 😊

Follow my YouTube channel, Instagram and Pinterest as well.

___________________________________

Disclaimer: Karen Burniston products are provided free of charge by the manufacturer for review and use. All other items were personally purchased. Compensated affiliate links used where or when possible, meaning I will receive a small percentage commission from these manufacturers at no cost to you. This will allow me to add more content to my YouTube channel and help out a lot. Thank you.

Materials Used:

Dies & Foiling Plates

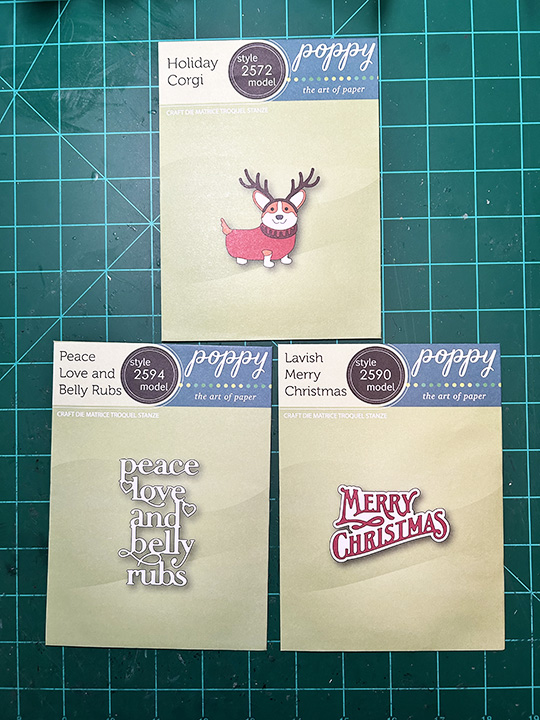
  • Poppystamps – Metal Die & Foiling Plate – Modest Banner Greetings – PSF806

Embossing Folders

  • The Greetery – 3D Embossing Folder –Shortbread Shapes: Rectangle Hearts – GEMB-010

Papers

  • Bazzill – 12×12-inch Cardstock – Easter Grass Marble
  • Spellbinders – 8.5×11-inch 100lb Cardstock – Pink Sand
  • White Cardstock
  • White A2 Envelope

Ink

  • Gel Pen – Yellow
  • OLO – Markers – Bubble Gum, Cotton Candy
  • Sharpie – Permanent Marker – Fine Tip – Green
  • Ranger – Letter Fineliner 03 – Orange

Adhesives

Tools

  • Die Cutting Machine
  • Bone Folder
  • Scoring Board
  • Scissors
  • Paper Masking Tape

Miscellaneous

  • 3/8-inch wide Pink Satin Ribbon

2025 ATC Calendar – MARCH

I started a new challenge for 2025 – the ATC calendar challenge. With a group of crafty friends, we are making a new image on a 4.25×5.5-inch calendar card for each month.

My March card is made with PoppyStamps dies from their Corner Shoppe collection.

Check Out Lois’s March calendar card.

___________________________________

Thank you for experiencing this blog post.

I hope this inspires you and makes you smile.

Please like and leave comments 😊

___________________________________

Disclaimer: Karen Burniston products are provided free of charge by the manufacturer for review and use. All other items were personally purchased. Compensated affiliate links used where or when possible, meaning I will receive a small percentage commission from these manufacturers at no cost to you. This will allow me to add more content to my YouTube channel and help out a lot. Thank you.

Materials Used:

Dies

  • Spellbinders – Cutting Dies – DIY Easel
  • PoppyStamps – Craft Dies – Corner Shoppe Wooden Cart -2619
  • PoppyStamps – Craft Dies – Flower and Leaf Sprinkles -2622

Press Plates

  • Spellbinders- BetterPress Plates – 2025 DIY Calendar

Papers

  • Spellbinders- BetterPress – 5.5 x 4.25” (A2) Cotton Card Panels – Porcelain & Pebble
  • Heavy Weight Brown Cardstock
  • Black, Brown, Pink, Purple and Yellow Cardstock Scraps
  • My Paper Insider – Envelopes – Silver Holographic Oil Slick

Ink

  • Pigma – Mircon 005 Fine Tip Pen – Black
  • Spellbinders- BetterPress Ink – BetterPress Black

Adhesives

Tools

Birthday Card For A Coffee Lover

This card was made for Craft Roulette #217 whose parameters included for A2 Project, French cafe colors, June element and polka dots.

This is a card for a coffee lover with a June birthday and also celebrates the USA Flag Day on 14th of June. 

Watch the process video for how it was assembled.

Cardbase: The paper pad is 8 x8-inches, so the base piece was trimmed to 5 1/2 x 8-inches and scored 4 1/4-inches from the left edge.

Sentiments: The tag sentiments were cut from the paper collection. Gold junk mail was used to cut the “Happy Birthday.”

Envelope: A tag sentiment was glued to the back flap of the A2 envelope.

___________________________________

Thank you for experiencing this blog post.

I hope this inspires you and makes you smile.

Please like and leave comments 😊

___________________________________

Materials Used:

Dies

Papers

  • Stamperia – 8×8 Double-Sided Paper – Coffee and Chocolate Scrapbooking by Caistina Aaddvan
  • Gold Junk Mail
  • Fraser Papers for William House – A2 Envelope – Genesis Text Milkweed Smooth

Ink

  • Pigma – Mircon 01 Fine Tip Pen – Black

Adhesives

Tools

  • Die Cutting Machine
  • Bone Folder
  • Stamping Blocks used as paperweights
  • Scissors
  • We R Memories – QuickStick

Miscellaneous

  • Nuvo – Crystal Drops – Metallic – Dirty Bronze

A Reindeer Dog Christmas Card

I have a neighbor who has the happiest small dog that when I saw this PoppyStamps die set, I thought of this dog in his winter vest.

I cut all the pieces from cardstock in my scrap bin. I think the patterned papers are from Photoplay while the other solids are a mixture of weights and textures.

Using a prescored A2 card base in my stash that is green outside and white inside, the die cuts were glued in place including all the sentiments. Strips were added to the front and back of the card and envelope flap for decoration.

Thank you for reading this blog post. I hope this inspires you and makes you smile. Please like and leave comments 😊

Materials Used:

Dies

  • PoppyStamps – Craft Die – Peace Love and Belly Rubs -2594
  • PoppyStamps – Craft Die – Lavish Merry Christmas -2590
  • PoppyStamps – Craft Die – Holiday Corgi -2572

Paper

  • Photoplay – Tulla & Norbert’s Christmas Party 6×6 paper Pad
  • Craft Consortium – A4 Solids Double-Sided Paper Pad – Candy Christmas – Reds
  • Multi-Colored Cardstock Scraps

Ink

  • Pigma – Mircon 01 Fine Tip Pen – Black
  • Pigma – Mircon 01 Fine Tip Pen –Brown

Adhesives

  • Neutral PH Adhesive by LINECO
  • Fine-Tip Glue Bottle

Tools

  • Die Cutting Machine
  • Bone Folder
  • Scissors
  • Stamping Blocks as paper weights

Enjoying The Little Things

Spring greenery and the mention of fairies, sprits, leprechauns and other wee creatures of mischief and fortune is what this card is about. It uses papers from the Graphic 45’s Little Things collection and dies by Karen Burniston including the new Rectangles and Labels Crosshatch set for creating backgrounds.

The card uses a pre-made 5×7-inch cardbase that decorative papers have been adhered. For the card front a card topper and two layers of decorative papers were used.

On the inside of the card, I covered the cardbase with a green dotted paper (5×7-inch) and then cut the floral papers (6×4.5-inches). I wanted a scalloped edge on the floral paper, but the scalloped rectangle in the die set is slightly smaller than 6×4-inches, so I had to cut the edges in a modified way. I placed one edge under the die and the other over the top of the die to cut. Unfortunately, I messed-up and cut two edges, which meant I had to piece the paper when I adhered it. The edge of the floral paper that abuts the center fold is not scalloped.

Before cutting or assembling the mushroom house, I watched the assembly video for both the Tiny House and Mushroom Roof. I decorated the white house piece first before assembling the house using windows and door from the mushroom set. I had a thin strip of the green dotted paper that I placed as grass edging the bottom of the house. The paper collection has a red dotted mushroom paper that was perfect for the roof.

I wanted the “Happy Birthday” to match as close as possible to the lettering font used on the card front, so I used a PoppyStamp word die, cut twice from blue cardstock scraps and glued together before adhering to the card.

For the pond label, I cut the crosshatch label from the new Rectangle and Labels die set and inked the edges with a dark blue ink. The clover leaf and ferns were fussy cut from the decorative papers.

One of the coordinating papers was used on the card back while a large sentiment was cut from the paper set for the back of the envelope flap.

Thank you for reading this blog post. I hope it gave you inspiration and a smile. Please like and leave comments 😊

Materials Used:

Dies

Papers

  • Graphic 45 – 12×12 Double-Sided Papers – Little Things Collection
  • Blue, Brown and Yellow Cardstock Scraps
  • Park Lane – A7 White Card and Envelope

Ink

  • Ranger – Tim Holtz Distress Ink – Prize Ribbon

Miscellaneous

Sending Violet Hugs

In the language of flowers, violets mean remembrance. Sometimes there aren’t words to express the comfort a hug can bring when someone is suffering a loss.  This card is meant to be up-lifting and offering comfort and hope.

Using recent PoppyStamps Flower Field Tall Curve Border, Penelope Pinpoint Frame and Sending Hugs Poe Script dies to create this card front, I used the solid green back of a striped A2 card base to be the background to the lattice work. Thin foam squares were used to raise the lattice frame off the green card base. (Dies-R-Us often stocks PoppyStamps dies as well as other name brand dies and stamps at discounted prices. The links under the Materials Used section links to Dies-R-Us.)

Scrap white cardstock was ink blended on both sides to create the die-cut violets. Four times the flower border was cut with the two glued to the front of the white lattice work frame.  The remaining borders were cut apart and the petals were bent to curl upward. These flowers were glued at the center to the base border flowers using a hand-held stylus with a tiny round tip to move and push the flower centers down into the glue. A dot of yellow Nuvo Drops completed the center of each flower.

The “Sending Hugs” was die cut from matte gold cardstock which was found on cookie packaging.

The inside sentiment “Happiness blooms from within” is from a new stamp set by PoppyStamps – Colorful Life. Another sentiment, “Bloom and Grow,” is from the same sent and is stamped in a gold ink on the envelope flap.

Thank you for reading this blog post. Please like and leave comments 😊

Materials Used:

Dies

Stamps

  • PoppyStamps – Clear Stamp Set – Colorful Life – CL509

Inks

  • Ranger – Jim Holtz’s Distress Oxide Ink – Chipped Sapphire, Shaded Lilac, Dusty Concord, Stormy Sky, Prize Ribbon
  • Stampin’ Up – Classic Stampin’ Pad – Crumb Cake

Papers

  • Lightweight white cardstock
  • Matte gold cardstock
  • A2 green striped card base and white envelope

Miscellaneous

Snowy Christmas Globe

All is calm, all is bright until you shake-up the snow globe. This traditional style snow globe easel card is made with PoppyStamps/Memory Box die set with the sentiment coming from a Tonic Studios die.

This was my first go at using these dies, so I followed the package example for the assembly and easel stopper (three holly berries placed on top of tiny foam circles with holly leaves cut from thin paper.) My green base card stock was lightweight, so I double cut the base and glued together before burnishing the fold lines.

The background white circle was ink blended use a sky-blue ink and a large blending brush. Next, I spritzed with circle once with a white ink spray. The snowy ground is a specialty handmade paper I’ve had for a while. For the cabin, I used a yellow scrap for the house outline/windows. Its roof is more of the specialty textured paper. I like the variety of fir and hardwood trees in this set which can easily be cut from various shades of green and brown scraps. The scene was laid-out and then glued to together before spraying the whole scene with white ink spray a few times.

For the woodgrain globe base, I used some heat embossed stamped woodgrain paper I had made for another project. (Click here to learn more about the paper.) I cut two of the thin trim piece from gold foil cardstock and trimmed one piece to fit the top of the woodgrain base.

To assemble the snow globe, there is a white globe outline die-cut that the assembled globe is glued onto and then the woodgrain base followed by the two gold trim pieces.

The sentiment was cut three times using the Tonic Studios die. The base layer is gold foil while the top layer is a thick red cardstock that was from some packaging that I had saved. I cut the tiny green holly leaves from a green paper.

Foam circles topped with the holly berries are used as the easel stop on the bottom card base with the holly leaves cut from thin dark green paper.

A personalized message can be written inside the card base. The card fits inside an A2 envelope (4 3/8 x 5 3/4 inches.) with its back flap stamped with stamps from the Winter Stags set by Stampendous! in a dark green ink.

Thank you for reading. If you enjoyed this blog post, please like it and follow the blog. 😊

Dies & Embossing Folder:

Stamps & Ink

  • Winter Stags stamp set by Stampendous! – free gift in Creative Stamping, issue 90, Nov. 2020.
  • Stampin’ Up – Classic Stampin’ Pad – Tranquil Tide
  • Catherine Pooler – Premium Dye Ink – Party Collection – All That Jazz
  • Avey Elle White Ink Spray
  • Simon Says Stamp Large Blending Brush
  • VersaMark – Watermark Stamp Pad
  • Stampin’ Pad – Rubber Stamp – Hardwood
  • Recollections – Detail Embossing Powder – Clear

Papers

  • White and green card stock
  • Gold foil card stock
  • White textured specialty handmade paper
  • Kraft card stock
  • Colored card stock scraps
  • A2 envelope

Additional Supplies:

Mother and Daughter Cards

Mothers and daughters can be so alike and yet not see it.  Here are two cards made for a woman who has recently received a job promotion and a birthday card for her 13-year-old daughter.

Both cards are made using a Studio Light stamp and die set designed by Karin Joan called Betty. It is much like creating paper dolls. The main head and shoulders die cuts four individual pieces -head, 2 ears and the neck and shoulders. I laid out the position of the hair, ears, facial features stamps as well as the jewelry stamps before I did anything else. Next, I stamped and heat embossed the facial features.

The three hair dies can be combined in a multitude of ways to create different looks. Both the mother and daughter cards use the back full hair piece placed at different heights to create long or short hair. The front bangs pieces are different. The daughter’s hair is accentuated by a large bow.

The set comes with several collar line options. I have used the V-neck for the mother and the off-the-shoulder cut for the daughter. For jewelry on the mother, I’ve used a flower hair pin stamp for the earrings (stamped and heat embossed before the head was glued over the hair) and the heart and chain stamps for the necklace.

For the sentiment on the mother’s card, I used the sentiment stamp included in the Betty set to stamp and heat emboss the “She believed she could, so she did!” and die-cut the “Happy Birthday.” (The words on the stamp “so she did!” are so fine, I found that they didn’t heat emboss well, so I stamped that line in black ink and then cut it out and glued over the blurred embossed one.) Next the sentiment was die-cut using a scalloped stitched rectangle from Tutti Designs. For the daughter’s card, a Poppy Stamps “Happy Birthday” die was used.

Both cards used layered mats of printed papers on both the front and back covers. Inside the cards have been left blank for personal messages.

Thank you for reading. If you enjoyed this blog post, please like it and follow the blog. 😊

Supplies Used:

Good Morning Farmstyle

Greetings it’s Sue here from the Dies R Us design team with a barn pop-up easel card.

Using PoppyStamps’ new Country Barn Pop Up Easel Set and lots of PoppyStamps’ Whittle animals and sun, this is an easy card to make.

Cut:

1 – largest barn die out of brown card stock

1 – middle barn die out of cream

1 – smallest barn die out of red (Save all the doors and windows cut out for the backing of the “X” frames)

2 – small “X” window from white

1 – doors “X” die out of white

1 – roof trim die out of white

1 – straight line out of white

Cut animals/sun and color with markers, black gel pen and Distress Ink.

Glue white “X” frames to doors and window cut outs to form doors. Glue on roof trim.

If you plan on having doors that open, ink blend the cream barn piece edges and door/window openings.  

Using clear tape, make hinges for all the doors and windows to open.

Position and glue cow to inside of barn. Glue barn to middle cream barn piece making sure not to glue any doors that are hinged to open. Glue flying chicken inside open barn door and other animals to front of barn.

Glue tab of brown base piece to back of cream piece. Test the barn in pop-up easel position. Using foam squares adhere green grass with eggs glued to them to the brown base to act as easel stops. Don’t have grass in front of the door that opens. Glue sun on to back of cream piece as if sun is rising behind the barn roof. (Make sure that sun top is no higher than the roof tip so card will fit in envelope.)

Stamp a sentiment on card base and back flap of envelope.

Hope this fun card has provided some inspiration for your crafting. 😊

SUPPLIES Used from Dies R Us:

Other Supplies:

  • Red, brown, cream and white cardstock
  • Foam squares
  • Clear tape
  • Scrap green paper for grass
  • Staples – Invitation Brights 24 lb.- Gummed Envelope – 4 3/8 x 5 3/4 inches
  • Crayola Signature Brush & Detail Dual-ended Markers
  • Simply Made Crafts by Helen Griffin – Fun Sentiments Stamp Set
  • Vintage goat stamp
  • Stampin’ Up – Early Espresso ink pad
  • Ranger – Distress Ink – Vintage Photo
  • Sponge dauber
  • Stamping platform
  • Scissors

Don’t forget to come join in the fun at the Dies R Us Challenge Blog. There’s a new challenge theme offered on the 1st and 15th of each month and one lucky randomly drawn winner will receive a gift voucher prize to the Dies R Us Store.  

 For your convenience, all the important Dies R Us links are provided below.

click below for:

STORE

CHALLENGE BLOG

FACEBOOK

INSPIRATION BLOG

FRIENDS OF DIES R US PINTEREST PAGE