I’m using a card kit from Papercraft EssentialsMagazine, issue 197, April 2021.
Watch video above for a tutorial on how to make the card.
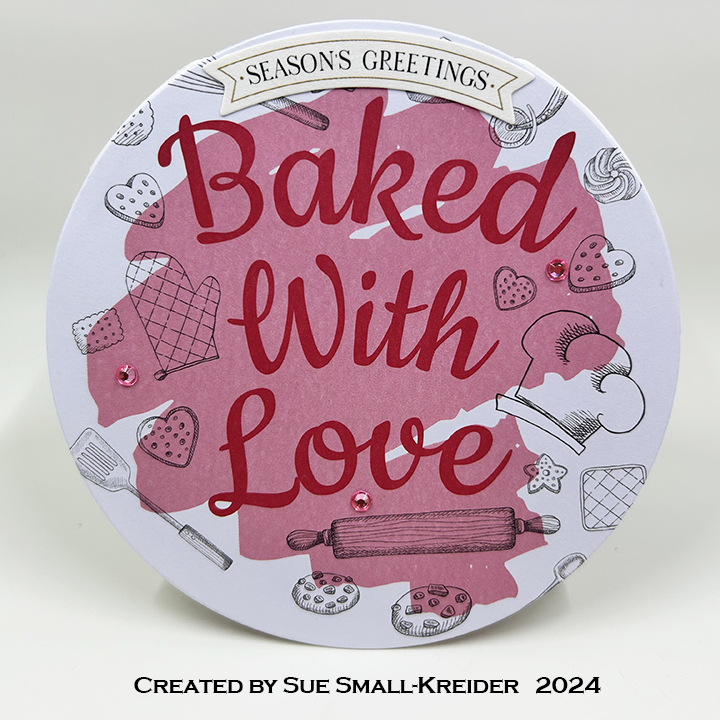
Cardbase: I cut a cardbase using a folded over piece of 8.5×11-inch white 65 lb. cardstock and a 4.5-inch circle die.
Sentiments: Sentiments came from the kit and the arched banner “Season’s Greetings” is an Anna Griffin sticker that I separated into two banners.
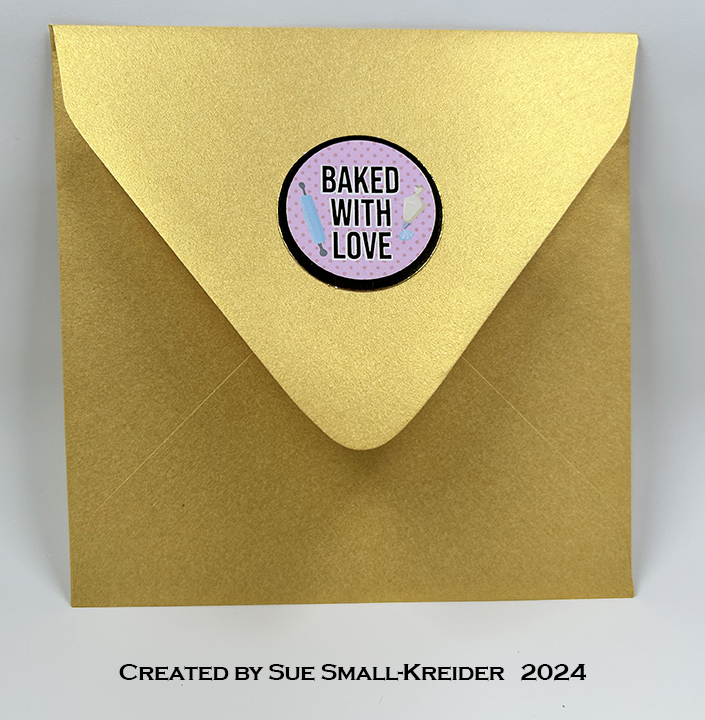
Envelope: The envelope is a 6-inch square envelope from my stash.
___________________________________
Thank you for experiencing this blog post.
I hope this inspires you and makes you smile.
Please like and leave comments 😊
___________________________________
Disclaimer: Karen Burniston products are provided free of charge by the manufacturer for review and use. All other items were personally purchased. Compensated affiliate links used where or when possible, meaning I will receive a small percentage commission from these manufacturers at no cost to you. This will allow me to add more content to my YouTube channel and help out a lot. Thank you.
Materials Used:
Dies
Hero Arts – Infinity Dies – Circle
Papers
Papercrafts Essentials Magazine, issue 197, April 2021 – Baked With Love
Watch video above for a tutorial on how to make the card.
Cardbase: Cut a 4 1/4 x8 1/2-inch rectangle of white cardstock and fold in half to form a 4 1/4-inch wide by 5 1/2-inch tall top fold A2 size cardbase. Cover the outside panels with decorative paper.
Oven: Use the Kitchen die set package image assemble the oven.
Cake: Cut one covered pot in brown and another in green. Cut off all the handles on each piece. Trim the lid off the green to make a plate for the cake to sit on. Add Nuvo drops for icing on cake top.
Sentiments: The sentiments on the front of the card are from The Greetery‘s Bake Someone Happy stamp set. The inside sentiment is from Scrapbook and Cards Today‘s Jolly Holiday workshop kit.
Envelope: The card fits into an A2 envelope. Its back flap is decorated with a Christmas cake made using the Let’s Bake die set.
___________________________________
Thank you for experiencing this blog post.
I hope this inspires you and makes you smile.
Please like and leave comments 😊
___________________________________
Disclaimer: Karen Burniston products are provided free of charge by the manufacturer for review and use. All other items were personally purchased. Compensated affiliate links used where or when possible, meaning I will receive a small percentage commission from these manufacturers at no cost to you. This will allow me to add more content to my YouTube channel and help out a lot. Thank you.
Materials Used:
Dies
Elizabeth Craft Designs – Metal Dies – Kitchen – 1993
Elizabeth Craft Designs – Metal Dies – Let’s Bake – 1994
Watch video above for a tutorial on how I made the Box.
___________________________________
Thank you for experiencing this blog post.
I hope this inspires you and makes you smile.
Please like and leave comments 😊
___________________________________
Disclaimer: Karen Burniston products are provided free of charge by the manufacturer for review and use. All other items were personally purchased. Compensated affiliate links used where or when possible, meaning I will receive a small percentage commission from these manufacturers at no cost to you. This will allow me to add more content to my YouTube channel and help out a lot. Thank you.
Materials Used:
Dies
The Greetery – Wafer Thin Steel Dies – Bake Someone Happy
Stamps
The Greetery – Clear Stamps – Bake Someone Happy
Papers
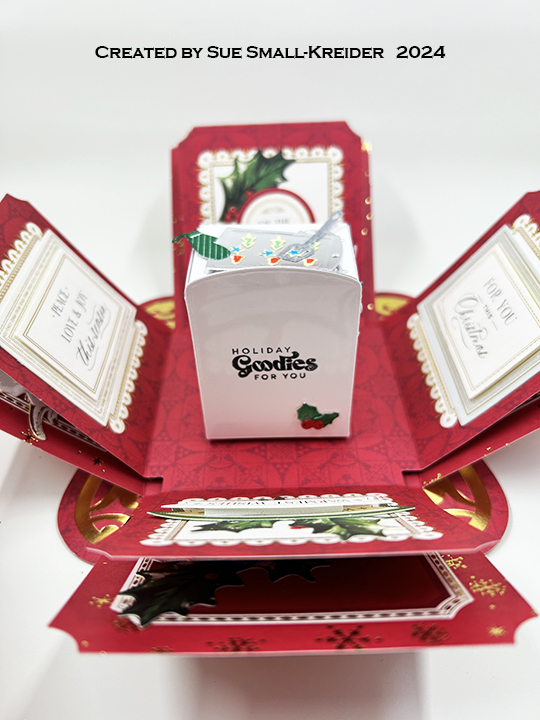
Anna Griffin – Gingerbread House Explosion Box
Anna Griffin – Present Pop-Up Card making Kit – Ephemera & Sentiment Stickers
Anna Griffin – Carte Noel – Sentiment Stickers
The Paper Cut – 8.5×11 Glossy 10 PT Kromekote Cardstock – White
Silver Foil Cardstock
Acetate/Clear Plastic
Ink
Stampin’ Up – Classic Ink Pad – Real Red & Shaded Spruce
StazOn – Solvent Ink – Jet Black
American Crafts – Metallic Marker – Silver
Gel Pens – Blue, Green and Red
Mont Marte – Dual Tip Art marker – E2 Raw Sienna
Sharpie – Permanent Marker – Ultra Fine Tip – Black, Green & Red
I’m using a stamp and die set by Diamond Press to create this interactive card that lets you pull the tab to open the oven door and reveal a Christmas turkey. (Because this kit doesn’t include any holiday sentiments, I had to use ones by other sources.)
Watch video above for a tutorial on how to make the card.
Cardbase: I used a purchased top-fold A2 size (2.25 x5.5-inch) gray cardbase and punched a half circle opening in the top center for a thumb hole to help with the pull tab. To help with the weight of the front, I added a 4×5.25-inch piece of the same green cardstock I had used for the front matching ups the thumb hole notches.
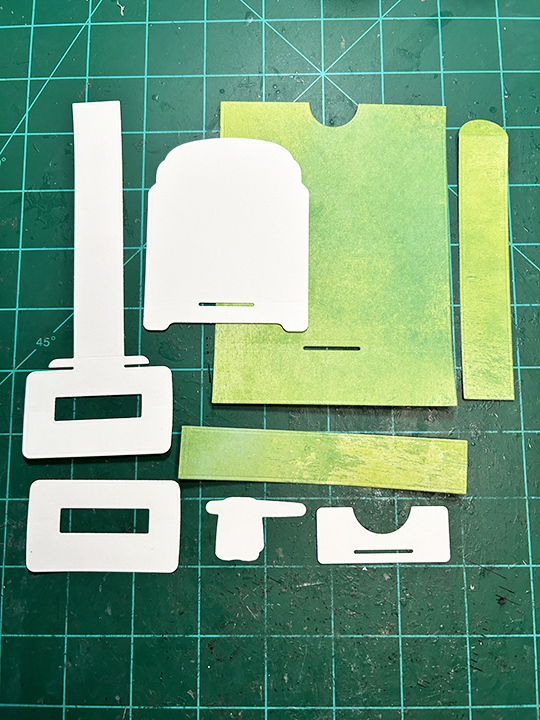
Oven: I watched an assembly video before I started my card. Then I cut the pieces I needed from green colored cardstock and white 65 lb. white cardstock.
Sentiments: For my original card, the outside “Merry Christmas” sentiment, I cut the words from a commercial Christmas card. For the card in my process video, I used stamps from the Greetery saying “Warmest Winter Wishes.” Inside both cards is “Happy Holidays, a die-cut sentiment by Karen Burniston in black.
Envelope: The card fits into an A2 envelope.
___________________________________
Thank you for experiencing this blog post.
I hope this inspires you and makes you smile.
Please like and leave comments 😊
___________________________________
Disclaimer: Karen Burniston products are provided free of charge by the manufacturer for review and use. All other items were personally purchased. Compensated affiliate links used where or when possible, meaning I will receive a small percentage commission from these manufacturers at no cost to you. This will allow me to add more content to my YouTube channel and help out a lot. Thank you.
It’s time for the Karen Burniston June 2024 Design Team Challenge with the theme of using border dies.
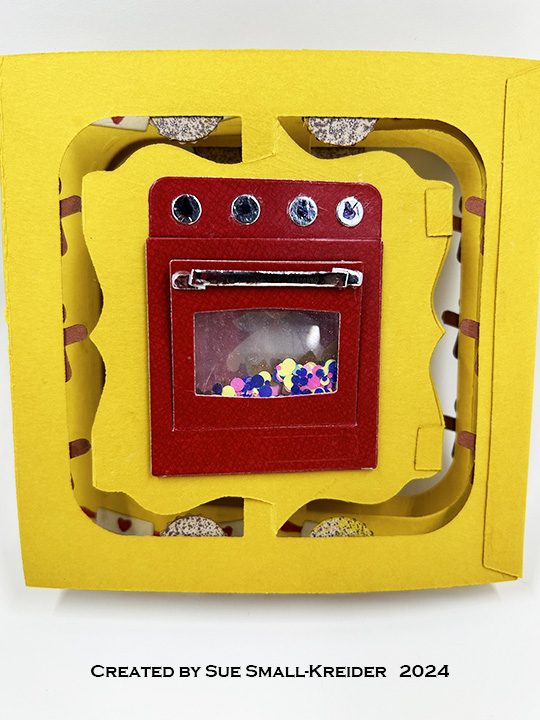
I wanted to get a jump on my end-of-the-year holiday cards by making a baking themed card with pies and gingerbread men from the Baking Borders and Christmas Borders 1 set. The rolling pin and chef’s hat are also in the Baking Borders set. Additional die sets used were: Oven Pop-Up, Tiny Gnomes, and the Fancy Label Accordion. (A 1 3/4-inch square die was used from the Frame Pull Pop-Up set, but any 1 3/4-inch square die could be used. This was the one I had handy.)
Watch my tutorial YouTube video to see how the card was made.
(TIP:Access the assembly videos for any of the dies used by clicking on the die link and scrolling towards the bottom of the linked pagefor the video.)
Cardbase: Cut three of the largest die in the Fancy Label Accordion set from a butterscotch-colored heavy cardstock. Work the scored fold-lines. Wait to until after making and attaching the oven shaker to glue the frames together.
Shaker Oven: Cut ten ovens from red cardstock and two additional ovens from coated red cardstock using the oven die from the Oven Pop-Up set. Trim off stove top section on all 12 pieces. From the two coated cardstock stove top pieces, trim off the back where knobs go and save. Layout oven with stove back on one panel of the cardbase. Mark the outside edges of oven lightly with pencil. Center 1 3/4-inch square die within the oven square and die cut. (You may want to use a ruler to find the center of the fancy label and center the die left to right with the center line. The die will be below the true center up and down because of the stove back piece.)
Glue five of the plain cardstock oven pieces to either side of the cardbase over the square opening. This will form the shaker base. Cut two 2-inch square pieces of clear acetate/plastic. Attach one piece of acetate/plastic with double-sided tape to the top of stacked oven pieces. Turn over and fill shaker with confetti and tiny cookie shapes from the Oven Pop-Up set. Attach the second piece of acetate/plastic with double-sided tape to seal up the oven shaker.
Cut two 1 1/2-inch square pieces of clear acetate/plastic. Adhere to the back of oven doors on the remaining two coated oven pieces using double-sided tape. With more double-sided tape added to the outer edges of the oven pieces, attach them over the shaker acetate/plastic. Glue the stove back with knobs attached to the cardbase above the ovens on both sides.
Pies, Gingerbread Men and Rolling Pins: Cut two strips of pie bases from the Baking Borders set. Color one strip all red .(I used a red glitter brush.) Color four orange and four baked apple yellow on the other strip. Cut out four of each of the pie tops. Ink the pie top to look like browned crusts with maybe some burnt tips of the crusts. Glue lattice pie crust to apple yellow pies, the open ring crust onto the pumpkin orange pies and the flower shaped crusts onto the red pies. Cut all the pies into separate circular pieces. Glue pies to the top and bottom of the front and back panel frames of the card base.
Cut two strips of gingerbread men using the die in the Christmas Borders 1 set. Using a white gel pen with a fine tip, trace the icing onto the men using the stencil feature of the die. Cut men apart and glue to sides of the front and back panel frames of the card base.
Cut two strips of the rolling pins from a kraft colored cardstock using the die from the Baking Borders set. With a red fine-tipped marker stencil on the hearts and color all the handles. Trim the strips to fit the top and bottom of the middle panel frame. Save one of the leftover rolling pins for the chef to hold.
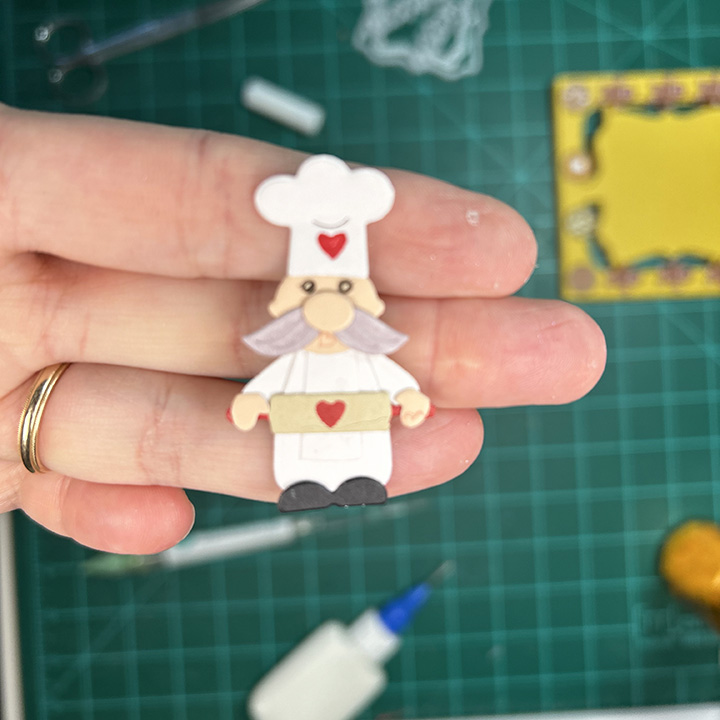
Chef: From the Tiny Gnomes set, cut two of the body piece and one mustache from white cardstock. From flesh colored cardstock cut the head, nose and hands. From black cardstock cut the shoes. With a fine tipped pen, trace the eyes using the stencil feature of the head die. Color the mustache brown or gray. Cut one chef’s hat from white using the die in the Baking Borders set. Using the rolling pin die to stencil a red heart onto the chef’s hat.
To assemble, cut one body piece to have an apron in the center and an arm on either side. (See video for visuals of this.) Glue apron onto other body piece and then head. Added mustache then nose to head. Glue arms onto back of body wide enough to hold a rolling pin. Glue rolling pin to end of arms and then add hands on top of rolling pin handles. Attach shoes and hat.
Sentiments: “Happy Holidays” comes from Word Set 3-Holidays. The labels behind it and the chef are from the decorator dies in the Fancy Label Accordion set. Personal messages can be written on the back of the panels.
Envelope: The card fits into an A7 size envelope decorated with leftover pies and rolling pins on the back flap.
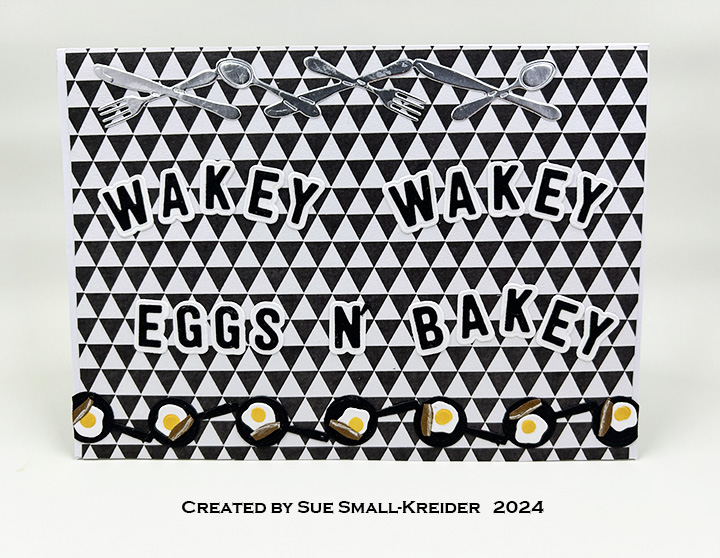
This card was made for Craft Roulette #202 whose parameters included a 5×7 inch card, formal & informal colors, warm(s) element and crisscross. Specifically, this card was made for a son starting a new job that requires an early morning wake-up time.
Cardbase: Cover a 5×7-inch wide top-fold cardbase with two patterns of decorative paper – one for card front and inside top (think wallpaper) and another pattern for the back and inside bottom (think flooring.)
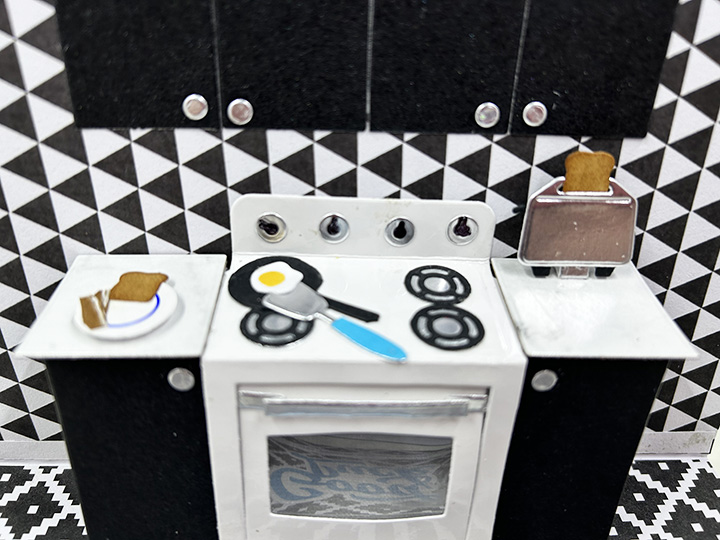
Card Front Decorations: Using the Kitchen Borders die set, cut one silverware border from matte silver cardstock for the top of the front panel. From black cardstock cut the frying pan/skillet border twice and trim one border down to three pans. Glue the two pan borders together by overlapping skillets. (Skillets are 1-inch wide, so should have seven skillets to cover all the way across card panel.)
Stove, Cabinets and Counters: Watch assembly video for the Oven Pop-Up at the bottom of the page link before starting. I used glossy white cardstock for the stove with a piece of clear packaging for the oven window. For the oven and cabinet base I used a textured silver cardstock and also cut a square piece to cover the back wall of the oven in textured silver. For the cabinet doors on the uppers and lowers, I used the large door die in the Oven Extras set (cut from a coated black cardstock) with the matte silver knobs from the Oven Pop-Up set.
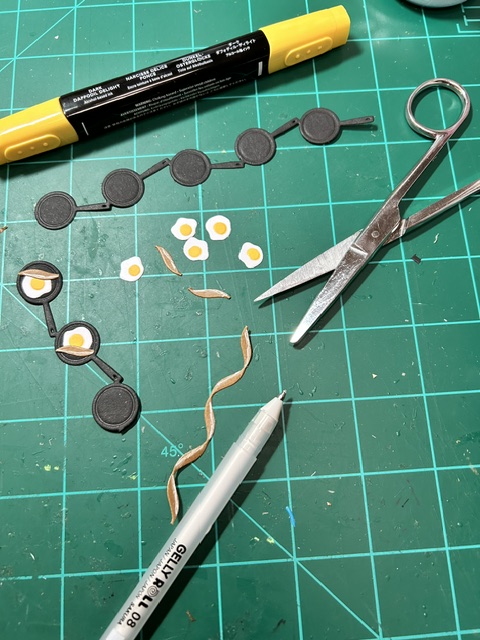
Food: Using the Kitchen Borders set, cut out 8 eggs from white and use die as stencil to color egg yolks yellow. Using the ribbon border die from the Border Blends – Trims die set, cut one from brown cardstock. Using a white gel pen color the bacon fat along one edge of ribbon. Cut ribbon into strips small enough to fit into skillet.
Using the Kitchen Borders set, Cut two pieces of bread from kraft cardstock and using tweezers to hold, ink the edges to look toasted. For the toaster, cut a toaster border from black cardstock. Cut two of the toaster covers with slots from matte silver cardstock. Cut two of the toasters from the border leaving on the tiny levers that connect the toasters. (I cut the levers off and had to use the tiny waste pieces from the stove burners as toaster levers.) Glue the silver piece atop the black piece and insert bread before glue dries positioning it according to the lever position – up with toast almost out or down with toast mostly inside toaster.
For the plate, I used the circle border piece in the Baking Borders set and cut the plate from glossy white cardstock and used the die as a stencil to draw the blue circle in the center of the plate. The spatula is in the Oven Pop-Up set and is cut twice from different cardstocks and the handle trimmed to fit.
Sentiments: The front sentiment of “Wakey Wakey Eggs N’ Bakey” were cut using the Mini Alphabet set’s shadow and letter dies. Inside the card, The Good Luck die set was used along with a computer generated “On your new job” cut out with the banner in the Lorna Label Pop-Up. On the card back the largest label from the Lorna Label was used for a personalized message space.
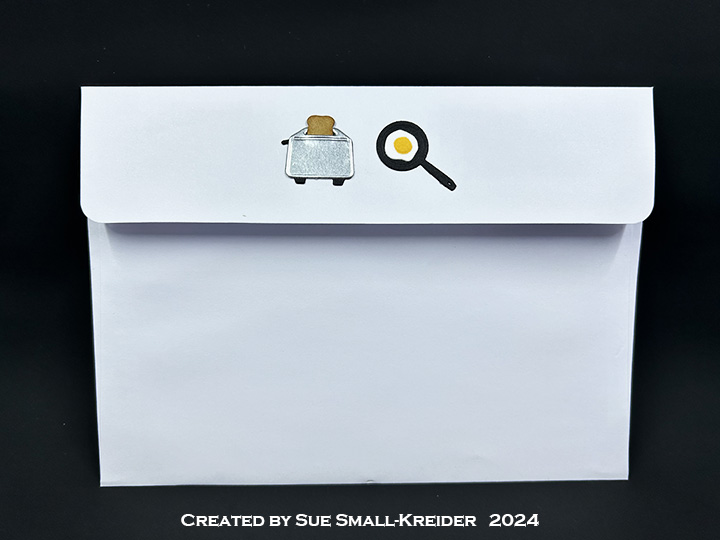
Envelope: Leftover toaster and frying pan are glued to the back of the envelope. (I would put the card and envelope in a padded envelope to mail, but it will be hand delivered.)
Thank you for reading this blog post. I hope this inspires you and makes you smile. Please like and leave comments 😊
Welcome to our Karen Burniston Products – KB Riley LLC February 2024 Release Blog Hop. The Design Team have come together with Karen today for a fun blog hop to celebrate the release of 12 new dies. Sneak peeks of the new release started last week, and the dies are available to order NOW! (Click here to go to the GIVEAWAY section.)
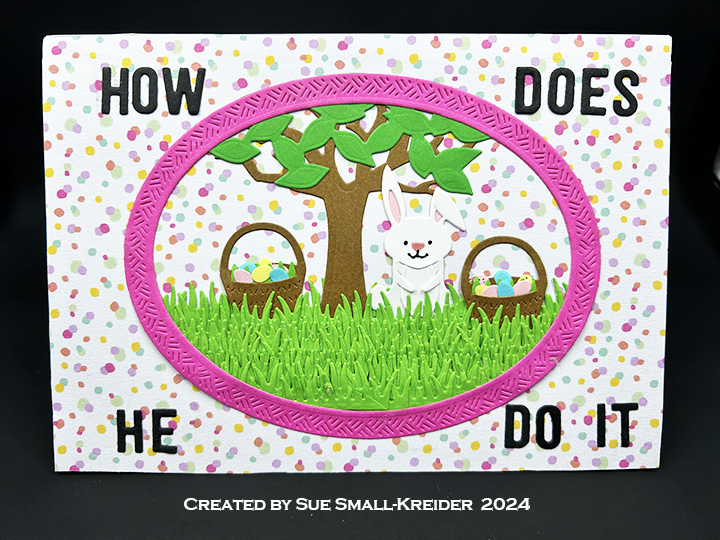
Ever wonder how the Easter Bunny gets all those eggs prepared to hide? He uses gnomes of course!
Instructions for how I created this 5×7-inch card with the gnome kitchen are in video above. The card front instructions are in written format only and are below the video. (Sorry I had a camera malfunction.)
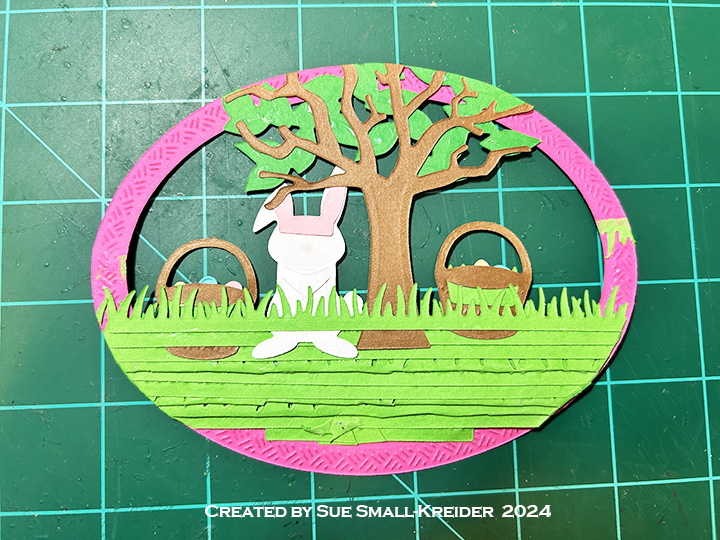
Card Front: To create the scene within the oval frame, I first had to create the scene by gluing the tree, basket and bunny to a strip of grass from the new Easter Borders set. (See assembly videos for tree and bunny on the bottom of their linked pages.)
Next I glued six grassing strips, plus the waste sections between the strip cutouts to form a grassy lawn. The second basket was glued in on a different layer than the bunny.
The oval frame was cut using the two largest dies in the Ovals – Crosshatch set. The scene was glued to the back of the frame and excess bits were trimmed off the oval.
Sentiments: For the card front sentiment of “How does he do it” I cut individual letters from black using the Mini Alphabet and Numbers set. For the “Happy Easter” I cut the shadow from white and the words from yellow cardstock using the new die set Happy Easter. I brushed a coat of glitter gloss over this sentiment to add some magic to the scene.
Thank you for reading this blog post. I hope this inspires you and makes you smile. Please like and leave comments 😊
To celebrate the release Karen Burniston and each of the Karen Burniston – KB Riley LLC Design Team members will be giving away a $25 Gift Certificate to some lucky person who comments on our blog posts, so make sure you join the hop and comment on everyone’s blog post. Winners will be randomly chosen from ALL of the blog hop comments received on our blog posts by Monday, 26 February 2024. Lots of chances to win some goodies, so just leave a comment on this post or any other blog hop posts to enter! Don’t forget to leave some way for us to contact you, in case you are a lucky winner!
It’s the Karen Burniston design team challenge for November 2023 with the theme of “What’s Cooking” using the Oven Pop-Up die set. I chose to celebrate Pi Day with apple pie making in my card.
Before starting, I recommend watching the assembly videos of the pop-ups which are usually near the bottom of the linked pages for the various dies used.
Cardbase: I started with two rectangles of heavy weight cardstock one piece 5-inches by 7-inches and the second piece 5-inches by 11-inches, scored and folded at 7-inches. The short panel was glued to the back of the 5×7 rectangle to form an A7 top fold card. (The weight of this extra long tab is used to weigh down the floor of the card when open.)
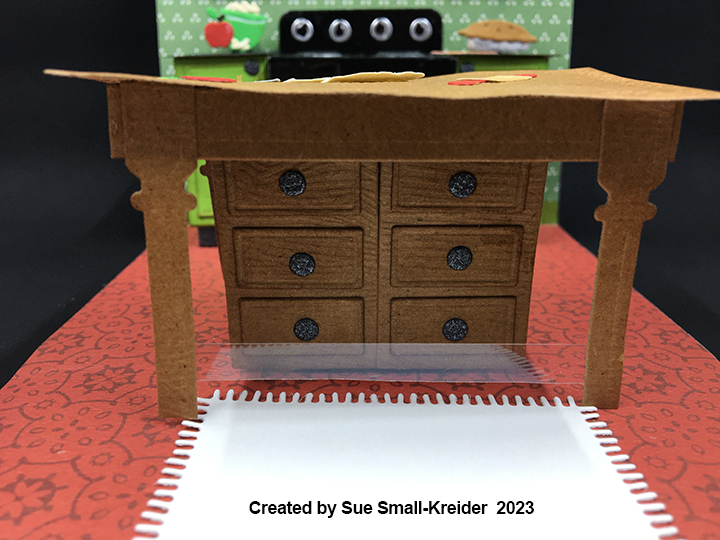
Card Back
I cut a rectangle of the red and white tablecloth paper using the large crosshatch rectangle in the Rectangle and Labels – Crosshatch die set to cover the card front. Because I cut the front decorative paper on an angle, I had some triangles of the paper left over and so I made a table on the back of the card.
Oven/Stove: I followed the basic way to make the oven and cabinets on the assembly video using the cabinet doors from the oven extra’s set. The black mirror cardstock used for the oven can be hard to get glue to stick to, so I often use double-sided tape to stick on the burners, knobs, and window acetate and Glossy Accents to attach the door handle.
Cabinets: Once the stove is attached, you can add the side cabinets. I cut the cabinets from apple green cardstock and then inked them with a brown ink to age them. The upper cabinets and lower cabinet door fronts are cut using the larger rectangle die in the Oven Extras set and then covered with the small rectangle die pieces. Upper cabinets are attached with foam tape to add some dimension to them. A stove hood was cut from silver cardstock and is hidden mostly behind the small upper middle cabinet.
To make the table legs more stable, I added a piece of wood grain cardstock under the tabletop connecting the two legs as well as a thin strip of clear acetate plastic near the bottom of the legs. Tabletop is the second smallest crosshatch rectangle in Rectangles-Crosshatch set. All tabletop parts are cut from woodgrain embossed cardstock and inked with brown ink to bring out the grain. (I think if I made this card again, I would use two layers of cardstock for the tabletop and glue the items on to the tabletop before assembling it so the top would lay flat.)
Decorations: Between the two oven sets are lots of fun pieces that add dimension and realism to the pop-up scene. The Oven Pop-Up set includes the oven mitt, stove burners and knobs, oven rack and door handle. The Oven Extras set includes the cutting board and roasting pan that I used to make a small rolling pin, the knife and the green bowl that holds the apple slices. as well as three pop-up cube strips that I used to pop-up the oven rack, pie inside the oven and the items on the counter.
Apple slices are the leftover bits from cutting two burner plates. Pie crust on table was cut freehand and the burner circle die from the Oven Pop-Up set was rubbed to emboss the pie pan and then cut away to show the trimming of the piecrust. Burner circle is silver pie pan under the crust. The baked pies are cut from silver foil cardstock and brown kraft cardstock using the Picnic Elements set. Brown is inked around the edges of pie crust. The red apples are from the Tree Fruit die set.
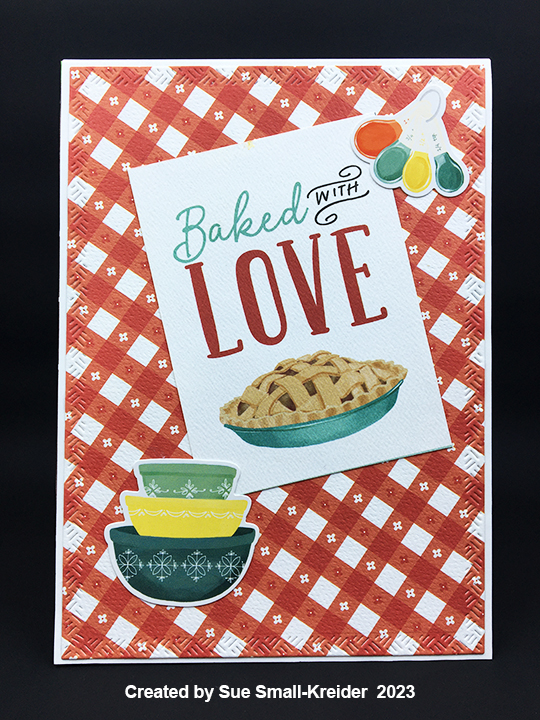
Card Front
Sentiments: All the sentiments are either stickers, journaling cards or papers from the paper collection Sunflower Market by Carta Bella. The white rug inside the card is place for a personal message and is cut using the base blanket die in the Picnic Elements set.
Envelope: A strip of pie paper is glued to the back flap of the envelope to set the tone for the card inside and are from the paper collection. Two red apples left over from inside the card were also glued on the flap.
Thank you for reading this blog post. I hope this inspires you and makes you smile. Please like and leave comments 😊
Before starting, I recommend watching the assembly videos of the pop-ups which are usually near the bottom of the linked pages for the various dies used.
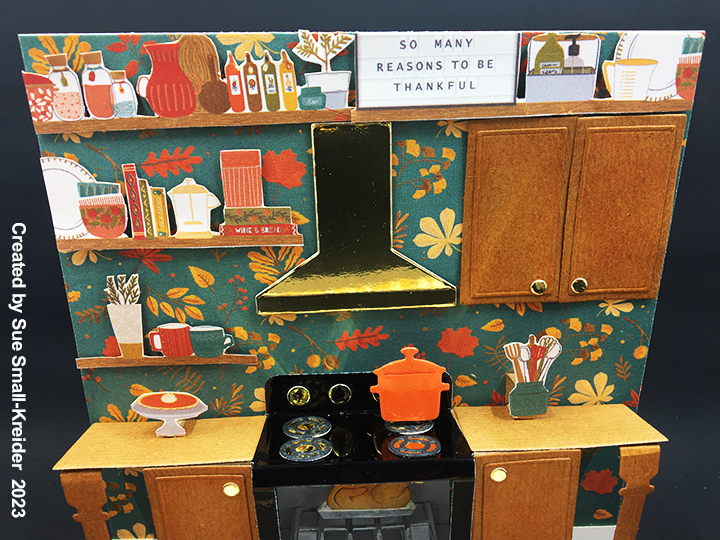
Cardbase: I started with a rectangle of patterned cardstock 12×6 inches that was folded in half to form a 6-inch square, top fold card. The outside was left to the beautiful autumn trees (Photoplay Autumn Vibes-Crunchy Leaves) while the inside top panel with a teal blue leaf wallpaper and the bottom panel a brown textured cardstock.
Oven/Stove: I was genuinely surprised at how easy the pop-up oven is assembled. It has just two pieces -the outer shell which I cut from black mirror cardstock and the inner platform which I cut from a gray cardstock. The platform attaches much like the Little Labels Pop-Up with the front tabs gluing to the floor of the card and the back tab gluing to the wall of the card. Before I attached the outer shell, I added a 1 3/8-inch square of clear plastic packaging to the back of the oven door with double-sided tape. Then I cut another oven door from gray cardstock trimming the bottom 1/8-inch shy of the fold line to cover the plastic inside when the door was opened. I also cut a 2-inch square of gray cardstock and glued it to the back wall just above the pop-up platform. This will be the inside wall of the oven. It is easier to add the items inside the oven before the outer shell is attached. I glued a silver rack to the platform and then added two pop-up cubes for the top oven rack which I trimmed one of the long edges from. Once the top rack was glued in place on the two cubes, I added another cube on top for the turkey pan which is in the Oven Extras set.
I find it easier to glue all the knobs, burners and door handle to the stove while it is still flat. (For this stove I cut all the knobs, burner base circles and door handle from gold foil cardstock). To attach the oven shell, glue the bottom to the center of the platform and then fold the oven flat and add adhesive to the back of the stove knob panel. Close the card and the top panel will be positioned on the card wall so that it forms the stove. On the tabs that come off the sides of the stove top add glue. Now position the squares of the cabinet pieces’ onto the tabs. Glue cabinet bottoms to the top edge of the platform, so that there is a toe kick below the cabinets.
Cabinets: Once the stove is attached, you can add the side cabinets. I cut the cabinets from some embossed wood grain cardstock and then inked them with Rusty Hinge ink to bring out the grain. The upper cabinets and lower cabinet door fronts are cut using the larger rectangle die in the Oven Extras set and then covered with the small rectangle die pieces.
To make the counter tops longer to fill the card, I followed Sandy Diller’s idea to use the larger rectangle door die for the countertops and two trimmed lampposts from the Street Lantern Pop-Up set for the turned legs that support the extended countertops.
Decorations: Between the two oven sets are lots of fun pieces that add dimension and realism to the pop-up scene. The Oven Pop-Up set includes the stove burners and knobs, oven rack and door handle. The Oven Extras set includes the turkey and roasting pan in the oven and pot on the stove as well as three pop-up cube strips that I used to pop-up the oven rack, pan inside the oven and pot on the stove. The turkey is cut in two pieces – leg bone base in pan and the bird body. The body I cut from kraft cardstock and inked with Fossilized Amber and Vintage Photo inks. The bone/pan base was cut from white cardstock and the pan colored with a silver marker, the body piece glued on so it sits in the pan and the bone was inked with rusty hinge ink.
For the orange pot, I used clear packing taper over orange cardstock to die-cut the pot. The plaid rug is cut from the second largest crosshatch die from the Rectangle Crosshatch set. I found a patterned paper (Photoplay Thankful Collection) with shelves of kitchen items and a message board that I fussy cut and adhered to the wall with foam squares. The cooking hood was cut from gold foil cardstock using the hood die from the Oven Extras set. The large pumpkin on the floor is from the Autumn Elements set.
Sentiments: The small strip sentiments of “give thanks with a grateful heart” (card front) and “thankful hearts” on envelope flap are from the same paper collection as the autumn trees paper used on the card front. “Happy Thanksgiving” was cut into the plaid rug with the waste pieces saved and glued on to the card floor once the rung was glued in place. These words are from Word Set 7.
Envelope: The sticker leaves and sentiment strip on the back of the envelope set the tone for the card inside and are from the Photoplay Autumn Vibes paper collection.
Thank you for reading this blog post. I hope this inspires you and makes you smile. Please like and leave comments 😊