Dancing Skeletons

“Stepping out with my baby!” coons Fred Astaire in his top hat and tails. “Putting on the Ritz!” the monster in Young Frankenstein moans with his top hat and stick. These were the sights and sounds that serve as the theme of this wedding anniversary card for a couple married close to Halloween.

The card brief was for some interactivity that was spooky (but not too spooky) and included the word “BOO!” as well as “Happy 15th Anniversary.”

Cardbase: Starting with an orange 8 1/2-inches wide by 7-inches tall rectangle folded in half for a top-fold, slimline cardbase of 3 1/2 -inches tall by 8 1/2-inches wide. The front and back panels of the card base has mats cut using the three crosshatch dies from Karen Burniston’s Long Rectangles – Crosshatch die set and papers from Graphic 45. They are glued together and then glued to the cardbase. (I found placing weights – stamping blocks or cell phone – on the mats to keep them flat as the glue dried very helpful.) The inside has a piece of white computer paper cut to 6 3/4 -inches tall by 8 1/4 -inches wide and folded in half before being adhered to the cardbase with thin double-sided tape.

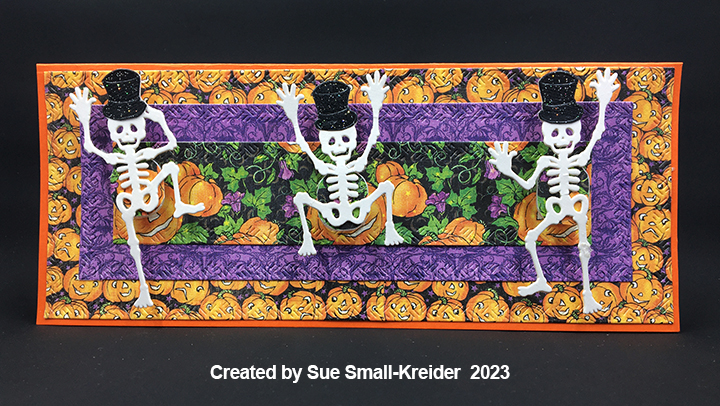
Card Front: Using the Creative Expressions Skeletons by Sue Wilson cut two each of the three skeletons dies from thick white cardstock and glued them together. Die cut just the hats/heads from black glitter cardstock. Fussy cut the hats from the heads and glue them in place. Cover one side of the wobbler springs with patterned paper to match the center mat of the card front. Glue the skeletons onto the patterned paper side of the spring and allow the glue to dry before gluing the springs to the card front.

Sentiments: The sentiments come from two different Karen Burniston die sets – Halloween Elements and Word Set 12 – Anniversary. The numbers are The Greetery’s Cake Pops Number Candles die set and fussy cut of their tabs and flame. The “th” superscript is from Karen Burniston’s Numbers set. (I cut two “Boo!” from black glitter and orange cardstock and offset them to create a shadow. For the anniversary greeting I used one layer of orange foil cardstock.)

Envelope: Karen Burniston’s jack-o-lantern border decorates the back flap of the envelope. It is cut in two pieces – the top orange and the bottom full outline from black glitter cardstock.

Thank you for reading this blog post. I hope this inspires you and makes you smile. Please like and leave comments 😊

Materials Used:

Dies

  • Creative Expressions – Craft Dies by Sue Wilson – Halloween Collection – Skeletons
  • Karen Burniston in cahoots with Riley and Company – Halloween Borders – 1247
  • Karen Burniston in cahoots with Riley and Company – Long rectangles – Crosshatch – 1151
  • Karen Burniston in cahoots with Riley and Company – Word Set 12 – Anniversary – 1137
  • Karen Burniston in cahoots with Riley and Company – Numbers – 1031
  • Karen Burniston in cahoots with Riley and Company – Halloween Elements – 1013
  • The Greetery – Wafer Thin Steel Dies – Cake Pops Number Candles

Papers

  • Graphic 45 – 8×8 Double-Sided Paper – Charmed Collection – If the Broomstick Fits
  • Graphic 45 – 8×8 Double-Sided Paper – Charmed Collection – Hey Pumpkin
  • Core’dinations – Black Glitter Cardstock – Black tie
  • Joy Craft Mirror Cardstock – Orange
  • Orange and White Cardstock
  • #10 Business Envelope – Kraft

Ink

  • Sharpie – Permanent Marker – Ultra Fine Tip – Black

Adhesives

  • Neutral PH Adhesive by LINECO
  • Fine-Tip Glue Bottle
  • Scor-Tape – Double-Sided Tape -1/8-Inch Wide

Tools

  • Die Cutting Machine
  • We R Memories – QuickStick
  • Scissors
  • Bone Folder

Miscellaneous

  • Riley & Company – Active Wobbles – Mini Action Springs

Brick Easel House

“From our home to yours” is a sentiment that is often seen during the winter holidays. House cards are one of my favorite types of cards to make.  The cards shown in today’s blog were made using new Creative Expressions Craft Dies by Sue Wilson.

To die cut a large solid die like the house front, it is best to angle it so that it goes through the die cutting machine at a diagonal rather than straight across. (See picture below.)

For the red brick house, I used leftover stenciled cardstock that was stenciled with Distress Ink in Fired Red Brick, a brick stencil and a small make-up brush (I find these inexpensive contour make-up brushes from Dollar Tree work as well as the expensive ink brushes.)

For the brown brick house, I used a digital image of a brick wall to create a tiled pattern to print on an 8 ½ x 11 sheet of white cardstock using a computer and ink jet printer.

The windows, door and roofs were all cut from lightweight white cardstock and then fussy cut. The roof and door were colored with watercolor pencils and a water brush and allowed to dry under the dies’ plastic packaging so they would be flat. Once the door was dry, I added a drop of a gold Nuvo drop for the door knob and set it aside to dry overnight.

Solid colored scraps of red and green papers were used for the bows and wreath. The topiary trees were cut from white cardstock and colored with watercolor pencils. Their pots are cut from scrap patterned paper.

To glaze the windows, I used shiny organza ribbon glued to the back of the house die-cut. (I had ¼ inch wide ribbon so had to use two stripes for each window. You could use wider ribbon.) After the ribbon has set, the decorated house front was glued to a solid house frame cut with the largest die in the set. The top of the this die has a non-cutting edge which has to be hand-cut.

The tiny decorations can be attached at this stage in the assembly.

While the die set is designed to cut a tent fold card, I decided to make it an easel card using a 5 ¼ inch by 11-inch sheet of heavy white cardstock to score and fold along the long edge at 3 inches and at 3/8 inches. I then die-cut the base, folded at the 3 inches scoring with the non-cutting top of the house die at the fold. (See photo below for how the easel base looks opened up after being cut.)

Next, I used a stamping platform, clear VersaMark watermark ink to stamp the inside greeting after rubbing clean the cardbase with an anti-static powder pad. (I like to use the round stamping tool Stampendable with my stamping platform for uniform pressure on my stamps. I also use scrap copier paper under my items being stamped to add more pressure and to keep the platform clean.) The greeting from Lou Collins’ Text{ures} Seasonal Sentiments set was heat embossed with my favorite gold detail embossing powder from Cosmic Shimmer.

To adhere the house to the easel base, fold the short roof piece closed and add glue to the 3/8 inch tab. Position the house front to match-up with folded base and press at the tab area to adhere to glued tab. Open card up to see if positioned correctly, before attaching welcome mat (stamped and heat embossed from a retired Stampin’ Up front door stamp set) with foam tape.

I used two more stamps from the Text{ures} Seasonal Sentiments set on the envelope flap with Stampin’ Up’s Crumb Cake ink, which looks very much like gold embossing on the cream-colored envelope.

Thank you for reading. If you enjoyed this blog post, please like it and follow the blog. 😊

See the more of Houses of Christmas

From Our House to Your House

Santa is Coming

A Baby is Coming

Keeping the Home Fires Burning

Red Four-Square

Santa Delivers to the Tropics

Supplies

Dies

Stamps

  • Text{ures} by Lou Collins – Seasonal Sentiments from Creative Stamping, issue 101, November 2021
  • Stampin’ Up – At Home with You – stamps & die set 143681 (Retired)

Ink & Embossing Powder

  • Stampin’ Up – Classic Stampin’ Pad – Crumb Cake
  • VersaMark – Watermark Stamp Pad
  • Cosmic Shimmer – Detail Embossing Powder – Bright Gold
  • Ranger -Embossing Powder – Black Sparkle
  • Ranger – Distress Ink – Antique Linen
  • Ranger – Distress Ink – Fired Brick
  • Brown Fine-Tipped Pen
  • Nuvo Watercolour Pencils

Paper

Miscellaneous