A Small Album of Encouragement to Chase Away the Winter Blues

This mini album was made for Craft Roulette #195 whose parameters included Project type of Encouragement, calm colors, stuffed element and ticket(s).

I have made one other journal similar to this one in a virtual workshop by Kim Hein from Art Impressions using their Mini Journal Template and stamps. In thinking about the layout, I decided that I wanted a positive affirmation for the center back page and all the interleaving pages to it to be wintery and joyful. The theme is chasing the winter blues away.

Watch a painting tutorial before coloring any of the watercolor pieces.

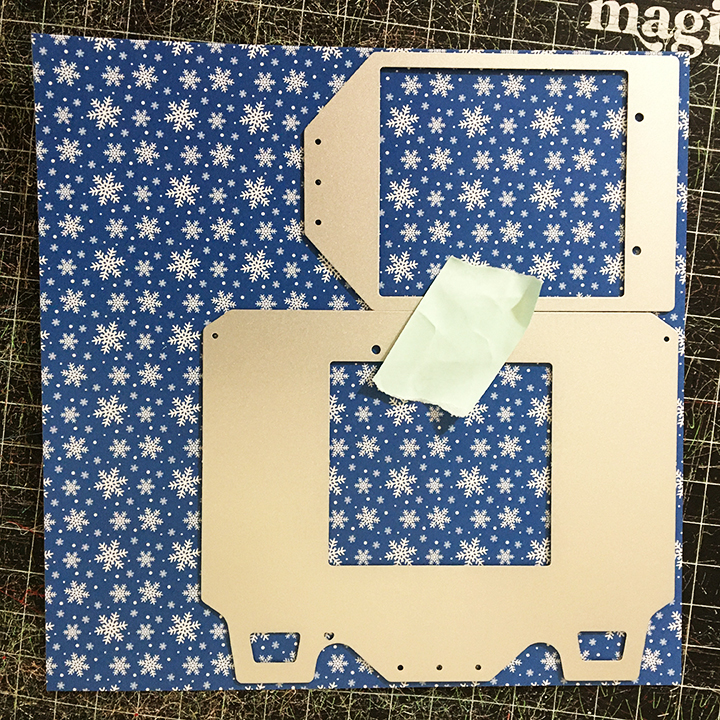
Window Journal Cover:  Using the window frame and window arch dies from the Mini Journal template set, cut the arch opening into the left album cover and two of the window frames from white cardstock.

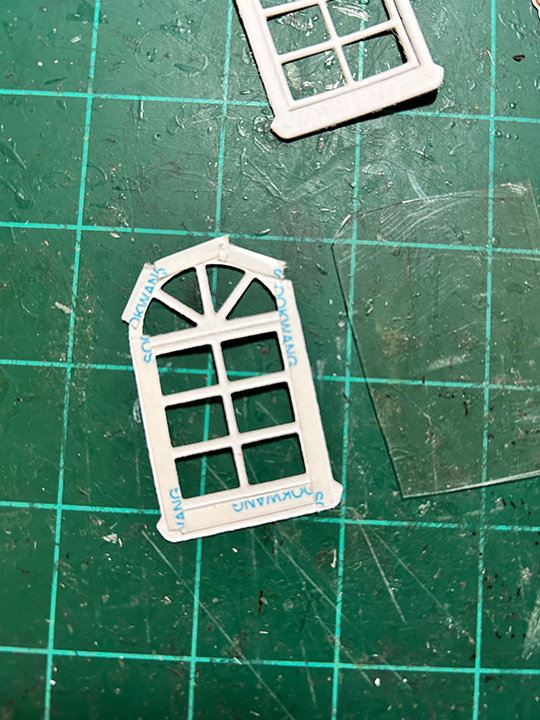
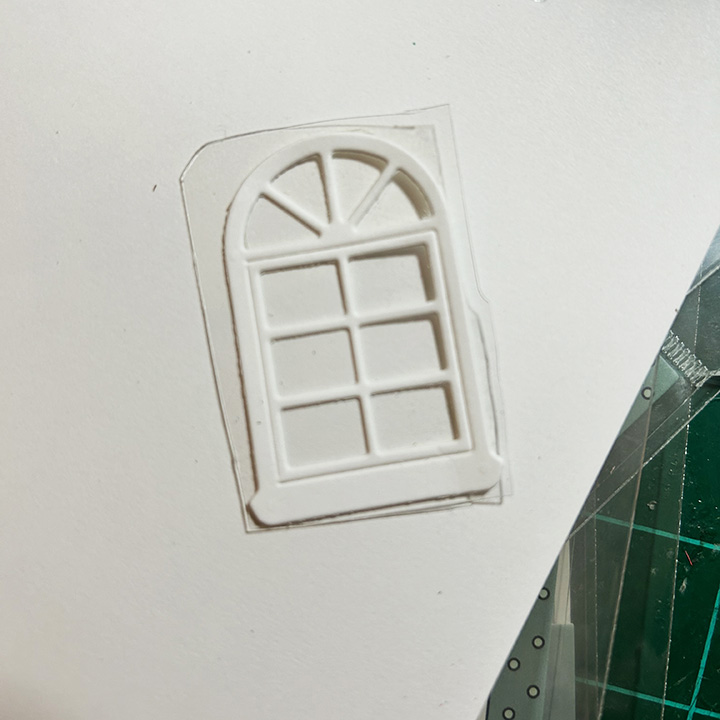
Cut a piece of clear acetate/plastic slightly larger than the window frame. Using narrow double-sided tape on the backside of one window frame, adhere the frame to the acetate piece. (Hint: If the double-sided tape is wider than the frame, peel off the backing paper and fold the tape over on itself to fit the frame.) Trim off the excess acetate around the frame. Add double sided tape to the back of the acetate and adhere over the cover opening. Attach the second frame to the back of the cover over the opening.

Room Scene Journal Cover:  Stamp onto patterned paper the chair from the Matchbook Den stamp and die set. Cut out using the matching die and trim off the tab with scissors. Stamp the fireplace onto watercolor paper using a alcohol based ink and color using water-soluble inks with a water brush. Die cut fireplace and trim off tabs. Die cut picture frame and color with ink. Write the word β€œJOY” in the frame’s picture area with a fine-tipped blue marker. Cut a scalloped edge rectangle from a wallpaper-like patterned paper using die from the Mini Journal Template set. Assemble room scene onto the right cover panel.

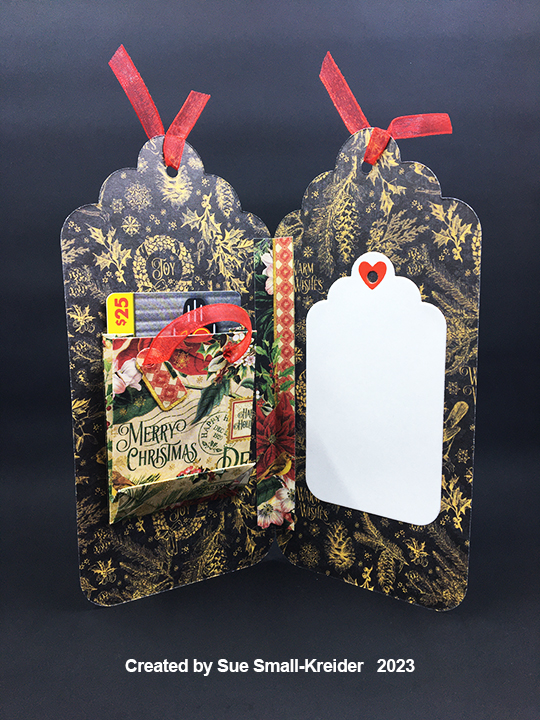
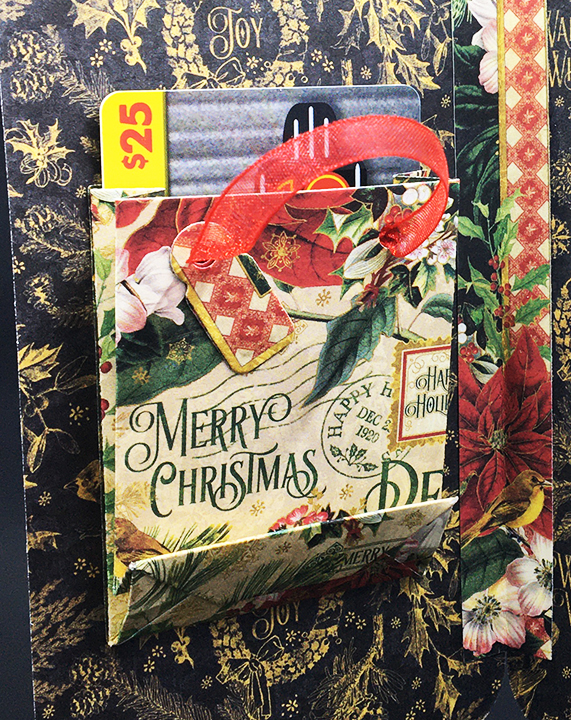
Pocket of Encouragement and Ticket Pages: The blue ticket was computer generated. The yellow tags with affirming statements were from my stash of batch foiling using Spellbinder Glimmer System products. A large needle was used to pierce and thread the embroidery floss through the tags. The scalloped background piece and white lacy pocket were die cut using dies from the Mini Journal Template set.

Joy and Snowman Twister Pages: Stamp the fronts and backs of the twister Joy and snowman using the Mini Christmas Twister stamp and die set. Watercolor them. (I used glitter gloss and glitter brush markers on the twisters.) Watch a twister assembly video before assembling. Die cut two of the rectangles from patterned paper for each page using the large straight edge rectangle die in the Mini Journal Template set. Position the decorative papers onto the white page base pieces making sure not to cover the tabs. Secure the papers to page with removable tape and tape in place the smaller of the twister oval dies. Die cut through all three layers. (I had to recut the bottom layer of decorative paper, but the impression of the die was there to show me the position.) Glue patterned paper to page. (I die cut two oval frames for the β€œJOY” page using the two twister oval dies. They made the opening too thick to get good action with the twister, so I had to trim some of the notch away. I would not use frames unless they were from very thin paper.)

Snowman and House Pages: Using the WC Snow Globe stamp and die set, stamp the house and snowman on to 2×2 1/2-inch rectangles of watercolor paper. (I watercolored the images after viewing a number of the Art Impression painting videos.) Use the frame die in the Mini Journal Template set to cut out the images. (You can use the rest of the image that is die cut as I did with the house, or die cut a frame from decorative paper as I did with the snowman.)

Little Birds Pages:  Die cut two scalloped circles using the die from the Mini Journal Template set. Stamp two birds from the Matchbook Garden set. Watercolor as shown in the opening video of this blog post. Using two of the oval cut outs from the patterned papers used for the Joy Twister page, and two scalloped rectangles of patterned paper, assemble the two bird pages. Stamp and die-cut the β€œhello Sunshine” banner from the Matchbook Garden set to place on the back center page.

Back Message and Ribbon Closure: I computer generated the back cover sentiment and used dies from the Mini Journal Template set to cut it out, frame and mat it. This panel is glued over the 24-inch piece of ribbon to hold it in place. Trim ribbon as needed once tied into a bow.

Thank you for reading this blog post. I hope this inspires you and makes you smile. Please like and leave comments 😊

Materials Used:

Dies

  • Art Impressions – Steel Dies – Mini Journal Template – 5718
  • Art Impressions – Steel Dies – Mini Christmas Twister Set – 5815
  • Art Impressions – Steel Dies – Matchbook Den Set – 5322

Stamps

  • Art Impressions – Clear Stamps – Mini Christmas Twister Set – 5815
  • Art Impressions – Clear Stamps – Matchbook Den Set – 5322
  • Art Impressions – Clear Stamps – Matchbook Garden – 5444
  • Art Impressions – Clear Stamps – WC Snow Globe Set – 5791

Foiling Plates

  • Spellbinders – Glimmer Hot Foil Plate – Mini Everyday Sentiments

Papers

  • Art Impressions – 6×6 Double-Sided 80lb Cardstock – Mini Journal Series -Mini PP -5835
  • Studio Light – 6×6 inch/15.2×15.2 cm Single-Sided Papers – Let it Snow
  • Master’s Touch – Watercolor Cold-Press Surface, Acid-Free Paper- 140lb/300gsm
  • White Cardstock

Ink

  • StazOn – Solvent Ink – Jet Black
  • Ranger – Tim Holtz – Distress Ink- Walnut Stain, Salvaged Patina, Salty ocean, Prize Ribbon, Mowed Lawn, Fossilized Amber, Forest Moss, Fired Brick and Black Soot
  • Dr. Ph. Martin’s Bleed Proof White
  • Scrapbook.com – Glitter Brush Marker – Frosty Blue
  • Sharpie – Permanent Marker – Ultra Fine Tip – Turquoise
  • Pigma – Mircon 01 Fine Tip Pen – Black
  • Nuvo – Aqua Shimmer – Glitter Gloss

Adhesives

  • Neutral PH Adhesive by LINECO
  • Fine-Tip Glue Bottle
  • Scor-Tape – Double-Sided Tape -1/8-inch wide

Tools

  • Die Cutting Machine
  • Bone Folder
  • Stamping Platform
  • LDRS – Stampendable Stamping Tool
  • Water Brushes
  • Craft Mat
  • Scissors
  • Spellbinders – Glimmer Hot Foil System
  • Large Needle

Miscellaneous

  • Gingham Ribbon – 5/8-inch wide – Blue
  • Embroidery Floss – Blue #824, Yellow #3822, Green #906

Owl And The Pussycat Valentine

It’s the Karen Burniston design team challenge for January 2023 using the Raising Platform Pop-Up die set.

For my card I chose a Valentine theme using excerpts Edward Lear’s 1870 poem β€œThe Owl and The Pussy-cat.” The action in this card comes as a wave lifting the pea-green boat up in the sea near the edge of the sand.

Cardbase: I used a purchased 5×7-inch (A7) white cardbase and covered the front and back panels with decorative blue sea patterned cardstock cut using the largest crosshatch rectangle in the Rectangles and Labels – Crosshatch set. Inside, I cut a 5×7 rectangle out of my one sheet of wave paper making the angle of the waves to match the angle of the raising platform base. From the scraps of wave paper, I pieced out the other inside panel leaving the bottom right corner without waves. I cut a sandy beach from patterned paper to cover the right corner. The edges of the beach were inked with blue ink and sea foam was added using a textured white paint. Trim off excess decorative paper from the card edges.

Raising Platform: (Watch the assembly video before starting.) From blue sea patterned paper cut, using the Raising Platform Pop-Up set, the β€œL” shaped mechanism piece, the largest label and a strip 1/4-inch by 2 1/2-inches. (Save the strip for use under the Boat section.)

(If your mechanism is cut from a one-sided patterned paper, cut a coordinating blue-green pattern paper cut two of each of the decorative diamond-shaped panels to cover the inside of the mechanism that is visible when assembled.)

Attach to inside of the card base as shown in assembly video/package instructions. Add waves cut from blue-green patterned cardstock using a die from the Tropical Scene set to the mechanism base making sure they don’t have catchpoints.

Owl: (Watch the assembly video before starting.) Cut two owls from brown, a triangle beak and a set of feet from yellow, one set of eyes from black and one oval from white using the Feathered Animals set. Glue white oval to back of one owl piece and attach black eyes. Add white dots to eyes as shown on packaging. Glue back owl piece to front and glue in the brown eye circles to back of head. Using the owl die, stencil on the feathers and wings to front and back of owl.

Cat: (Watch the assembly video before starting.) Cut two cats and two collars using the Cat and Dog set. Using die, stencil face on to one cat piece. Trim tag off one collar and glue to back cat piece and tagged collar to front cat piece. (I used markers and glitter brushes to color the collar.) Glue the green tab cut from scrap green cardstock used for the boat to the back side of one cat piece and then glue the other piece sandwiching the tabbed piece in between.

Boat: The boat is made by trimming off the two arm sections of the Raising Platform Pop-Up β€œL” shaped mechanism. (See photo for white sections to keep.) Train all the folds in the two pieces. Glue the tab to the inside of each piece to form the pointed front and back of the boat. Place one piece inside the other piece so that the untabbed tip of one piece points into the base point of the other and fold the sides to form a triangle. (See photo of inside of boat for folds.) Repeat with other piece. Glue the two pieces together making sure the boat is long enough to hold the cat and owl pieces.

Take the strip 1/4-inch by 2 1/2-inches cut in the Raising Platform section and fold in half. Fold again a 1/2-inch from the center fold and then 3/4-inch from the center fold. Repeat on the other side of the fold. (If using a one-sided patterned cardstock, cut 1/2-inch strips to cover the two ends that will show when assembled.) glue strip to bottom of boat as shown in photo.

Cut two more of the boat pieces for the inside of the boat. Trim off tabs and cut down the center fold to form diamond shapes. Glue in the cat and the owl inside the boat using their green tabs. Glue green boat diamonds inside the boat covering the animals’ tabs.  Trim off excess patterned paper as needed along boat top edges.

Fold strip on bottom of boat form a cradle that the boat sets on when placed on raising platform . Adjust strip’s folds as needed. Glue cradle to platform.

Train boat and platform to close properly.

Sentiments: I used computer generated sentiments sized to be cut using dies in the Rectangles and Labels – Crosshatch set. I aged the pieces that were printed on cream cardstock by roughing-up the edges with a distress tool (knife sharpener) and crumpling the pieces and inking with yellow, brown and blue inks. On the inside sentiment I stamped in yellow a crescent moon in the clouds and on the front sentiment shooting stars in the corners. Tiny iridescent star confetti were glued randomly on the sentiments. On the card back credit is given to Edward Lear for the poem excerpts.

Thank you for reading this blog post. I hope this inspires you and makes you smile. Please like and leave comments 😊

Materials Used:

Dies

Stamps

  • Penny Black – Clear Stamps – My Universe
  • Hero Arts – Clear Stamps – Galaxy Peek-A-Boo Parts

Papers

  • Kaisercraft – 12×12 Double-Sided Paper – Uncharted Waters
  • Love Cardmaking issue 4 – Digital Papers – By the Shore
  • Mrs. Sparkle & Co. – 5.5 x7.5 Single-Sided Paper – Woodgrain Color
  • Park Lane Paperie – 12Γ—12 Printed Paper – Nautical
  • Bazzill – 8.5Γ—11 Textured Cardstock – Tiara -18-1002
  • Fun Stampers Journey – 8.5Γ—11 Cardstock – Pumpkin Bread
  • Black, Yellow, White and Cream Cardstock
  • Park Lane Paperie – A7 Cardbase and Envelope – White

Ink

  • Stampin’ Up – Classic Stampin’ Pad – Pineapple Punch
  • Ranger – Tim Holtz – Distress Ink- Vintage Photo
  • Hampton Art – Acid Free, Dye-based Mini ink Cube – Light Blue
  • Nellie’s Choice – Effect Snow
  • Sharpie – Permanent Marker – Ultra Fine Point – Black
  • Sharpie – Permanent Marker – Ultra Fine Point – Brown
  • Sharpie – Permanent Marker –Fine Point – Pink
  • Pigma – Mircon 03 Fine Tip Pen – Black
  • Crafter’s Square – Metallic Marker – Gold
  • Scrapebook.com – Glitter Brush Marker – Red Shimmer

Adhesives

Tools

Miscellaneous

  • This Calls For Confetti – Bokeh Bliss Teeny Tiny Mix
  • This Calls For Confetti – Leprechaun Gold Sequin

Being Fishy Just For Fun

I’ve had some flat back fish embellishments in my stash for awhile and the Candy Hearts Box in the December 2023 release by Karen Burniston begged to be the container for these candy-like fish.

The box is cut in one piece. (I was able to cut it from an A5 (5.83 x 8.27 inches/14.8 x 21 cm) piece of blue water patterned paper.) Before assembling, cut out the window with the largest of the square dies in the set and back it with a scrap of clear acetate or plastic packaging. Then, adhere the cut-out inside the box as a backdrop for the window.

The sentiment of β€œHB2U” (Happy Birthday to You) are cut using the Mini Alphabet and Numbers die set. Use the stitched medium size square die from the box set for the white label on the back of the box.

Thank you for reading this blog post. I hope this inspires you and makes you smile. Please like and leave comments 😊

Materials Used:

Dies

Papers

  • Papercraft Society – Sam Calcott’s Underwater & Nautical Box – A5 Size Papers -Water Background Cardstock
  • White, Red and Black Cardstock Scraps
  • Grafix Dura-Lar .005 Clear Film (Acetate/Plastic)

Adhesives

Tools

Miscellaneous

  • Buttons Galore & More – Flatbackz Embellishments – Aquarium
  • Buttons Galore & More – Flatbackz Embellishments – Bug Eyes

Winter Bag Bear

Needing something cute to put a gift card in with a winter theme, I quickly created this mini gift bag with a polar bear holding a heart.

Karen Burniston’s December 2023 release includes the Mini Gift Bag die set that makes a collapsing bag that will hold a gift card and fit in the palm of your hand.

If you use a patterned paper that doesn’t have a design with a distinct up and down to it, you can cut the entire bag from a 6×6 piece of paper.

I use red vellum to cut a heart with the heart die in the set.  The bear is from the Winter Animals set and the tiny heart he holds comes from the Safari Animals sets.

For the bag handles, I used 1/4-inch wide organza ribbon tied as a loop for each side with the knots hidden inside the bag.

Thank you for reading this blog post. I hope this inspires you and makes you smile. Please like and leave comments 😊

Materials Used:

Dies

Papers

  • Ink N’ Splatter – 6×6 Double-Sided Paper Pad – Winter Blues
  • The Paper Studio – 8.5×11-inch – Red Vellum
  • White, Red and Gray Cardstock

Ink

Adhesives

Tools

Miscellaneous

  • Blue Organza Ribbon – 1/4-inch wide

Bagged and Tagged

Beautiful holiday papers inspired this gift card holder/Christmas card.

It uses two of the new die sets in Karen Burniston’s December 2023 release – Mini Gift Bag and Topper Tags.

Cardbase: Cut two tags using the largest die in the topper tags set from decorative paper. From the same double-sided paper cut a strip 5×1/2-inch and fold lengthwise in half for the card hinge. Glue the hinge to the tag edges to form the inside of the card. Tie ribbon through the tag hole on each side of the card.

Gift Bag: Plan out what images you want to see on the mini gift bag when it is attached. Center the larger of the two bag dies using the square opening over your desired image making sure the top flat die edge with holes is at the top of your image. (I have a few upside-down paper bags in my stash.) Assemble bag as shown on the packaging. Glue the flat side of the bag to the inside of the card. Add the ribbon handle by threading ribbon through the holes and knotting it inside the bag.

Sentiments: The main sentiments of β€œMerry & Bright,” β€œMerry Christmas,” and β€œWarm Wishes” are all on the decorative cardstock. The white tag label inside for a personal message is cut from smallest tag in the tag set and uses the heart hole protector also in the set.

Envelope: The tag card easily fits into a #10 business envelope.

Thank you for reading this blog post. I hope this inspires you and makes you smile. Please like and leave comments 😊

Materials Used:

Dies

Papers

  • Graphic 45 – 8×8 Double-Sided Paper Pad – Warm Winter Wishes
  • White and Red Cardstock
  • #10 Business Envelope – Kraft

Adhesives

Tools

Miscellaneous

  • Red Organza Ribbon – 1/4-inch wide

12 Days of Christmas Gift Bags Tree

Need a fun way to give gift cards? Make a gift bag tree.

I used the new Mini Gift Bag die set by Karen Burniston to make 12 bags using patterned papers from a 12 Days of Christmas collection. You could use a jewelry tree or any other style of tree that would hold a number of bags. I made my own tree from foam core board and clear glitter. I plan to add gift cards, candy, crafting supplies and jewelry to my mini gift bags.

Bags: Cut out the bag pieces using the two bag dies for each bag. (If you use pattern paper with a design that has a top and bottom make sure the flat top of the die with the holes is at the top of your paper’s design top too.) Train the folds of the pieces. (I start with the tabs and fold that goes across near the bottom of the bag and then do the diagonal folds on the side that make the bag bottom fold up.) Fold the large back piece as directed on packaging and then add glue to the long side tabs. Glue front onto tabs. Fold in the tabs on bag bottom and glue shut. (You could use narrow double-sided tape instead of glue.) Let glue dry before adding ribbon or cording for handles. (I threaded the cording through the holes and tied knots to hold the cording inside the bag.) Using the Mini Alphabet and Numbers set, I glued gold numbers onto the front and backs of the bags.

Tree: Trace two of the trees from the downloadable pattern below onto foam core. (Pattern was cut from an 8.5×11-inch sheet of paper.) On one tree I made the slit go from the middle up and the other tree the slit go from the middle down. Using a craft knife cut out the trees. Fit the two trees together and adjust the fit by trimming off bits of the slits as needed. Use white paint (I used gesso) to cover any pen or pencil marks. Place the tree on a large sheet of paper to catch extra glitter. Cover a section of the tree with glue and sprinkle clear glitter over the tree to cover. Use the large sheet of paper to put extra glitter back into its container. Repeat gluing and glittering a new section until tree is covered with glitter.

Thank you for reading this blog post. I hope this inspires you and makes you smile. Please like and leave comments 😊

Materials Used:

Dies

Papers

  • Crafter’s Companion – 6×6 Double-Sided Paper Pad – 12 Days of Christmas
  • Matte Gold Cardstock
  • White Foam Core Board

Ink

  • Stampin’ Up – Classic Stampin’ Pad – Early Espresso
  • Memento – Fade-Resistant Dye ink – Tuxedo Black
  • Ranger – Tim Holtz – Distress Ink- Walnut Stain
  • Dark Green Fine Tipped Marker
  • Farber-Castell – Pitt Artist Pen- Bullet Nib – White-101 Marker – Snow
  • Sharpie – Permanent Marker – Ultra Fine Tip – Black
  • Pigma – Mircon 01 Fine Tip Pen – Black
  • Recollections Opaque Marker – Snow
  • Sakura – Gelly Roll Pen – Medium – White
  • Nuvo – Aqua Shimmer – Glitter Gloss

Adhesives

Tools

Miscellaneous

  • Cording – Thin Gold and Thick Gold/Green/Red
  • Ranger – Tim Holtz Distress – Rock Candy Clear Glitter

Under the Christmas Tree

Welcome to our Karen Burniston Products – KB Riley LLC December 2023 Release Blog Hop. (See details at the end of this post for blog list.) The Design Team have come together with Karen today for a fun blog hop to celebrate the release of 7 new dies. Sneak peeks of the new release started last week, and the dies are available to order NOW!

For this fun and interactive Christmas card with two mini ornaments that can go on the recipient’s own Christmas tree, I combined two of the new die sets in Karen Burniston’s December 2023 release – Topper Tags and Raising Platform Pop-Up. I also used previously released sets – Small Script -Christmas, Pattern Plate – Holly and Holiday Charms – to decorate the card.

(PLEASE NOTE: While the video shows both the raising platform installed going up and a second card with it going down, this tutorial will focus only on the assembly of the platform raising UP. You can create a down version by turning the mechanism so the points of the mechanism arms point down.)

Cardbase: Cut two of the largest tags from the Topper Tags set from decorative paper that you want for your card outside. Repeat with another paper for the card inside. (Note: I had to piece one of my card fronts because I was shy about an inch with the red paper.) Cut a strip of decorative outside paper 1/2-inch by 2-inches, fold lengthwise in half and glue inside the front card tags to form a hinge. Glue the inside pieces over the hinge and match-up the tag edges.

Raising Platform: The Raising Platform Pop-Up has two main pieces – the mechanism and the label. Cut one of the L-shaped mechanism pieces from decorative paper. (I cut two diamond shaped pieces to cover the inside of back arm.) Train all the folds and follow the package directions only putting glue on the triangle I marked with an β€œx.”

Cut from white cardstock the largest of the labels in the set. Fold in half and burnish with a bone folder for a crisp fold. Glue the folded label into the mechanism. (This can be a fiddly bit making sure the mechanism’s triangular tab edges are matching the label’s folded edge.) Test the opening of the mechanism to see if all is aligned and opening as desired before gluing into the card. Be sure to point the tips of the mechanism arms up when installing in the card, as they point to the direction that the platform will move. (Please note this method of installing the mechanism will not allow the mechanism to open totally flat. Karen’s assembly video has an alternate installation method that will allow for a flat opening of the card.)

Tree Branches: Cut two 1-inch by 2 1/4-inch rectangles from a green paper. Fold the rectangles in half lengthwise and glue together. Glue the strips to either side of the white label’s back. Cut six branches from the Holiday Charms Set from a green paper (I used a green and white patterned paper that gives the effect of snow on the branches.) Glue two branches to each strip making sure they don’t extend outside of the card when closed. Snip the remaining two branches into smaller pieces to decorate the top of the label.

Ornaments:  The ornaments come from the Holiday Charms set. Cut two of both the circle and ornament topper piece for each ornament from foil cardstock Glue the circles back-to-back and then attach the ornament toppers onto the circle with them connecting back-to-back at their upper loop. You can add the snow flake decoration as I did on the one card or leave the shiny ornaments as they are.

Decorations: When using patterned paper collections that have journaling cards and other cut-out decorative elements, I use them to decorate. From the Topper Tags set I used the flower hole protectors both inside and out. The foiled holly leaves and berries comes from the Holly Pattern Plate trimmed regrouped.

Sentiments: Using the Small Script – Christmas word set, cut just the words β€œChristmas greetings” from red foil cardstock and adhere to the white label. (While you could adhere the words to the label before folding it. I find the mechanism works better when applying the words over the fold.)

Envelope: These large tag cards with their tied ribbons will fit nicely into #10 business envelopes.

Thank you for reading this blog post. I hope this inspires you and makes you smile. Please like and leave comments 😊

Materials Used:

Dies

Papers

  • Graphic 45 – 8×8 Double-Sided Paper Collection – β€˜Twas The Night Before Christmas
  • The Paper Studio – 4.5in x 6.5in Single-Sided Textured Paper Pad – Old World Winter
  • Silver, Gold, Red and Green Foil Cardstock
  • White Cardstock
  • #10 Business Envelopes – White

Adhesives

Tools

Miscellaneous

  • Red Organza Ribbon – 1/4-Inch Wide
  • Red and Green Bakers Twine

GIVEAWAY:

To celebrate the release Karen Burniston and each of the Karen Burniston – KB Riley LLC Design Team members will be giving away a $25 Gift Certificate to some lucky person who comments on our blog posts, so make sure you join the hop and comment on everyone’s blog post. Winners will be randomly chosen from ALL of the blog hop comments received on our blog posts by Monday,18th December 2023. Lots of chances to win some goodies, so just leave a comment on this post or any other blog hop posts to enter! Don’t forget to leave some way for us to contact you, in case you are a lucky winner!

Karen Burniston – https://karenburniston.typepad.com/i_am_not_lefthanded/2023/12/karen-burniston-december-2023-blog-hop.html

Lois Bak – https://clownmomcreations.blogspot.com/2023/12/karen-burniston-new-release.html

Sue Small-Kreider – YOU ARE HERE

Frances Byrne – https://stampowl.blogspot.com/2023/12/karen-burniston-kb-riley-llc-december.html

Jennifer Webster https://www.jlwebstercreations.com/2023/12/karen-burniston-kb-riley-llc-december.html

Fran Sabad – https://fransabad.com/cards/december-release-blog-hop-and-give-away/

Suzanne Smithttps://knutselsuus.blogspot.com/2023/12/kb-riley-llc-december-2023-release-blog.html

Nicky Fodenhttps://mymessycraftroomme.wordpress.com/?p=6397&preview=true

Sandy Diller – https://sandydiller.blogspot.com/2023/12/new-release-blog-hop.html

A Heartfelt Thank You

This card was made for Craft Roulette #192 whose parameters included a thank you card, roadside market colors, yard(s) element and confetti.

Heartfelt thanks is the emotion that this accordion-fold card expresses. Inspired by Karen Burniston’s December 2023 release Heart Add-ons pivoting panel, the card features a shaker element filled with confetti. Other Karen Burniston dies were used including: Fence Add-Ons, Thank You and Fancy Label Accordion.

Before starting, watch the assembly videos of the pop-ups which are usually near the bottom of the linked pages for the various die sets used.

Accordion Frames: Cut three accordion frames from heavy blue cardstock using the main large die in the Fancy Label Accordion set. Train the folds of each frame and set aside. (You will cut a fourth accordion frame under the Shaker section using the same heavy cardstock.)

Fence Panel: Using the largest of the label die in the Fancy Label Accordion set, tape it inside the accordion frame die and cut two from decorative paper. Save the inner fancy labels for use on the fence panel. From the decorative paper accordion frames, trim the smaller panel frames away from the larger frame leaving the small tabs attached to the frames. Set both accordion frames and small frames aside for later use. From brown decorative paper cut one fence using the fence die in the Fence Add-Ons set. Cut flowers and grass to decorate fence with using dies also in the Fence Add-Ons set.

Attach a fancy label to the center panel of one of the blue accordion frames. Trim fence to fit panel and adhere to panel. Decorate the fence with grass and flowers. Glue the remaining fancy label to the reverse side of center panel. Set the piece aside.

Heart Pivot Panel:  Glue the tab of one blue accordion frame to the backside of the remaining blue accordion frame. Cut from a lightweight teal blue cardstock the Hearts-Add-Ons panel. Train the folds of the hearts panel. From the blue accordion frames cut off half of the center panel leaving them attached at their pivot points. (See photo)

Put glue on the left back side edge of the teal blue hearts panel before attaching to the left blue center panel of the blue accordion frame. Match up the fancy curved edges of the panels. With the blue connecting post of the accordion frame behind the teal blue hearts panel, attach the right side of the hearts panel to the right accordion frame panel.

Cut a hearts panel from decorative paper. Trim out the string of hearts and save to decorate the backside of hearts. Glue decorative panel to the front side of hearts panel. Using the smaller decorative heart dies in the set, cut a number of hearts from patterned paper. Decorate both front and back sides of panel.  

Glue the panel frames to the front of the hearts panel with the panel tabs being covered with decorative paper. Trim off the parts of the frames at the center of the hearts panel that are not attached.  Set piece aside.

Shaker: Using the largest of the label die in the Fancy Label Accordion set, tape it inside the accordion frame die. Cut the fourth frame piece from the blue heavy cardstock. Keep the dies tapped together to cut four heavy cardstock frames and two decorative paper frames. Use smaller pieces of the heavy cardstock for the four panel frames. Cut the full accordion frame with the decorative paper. Trim the panel frames from the accordion frames and save the decorative paper frames for later. Cut two squares of clear acetate or plastic slightly larger than the panel frames.

To assemble, glue two blue panel frame pieces together. Using 1/8-inch wide double-sided tape around the blue frame, adhere the acetate to frame. Trim off overhanging acetate. Attach decorative pink paper frame over the acetate with more double-sided tape matching up edges. Glue the assembly to the accordion frame panel matching blue frame to blue frame. Repeat with the remaining two blue frames, pink decorative paper frame and acetate piece, but DO NOT attach to accordion frame panel.

Using an anti-static tool, swipe powder over all of the acetate inside the frame and the sides of the shaker frames. Add confetti/sequins to the frame attached to the accordion frame. Glue the remaining shaker frame over the confetti filled frame. Leave undisturbed until glue dries. (To listen to commentary about the anti-static products I used go to my video.)

Accordion Assembly: With all the accordion frames decorated, assembly can begin. Collect the four decorative paper accordion frames previously cut in the Shaker and Fence Panel sections. Cut four more frames from decorative paper, trimming out the inner panels which can be saved for later.  Glue the fence panel accordion frame tab to the backside of the first heart panel accordion frame. Glue the second heart panel accordion frame tab to the backside of the shaker accordion frame.  Trim off the unused tab on the shaker accordion frame. Cover the backs of all the accordion frames with the decorative paper frames. (This should hide all the tabs.) Glue decorative paper frames to fronts of the accordion frames.

Once all the decoration of frames is completed, glue the center panels of fence and shaker accordion frames to the heart panels. (Note: the tabs that attach to the shaker panel are glued to the front of the shaker panel, while the fence tabs are glued to the back of the hearts panel.)

Cut one of the decorative paper inner panels in half to cover the backsides of the panels cut in half that the hearts panel is attached to. (Green paper in the photo.)

Sentiment: β€œThank You” is a die-cut that was cut twice from the same double-sided paper with the blue side used as an off-set shadow behind the pink patterned paper.

Envelope: The card is thick and would require a padded bubble envelope if not hand delivered.

Thank you for reading this blog post. I hope this inspires you and makes you smile. Please like and leave comments 😊

Materials Used:

Dies

Papers

  • Hot Off The Press – 12×12 Double-Sided Paper Pad – Sweet Life
  • Spellbinders – 8.5×11 100 lb Cardstock – Waterfall
  • Teal Blue 65 lb Cardstock
  • Grafix – 8.5×11 Acetate .0075 – Clear

Adhesives

Tools

Confetti

  • This Calls for Confetti – Bokeh Bliss Teeny Tiny Mix
  • This Calls for Confetti – Crystal Metallic Aqua Violet
  • This Calls for Confetti – Opaque Iridescent Celadon
  • Diamond-Cut Tiny Green Metal Confetti