It’s Sneak Peek Week for Karen Burniston’s February 2024 release. These dies will be available for purchase on February 19, 2024 on the KB Riley LLC website.

Inspired by a bookmark card I recently made, I decided to make a bunny bookmark slimline card using Karen Burniston’s new Animal Add-ons 5, Easter Borders, and Happy Easter.
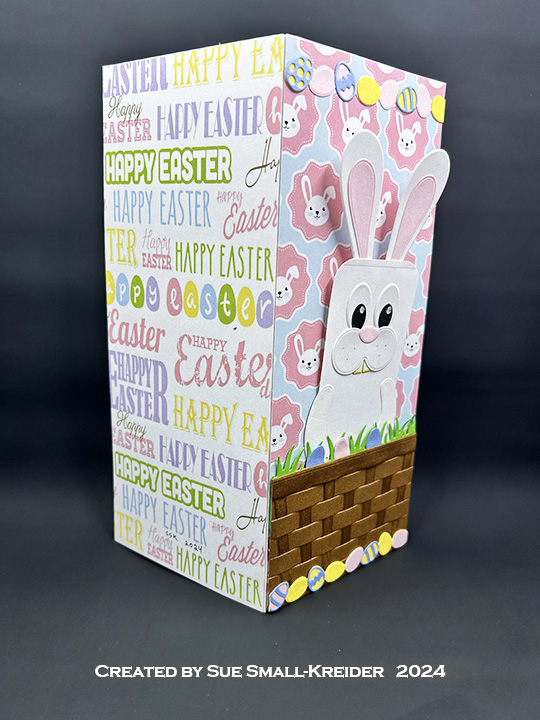
Cardbase: Start with a 7.25×8.75-inch rectangle of heavy white cardstock and fold to create a slimline card that is slightly larger than 3.5×8.5-inches. (I folded my cardbase crooked and had to even up the sides by trimming off some.) Using decorative Easter papers cover the front and back of the card with full sheets. Use scraps to cover the top and bottom of the inside of the card. Make sure to leave a gap where the card fold is in the inside papers.
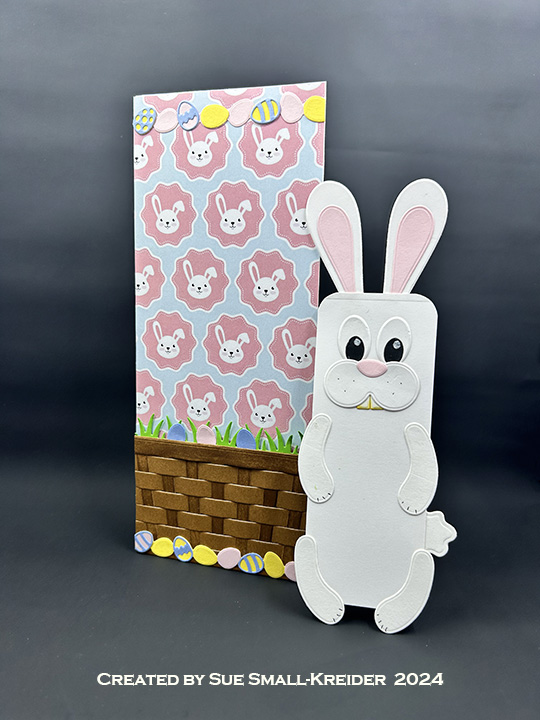
Bunny Bookmark: Cut a 2×5-inch rectangle from heavy white cardstock. Round corners with a corner punch. Using the Animal Add-ons 5 set, cut the two large ears, two large oval eyes, one double circle piece, one split square teeth piece, one wavy circle tail piece and four arm pieces from white cardstock. Cut two smaller ear pieces and one triangular nose piece from pink. Cut two smaller eye pieces from black. Using a white gel pen use stencil feature to add white highlight to black portion of eyes. With a fine-tipped black pen add three dots to double circle piece for whiskers. Add three small lines to each paw for nails. Ink the edges of the teeth piece very lightly with a pale yellow ink. Assemble the face of bunny using package picture as a guide onto the top of the rectangle. Glue ears to back of rectangle and arms and hind legs to front of rectangle. (Hint: glue the hind legs to bottom corners of rectangle then glue tail to back side just above the hind leg. Then glue arms so that the paw is just above top of tail.)
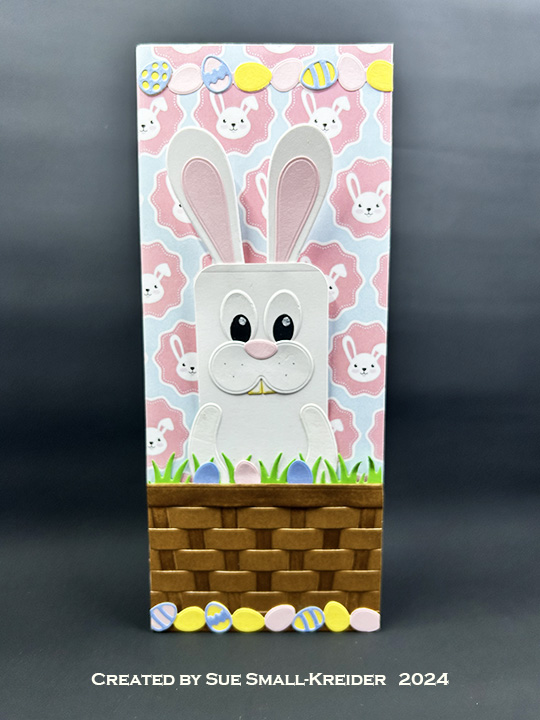
Basket Pocket: (Follow directions in assembly video at bottom of linked page.) Make one Wide Woven Basket Box Card panel from brown. Ink the slat pieces with brown ink before weaving into main basket piece and glue in place. Trim off tab. Cut from green cardstock a grassy strip and glue to back side of basket top. Using thin strips of foam tape on the bottom and sides of basket panel, attach to card front to form a pocket. Insert bunny bookmark.
Raising Platform: (Follow directions in assembly video at bottom of linked page the Raising Platform Pop-Up.) Cut one mechanism piece from double-sided decorative cardstock. (I used a carrot and bunny print.) Assemble onto a flattened cardbase. Cut one of the largest fancy label from white cardstock and fold in half. Glue on sentiment. Train the fold with the sentiment. Attach sentiment label to mechanism.
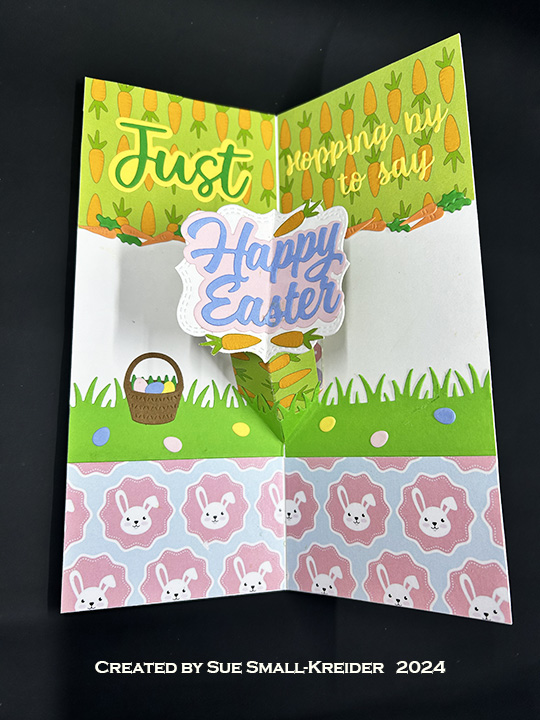
Decorations: Cut two egg borders from Easter Borders set using two different colors of cardstock. Cut two sets of decorative eggs from the same set in a darker color. Trim egg border to width of card and use left over eggs to decorate egg borders along with decorative eggs. Glue to finished borders to bottom and top of card front. Add any extra eggs to basket grass.
Cut two more grass strips from Wide Woven Basket Box Card set and glue to cardbase above bottom decorative paper inside card. Decorate with eggs and basket from the Animal Add-ons 5 set. Cut two of the carrot borders from the Easter Borders set from orange and two sets of carrot tops from green. Assemble carrots using a Quickstik tool or tweezers. Glue carrots to base of carrot paper inside card. (I had to cut the carrot border to cover the edge aesthetically.) Glue extra carrots to the sentiment label. (I cut some carrots from my decorative paper for the label.)
Sentiment: Using the new Happy Easter set, I cut the shadow from pink and the words from blue then cardstock since they are going on top of the platform label and being folded in half. The large “Just” with shadow is from Word Set 15 – Just Because. I had to do minor word surgery using Word Set 4 – Just A Note taking the “H” from “Hooray” and replacing the first “p” in “popping” with it to make “Hopping.” The word “by” comes from words in both word sets. “to say” is from Word Set 4.
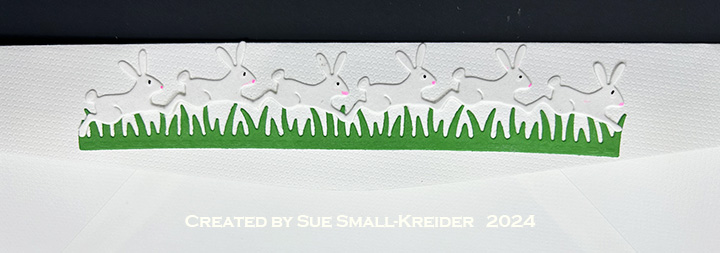
Envelope: #10 business envelope back flaps are perfect to use border dies on. I cut the hopping rabbits and grass borders from the Easter Borders set and used fine-tipped pens to add the eyes and noses on the rabbits.
Thank you for reading this blog post. I hope this inspires you and makes you smile. Please like and leave comments 😊
Materials Used:
Dies
- Karen Burniston in cahoots with Riley and Company – Animal Add-ons 5 – 1265
- Karen Burniston in cahoots with Riley and Company – Easter Borders – 1264
- Karen Burniston in cahoots with Riley and Company – Happy Easter – 1263
- Karen Burniston in cahoots with Riley and Company – Raising Platform Pop-Up – 1254
- Karen Burniston in cahoots with Riley and Company – Wide Woven Basket Box Card – 1223
- Karen Burniston in cahoots with Riley and Company – Word Set 15 – Just Because – 1205
- Karen Burniston in cahoots with Riley and Company – Word Set 4 – Just A Note – 1027
Papers
- Kat Scrappiness –10.75×4-Inches Double-Sided, Slimline Sized Patterned Paper- Easter on Parade
- Spellbinder’s – 8.5×11 Color Essentials Cardstock – Snowdrift
- Blue, Brown, Green, Orange, Pink and Yellow Cardstock
- #10 business Envelope – White
Ink
- Ranger – Tim Holtz – Distress Ink- Antique Linen and Gathered Twigs
- Pigma – Mircon 01 Fine Tip Pen – Black
- Sakura – Gelly Roll Pen – Medium – White
- Pink Gel Pen
Adhesives
Tools
- Die Cutting Machine
- Scoring Board
- Bone Folder
- Craft Mat
- We R Memories – QuickStick
- Craft Clips
- Sponge Dauber
- Stamping Blocks used as paperweights
- Scissors
- Large Corner Punch
