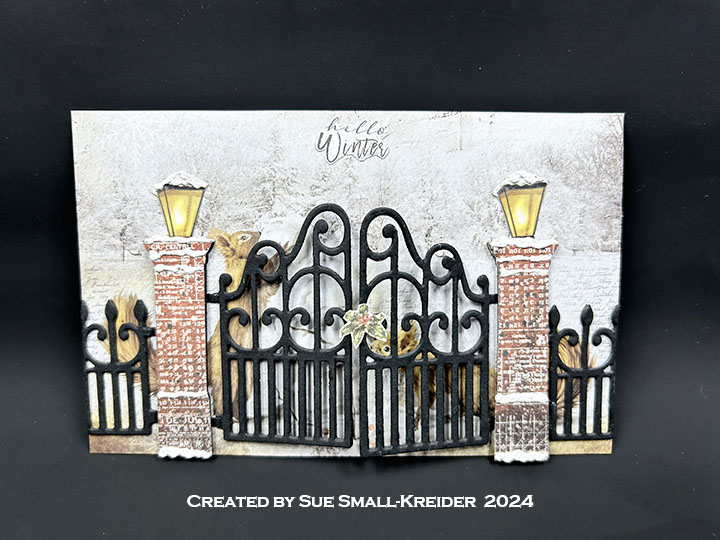
This card was made for Craft Roulette #242 whose parameters included a gatefold card, produce aisle colors, fence element, and crumpled paper.
Watch the process video to see how I made this card.
Cardbase: The cardbase is 4×6-inches of double sided patterned paper.
Sentiment: “hello Winter” is a fussy cut sentiment from the paper collection. The back side of the card has space to write a personal message.
Envelope: This card fits into an A6 envelope with it’s back flap covered with patterned paper to hint at the playful squirrels inside the envelope.
___________________________________
Thank you for experiencing this blog post.
I hope this inspires you and makes you smile.
Please like and leave comments 😊
___________________________________
Disclaimer: Karen Burniston products are provided free of charge by the manufacturer for review and use. All other items were personally purchased. Compensated affiliate links used where or when possible, meaning I will receive a small percentage commission from these manufacturers at no cost to you. This will allow me to add more content to my YouTube channel and help out a lot. Thank you.
Materials Used:
Dies
Leane Creatief – LeCrea’Combi Dies – Garden Gate
Papers
Ciao Bella Paper – 6×6-inch Double-Sided Papers – Memories Of A Snowy Day
Watch the process video to see how I made this card.
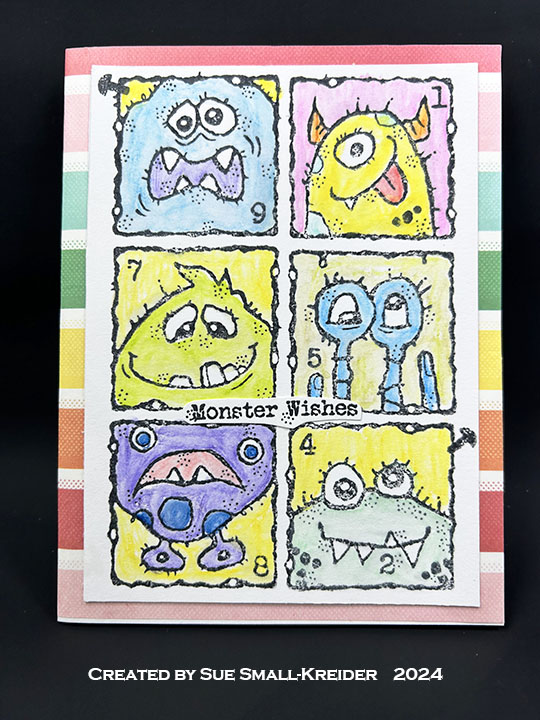
Cardbase: Starting with a 5.5×8.5-inch rectangle of white cardstock folded in half to form a 4.25×5.5-inch side-fold A2 cardbase, the card was covered with colorful glassine paper inside and out. The inside panels were cut with the largest die in Karen Burniston’s Rectangles-Crosshatch set.
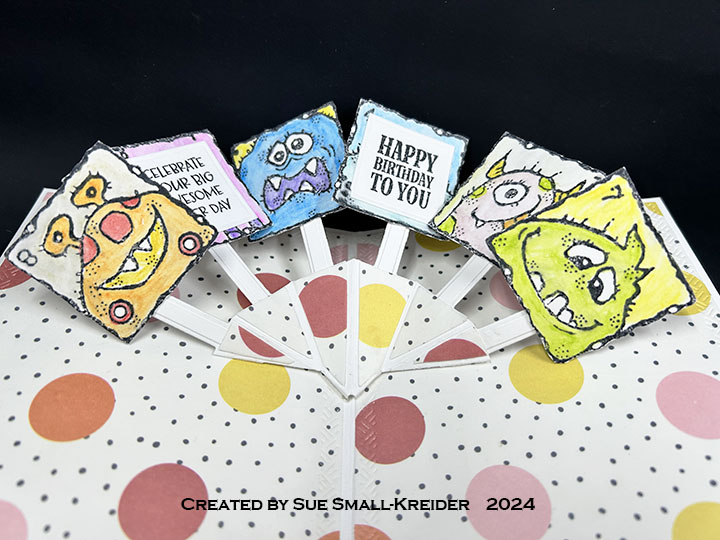
Monsters: Monster Gallery stamp set is used as a front panel cut out as separate squares for the inside pop-up feature. The images were colored with watercolor pencils and then waterbrushed to even out the color.
Photo Fan Pop-Up: Watch the assembly video at the bottom of the linked page for the Photo Fan Pop-Updie.
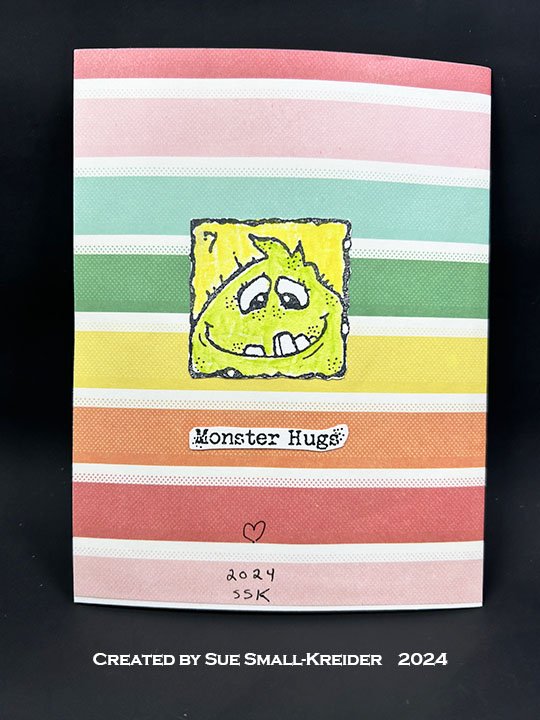
Sentiments: The inside sentiments of “Celebrate your big awesome super day” and “Happy Birthday to You” are from Karen Burniston’s Photo Memories stamp set. The “Monster Wishes” on the card front and “Monster Hugs” on the card back are from the Monster Gallery stamp set.
Envelope: The card fits into an A2 (4.25x 5.5-inches) size envelope. On the back flap there is a “M” cut from scrap paper and glued there.
___________________________________
Thank you for experiencing this blog post.
I hope this inspires you and makes you smile.
Please like and leave comments 😊
___________________________________
Disclaimer: Karen Burniston products are provided free of charge by the manufacturer for review and use. All other items were personally purchased. Compensated affiliate links used where or when possible, meaning I will receive a small percentage commission from these manufacturers at no cost to you. This will allow me to add more content to my YouTube channel and help out a lot. Thank you.
This card was made for Craft Roulette #241 whose parameters included a z-fold card, scarecrow colors, bake element, and crinkle inkle technique. This card is also the fourth day in my shelf card series.
Watch the process video to see how I made this card.
Cardbase: The cardbase is an A2 size but is 1/2-inch thick. The z-fold base is made from a 5 1/2×11-inch rectangle folded at 5 1/2-inches and 2 3/4-inches. The buffet easel is made from two rectangles (4 1/4×6 1/2-inches and 4 1/4×3 3/4-inches) each scored and folded at 1/2 and 1-inch of the 4 1/4-inch side. Watch video for how to fold and glue.
Lights: Watch video for how to install the EZ-lights.
Sentiment: “Merry Christmas” is die cutting three layers of cardstock and PoppyStamps dies. It is popped-up on think foam squares to act as the easel stopper. The card back is left blank for a personal message.
CRX Sheet: The Card Recipient Experience (CRX) Sheet is a set of instructions on how to open and set-up the card and turn on the lights.
Envelope: This card will be hand delivered or mailed in a box.
___________________________________
Thank you for experiencing this blog post.
I hope this inspires you and makes you smile.
Please like and leave comments 😊
___________________________________
Disclaimer: Karen Burniston products are provided free of charge by the manufacturer for review and use. All other items were personally purchased. Compensated affiliate links used where or when possible, meaning I will receive a small percentage commission from these manufacturers at no cost to you. This will allow me to add more content to my YouTube channel and help out a lot. Thank you.
Materials Used:
Dies
Anna Griffin – Metal Dies – Slimline 3D Mantle & Fireplace
This is the third in a series of cards that have shelves as the main element of the card.
Today’s card is a tri-fold house card with a cozy room scene with a bookcase made using dies by My Favorite Things.
Watch the process video to see how I made this card.
Cardbase: The cardbase is a slimline size made from a 7 .75×8.5-inch rectangle folded in half and a 4.25×6.5-inch rectangle. Watch the tutorial video to see the details of the cardbase assembly.
Sentiment: The “hello” on the card front is a die in the Concord & 9th On Display Pop-Up die set. There is a third panel that a personal message can be added to the card.
Envelope: The card fits into a #10 business envelope. The back flap is decorated with a coffee mug from the My Favorite Things Be Your Own Barista die set.
___________________________________
Thank you for experiencing this blog post.
I hope this inspires you and makes you smile.
Please like and leave comments 😊
___________________________________
Disclaimer: Karen Burniston products are provided free of charge by the manufacturer for review and use. All other items were personally purchased. Compensated affiliate links used where or when possible, meaning I will receive a small percentage commission from these manufacturers at no cost to you. This will allow me to add more content to my YouTube channel and help out a lot. Thank you.
Materials Used:
Dies
Concord and 9th – Metal Dies – On Display Pop-Up
My Favorite Things – Premium Steel Die – Be Your Own Barista
My Favorite Things – Premium Steel Die – Décor and More
My Favorite Things – Premium Steel Die – Fundamental Furnishings
My Favorite Things – Premium Steel Die – Picture Window
My Favorite Things – Premium Steel Die – Potted Plants
My Favorite Things – Premium Steel Die – Room Decor
My Favorite Things – Premium Steel Die – Take A Seat
This is the second in a series of cards that have shelves as the main element of the card.
Today’s card is a pop-up set of shelves made with On Display Pop-Up die set by Concord and 9th.
Watch the process video to see how I made this card.
Cardbase: The cardbase is an A2 (4.25×5.5-inch) side-fold made by folding an 8.5×5.5-inch rectangle in half.
Sentiments: The “hello” on the card front is a die in the On Display Pop-Up die set.
Envelope: The card fits into an A2 (4.25x 5.5-inches) size envelope with a die-cut plant on the back flap.
___________________________________
Thank you for experiencing this blog post.
I hope this inspires you and makes you smile.
Please like and leave comments 😊
___________________________________
Disclaimer: Karen Burniston products are provided free of charge by the manufacturer for review and use. All other items were personally purchased. Compensated affiliate links used where or when possible, meaning I will receive a small percentage commission from these manufacturers at no cost to you. This will allow me to add more content to my YouTube channel and help out a lot. Thank you.
This is the first in a series of cards that have shelves as the main element of the card.
Today’s card is a plant ladder made with dies by Scrappy Tails.
Watch the process video to see how I made this card.
Cardbase: Use the outline die in the Plant Ladder die set to cut a shaped cardbase from a 3×12-inch piece of card stock that has been folded in half. Place the die so that the two top cutting edges of the die are just off the fold.
Sentiments: I am leaving off any sentiment so that there is space inside and on the card back to write a message.
Envelope: The card fits into an A2 (4.25x 5.5-inches) size envelope with a cardstock liner to keep the palm tree leaves from getting damaged in the mail.
___________________________________
Thank you for experiencing this blog post.
I hope this inspires you and makes you smile.
Please like and leave comments 😊
___________________________________
Disclaimer: Karen Burniston products are provided free of charge by the manufacturer for review and use. All other items were personally purchased. Compensated affiliate links used where or when possible, meaning I will receive a small percentage commission from these manufacturers at no cost to you. This will allow me to add more content to my YouTube channel and help out a lot. Thank you.
Materials Used:
Dies
Scrappy Tails – Metal Dies – Plant Ladder
Papers
Bazzill – 12×12 Cardstock – Sand Dollar
Black, Browns, Greens, and Yellows Cardstock Scraps
Fraser Papers for William House – A2 Envelope – Genesis Text Milkweed Smooth
This card was made for Craft Roulette #240 whose parameters included a card for a helper, cereal box colors, jungle element, and a paper sack.
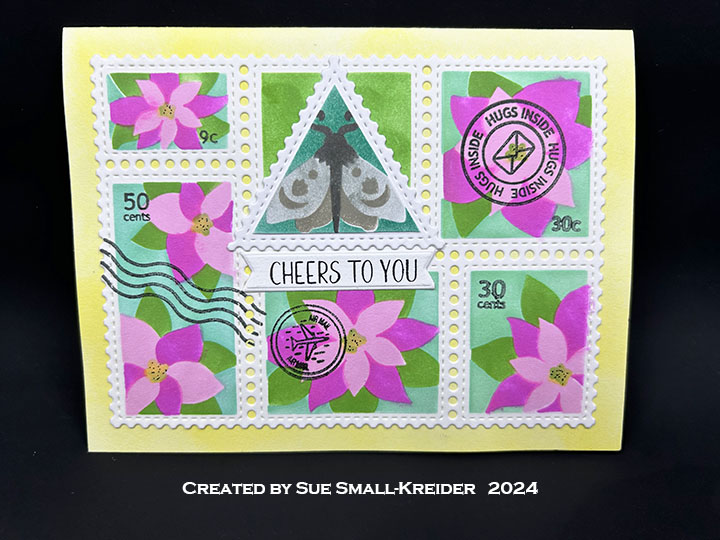
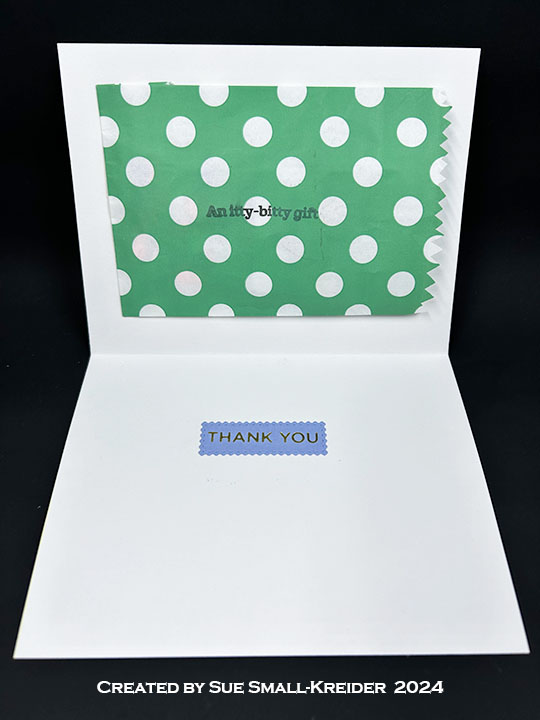
I choose to make a thank you card with a paper sack for an itty-bitty gift, stenciling tropical flowers and a large moth that you might see in a jungle. (Please note that after I completed the process video, I decided to add some cancellation stamps to the front of the card. So they are not mentioned in the video, but they are Waffle Flower stamps.)
Watch the process video to see how I made this card.
Cardbase: Cut a 5.5 x 8.5-inch piece of white cardstock and fold in half to form a 4.25×5.5 top-fold A2 size card.
Sentiments: The front sentiment “Cheers to you” is from a BetterPress plate and die set while the inside foiled “Thank You” is a Spellbinders Glimmer plate die cut with a Waffle Flower Postage Collage rectangle die. The “Itty-bitty gift stamped on the paper sack is from the Craft Roulette Stamp set.
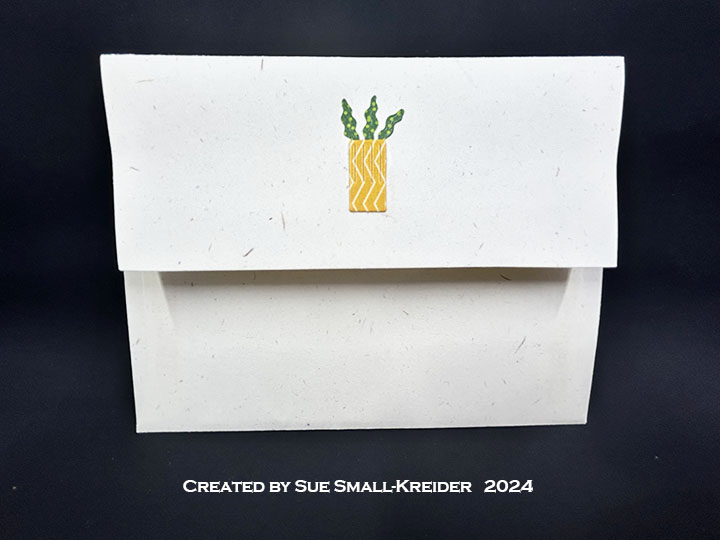
Envelope: The card fits into an A2 (4.25x 5.5-inches) size envelope with an extra moth stamp on the back flap.
___________________________________
Thank you for experiencing this blog post.
I hope this inspires you and makes you smile.
Please like and leave comments 😊
___________________________________
Disclaimer: Karen Burniston products are provided free of charge by the manufacturer for review and use. All other items were personally purchased. Compensated affiliate links used where or when possible, meaning I will receive a small percentage commission from these manufacturers at no cost to you. This will allow me to add more content to my YouTube channel and help out a lot. Thank you.
This card was inspired by a pun on the Bing Crosby classic “I’m Dreaming of a White Christmas” song. It uses dies by Karen Burniston and stamps by Riley and Company.
Watch the process video to see how I made this card.
Cardbase: Cut an 8.75 x7.5-inch rectangle of 65lb. white cardstock and score and fold in half to form an 8.75 x3.25-inch top-fold slimline card base. Cover using decorative papers.
Pop-Ups: Watch the assembly videos for the Lorna Label Pop-Up and the Piano Keys Pop-Up by click on the links and looking for the videos at the bottom of each link’s page.
Decorations: For the musical notes and piano are from the Music Charms set while the shark inside is from the Sea Animals set. The shark border on the card back is from the Beach Borders set. The sharks were cut in white and colored with a gray marker.
Envelope: The card will need to be mailed in a bubble wrap envelope because of its size and thickness.
___________________________________
Thank you for experiencing this blog post.
I hope this inspires you and makes you smile.
Please like and leave comments 😊
___________________________________
Disclaimer: Karen Burniston products are provided free of charge by the manufacturer for review and use. All other items were personally purchased. Compensated affiliate links used where or when possible, meaning I will receive a small percentage commission from these manufacturers at no cost to you. This will allow me to add more content to my YouTube channel and help out a lot. Thank you.
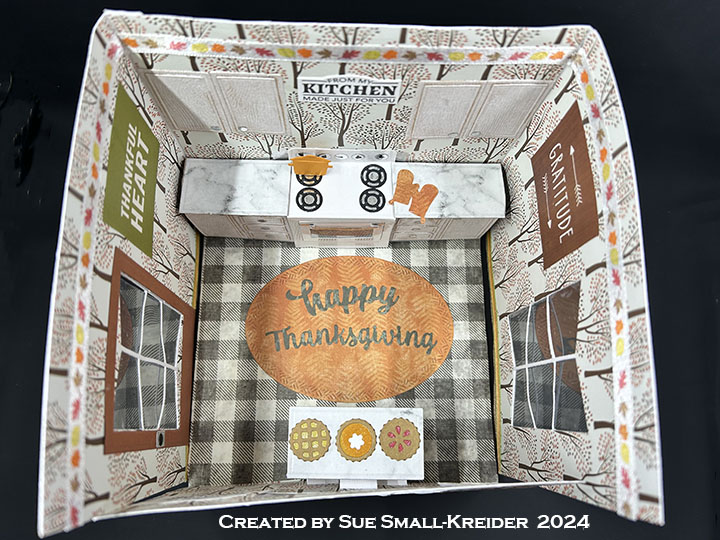
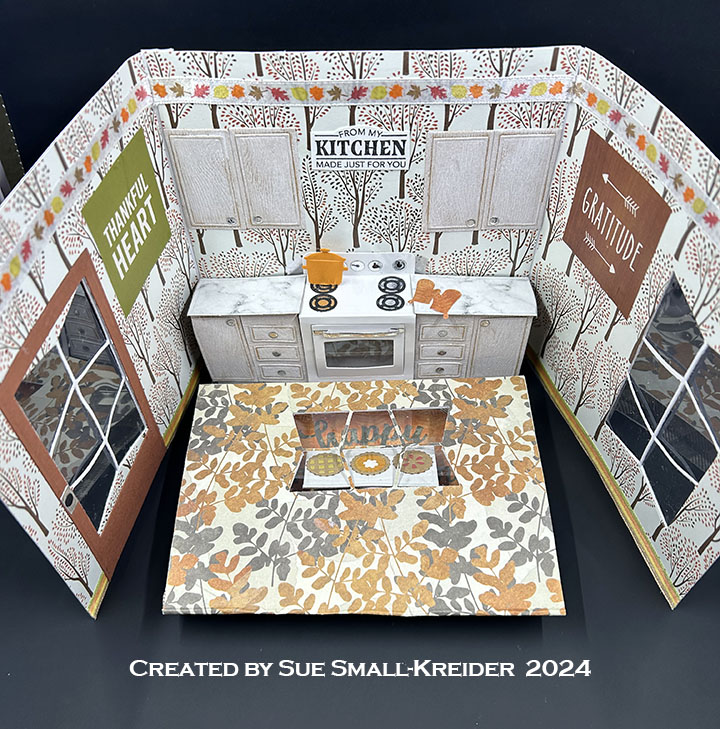
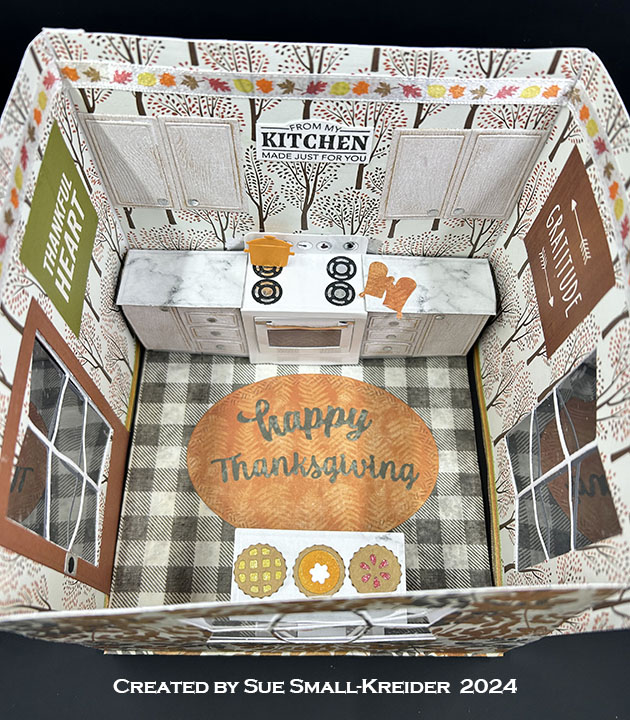
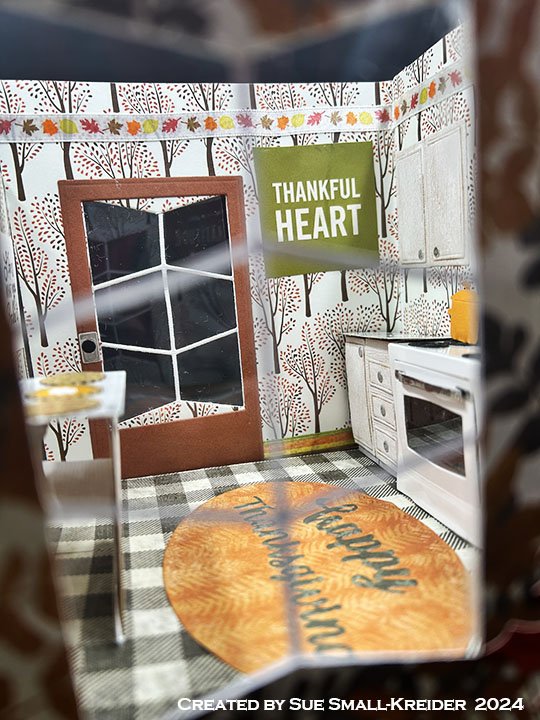
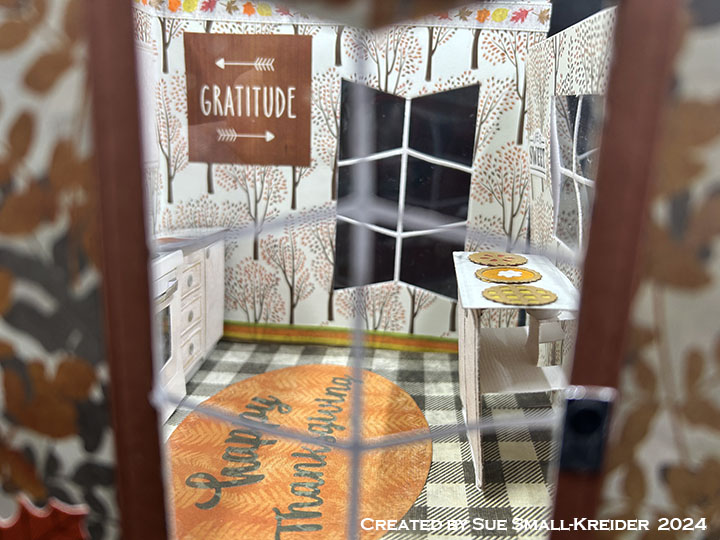
Cardbase: From 100 lb. cardstock cut two 6 x 6 1/2-inch rectangles, one 6 x12-inch rectangle, and one 6 x 5-inch rectangle. Watch video to see the order of assembly of pieces and when to cover pieces with decorative paper.
Windows: Using the Bitty Ball Double-Ups large die, cut windows into the two 6 x 6 1/2-inch rectangles of the card base. Use the Mini Ball Double-Ups to cut the rear window in the 4 1/2-inch tall wall panel. The door uses the Rectangles–Crosshatchand the Long Rectangles–Crosshatch as well as the leftover rectangles from the oven rack and black circle from the oven burner in the Oven Pop-Up set.
Oven: Cut two of the Oven Pop-Up base and cut one in half and assemble the base pieces as shown in the tutorial video above. Complete as shown in Karen Burniston’s assembly video. (Watch assembly video on the dies’ linked page.)
Cabinets: Cut eight of the cabinet doors from the Oven Extras set. (Watch assembly video on the dies’ linked page.) Add to the scene as shown in the tutorial video above. The double cabinet counter tops are cut using the second smallest rectangle in the Short Rectangles-Crosshatch. (While the tutorial video shows using the Explosion Pop-Up for the base of the island cabinets, you could just use a cut down oven base for this island.)
Decorations: The pies come from the Baking Borders set while the oven mitts are from the Oven Pop-Up set. The turkey in the roasting pan in the oven as well as the orange pot on the stove are from the Oven Extras set as is the pop-up cubes that animate them as the card opens. The pumpkins and leaves on the outside panels are from the Autumn Elements set.
Sentiments: The card uses two sentiments from an American Crafts journaling card paper sheet as well as the Sweet Treats stamped sentiments. Die-cut “Happy Thanksgiving” and “Welcome Autumn” come from Word Set 7- Autumn.
Envelope: The card is thick, so a special padded envelope is needed to mail it.
Disclaimer: Karen Burniston products are provided free of charge by the manufacturer for review and use. All other items were personally purchased. Compensated affiliate links used where or when possible, meaning I will receive a small percentage commission from these manufacturers at no cost to you. This will allow me to add more content to my YouTube channel and help out a lot. Thank you.