I have been collecting and making oven cards for several years now. Here is a collection of all my ovens blog posts. Click on an image to see details of the oven.
(Images are posted from the earliest release of dies/stamps/kits 2016 to newest 2023.)
____________________________
Thank you for experiencing this blog post.
I hope this inspires you and makes you smile.
Please like and leave comments 😊
___________________________________
Disclaimer: Karen Burniston products are provided free of charge by the manufacturer for review and use. All other items were personally purchased. Compensated affiliate links used where or when possible, meaning I will receive a small percentage commission from these manufacturers at no cost to you. This will allow me to add more content to my YouTube channel and help out a lot. Thank you.
I got this cute bunny mug die set on sale after Easter from Teaspoon of Fun. This Pixi Dust Designs die set has 22 dies to make the bunny face mug, a carrot, a cake slice and a macaroon.
Cardbase: Use an A2 (4 1/4 x 5 1/2-inches) side-fold horizontal card base (I used a purchased kraft cardbase and matching envelope.) cover the four panels with double-sided papers.
Bunny Mug: Cut the mug, large ears, eyes, cheeks and teeth from white cardstock. Cut nose and two inner ear piece from pink. From black, cut inner eye and eyelash circles. Use a pale-yellow ink to color teeth. Glue pieces together. With a fine-tipped black pen, add dots for whiskers on cheeks Also use black pen to outline cheeks, teeth and mug shape. Glue mug to card front and trim away cardbase around top half of mug.
Carrot: Cut the two carrot dies from different shades of orange. And the carrot top from green. Assemble with whole carrot piece on the bottom and then the carrot piece with three vs and top off with carrot greens. Use a fine-tipped black pen to add fine lines to add rounded shaping to the carrot and greens. Make two carrots.
Carrot Cake: Cut cake from brown and three icing pieces and thin oval from white. Lightly shade the icing piece with a pale-yellow ink. Add orange dots to brown cake piece. Glue the two ripple lines first using makes on cake piece and then attach the top icing piece.
I saw a side-fold of like this card on social media and decided to make my own version using a top fold A6 (4 1/2 x 6 1/4-inches) purchased card base and the egg die from Karen Burniston’s Spring Animals die set.
Cardbase: Using a purchased A6 card base, I used double sided patterned paper from Kat Scrappiness to make a mat frame on the front panel, piecing it together as the patterned paper was 1/2-inch smaller than the card height. Added a yellow 5 3/4 x 4 1/4-inches panel over mat frame. On the back panel, I used the leftover pieces to make an interesting symmetrical design utilizing both patterned sides of the paper.
Egg Panel: A 4×5 1/2-inches rectangle cut from white cardstock, I lightly marked in pencil lines at 1 1/8-inches, 2 3/4-inches and 4 3/8-inches. Along the tops and bottoms of these lines I marked 5/16-inches from the edge. These “T” marks where to center the top or bottom of the egg die. I used the center crack in the egg die to center on the vertical lines. After die-cutting out the six eggs, I erased the pencil marks. (I found it easier to sketch out the egg placement on the back side of the card, tracing around the die to see if it looked right before die-cutting from the front of the panel.) (I added two clay flower shaker elements to the front of the card.)
Shaker Assembly: Position the white panel over the yellow panel and mark the corners of the white panel on the yellow as well as tracing the egg cut-outs onto the yellow. Using double-sided tape, adhere a 4×5 1/2-inches rectangle of clear acetate/film to the back of the white panel. Add strips of narrow foam tape to create boxes around the traced eggs on yellow panel. Using an anti static tool to apply powder to the inside of each box (including the sides of the sides of the foam tape) and back side of acetate/film on white panel. Add confetti and clay sprinkles to each box, avoid putting too much in each box and level out any high points to below the foam tape level. Holding the card base, carefully peel off the backing paper on the foam tape. Remove any confetti from tape. Using the corner marks on the yellow panel line-up the white panel and adhere to foam tape, sandwiching the confetti inside the boxes. (I like to use the confetti sequins from This Calls For Confetti who have a variety of colors, sizes and finishes and have wonderfully quick customer service/delivery time.They also have the best anti-static tool for making shaker cards.)
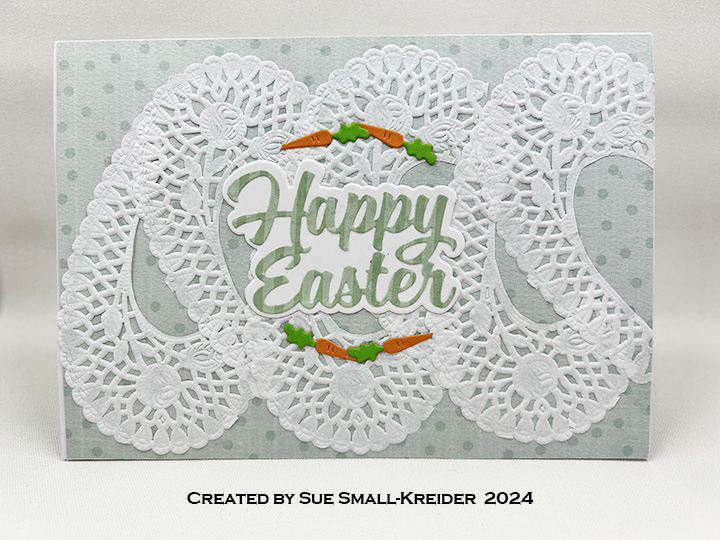
Sentiment: I cut out the words only using Karen Burniston’s Happy Easter word die from purple cardstock for the inside of the card.
Envelope: I cut out a sticker from the decorative paper to embellish the back of the envelope flap.
This card was made for Craft Roulette #204 whose parameters included: thinking of you project, fairy tale colors, hear(s) or ear(s) element and stamped background.
To learn how I made the card, watch this process video.
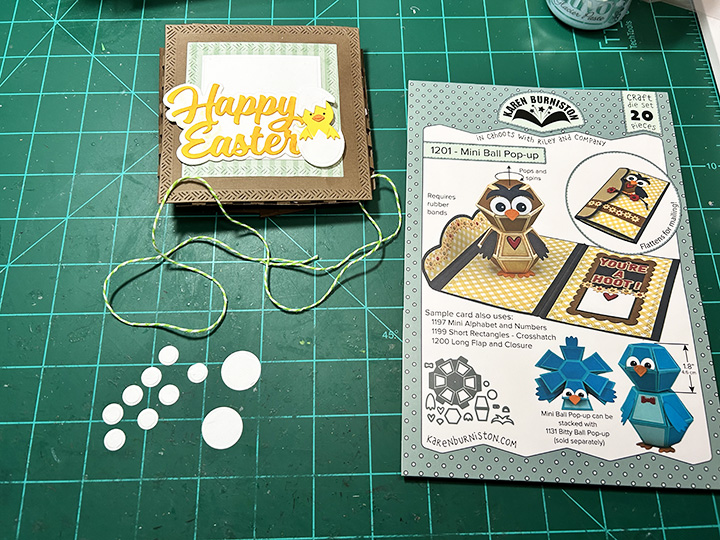
Wanting a basket to put a hatching chick pop-up ball in, I came up with a collapsible basket card for Easter using several of the new die sets in Karen Burniston’s February 2024 release.
How to make this interactive card:
Chick: Make two Mini Pop-up Balls – one entirely yellow and the other half yellow, half white. Assemble chick following Karen Burniston’s assembly video located at the bottom of the Mini Pop-up Balls page. Cut six of the top and bottom eggshell jagged pieces and one hexagon for the top of the egg from white cardstock using the dies from the Animal Add-on 5 die set.
Basket: Cut four of the basket pieces from the Wide Woven Basket Box Card set and assemble as shown in the KB assembly video at the bottom of the linked page. Trim off the side tabs on the four basket pieces. Watch the following video. Cut two of the largest crosshatch squares from brown.
Closure Sentiment: Cut the Shadow from the Happy Easter word set from white. Cur the words from yellow and ink bled to a darker yellow. Die cut eggshell and chick pieces following assembly video for Spring Animals.
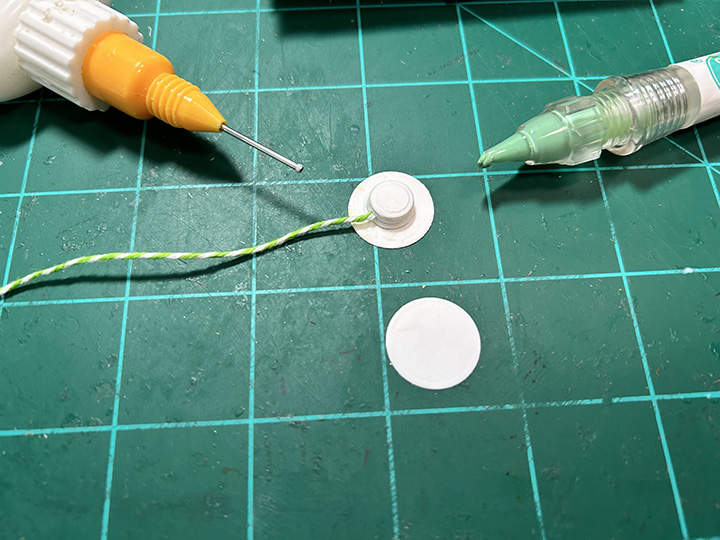
Glue assemble chick to sentiment. Cut eight of the smaller eye circles and two of the larger eye circles from the Mini Pop-up Balls die set. Glue four of the small circles onto one of the large circles. Cut a piece of string at least 24-inches long and glue one end on top of small circle stack. Glue the last four circles on top of the string end, thus sandwiching the string in center of the small circles stack of eight. Attach to top of stack the last large circle. Once the stack is dry, glue to the back of the sentiment and then onto top basket flap. Let dry with a weight on top of it.
Envelope: This card would either be hand delivered or mailed in a bubble pack envelope.
_______________________________________
Thank you for reading this blog post. I hope this inspires you and makes you smile.
Welcome to our Karen Burniston Products – KB Riley LLC February 2024 Release Blog Hop. The Design Team have come together with Karen today for a fun blog hop to celebrate the release of 12 new dies. Sneak peeks of the new release started last week, and the dies are available to order NOW! (Click here to go to the GIVEAWAY section.)
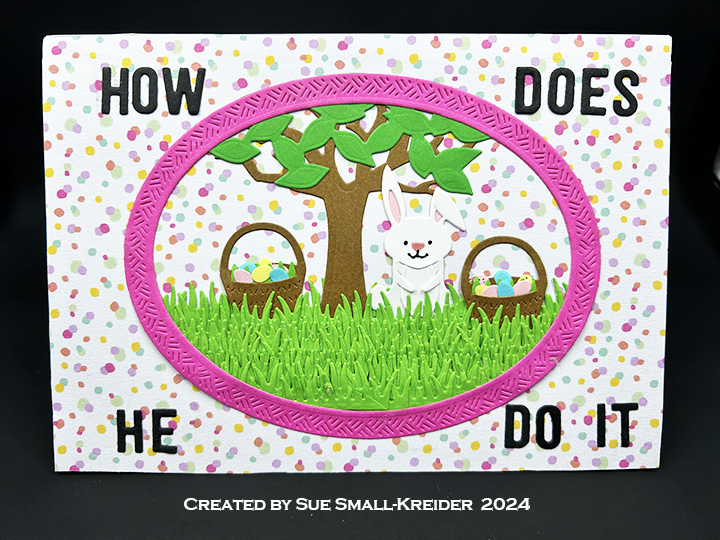
Ever wonder how the Easter Bunny gets all those eggs prepared to hide? He uses gnomes of course!
Instructions for how I created this 5×7-inch card with the gnome kitchen are in video above. The card front instructions are in written format only and are below the video. (Sorry I had a camera malfunction.)
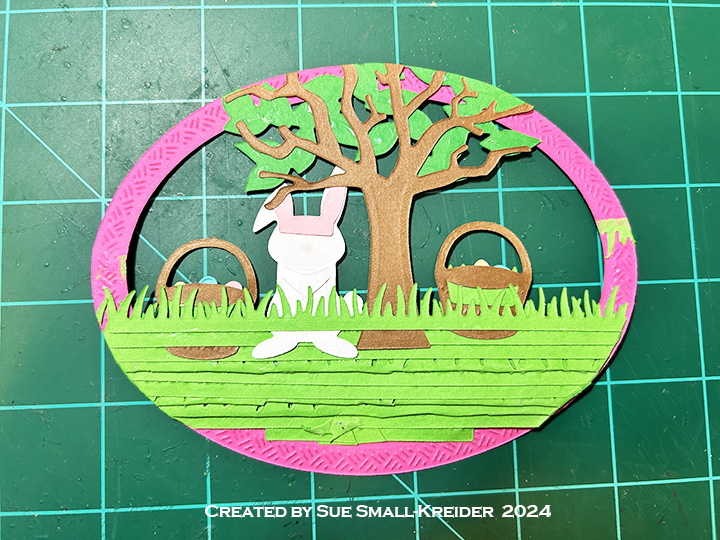
Card Front: To create the scene within the oval frame, I first had to create the scene by gluing the tree, basket and bunny to a strip of grass from the new Easter Borders set. (See assembly videos for tree and bunny on the bottom of their linked pages.)
Next I glued six grassing strips, plus the waste sections between the strip cutouts to form a grassy lawn. The second basket was glued in on a different layer than the bunny.
The oval frame was cut using the two largest dies in the Ovals – Crosshatch set. The scene was glued to the back of the frame and excess bits were trimmed off the oval.
Sentiments: For the card front sentiment of “How does he do it” I cut individual letters from black using the Mini Alphabet and Numbers set. For the “Happy Easter” I cut the shadow from white and the words from yellow cardstock using the new die set Happy Easter. I brushed a coat of glitter gloss over this sentiment to add some magic to the scene.
Thank you for reading this blog post. I hope this inspires you and makes you smile. Please like and leave comments 😊
To celebrate the release Karen Burniston and each of the Karen Burniston – KB Riley LLC Design Team members will be giving away a $25 Gift Certificate to some lucky person who comments on our blog posts, so make sure you join the hop and comment on everyone’s blog post. Winners will be randomly chosen from ALL of the blog hop comments received on our blog posts by Monday, 26 February 2024. Lots of chances to win some goodies, so just leave a comment on this post or any other blog hop posts to enter! Don’t forget to leave some way for us to contact you, in case you are a lucky winner!
It’s Sneak Peek Week for Karen Burniston’s February 2024 release. These dies will be available for purchase on February 19, 2024 on the KB Riley LLC website.
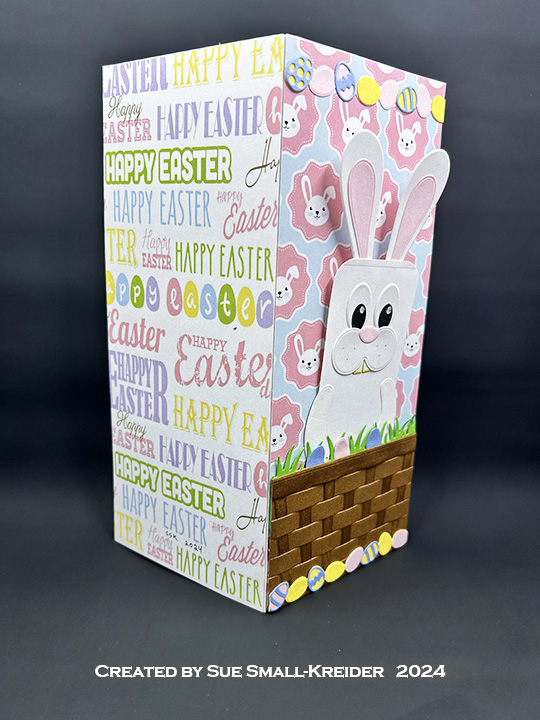
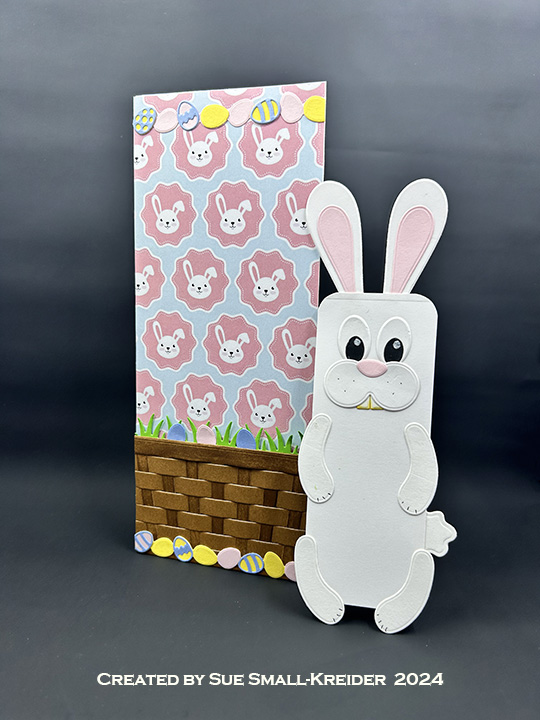
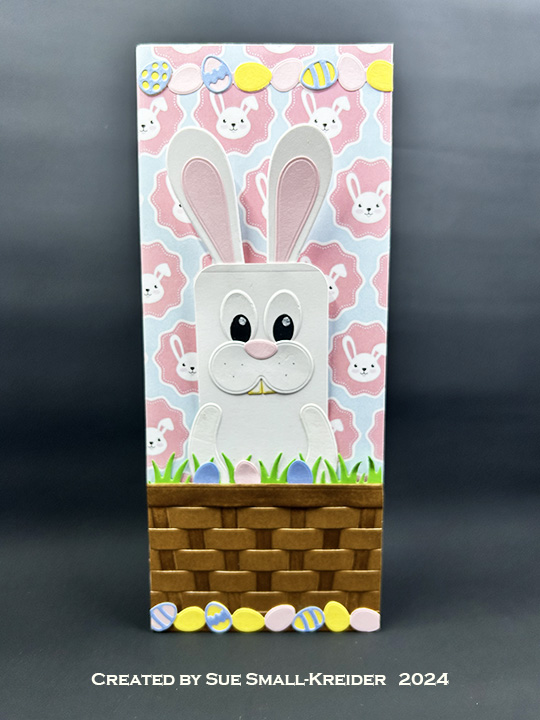
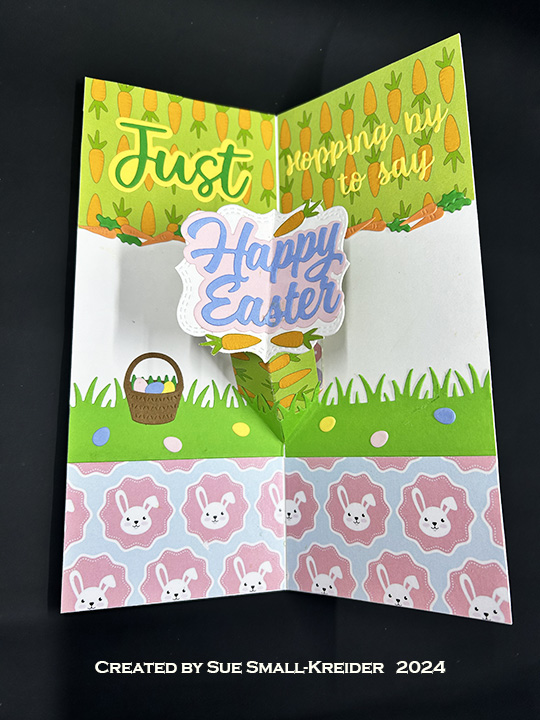
Inspired by a bookmark card I recently made, I decided to make a bunny bookmark slimline card using Karen Burniston’s new Animal Add-ons 5, Easter Borders, and Happy Easter.
Cardbase: Start with a 7.25×8.75-inch rectangle of heavy white cardstock and fold to create a slimline card that is slightly larger than 3.5×8.5-inches. (I folded my cardbase crooked and had to even up the sides by trimming off some.) Using decorative Easter papers cover the front and back of the card with full sheets. Use scraps to cover the top and bottom of the inside of the card. Make sure to leave a gap where the card fold is in the inside papers.
Bunny Bookmark: Cut a 2×5-inch rectangle from heavy white cardstock. Round corners with a corner punch. Using the Animal Add-ons 5 set, cut the two large ears, two large oval eyes, one double circle piece, one split square teeth piece, one wavy circle tail piece and four arm pieces from white cardstock. Cut two smaller ear pieces and one triangular nose piece from pink. Cut two smaller eye pieces from black. Using a white gel pen use stencil feature to add white highlight to black portion of eyes. With a fine-tipped black pen add three dots to double circle piece for whiskers. Add three small lines to each paw for nails. Ink the edges of the teeth piece very lightly with a pale yellow ink. Assemble the face of bunny using package picture as a guide onto the top of the rectangle. Glue ears to back of rectangle and arms and hind legs to front of rectangle. (Hint: glue the hind legs to bottom corners of rectangle then glue tail to back side just above the hind leg. Then glue arms so that the paw is just above top of tail.)
Basket Pocket: (Follow directions in assembly video at bottom of linked page.) Make one Wide Woven Basket Box Card panel from brown. Ink the slat pieces with brown ink before weaving into main basket piece and glue in place. Trim off tab. Cut from green cardstock a grassy strip and glue to back side of basket top. Using thin strips of foam tape on the bottom and sides of basket panel, attach to card front to form a pocket. Insert bunny bookmark.
Raising Platform: (Follow directions in assembly video at bottom of linked pagetheRaising Platform Pop-Up.) Cut one mechanism piece from double-sided decorative cardstock. (I used a carrot and bunny print.) Assemble onto a flattened cardbase. Cut one of the largest fancy label from white cardstock and fold in half. Glue on sentiment. Train the fold with the sentiment. Attach sentiment label to mechanism.
Decorations: Cut two egg borders from Easter Borders set using two different colors of cardstock. Cut two sets of decorative eggs from the same set in a darker color. Trim egg border to width of card and use left over eggs to decorate egg borders along with decorative eggs. Glue to finished borders to bottom and top of card front. Add any extra eggs to basket grass.
Cut two more grass strips from Wide Woven Basket Box Card set and glue to cardbase above bottom decorative paper inside card. Decorate with eggs and basket from the Animal Add-ons 5 set. Cut two of the carrot borders from the Easter Borders set from orange and two sets of carrot tops from green. Assemble carrots using a Quickstik tool or tweezers. Glue carrots to base of carrot paper inside card. (I had to cut the carrot border to cover the edge aesthetically.) Glue extra carrots to the sentiment label. (I cut some carrots from my decorative paper for the label.)
Sentiment: Using the new Happy Easter set, I cut the shadow from pink and the words from blue then cardstock since they are going on top of the platform label and being folded in half. The large “Just” with shadow is from Word Set 15 – Just Because. I had to do minor word surgery using Word Set 4 – Just A Notetaking the “H” from “Hooray” and replacing the first “p” in “popping” with it to make “Hopping.” The word “by” comes from words in both word sets. “to say” is from Word Set 4.
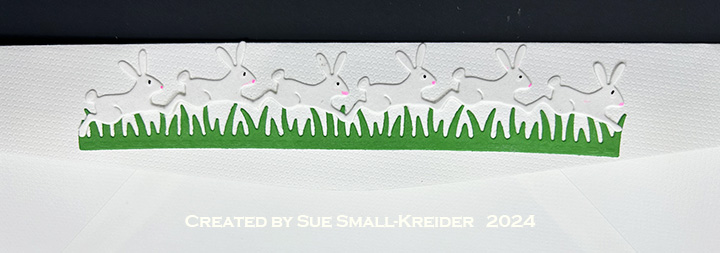
Envelope: #10 business envelope back flaps are perfect to use border dies on. I cut the hopping rabbits and grass borders from the Easter Bordersset and used fine-tipped pens to add the eyes and noses on the rabbits.
Thank you for reading this blog post. I hope this inspires you and makes you smile. Please like and leave comments 😊
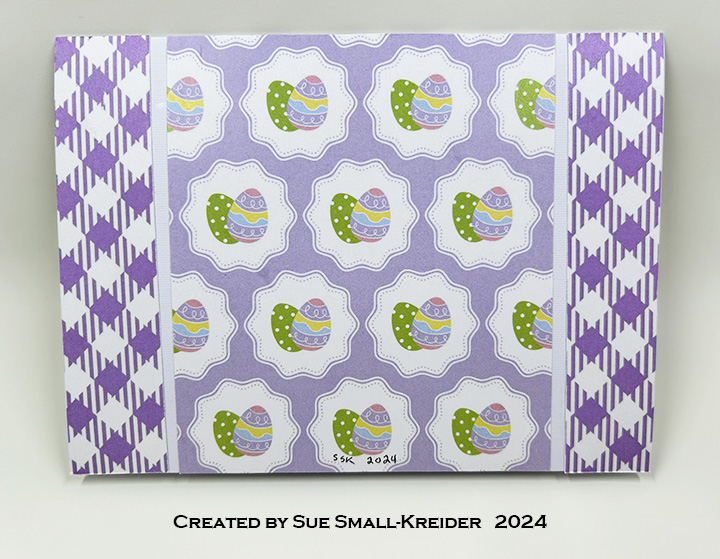
The box is cut in one piece. (I used patterned paper which the striped paper had a white backside while the egg paper had stripes inside.) Before assembling, cut out the window with the square or hearts decorator dies in the set and back it with a scrap of clear acetate or plastic packaging. Then, adhere a contrasting frame cut with the same dies. Thin double-sided tape works well to adhere the plastic the inside of the box and for the long side tab, but glue will work as well.
I used stickers from the paper collection as well as “Happy” and the bunny from Word Set 2 and Spring Animals to decorate the boxes.
Thank you for reading this blog post. I hope this inspires you and makes you smile. Please like and leave comments 😊