I have been collecting and making oven cards for several years now. Here is a collection of all my ovens blog posts. Click on an image to see details of the oven.
(Images are posted from the earliest release of dies/stamps/kits 2016 to newest 2023.)
____________________________
Thank you for experiencing this blog post.
I hope this inspires you and makes you smile.
Please like and leave comments 😊
___________________________________
Disclaimer: Karen Burniston products are provided free of charge by the manufacturer for review and use. All other items were personally purchased. Compensated affiliate links used where or when possible, meaning I will receive a small percentage commission from these manufacturers at no cost to you. This will allow me to add more content to my YouTube channel and help out a lot. Thank you.
Watch the YouTube video below to learn how the card was made.
Sailboat Pop-Up: This pop-up is made with two die sets – the base is the Boat Pop-Up and the sails, pendant, railing, life preservers and anchor are all in the Sailboat Add-Ons set.
Cardbase: The card base is made up of two rectangles On 4 x8 1/2-inches and the other 4 x 8 3/4-inches. The longer piece is scored at 8 1/2-inches for the tab to glue to back of the other piece. The card front scene is made from waving water paper brushed with glitter gloss and Distress Oxide ink and a large blending brush. The birds are hand-drawn. The porpoise is from the Set Sail Bordersdie set. On the card back is a border of shells from the Set Sail Bordersdie set and colored with alcohol markers.
Sentiments: The card front “waving hello” is die-cut letters from the Mini Alphabet and the “hello” is from the Just A Note Lorna Add-Ons. The stamped sentiments inside the card are from the Sail Awaystamp set. A white label inside is for a personal message and was cut from the Labels – Crosshatch die set.
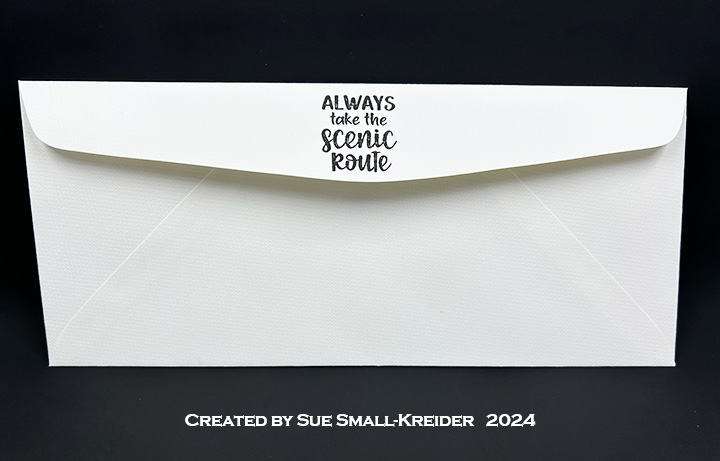
Envelope: The card fits into a #10 business envelope stamped with “Always take the scenic route” from the Sail Awaystamp set.
This card was made for Craft Roulette #216 whose parameters included for A2 project, baseball game colors, number(s) element and charm(s).
After I completed the process video I added thin strips of decorated paper to even out the borders of the front background paper as well as adding a second jump ring to the charm to have it hang more in the center of the frame.
This card was made for Craft Roulette #207 whose parameters included an A2 size card, ice cream store colors, tasty or tastes element and a banner.
I wanted to make a pop-up or 3-dimensional A2 size card for this episode of Craft Roulette, so I modified a 3D postal truck I had made for my mail carrier to say thank you to fit into an A2 size envelope (4.25×5.5 inches.) (See Mail Truck blog post.)
This card was made for Craft Roulette #204 whose parameters included: thinking of you project, fairy tale colors, hear(s) or ear(s) element and stamped background.
To learn how I made the card, watch this process video.
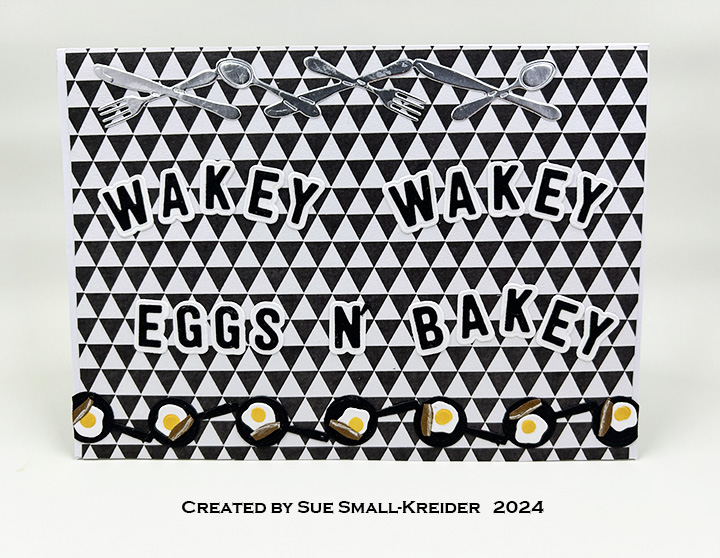
This card was made for Craft Roulette #202 whose parameters included a 5×7 inch card, formal & informal colors, warm(s) element and crisscross. Specifically, this card was made for a son starting a new job that requires an early morning wake-up time.
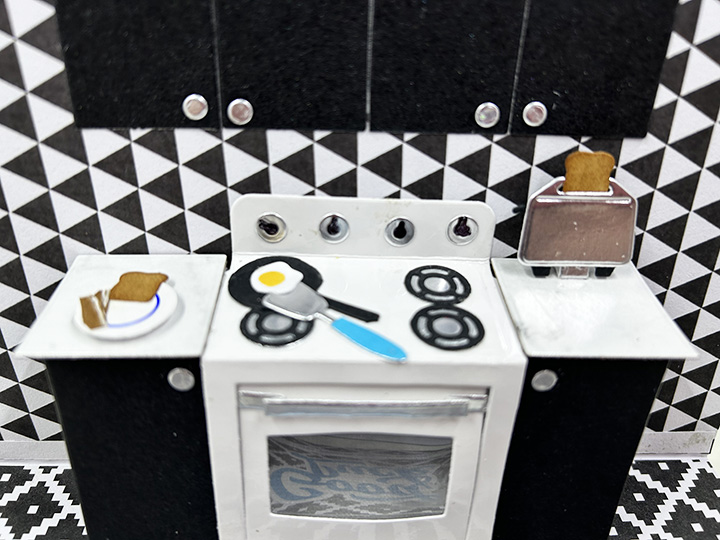
Cardbase: Cover a 5×7-inch wide top-fold cardbase with two patterns of decorative paper – one for card front and inside top (think wallpaper) and another pattern for the back and inside bottom (think flooring.)
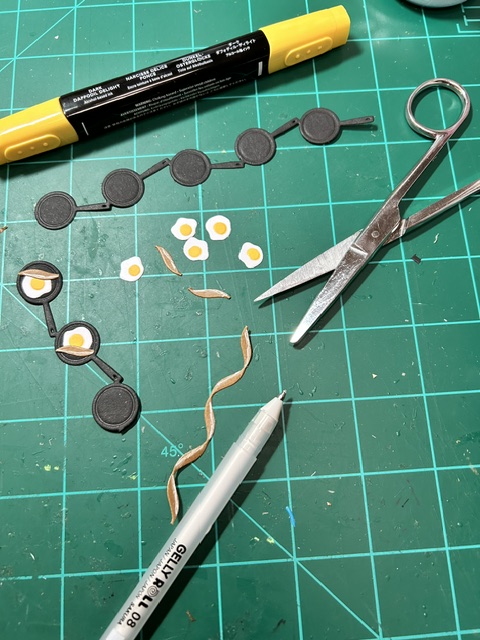
Card Front Decorations: Using the Kitchen Borders die set, cut one silverware border from matte silver cardstock for the top of the front panel. From black cardstock cut the frying pan/skillet border twice and trim one border down to three pans. Glue the two pan borders together by overlapping skillets. (Skillets are 1-inch wide, so should have seven skillets to cover all the way across card panel.)
Stove, Cabinets and Counters: Watch assembly video for the Oven Pop-Up at the bottom of the page link before starting. I used glossy white cardstock for the stove with a piece of clear packaging for the oven window. For the oven and cabinet base I used a textured silver cardstock and also cut a square piece to cover the back wall of the oven in textured silver. For the cabinet doors on the uppers and lowers, I used the large door die in the Oven Extras set (cut from a coated black cardstock) with the matte silver knobs from the Oven Pop-Up set.
Food: Using the Kitchen Borders set, cut out 8 eggs from white and use die as stencil to color egg yolks yellow. Using the ribbon border die from the Border Blends – Trims die set, cut one from brown cardstock. Using a white gel pen color the bacon fat along one edge of ribbon. Cut ribbon into strips small enough to fit into skillet.
Using the Kitchen Borders set, Cut two pieces of bread from kraft cardstock and using tweezers to hold, ink the edges to look toasted. For the toaster, cut a toaster border from black cardstock. Cut two of the toaster covers with slots from matte silver cardstock. Cut two of the toasters from the border leaving on the tiny levers that connect the toasters. (I cut the levers off and had to use the tiny waste pieces from the stove burners as toaster levers.) Glue the silver piece atop the black piece and insert bread before glue dries positioning it according to the lever position – up with toast almost out or down with toast mostly inside toaster.
For the plate, I used the circle border piece in the Baking Borders set and cut the plate from glossy white cardstock and used the die as a stencil to draw the blue circle in the center of the plate. The spatula is in the Oven Pop-Up set and is cut twice from different cardstocks and the handle trimmed to fit.
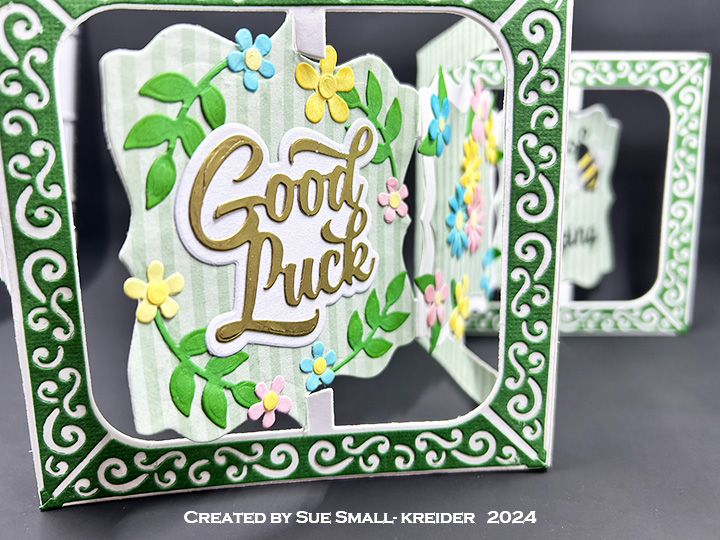
Sentiments: The front sentiment of “Wakey Wakey Eggs N’ Bakey” were cut using the Mini Alphabet set’s shadow and letter dies. Inside the card, The Good Luck die set was used along with a computer generated “On your new job” cut out with the banner in the Lorna Label Pop-Up. On the card back the largest label from the Lorna Label was used for a personalized message space.
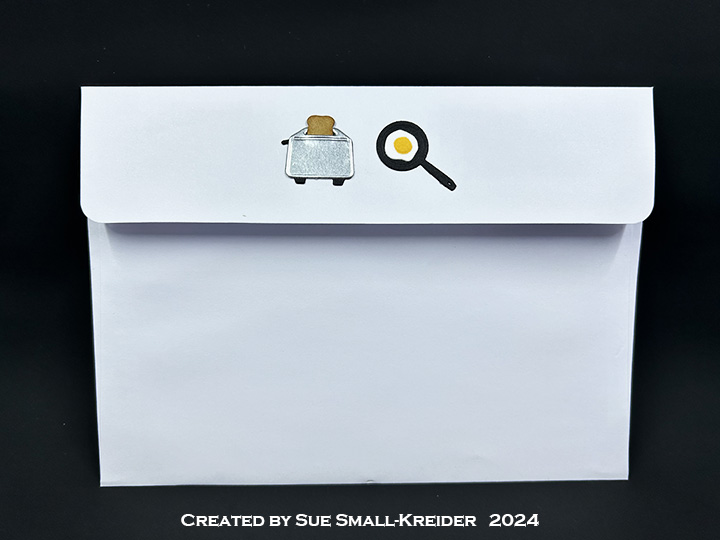
Envelope: Leftover toaster and frying pan are glued to the back of the envelope. (I would put the card and envelope in a padded envelope to mail, but it will be hand delivered.)
Thank you for reading this blog post. I hope this inspires you and makes you smile. Please like and leave comments 😊
It’s Sneak Peek Week for Karen Burniston’s February 2024 release. These dies will be available for purchase on February 19, 2024 on the KB Riley LLC website.
Your co-worker is leaving for a new job and you need a card for others in the office to sign for her. That is the brief for this accordion card.
This mini album was made for Craft Roulette #195 whose parameters included Project type of Encouragement, calm colors, stuffed element and ticket(s).
I have made one other journal similar to this one in a virtual workshop by Kim Hein from Art Impressions using their Mini Journal Template and stamps. In thinking about the layout, I decided that I wanted a positive affirmation for the center back page and all the interleaving pages to it to be wintery and joyful. The theme is chasing the winter blues away.
Watch a painting tutorial before coloring any of the watercolor pieces.
Window Journal Cover: Using the window frame and window arch dies from the Mini Journal template set, cut the arch opening into the left album cover and two of the window frames from white cardstock.
Cut a piece of clear acetate/plastic slightly larger than the window frame. Using narrow double-sided tape on the backside of one window frame, adhere the frame to the acetate piece. (Hint: If the double-sided tape is wider than the frame, peel off the backing paper and fold the tape over on itself to fit the frame.) Trim off the excess acetate around the frame. Add double sided tape to the back of the acetate and adhere over the cover opening. Attach the second frame to the back of the cover over the opening.
Room Scene Journal Cover: Stamp onto patterned paper the chair from the Matchbook Den stamp and die set. Cut out using the matching die and trim off the tab with scissors. Stamp the fireplace onto watercolor paper using a alcohol based ink and color using water-soluble inks with a water brush. Die cut fireplace and trim off tabs. Die cut picture frame and color with ink. Write the word “JOY” in the frame’s picture area with a fine-tipped blue marker. Cut a scalloped edge rectangle from a wallpaper-like patterned paper using die from the Mini Journal Template set. Assemble room scene onto the right cover panel.
Pocket of Encouragement and Ticket Pages: The blue ticket was computer generated. The yellow tags with affirming statements were from my stash of batch foiling using Spellbinder Glimmer System products. A large needle was used to pierce and thread the embroidery floss through the tags. The scalloped background piece and white lacy pocket were die cut using dies from the Mini Journal Template set.
Joy and Snowman Twister Pages: Stamp the fronts and backs of the twister Joy and snowman using the Mini Christmas Twister stamp and die set. Watercolor them. (I used glitter gloss and glitter brush markers on the twisters.) Watch a twister assembly video before assembling. Die cut two of the rectangles from patterned paper for each page using the large straight edge rectangle die in the Mini Journal Template set. Position the decorative papers onto the white page base pieces making sure not to cover the tabs. Secure the papers to page with removable tape and tape in place the smaller of the twister oval dies. Die cut through all three layers. (I had to recut the bottom layer of decorative paper, but the impression of the die was there to show me the position.) Glue patterned paper to page. (I die cut two oval frames for the “JOY” page using the two twister oval dies. They made the opening too thick to get good action with the twister, so I had to trim some of the notch away. I would not use frames unless they were from very thin paper.)
Snowman and House Pages: Using the WC Snow Globe stamp and die set, stamp the house and snowman on to 2×2 1/2-inch rectangles of watercolor paper. (I watercolored the images after viewing a number of the Art Impression painting videos.) Use the frame die in the Mini Journal Template set to cut out the images. (You can use the rest of the image that is die cut as I did with the house, or die cut a frame from decorative paper as I did with the snowman.)
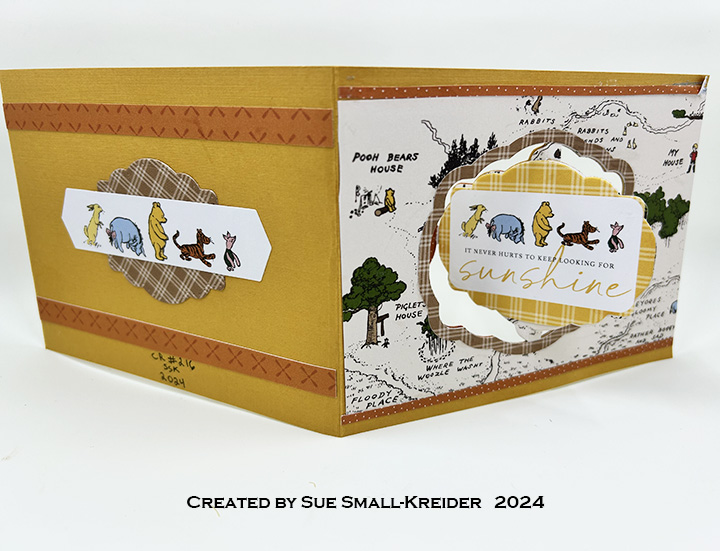
Little Birds Pages: Die cut two scalloped circles using the die from the Mini Journal Template set. Stamp two birds from the Matchbook Garden set. Watercolor as shown in the opening video of this blog post. Using two of the oval cut outs from the patterned papers used for the Joy Twister page, and two scalloped rectangles of patterned paper, assemble the two bird pages. Stamp and die-cut the “hello Sunshine” banner from the Matchbook Garden set to place on the back center page.
Back Message and Ribbon Closure: I computer generated the back cover sentiment and used dies from the Mini Journal Template set to cut it out, frame and mat it. This panel is glued over the 24-inch piece of ribbon to hold it in place. Trim ribbon as needed once tied into a bow.
Thank you for reading this blog post. I hope this inspires you and makes you smile. Please like and leave comments 😊
Materials Used:
Dies
Art Impressions – Steel Dies – Mini Journal Template – 5718
Art Impressions – Steel Dies – Mini Christmas Twister Set – 5815
Art Impressions – Steel Dies – Matchbook Den Set – 5322
Stamps
Art Impressions – Clear Stamps – Mini Christmas Twister Set – 5815
Art Impressions – Clear Stamps – Matchbook Den Set – 5322
Art Impressions – Clear Stamps – Matchbook Garden – 5444
Art Impressions – Clear Stamps – WC Snow Globe Set – 5791
Foiling Plates
Spellbinders – Glimmer Hot Foil Plate – Mini Everyday Sentiments
Papers
Art Impressions – 6×6 Double-Sided 80lb Cardstock – Mini Journal Series -Mini PP -5835
Studio Light – 6×6 inch/15.2×15.2 cm Single-Sided Papers – Let it Snow
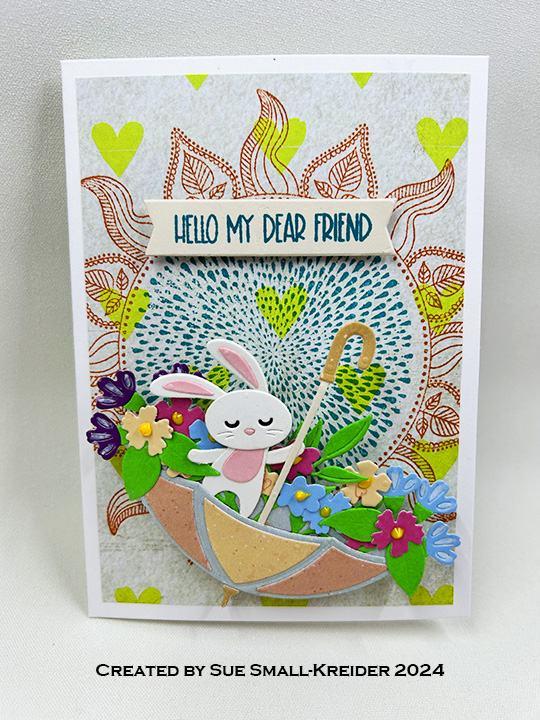
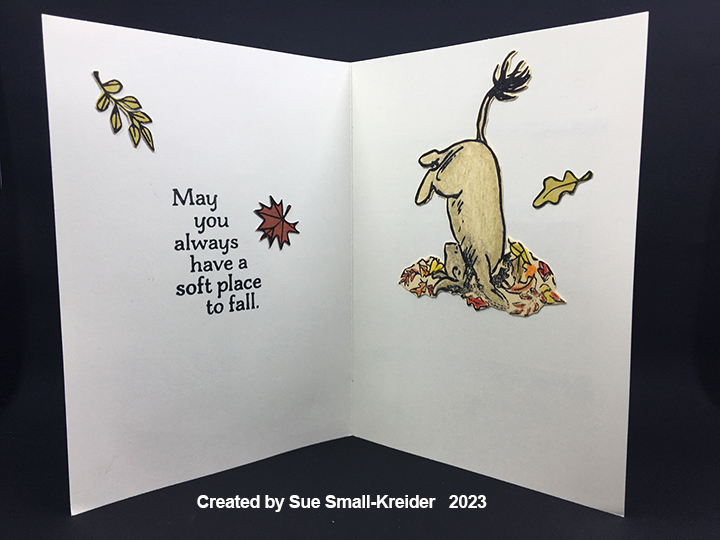
Crisp, colorful leaves gently falling off tree branches sometimes bring bitter-sweet emotions. A.A. Milne’s characters of Winnie-the-Pooh and Eeyore the donkey are playful reminders that fun can be had even in the worst of times.
For this card I used stamps and papers from Impression Obsession featuring E. H. Shepard’s Winnie-the-Pooh and Eeyore along with leaves and sentiments designed by Dina Kowal. The images were stamped in black ink and then colored with watercolor pencils. (I elected not to water brush the coloring.) Next the colored images were fussy cut. Additional leaves were stamped on some of the matted papers used on the card front and fussy cut.
The design principle of three is floated with the leaves throughout the card. Notice that the heart shaped leaf is always pointing to where your eye should flow. Leftover paper scraps were used to decorate the card back.
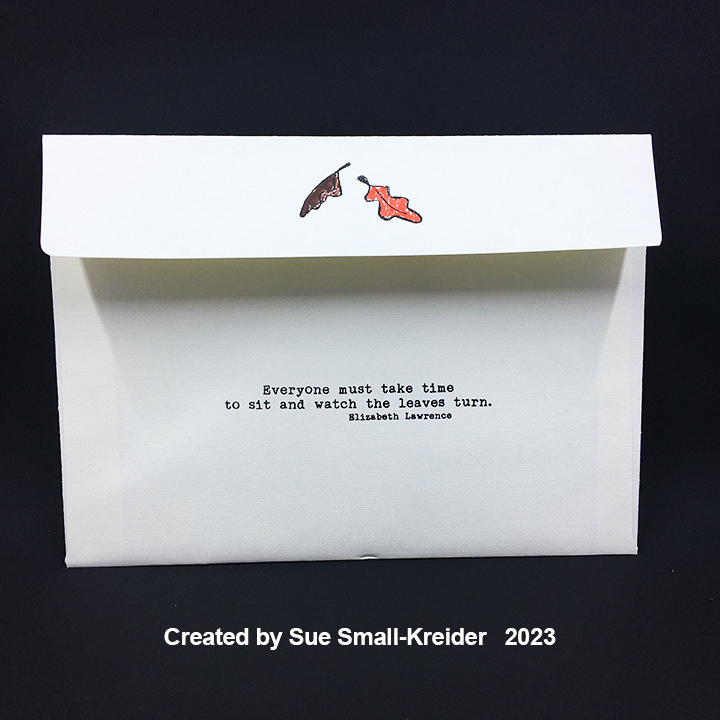
For the envelope back, leaves and a quote from Elizabeth Lawrence about taking time to watch the leaves turn colors, are stamped in black ink and colored with permanent markers.
Thank you for reading this blog post. I hope this inspires you and makes you smile. Please like and leave comments 😊
Materials Used:
Stamps
Impression Obsession – Clear Stamps designed by Dina Kowal – Pooh Window – CL1138
Papers
Impression Obsession – 6×6 Double-Sided Paper Pad – Classic Pooh – PP004
Park Lane Paperie – A6 Cardbase and Envelope – Ivory
Ink
StazOn – Solvent Ink – Jet Black
Ranger – Tim Holtz – Distress Watercolor Pencil- Antique Linen, Barn Door, Fired Brick, Mustard Seed, Peeled Paint, Rusty Hinge, Spice Marmalade and Walnut Stain
Pigma – Mircon 01 Fine Tip Pen – Black
Sharpie – Permanent Marker – Ultra Fine Tip – Orange and Brown