This card was made for Craft Roulette #204 whose parameters included: thinking of you project, fairy tale colors, hear(s) or ear(s) element and stamped background.
To learn how I made the card, watch this process video.
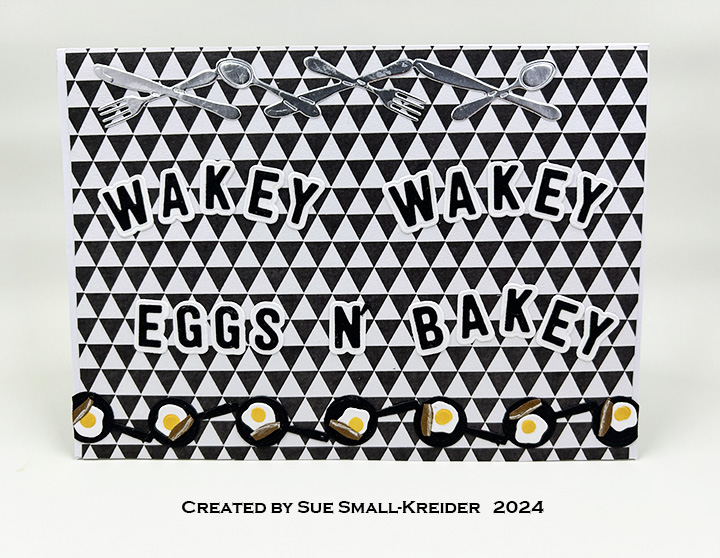
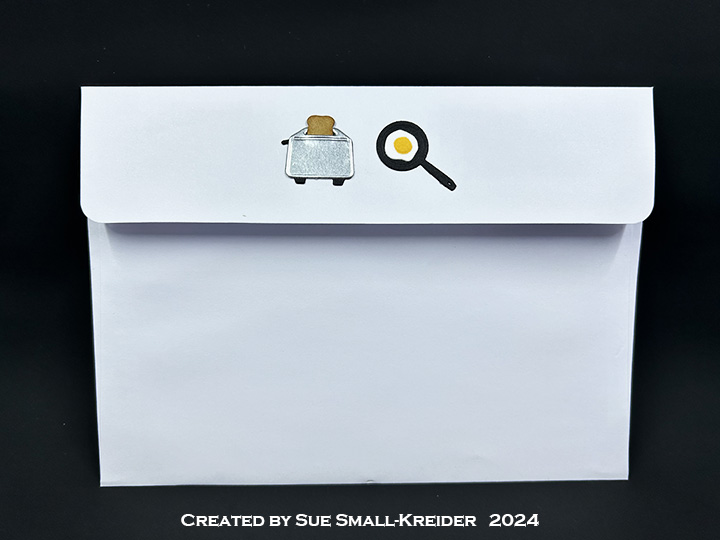
This card was made for Craft Roulette #202 whose parameters included a 5×7 inch card, formal & informal colors, warm(s) element and crisscross. Specifically, this card was made for a son starting a new job that requires an early morning wake-up time.
Cardbase: Cover a 5×7-inch wide top-fold cardbase with two patterns of decorative paper – one for card front and inside top (think wallpaper) and another pattern for the back and inside bottom (think flooring.)
Card Front Decorations: Using the Kitchen Borders die set, cut one silverware border from matte silver cardstock for the top of the front panel. From black cardstock cut the frying pan/skillet border twice and trim one border down to three pans. Glue the two pan borders together by overlapping skillets. (Skillets are 1-inch wide, so should have seven skillets to cover all the way across card panel.)
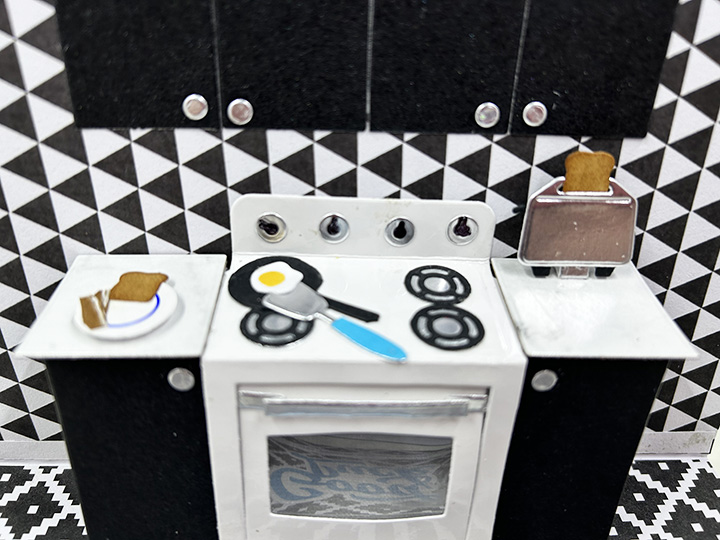
Stove, Cabinets and Counters: Watch assembly video for the Oven Pop-Up at the bottom of the page link before starting. I used glossy white cardstock for the stove with a piece of clear packaging for the oven window. For the oven and cabinet base I used a textured silver cardstock and also cut a square piece to cover the back wall of the oven in textured silver. For the cabinet doors on the uppers and lowers, I used the large door die in the Oven Extras set (cut from a coated black cardstock) with the matte silver knobs from the Oven Pop-Up set.
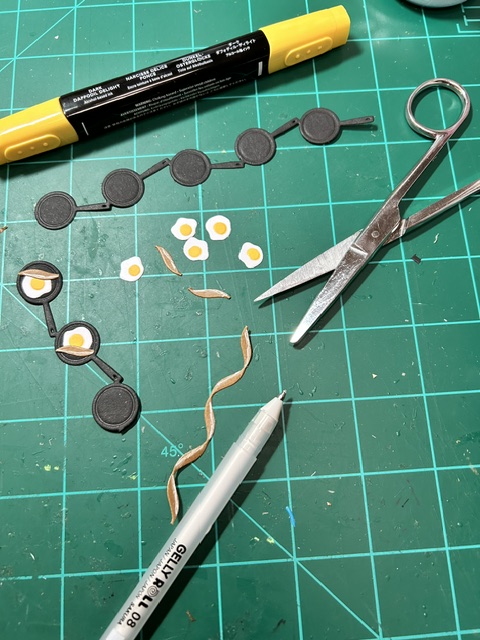
Food: Using the Kitchen Borders set, cut out 8 eggs from white and use die as stencil to color egg yolks yellow. Using the ribbon border die from the Border Blends – Trims die set, cut one from brown cardstock. Using a white gel pen color the bacon fat along one edge of ribbon. Cut ribbon into strips small enough to fit into skillet.
Using the Kitchen Borders set, Cut two pieces of bread from kraft cardstock and using tweezers to hold, ink the edges to look toasted. For the toaster, cut a toaster border from black cardstock. Cut two of the toaster covers with slots from matte silver cardstock. Cut two of the toasters from the border leaving on the tiny levers that connect the toasters. (I cut the levers off and had to use the tiny waste pieces from the stove burners as toaster levers.) Glue the silver piece atop the black piece and insert bread before glue dries positioning it according to the lever position – up with toast almost out or down with toast mostly inside toaster.
For the plate, I used the circle border piece in the Baking Borders set and cut the plate from glossy white cardstock and used the die as a stencil to draw the blue circle in the center of the plate. The spatula is in the Oven Pop-Up set and is cut twice from different cardstocks and the handle trimmed to fit.
Sentiments: The front sentiment of “Wakey Wakey Eggs N’ Bakey” were cut using the Mini Alphabet set’s shadow and letter dies. Inside the card, The Good Luck die set was used along with a computer generated “On your new job” cut out with the banner in the Lorna Label Pop-Up. On the card back the largest label from the Lorna Label was used for a personalized message space.
Envelope: Leftover toaster and frying pan are glued to the back of the envelope. (I would put the card and envelope in a padded envelope to mail, but it will be hand delivered.)
Thank you for reading this blog post. I hope this inspires you and makes you smile. Please like and leave comments 😊
It’s Sneak Peek Week for Karen Burniston’s February 2024 release. These dies will be available for purchase on February 19, 2024 on the KB Riley LLC website.
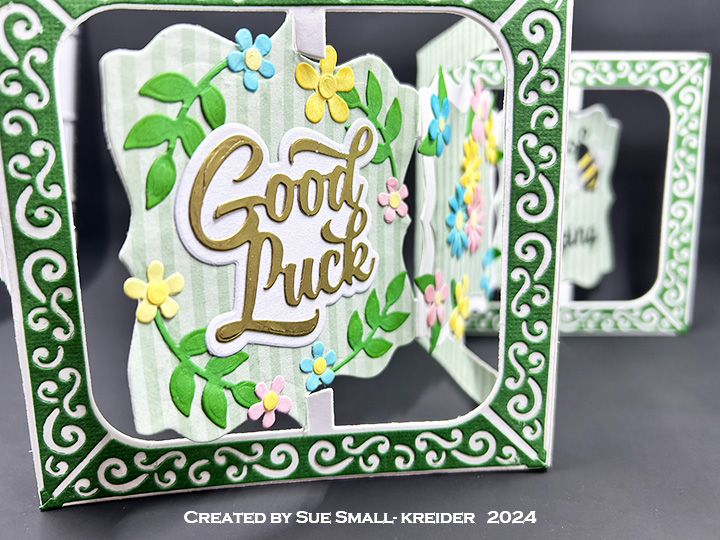
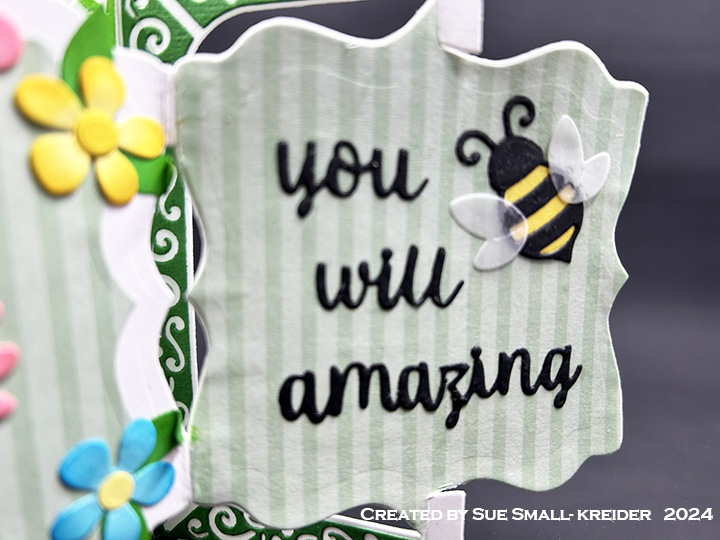
Your co-worker is leaving for a new job and you need a card for others in the office to sign for her. That is the brief for this accordion card.
This mini album was made for Craft Roulette #195 whose parameters included Project type of Encouragement, calm colors, stuffed element and ticket(s).
I have made one other journal similar to this one in a virtual workshop by Kim Hein from Art Impressions using their Mini Journal Template and stamps. In thinking about the layout, I decided that I wanted a positive affirmation for the center back page and all the interleaving pages to it to be wintery and joyful. The theme is chasing the winter blues away.
Watch a painting tutorial before coloring any of the watercolor pieces.
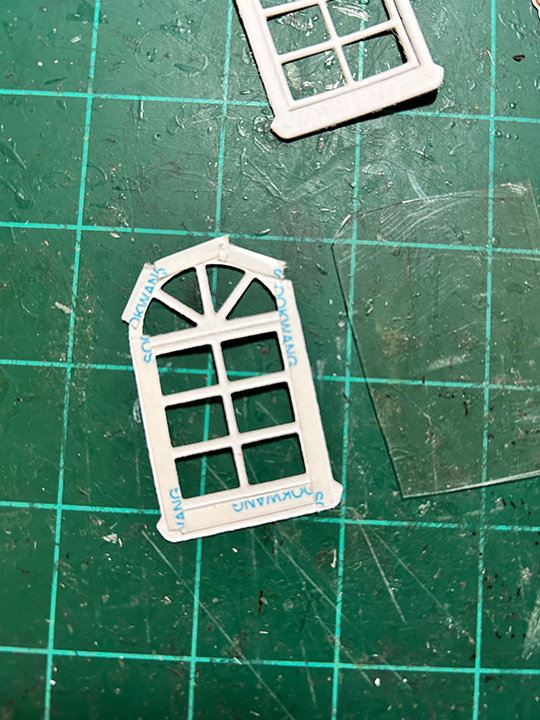
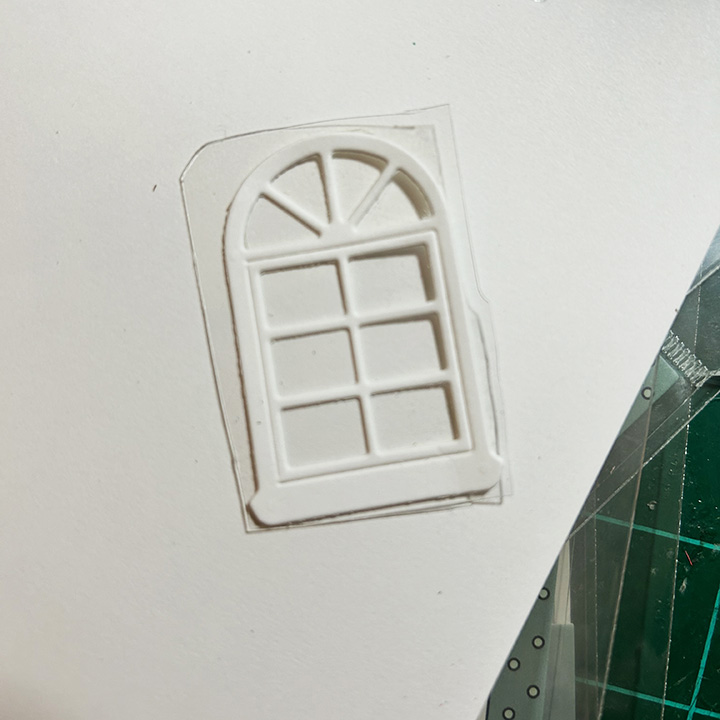
Window Journal Cover: Using the window frame and window arch dies from the Mini Journal template set, cut the arch opening into the left album cover and two of the window frames from white cardstock.
Cut a piece of clear acetate/plastic slightly larger than the window frame. Using narrow double-sided tape on the backside of one window frame, adhere the frame to the acetate piece. (Hint: If the double-sided tape is wider than the frame, peel off the backing paper and fold the tape over on itself to fit the frame.) Trim off the excess acetate around the frame. Add double sided tape to the back of the acetate and adhere over the cover opening. Attach the second frame to the back of the cover over the opening.
Room Scene Journal Cover: Stamp onto patterned paper the chair from the Matchbook Den stamp and die set. Cut out using the matching die and trim off the tab with scissors. Stamp the fireplace onto watercolor paper using a alcohol based ink and color using water-soluble inks with a water brush. Die cut fireplace and trim off tabs. Die cut picture frame and color with ink. Write the word “JOY” in the frame’s picture area with a fine-tipped blue marker. Cut a scalloped edge rectangle from a wallpaper-like patterned paper using die from the Mini Journal Template set. Assemble room scene onto the right cover panel.
Pocket of Encouragement and Ticket Pages: The blue ticket was computer generated. The yellow tags with affirming statements were from my stash of batch foiling using Spellbinder Glimmer System products. A large needle was used to pierce and thread the embroidery floss through the tags. The scalloped background piece and white lacy pocket were die cut using dies from the Mini Journal Template set.
Joy and Snowman Twister Pages: Stamp the fronts and backs of the twister Joy and snowman using the Mini Christmas Twister stamp and die set. Watercolor them. (I used glitter gloss and glitter brush markers on the twisters.) Watch a twister assembly video before assembling. Die cut two of the rectangles from patterned paper for each page using the large straight edge rectangle die in the Mini Journal Template set. Position the decorative papers onto the white page base pieces making sure not to cover the tabs. Secure the papers to page with removable tape and tape in place the smaller of the twister oval dies. Die cut through all three layers. (I had to recut the bottom layer of decorative paper, but the impression of the die was there to show me the position.) Glue patterned paper to page. (I die cut two oval frames for the “JOY” page using the two twister oval dies. They made the opening too thick to get good action with the twister, so I had to trim some of the notch away. I would not use frames unless they were from very thin paper.)
Snowman and House Pages: Using the WC Snow Globe stamp and die set, stamp the house and snowman on to 2×2 1/2-inch rectangles of watercolor paper. (I watercolored the images after viewing a number of the Art Impression painting videos.) Use the frame die in the Mini Journal Template set to cut out the images. (You can use the rest of the image that is die cut as I did with the house, or die cut a frame from decorative paper as I did with the snowman.)
Little Birds Pages: Die cut two scalloped circles using the die from the Mini Journal Template set. Stamp two birds from the Matchbook Garden set. Watercolor as shown in the opening video of this blog post. Using two of the oval cut outs from the patterned papers used for the Joy Twister page, and two scalloped rectangles of patterned paper, assemble the two bird pages. Stamp and die-cut the “hello Sunshine” banner from the Matchbook Garden set to place on the back center page.
Back Message and Ribbon Closure: I computer generated the back cover sentiment and used dies from the Mini Journal Template set to cut it out, frame and mat it. This panel is glued over the 24-inch piece of ribbon to hold it in place. Trim ribbon as needed once tied into a bow.
Thank you for reading this blog post. I hope this inspires you and makes you smile. Please like and leave comments 😊
Materials Used:
Dies
Art Impressions – Steel Dies – Mini Journal Template – 5718
Art Impressions – Steel Dies – Mini Christmas Twister Set – 5815
Art Impressions – Steel Dies – Matchbook Den Set – 5322
Stamps
Art Impressions – Clear Stamps – Mini Christmas Twister Set – 5815
Art Impressions – Clear Stamps – Matchbook Den Set – 5322
Art Impressions – Clear Stamps – Matchbook Garden – 5444
Art Impressions – Clear Stamps – WC Snow Globe Set – 5791
Foiling Plates
Spellbinders – Glimmer Hot Foil Plate – Mini Everyday Sentiments
Papers
Art Impressions – 6×6 Double-Sided 80lb Cardstock – Mini Journal Series -Mini PP -5835
Studio Light – 6×6 inch/15.2×15.2 cm Single-Sided Papers – Let it Snow
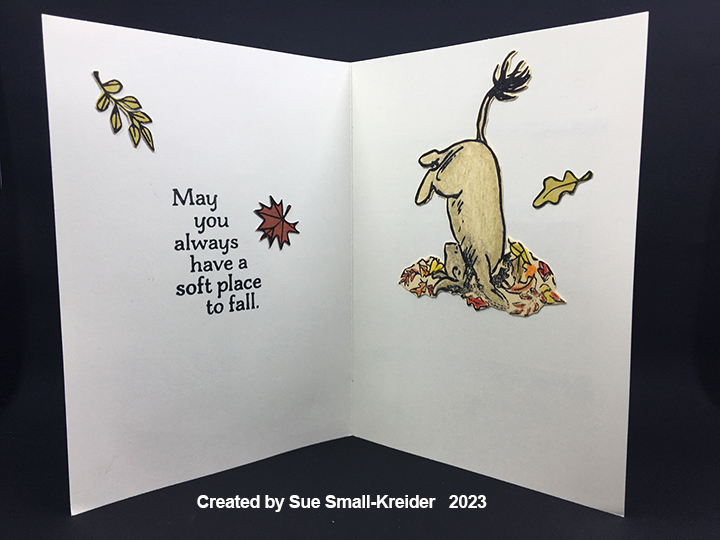
Crisp, colorful leaves gently falling off tree branches sometimes bring bitter-sweet emotions. A.A. Milne’s characters of Winnie-the-Pooh and Eeyore the donkey are playful reminders that fun can be had even in the worst of times.
For this card I used stamps and papers from Impression Obsession featuring E. H. Shepard’s Winnie-the-Pooh and Eeyore along with leaves and sentiments designed by Dina Kowal. The images were stamped in black ink and then colored with watercolor pencils. (I elected not to water brush the coloring.) Next the colored images were fussy cut. Additional leaves were stamped on some of the matted papers used on the card front and fussy cut.
The design principle of three is floated with the leaves throughout the card. Notice that the heart shaped leaf is always pointing to where your eye should flow. Leftover paper scraps were used to decorate the card back.
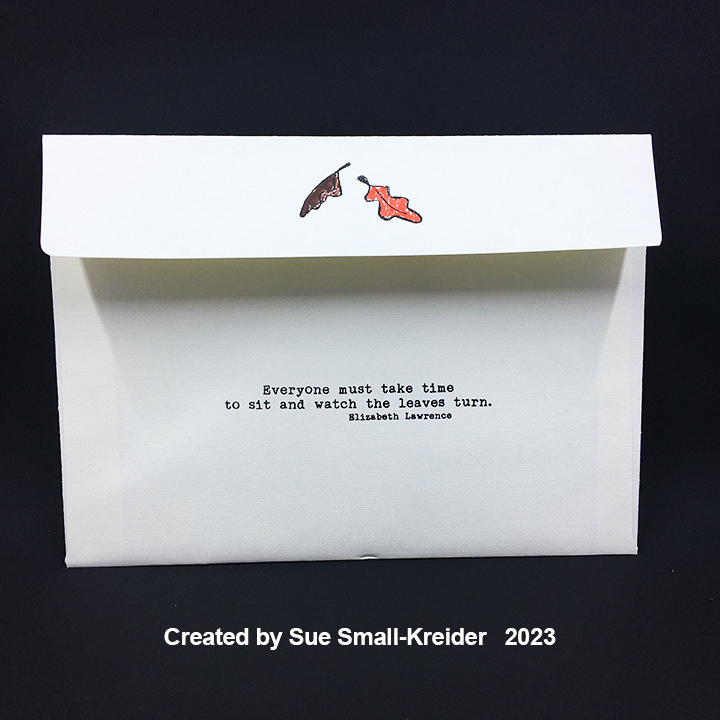
For the envelope back, leaves and a quote from Elizabeth Lawrence about taking time to watch the leaves turn colors, are stamped in black ink and colored with permanent markers.
Thank you for reading this blog post. I hope this inspires you and makes you smile. Please like and leave comments 😊
Materials Used:
Stamps
Impression Obsession – Clear Stamps designed by Dina Kowal – Pooh Window – CL1138
Papers
Impression Obsession – 6×6 Double-Sided Paper Pad – Classic Pooh – PP004
Park Lane Paperie – A6 Cardbase and Envelope – Ivory
Ink
StazOn – Solvent Ink – Jet Black
Ranger – Tim Holtz – Distress Watercolor Pencil- Antique Linen, Barn Door, Fired Brick, Mustard Seed, Peeled Paint, Rusty Hinge, Spice Marmalade and Walnut Stain
Pigma – Mircon 01 Fine Tip Pen – Black
Sharpie – Permanent Marker – Ultra Fine Tip – Orange and Brown
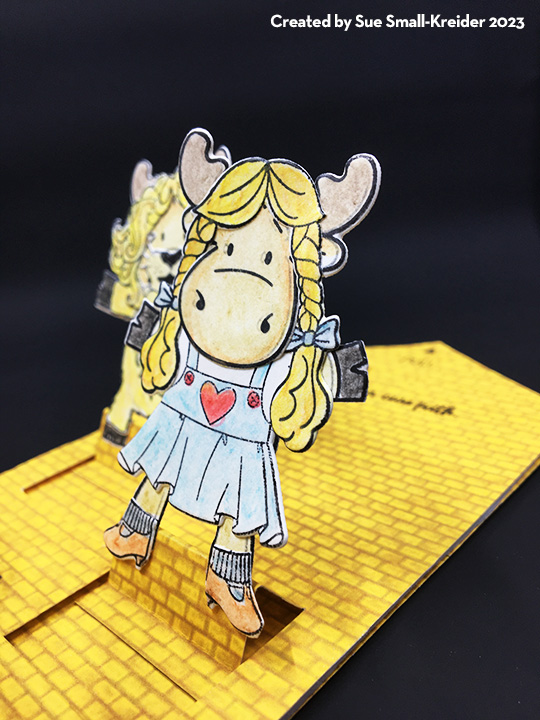
Sometimes it just feels like we’re off to see the Wizard of Oz to get all our problems solved. But what we learn as we traverse the road, it’s the people we meet along the way that mean more to us than the real issue.
This is a card to let the friends you meet along the journey know you appreciate them. It uses stamps and dies by Riley and Company to recreate the characters from the movie, The Wizard of Oz. Riley of course is a moose, so it’s moose in OZ costumes.
I stamped Riley four times and then stamped the costumes for the Tin Man, Lion, Scarecrow and Dorothy from the two Oz Dress-Up sets and Toto too. Watercolor pencils were used to color the individual pieces before die-cutting out the colored pieces. I found that cutting apart the bodies made it easier to assemble the costumed moose allowing for feet and arms to be positioned in more interesting ways. (The dies cut very close to the stamped images and are very easy to line-up.)
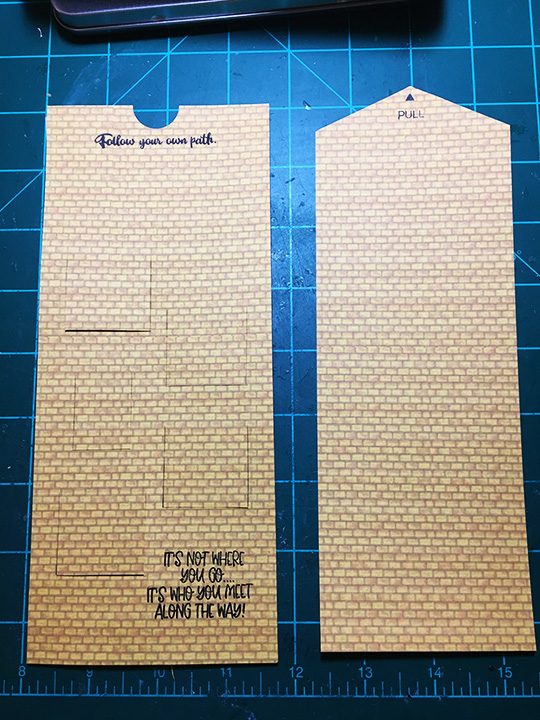
Using a download template that I had created for other cards using multiple sliders I first printed by yellow brick paper on medium weight white cardstock and then printed the template on the back of the yellow brick paper.
I had to edit the template, x-ing out some sliders and moving two others by half an inch to accommodate the size of the moose. Using a metal ruler and craft knife I cut the red lines around each slider and then scored the blue and green lines before folding the sliders.
Before assembling the card, I stamped the sentiments on to the card front and the interactive directions on to the pull tab of the main slider piece.
Double sided tape was added to the thin tabs on the five multi-sliders. To adhere the card front to the card back, I used narrow strips of foam tape along the sides and bottom edges. Place the main slider piece with the print side down to adhere the multi-slider panels to it. Making sure it can slide between the foam tape. Peel off foam tape backing and adhere the card back.
Turn to the front to train the multi-slider panels to slide open and close. Glue figures on to the panels.
Decorate the back of the card with scraps and you can write your personal message there.
As is my usual, I stamped the envelope flap back to hint as to what is inside. I used the ruby slippers and the “Where are my freakin’ ruby slippers when I need them?” which came-out upside-down and I think sets the card up nicely for the journey.
Hope you enjoyed the card and found inspiration from it.
Here are more split easel slider cards I’ve blogged about:
There is nothing so relaxing as a train ride through the mountains. Seeing the pine trees at the higher elevations and the babbling streams in the gullies. Hearing the chug-chug-chugging of the steam engine and experiencing the darkness of a mountain tunnel coming back into the sunlight.
In my challenge to myself to see how many different themed cards I can make with Karen Burniston’s new Fireplace die set; I decided on a mountain train tunnel with the mouth of the tunnel using the fireplace mechanism’s opening. All the dies used are by Karen Burniston.
I had made multiple train cars and engines for an earlier project. (Watch the assembly video for the trains.) The train tracks are from a train elements set and I cut 4 of them to have enough pieces to form the track I needed for the front and inside of the card. For the smoke from the smokestack, I turned the smallest cloud from the Outdoor Scene set on its side and glued inside the stack.
The front of the card uses curving hillside with large pine trees from the Outdoor Scene set and the treeless curving stitched edger from the Long Nature Edges set for the foothills. I shaded the hillside tope edges with a pale brown ink.
For the card’s sentiment, I double cut the large words “Enjoy” and “ride” once from brown and again from black so that I could offset them to create a shadow. The oval cuts out the word “THE” so it is backed with a scrap of black.
The inside of the card requires some practice laying out to get the right placement of the mountains, so they won’t stick out of the card when closed. (Watch the fireplace assembly video before laying out and assembling.) I used scrap pieces of brown lightweight cardstock to cut my crosshatch ovals. (Largest oval die in set was used.) I cut off the bottom of the ovals to have varying heights. The largest oval I turned over on the back, traced the mechanism opening onto and then die-cut the opening using the second to smallest to fit inside the penciled opening.
The smaller ovals are glued to the sides and behind the oval with the tunnel opening. I then adhered the fireplace mechanism as shown in assembly video and glued the mountains onto mechanism matching up the openings. Next, I pieced together the train tracks to come out of the tunnel and near the side of the mountains. Using the pop-up strip from the Fireplace die set and the two angled pop-ups from the Mini Pops set, played with placement of the pop-ups with the train pieces to set spacing. Glue the pop-ups first and once their glue has set, then adhere the train pieces. (I bent the pop-ups at their original scored folds, but you might play with other folds and or strips to get a more realistic alignment of the train cars.)
The babbling stream is created from strips of patterned paper cut with the Long Nature Edges curving stitched edger. The diagonal placement adds drama to the card and space in the corner to write a personal message.
Leftover pieces from the train track as well as pieces from other card projects complete the back of the card.
As is my habit, I decorated the envelope back flap with additional train pieces to hint at what’s inside.
Thank you for reading this blog post. Please like and leave comments 😊
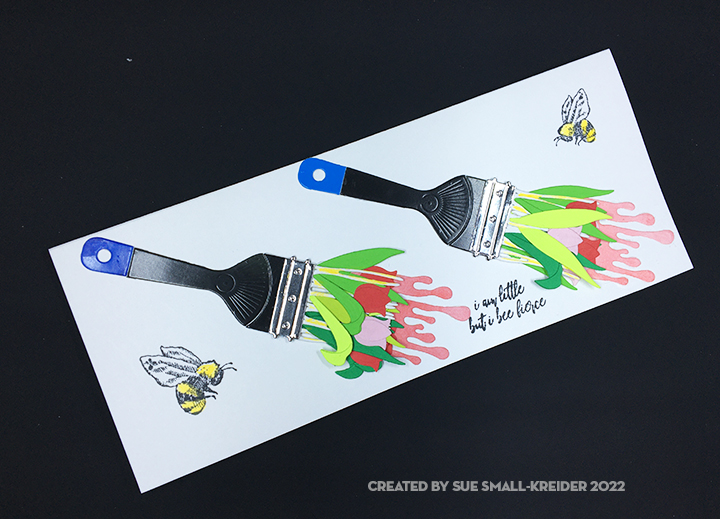
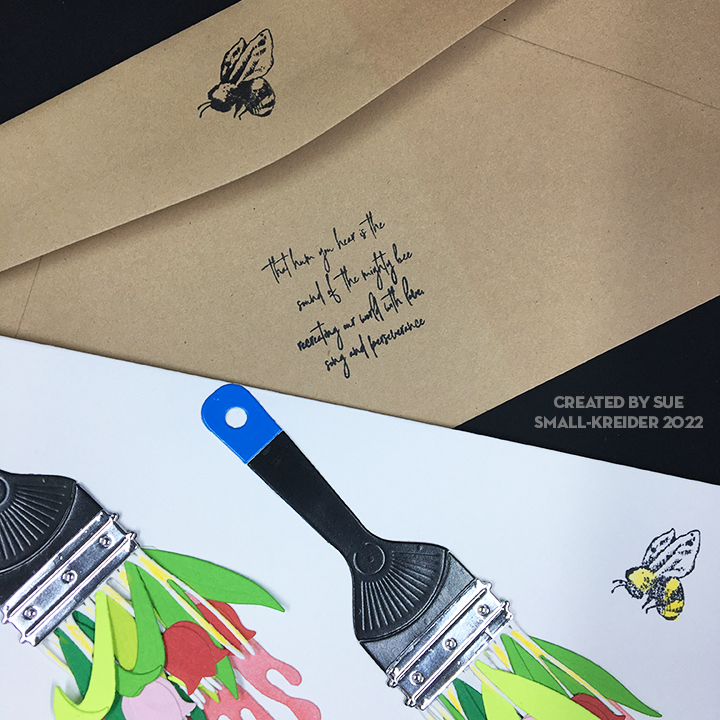
Bees, fresh paint and tulips seem like harbingers of Spring as we humans come out of winter hibernation. I had some of the paint brush die sets from the Spellbinder’s Paint Your World Collection by Vicky Papaioannou as well as the Picket Fence Studio’s I Bee Fierce stamp set by Nicole Peterson on my crafting desk and thought they went well together.
Having die-cut four sets of paint brushes from three of the die sets, I set about assembling the brushes noting that the handle pieces are not interchangeable, but all three sets have the same bristles die. I glued one layer of bristles to the back of each handle and another layer of bristles to the back of the silver band. Next, I studied the packaging for decorative ideas on the placement of the tulips within the bristles. I glued in place the leaves and flowers once I had figured out their placement in the two layers of bristles. I decided to ink blend some pink Distress Ink onto white cardstock scraps before die-cutting the paint drips. I applied glue the silver band layer just on the back of the band and then placed it on top of the handle layer matching up the two lines on the band with the lines on the handle. Once the paint drips were dry, they were glued to the back of the assembled paint brushes.
Following the design rule of odd numbers of elements, I knew I had to stamp three elements to make the card front flow. Another design trick is to suggest movement by placing things on the diagonal.
I stamped the front, back and inside of the card before I adhered the paint brushes to the card. Stamping is easy when you use a stamping platform with stamping tool to help apply even pressure to the stamps. The back of the card is stamped using a Technique Tuesday stamp set.
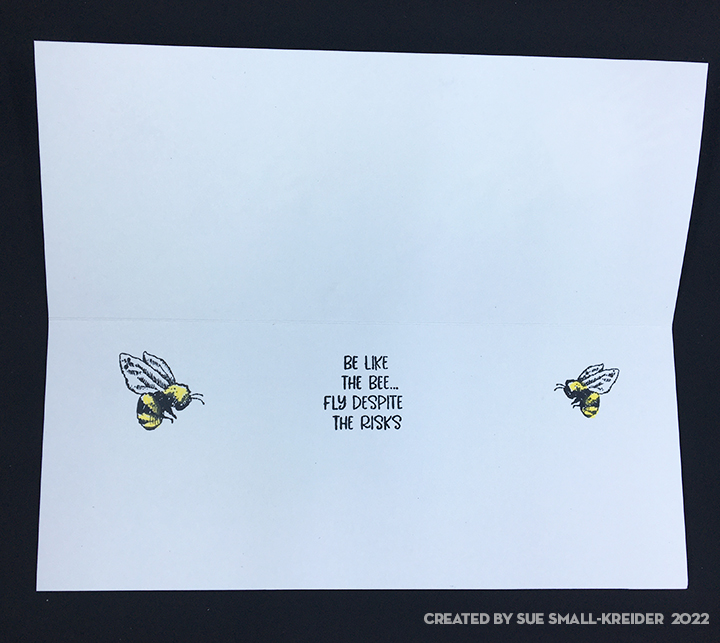
The front sentiment is “I am little but I bee fierce,” while the inside says, “Be like the bee… fly despite the risks.” The back of the card states “This is a random act of cardiness.”
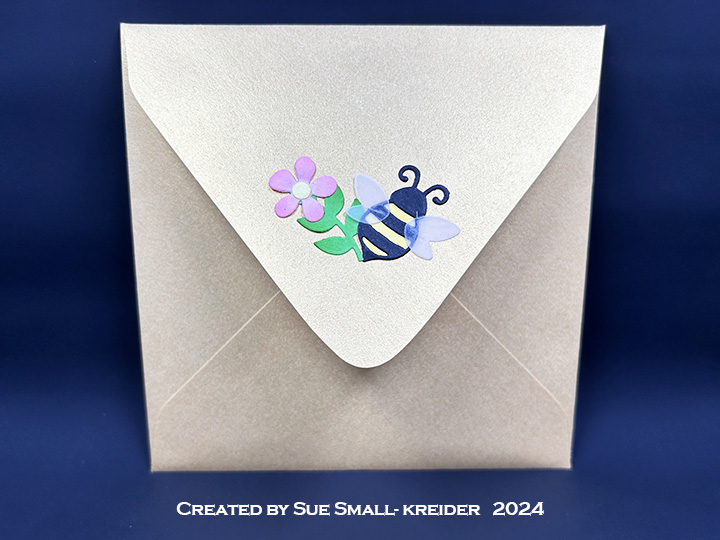
The envelope back was stamped with another sentiment from the Picket Fence set as well as the smaller bee. It says “that hum you hear is the sound of the mighty bee recreating our world with love, song and perseverance.”
Thank you for reading this blog post. Please like and leave comments 😊
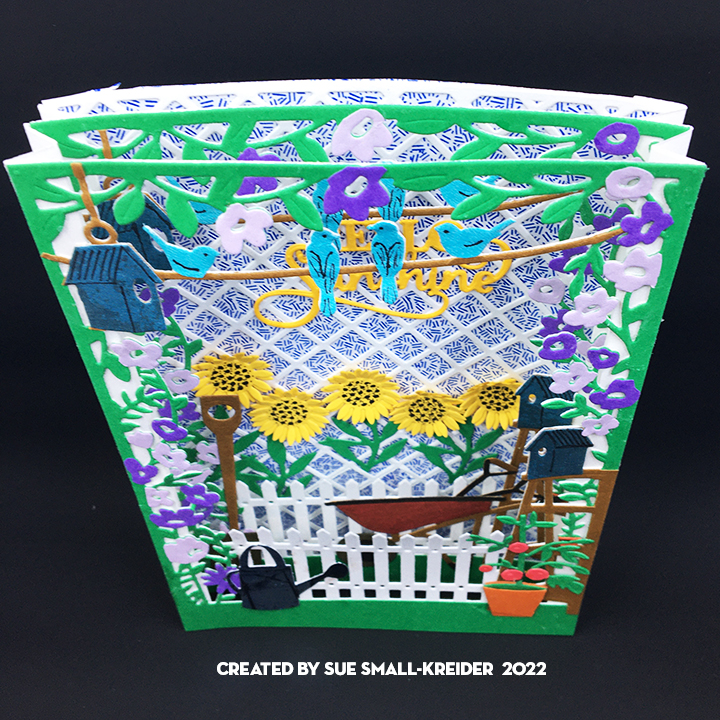
Olga Direktorenko is the creative designer behind thePaper Discovery brand sold by Craftstash out of the UK and carried by Paper Wishes in the USA. I love her dimensional dies sets that often feel like creating a doll’s house or miniature scenes.
On Craftworld, she talks of her garden with vegetables and Ukrainian sunflowers in one of her video demos. This card is my first time out using her Garden Delight dies which are copyrighted in 2021. I purchased them from Paper Wishes.
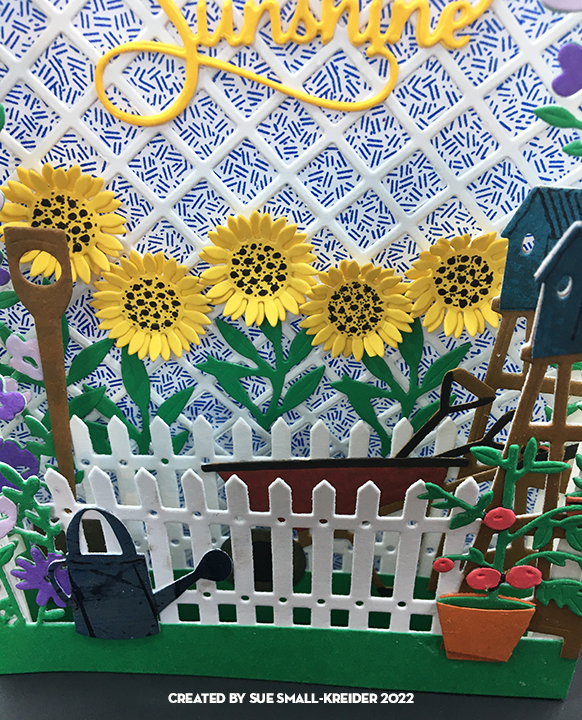
The side dies cut and score accordion folds that easily create tunnel-like cards. Her garden accessories allow for fun details, but like doll house accessories, not all are on the same scale. I placed the wheelbarrow in the middle layer because I felt it was of a larger scale than the picket fence.
I colored the garden frame using colored papers. The flowered vines reminded me of purple morning glories common in the USA. I cut the frame die, several times in several colors to fussy cut and glue the vines, flowers, birds, rope, bird houses and ladder on to the white base frame.
For the sunflowers have two flower head dies and are intended to be glued on top of each other with the petals alternating to create a full flower. Using a black gel pen, I colored the seed heads that are embossed with the die.
The white lattice background is glued to some blue patterned paper recycled from an envelope.
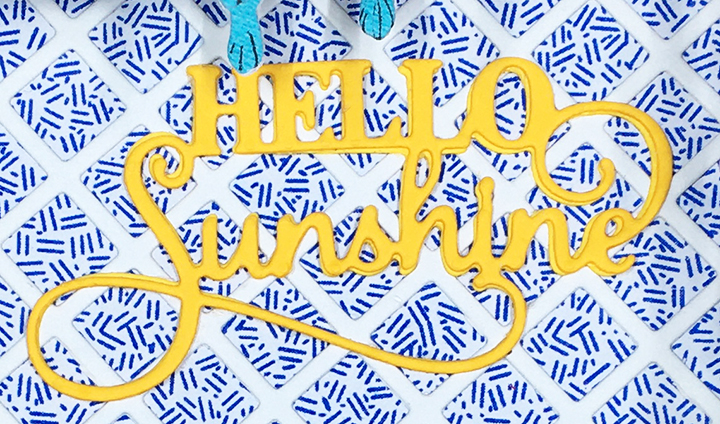
The sentiment “Hello Sunshine” is a die-cut from Sue Wilson of Creative Expressions. (While there are stamps that go with the Garden Delights collection there are no sentiments.)
This card will collapse to fit into a 5 inch by 7 inch envelope.
Thank you for reading. If you enjoyed this blog post, please like it and follow the blog. 😊