A Pop-Up Get Well Card – Fishing Themed

IT’S TIME for the Karen Burniston Products – KB Riley LLC January 2025 Release Blog Hop. (See GIVEAWAY details at the end of this post for blog hop list.) The Design Team have come together with Karen today for a fun blog hop to celebrate the release of 8 new dies and 4 new stamp sets. Sneak peeks of the new release started last week, and the dies are available to order NOW!

Watch the video below to see how this card was made.

Cardbase: I started with a 7×10-inch piece of patterned paper folded in half to form an A7 side-fold card. The inside was covered with two rectangles of patterned paper cut using the second largest of the Rectangles and Labels – Crosshatch dies. Color center fold gap with marker close in color to patterned paper. Add decorative stripes for side borders. Decorate the outside with journaling cards and stickers from decorative paper collection.

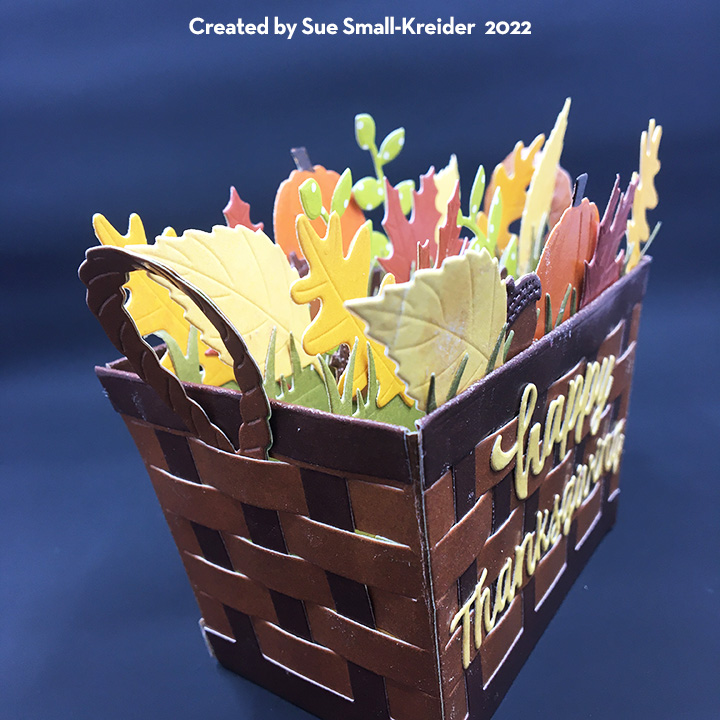
Basket Pop-Up: Cut the Flower Pot Pop-Up main pot piece twice from a dark brown cardstock. Cut two sets of strips with smiley faces from the same brown cardstock. (Watch Karen Burniston’s assembly video located at the bottom of the linked Flower Pot Pop-Up page.) Cut four sets of the striped side and top pieces from the Popcorn die set from a light brown paper. Save all five waste strips from each of the sides to weave through the decorative side pieces to make the basket. Cut one square base piece with tabs from the Flower Pot Add-Ons set in dark brown cardstock.

Decorations:  From the Fishing Boat Add-Ons die set, cut all three of the fish dies three times from a silver gray cardstock. Cut two of the heart picks from the Bouquet Bits die set in green and save the heart waste pieces to use as greenery in the front corner of the basket. (I ended up only using the heart pick in this card.) Cut one pail and handle from silver mirror cardstock. (Color handle with black alcohol marker.) Cut three cattails from the Bayou Animals die set from green and color cattails brown on both sides. (In the video I call these bulrushes from the gator and frog set.) Cut five green leafy pieces from the Flower Pot Add-Ons set. From the Fishing Boat Add-Ons die set, cut the fishing rod twice. (If using patterned paper, flip paper to backside to cut the mirror image of rod.) Cut one fishing line from silver cardstock.

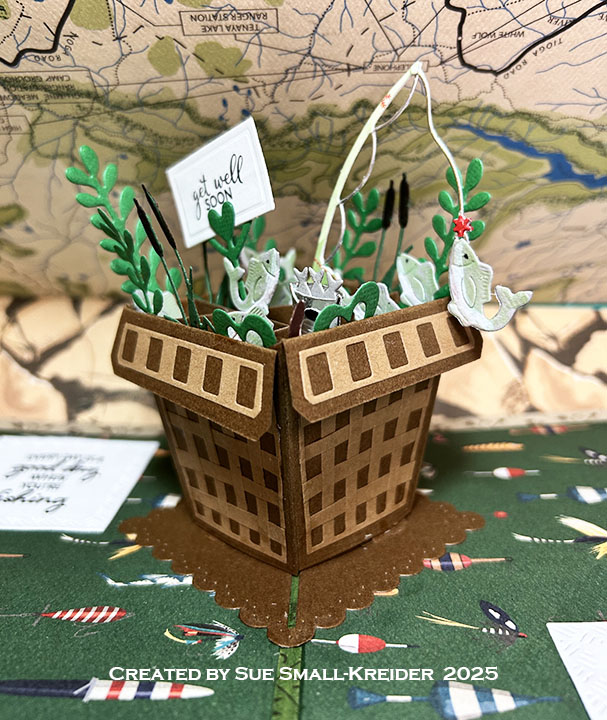
Sentiments:  “Get Well Soon” is from the Bouquet Sayings stamp set and cut out using the die in the Bouquet Bits die set. The green heart pick that holds the card is also in the Bouquet Bits die set. “Every day is a good day when you’re fishing” is from the Fishing Phrases stamp set and cut out using the second smallest crosshatch die in the Squares – Crosshatch die set.

Envelope: The card fits into an A7 size envelope with one of the jumping fish die cuts. “Here fishy, fishy” is stamped in black ink using the Fishing Phrases stamp set.

___________________________________

Thank you for reading this blog post.

I hope this inspires you and makes you smile.

Please like and leave comments 😊

___________________________________

Materials Used:

Dies

Stamps

Papers

  • Bazzill – 8.5×11 Cardstock – Tiara -18-1002
  • Carta Bella – 12×12 Double-Sided 65 lb Cardstock – Outdoor Adventures
  • Silver Mirror Cardstock
  • Browns, Green, Red and White Cardstock
  • Recollections – A7 Envelope – Cream

Ink

  • Pigma – Mircon 05 Fine Tip Pen – Black
  • Sharpie – Permanent Marker – Fine Tip – Olive Green
  • Sharpie – Permanent Marker – Ultra Fine Tip – Black
  • Scrapbook.com – Shimmer Glitter Brush Marker – Pretty Pink, Key Lime Green, Frosty Blue & White
  • Stampin’ Up – Stampin’ Blends Marker – Chocolate Chip

Adhesives

Tools

GIVEAWAY:

To celebrate the release Karen Burniston and each of the Karen Burniston – KB Riley LLC Design Team members will be giving away a $25 Gift Certificate to some lucky person who comments on our blog posts, so make sure you join the hop and comment on everyone’s blog post. Winners will be randomly chosen from ALL of the blog hop comments received on our blog posts by Monday, 3rd February 2025. Lots of chances to win some goodies, so just leave a comment on this post or any other blog hop posts to enter! Don’t forget to leave some way for us to contact you, in case you are a lucky winner!

Karen Burniston – https://karenburniston.typepad.com/i_am_not_lefthanded/2025/01/karen-burniston-january-2025-release-blog-hop.html

Lois Bak – https://clownmomcreations.blogspot.com/2025/01/karen-burniston-new-release-blog-hop.html

Sue Small-Kreider – YOU ARE HERE

Frances Byrne – https://stampowl.blogspot.com/2025/01/karen-burniston-kb-riley-llc-january.html

Jennifer Webster – https://www.jlwebstercreations.com/2025/01/karen-burniston-january-2025-new_27.html

Suzanne Smit – https://knutselsuus.blogspot.com/2025/01/kb-riley-llc-january-release-blog-hop.html

Nicky Foden – https://mymessycraftroomme.wordpress.com/?p=7490&preview=true

Sandy Diller – https://sandydiller.blogspot.com/2025/01/new-release-bog-hop-january-2025.html

Ken Chien – https://www.instagram.com/gogoro_bricks/

Pop-Up Chick In A Basket

Wanting a basket to put a hatching chick pop-up ball in, I came up with a collapsible basket card for Easter using several of the new die sets in Karen Burniston’s February 2024 release.

How to make this interactive card:

Chick: Make two Mini Pop-up Balls – one entirely yellow and the other half yellow, half white. Assemble chick following Karen Burniston’s assembly video located at the bottom of the Mini Pop-up Balls page. Cut six of the top and bottom eggshell jagged pieces and one hexagon for the top of the egg from white cardstock using the dies from the Animal Add-on 5 die set.

Basket: Cut four of the basket pieces from the Wide Woven Basket Box Card set and assemble as shown in the KB assembly video at the bottom of the linked page. Trim off the side tabs on the four basket pieces. Watch the following video. Cut two of the largest crosshatch squares from brown.

Closure Sentiment: Cut the Shadow from the Happy Easter word set from white. Cur the words from yellow and ink bled to a darker yellow. Die cut eggshell and chick pieces following assembly video for Spring Animals.

Glue assemble chick to sentiment.  Cut eight of the smaller eye circles and two of the larger eye circles from the Mini Pop-up Balls die set. Glue four of the small circles onto one of the large circles. Cut a piece of string at least 24-inches long and glue one end on top of small circle stack. Glue the last four circles on top of the string end, thus sandwiching the string in center of the small circles stack of eight. Attach to top of stack the last large circle. Once the stack is dry, glue to the back of the sentiment and then onto top basket flap. Let dry with a weight on top of it.

Envelope: This card would either be hand delivered or mailed in a bubble pack envelope.

_______________________________________

Thank you for reading this blog post. I hope this inspires you and makes you smile.

Please like and leave comments 😊

_______________________________________

Materials Used:

Dies

Papers

  • Hot off The Press – Paper Pazazz – 12×12 Single-Sided Paper – Soft Tints Green Stripes
  • Black, Blue, Brown, Orange, White and Yellow Cardstock

Ink

  • Ranger – Tim Holtz – Distress Ink- Fossilized Amber and Vintage Photo
  • Pigma – Mircon 01 Fine Tip Pen – Black

Adhesives

Tools

  • Stamping Blocks used as paperweights
  • Scissors
  • Tombow – Mono – Sand Eraser -512A

Miscellaneous

  • 24-inches of Baker’s Twine

Summer Sympathy Basket

Sympathy cards are never easy cards to do. I think of making them as part of my own grieving process, putting in loving thoughts to those left behind.

Karen Burniston’s Wide Woven Basket has become my go to for sympathy cards tailoring the flowers and decorations to the individual who has passed.

I use the following Karen Burniston dies Woven Basket Box Card, Wide Woven Box Card, tag from Tag Book Pop-Up, flowers from the Flowers and Bee and Flower Pot Pop-Up, and With Sympathy sentiment. I also tried the new Small Scenes Bam Box to pop-out the basket when pulled from the envelope. Nuvo Drops were used to make the small flowers’ centers.

(Please watch the assembly videos for the various dies that are located toward the bottom of each die set’s link page before starting a card.) For a detailed tutorial of a sympathy basket click here.

The folded card fits into a catalog 6×9 inch envelope. To mail the card, I fold a sheet of 8 1/2 x 11-inch white cardstock in half to fit inside the envelope and cushion the card in the mail.

Thank you for reading this blog post. I hope this inspires you and makes you smile. Please like and leave comments 😊

Materials Used:

Dies

Stamps

  • Waffle Flower – Clear Stamps – Sweet Sentiments -271296

Papers

  • Colored Cardstock
  • Matte Gold Cardstock
  • White Heavyweight Cardstock
  • White Catalog 6×9 Inch Envelope

Ink

  • VersaMark – Watermark Stamp Pad

Embossing Poweder

  • Papercraft Society – Embossing Powder – Matte Gold

Adhesives

Tools

  • Die Cutting Machine
  • We R Memories – QuickStick
  • Stamping Platform
  • LDRS – Stampendable Stamping Tool
  • Stamping Cloth
  • Kat Scrappiness – Anti-Static Tool
  • Scissors
  • Tweezers
  • Heat Tool
  • Ball Tipped Flower Shaping Tool
  • Foam Mat

Miscellaneous

  • Ivory Organza Ribbon – 1/4-inch wide
  • Nuvo – Crystal Drops – Dandelion Yellow, Ripened Pumpkin, and Ebony Black

Patriotic Sympathy Basket

One of my cardmaking friends lost her husband to cancer recently. He was career military. I wanted to make a flower basket for the card with a nod to his military career, so I did the colors of red, white and blue with some flag bunting on the sides of the basket.

I use the following Karen Burniston dies Woven Basket Box Card, Wide Woven Box Card, tag from Tag Book Pop-Up, flowers from the Flowers and Bee and Flower Pot Pop-Up, and With Sympathy sentiment. I also tried the new Small Scenes Bam Box to pop-out the basket when pulled from the envelope.

Please watch the assembly videos for the various dies that are located toward the bottom of each die set’s link page before starting a card.

When assembling the woven basket, I like to make the rims of the basket fold by lining up a metal ruler from pointed edge to pointed edge. This make a straight fold that is more rounded to cover the top edges of the basket.

When making the flowers, I like to use some flower shaping techniques such as using a tool with a round ball on its end to push the center of the flower into foam to create depth. I most often use my fingers to curl the petal tips under. On the large hibiscus-like flower I used the ball tool to shape the undersides of the petals. Many flowers, such as daisies, have two layers of petals.

The arrangement of the flowers always scares me, but I tried to remember my flower arranging class tricks from years ago. Start with the largest flowers first, creating a tall focal point in the center and shorter to the sides. Fill-in with smaller flowers symmetrically and finish with baby’s breath to fill-out the empty spaces.

I cut the “with Sympathy” sentiment from matte gold cardstock and curved the word sympathy to fit the front of the basket. In addition, I cut a white tag from the Tag Book Pop-Up and stamped and heat embossed the tag with “Sending prayers your way” in matte gold embossing powder. A narrow ivory organza ribbon was used to tie the tag on to a basket handle. A personal message can be written on the tag back.

The folded card fits into a catalog 6×9 inch envelope. To mail the card, I fold a sheet of 8 1/2 x 11-inch white cardstock in half to fit inside the envelope and cushion the card in the mail.

Thank you for reading this blog post. I hope this inspires you and makes you smile. Please like and leave comments 😊

Materials Used:

Dies

Stamps

  • Waffle Flower – Clear Stamps – Sweet Sentiments -271296
  • Simon Says Stamp! – Clear Stamps – Brushed Flowers – sss202392c

Papers

  • Photoplay – 12×12 Double-Sided Paper Collection – Stars and Strips by Michelle Coleman
  • Keep It Simple – 6×6 Double-Sided Paper Collection – Back To basics – Ruby Collection
  • White Heavyweight Cardstock
  • White Catalog 6×9 Inch Envelope

Ink

  • Stampin’ Up – Classic Stampin’ Pad – Misty Moonlight
  • Simon Says Stamp – Pawsitively Saturated Ink
  • VersaMark – Watermark Stamp Pad
  • Sharpie – Permanent Maker – Ultra Fine Point – Yellow
  • Pigma – Mircon 03 Fine Tip Pen – Black

Embossing Poweder

  • Papercraft Society – Embossing Powder – Matte Gold

Adhesives

Tools

  • Die Cutting Machine
  • We R Memories – QuickStick
  • We R Memories – Scoring Board and Trimmer
  • Stamping Platform
  • LDRS – Stampendable Stamping Tool
  • Stamping Cloth
  • Kat Scrappiness – Anti-Static Tool
  • Scissors
  • Tweezers
  • Heat Tool
  • Ball Tipped Flower Shaping Tool
  • Foam Mat

Miscellaneous

  • Ivory Organza Ribbon – 1/4-inch wide

ALL STAR Birthday Basket

What to give to an all-star athlete who enjoys playing a variety of team sports? A basket of sport balls of course.

This pop-up birthday card features some of Karen Burniston’s December 2022 release die sets – Wide Woven Basket Box Card, Bam Box and Sports Charms.

Wide Woven Basket: This die set makes it easy to create a rectangular pop-up basket. (Prior to this set you had to die cut an extra set of pieces to widen the basket sides and grass. See video.) When used with the previously released Woven Basket Box Card, you cut two sets of the original size sides and two sets of the wide size sides. Follow the directions on the package or the assembly video to weave the basket and join the sides together. (I choose to leave the top decorative full width rather than folding over as directed in the video.)

Adding Crossbars of Grass: The Wide Woven Basket Box Card includes the wide grass crossbars used to attach the various balls. (I cut four to make a full basket.)

Sports Charms: In the Sports Charm set there are a softball and bat, a golf ball and tee, a basketball, a volleyball, a soccer ball and an American football. All but the softball and golf ball use two dies to create the stitching patterns of the various balls. The softball has embossed stitching lines that I highlighted with a fine-tipped red marker. I inked the golf ball’s indentations lightly with a black ink. (See assembly video for Sports charms.)

Sentiments: I cut an extra set of the weaving panels from the original basket set and folded the two-prong piece in half to glue behind the “T” piece to create a signpost to glue “ALL STAR” from the mini alphabet set. When I glued the signpost onto the back of the basket, I laid it out over the A7 envelope to know how tall I could make it and still fit into the envelope. The “Happy Birthday” used both the sentiment set and its matching shadow set cut from a contrasting color. (I used Glassy Accents on the “Happy Birthday” to make it have some shine which doesn’t show very well in the photos.) The shadow piece is popped up on two foam dots to give some dimension from the basket.

Bam Boxes: To animate the basket when it comes out of the envelope and pops into shape, two small “Bam Boxes” were used. (Assembly video) These easy to make rectangular boxes are powered by a small rubber band. (I used #8 size bands.) These go in diagonally opposite corners of the basket. Once glued in, the basket will only fold flat in one direction.

Envelope: As with all my cards that are sent in an envelope, I have stamped the back flap to hint at what’s inside. This is an A7 envelope.

Thank you for reading this blog post. Please like and leave comments 😊

Materials Used:

Dies

Papers

  • Colored Cardstock Scraps
  • Light-Weight Yellow and Orange Cardstock
  • A7 White Envelope

Pens, Inks & Stamps

  • Red Fine-Tipped Marker
  • Catherine Pooler – Premium Dye Ink – Spa Collection – Mandarin Spice
  • Fun Stampers Journey – Rubber Stamp – Winners -SS-0362

Miscellaneous

Thanksgiving Basket

Being thankful for friends, family and a good harvest is what this basket pop-up card is all about.

This pop-up Thanksgiving card features some of Karen Burniston’s December 2022 release die sets – Wide Woven Basket Box Card and Bam Box.

Wide Woven Basket: This die set makes it easy to create a rectangular pop-up basket. (Prior to this set you had to die cut an extra set of pieces to widen the basket sides and grass. See video.) When used with the previously released Woven Basket Box Card, you cut two sets of the original size sides and two sets of the wide size sides. Follow the directions on the package or the assembly video to weave the basket and join the sides together. (I cut four rope handles because my cardstock was printed on the back side – so two ropes glued together.)

Crossbars of Grass: The Wide Woven Basket Box Card includes the wide grass crossbars used to attach the various balls. (I cut four to make a full basket and glued them in rather than tucked as suggested in the video.)

Autumn Elements: The leaves, vine, pumpkin and acorns are all from a previously released Karen Burniston Autumn Elements die set. (I didn’t do a test layout of my leaves with the basket folded closed overt the envelope, hence the folded tips of leaves to fit into the envelope.)

Sentiment: The “Happy Thanksgiving” is from the Karen Burniston Autumn word set. It is a single layer of a contrasting color from the basket. For the matted label on the back of the basket, I used the large rectangle and the smaller stitched rectangle from Karen Burniston’s Slim Frames set. This label is for a personal message.

Bam Boxes: To animate the basket when it comes out of the envelope and pops into shape, two small “Bam Boxes” were used. (Bam Box assembly video)These easy to make, rectangular boxes are powered by a small rubber band. (I used #8 size bands.) These go in diagonally opposite corners of the basket. Once glued in, the basket will only fold flat in one direction. (I recommend using a heavy weight cardstock for bam boxes and letting each stage of gluing dry before moving onto the next step.)

Envelope: As with all my cards that are sent in an envelope, I have stamped the back flap. This time it is stamped with my main sentiment. This is an A7 envelope.

Thank you for reading this blog post. Please like and leave comments 😊

Materials Used:

Dies

Papers

  • Rubbernecker – 6 x6 Paper Pad Double-Sided Papers 80# Cardstock – Autumn Leaves
  • A7 White Envelope

Inks & Stamps

  • Catherine Pooler – Premium Dye Ink – Spa Collection – Mandarin Spice
  • Stampin’ Up – Classic Stamping Pad -Crushed Curry and Pumpkin Pie
  • Crafter’s Companion – Nature’s Garden – Autumn Blessings Collection

Miscellaneous

Happy Christmas Basket

There is something magical about going to a Christmas Eve Candlelight church service on a frosty evening. That is the feeling this basket card is hoping to invoke.

This Christmas card features some of Karen Burniston’s December 2022 release die sets – Wide Woven Basket Box Card, Church School Tiny House Add-ons and Bam Box. All of the pieces were cut from two types of white cardstock with silver ink added to some pieces. Vellum was used behind the windows.

Church: The assembly of the church starts with the Tiny House base with its windows cut out while still flat. (Save the window frames to glue back into openings.) Cut rectangles of clear vellum to be glued on the inside of the church over the window openings. Trim excess vellum away from round window as needed. Coat the two roofs with glitter gloss. Coat window frames and door frame with glitter gloss. Using door die as a stencil, color door handles silver. Color the two crosses silver and glue together. Color the two halves of the tall charm holder on the church tower silver.

Assemble the tiny house as directed in assembly video. Don’t fold back bottom tabs, but rather trim off the tab on the house side, leaving the back or pointed side’s tab attached. Follow assembly video for the church tower. After adding the Bam Boxes, cut a rectangle to fit on the inside of the church to cover the other half of the church front. (This piece will stabilize the church when attached to the basket and will block light if you add LED lights.)

Wide Woven Basket: This die set makes it easy to create a rectangular pop-up basket. (Prior to this set you had to die cut an extra set of pieces to widen the basket sides and grass.

When used with the previously released Woven Basket Box Card, you cut two sets of the original size sides and two sets of the wide size sides. Follow the directions on the package or the assembly video to weave the basket and join the sides together. (I colored both sides of the ropes with silver metallic pen and then coated with a glitter gloss brush pen before attaching them.)

Adding Crossbars of Grass: The Wide Woven Basket Box Card includes the wide grass crossbars. (I cut four to make a full basket.) I trimmed away the grass leaves where the church would be. The front tab on the church is NOT attached to the crossbar, but rather acts as a guide for when the church and basket are folded closed.

Bam Boxes: To animate the basket when it comes out of the envelope and pops into shape, two small “Bam Boxes” were used. Watch the assembly video first. The church also uses two Bam Boxes. These easy to make rectangular boxes are powered by a small rubber band. (I used #8 size bands.) These go in diagonally opposite corners of the basket or church. Once glued in, the basket or church will only fold flat in one direction, so make sure both church and basket fold in the same direction. (I recommend using a heavy weight cardstock for bam boxes and letting each stage of gluing dry before moving onto the next step. I found that making a bunch of Bam Boxes at one time is useful for having some ready made to use on other projects.)

Tag, Bells, Holly and Berries: A tag is tied to the handle of the basket for a personal message. It is cut using the tag die from the Karen Burniston Tag Book die set. The bells are charms from the Church School Tiny House Add-ons colored with a silver gel pen. Karen Burniston’s Pattern Plate of Holly was coated a glitter gloss while the berries were colored with a silver gel pen. The holly leaves and berries were cut apart for decorations on the basket, tag and in the basket grass.

Sentiment: The “Happy Christmas” is from the Karen Burniston Word Set 3 -Holiday. It was cut three times from white, and the top layer was not weeded out of its original piece of cardstock while it was being colored with a silver gel pen. The three layers were glued together before being attached to the front of the basket.

Lights: I added an inexpensive string of LED fairy lights to the inside of the church. (You can find these at Dollartree and Poundland stores.) Because the lights restrict the movement of the Bam Boxes inside the church, the lights need to be removed to fold flat.

Thank you for reading this blog post. Please like and leave comments 😊

Materials Used:

Dies

Papers

  • Brazzill – 12×12 Smooth Cardstock – Coconut Swirl
  • White Heavy Weight Cardstock

Pens & Brushes

  • American Crafts Metallic Marker – Silver
  • Gelly Roll – Gel Pen – Silver
  • Nuvo – Aqua Shimmer Brush Pen – Glitter Gloss

Miscellaneous

A Basket of Flowers For Mom

Mothers deserve special cards. A basket full of roses using Anna Griffin’s new Basket Pop-Up kit and a few tea service pieces from an older Anna Griffin Favorite Tea Embellishments made the perfect card for this special mom.

The envelope was stamped with stamps from Anna Griffin’s Treasury of Stamps and Dies using Stampin’ Up Always Artichoke ink.

Other cards using stamps and papers from Anna Griffin include:

Thank you for looking at my blog. Please like, comment and follow. 🌞

A Spring Basket of Flowers

Special aunts deserve special cards. A basket full of spring flowers using Anna Griffin’s new Basket Pop-Up kit and a few flowers from an older Anna Griffin Pretty Paintings kit made the perfect card for this special aunt.

The envelope was stamped with stamps from Anna Griffin’s Treasury of Stamps and Dies using Stampin’ Up Soft Suede ink.

Thank you for looking at my blog. Please like, comment and follow. 🌞

Other cards using stamps and papers from Anna Griffin include: