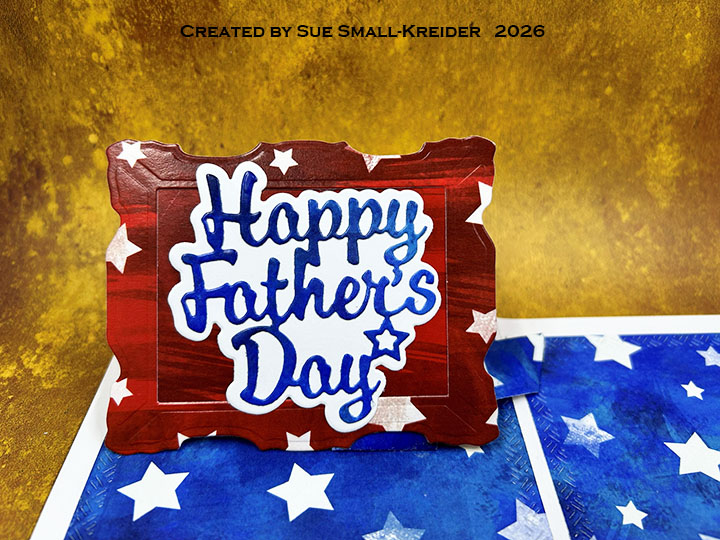
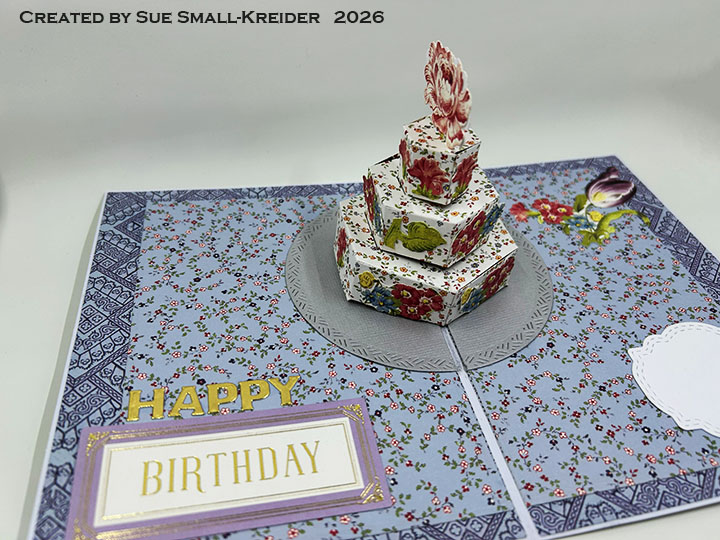
Father’s Day Card for a Navy Man

I’m here today with a pop-up ship Father’s Day card full using Relatively Thoughtful digital papers – A collection called The Royal Navy Heritage Collection.

Watch the process video to see how I use the paper collection.

Cardbase: From the The Royal Navy Heritage Collection digital paper collection, I printed single-sided 65lb. lightweight cardstock of the blue neckerchief design. (When the neckerchief is cut out, it makes a 5.25×7.5-inch side-fold card.) Next I printed out on cardstock the blue & white striped page, and the small waves on thin white paper. Using the Karen Burniston Rectangle and Labels – Crosshatch die set, I cut two large crosshatch rectangles from the striped cardstock and two smaller rectangles from the wave paper. The rectangles were glued inside the cardbase as shown in the video above.

Card Decorations: I printed on thin white paper, the images of the ships used on the front and the back of the card from the The Royal Navy Heritage Collection. The small tag on the back is also from the same collection.

Ship Pop-Up: I used the Karen Burniston’s 1277 – Boat Pop-Up and 1296 – Cruise Ship Add-Ons dies to create the gray pop-up naval ship. (Watch the video above for assembly.)

Sentiments: Karen Burniston dies sets of Thank You, Happy Father’s Day, Greeting Labels, Thank You Shadow and Mini Alphabet and Numbers were used for all the card sentiments.

Envelope:  The card fits into a catalog (6×9-inches) envelope with “Thank you for always being there” stamped on the back flap in navy ink using Karen Burniston’s Thank You Phrases stamp set.

___________________________________

Thank you for experiencing this blog post.

I hope this inspires you and makes you smile.

Please subscribe, like and leave comments 😊

Follow my YouTube channel, Instagram and Pinterest as well.

___________________________________

Disclaimer: Relatively Thoughtful and Karen Burniston products were provided for free or at a discount by the manufacturer for review and use. All other items were personally purchased. Compensated affiliate links used where or when possible, meaning I will receive a small percentage commission from these manufacturers at no cost to you. This will allow me to add more content to my YouTube channel and help out a lot. Thank you.

Materials Used:

Dies

  • Karen Burniston in cahoots with Riley and Company – Greeting Labels – 1312
  • Karen Burniston in cahoots with Riley and Company – Cruise Ship Add-Ons – 1296
  • Karen Burniston in cahoots with Riley and Company – Boat Pop-Up – 1277
  • Karen Burniston in cahoots with Riley and Company – Thank You Shadow – 1282
  • Karen Burniston in cahoots with Riley and Company – Rectangle and Labels – Crosshatch – 1233
  • Karen Burniston in cahoots with Riley and Company – Mini Alphabet and Numbers – 1197
  • Karen Burniston in cahoots with Riley and Company – Happy Father’s Day – 1164
  • Karen Burniston in cahoots with Riley and Company – Thank You – 1066

Stamps

  • Karen Burniston in cahoots with Riley and Company – Thank You Phrases

Inks

  • Crafter’s Square – Matallic Marker – Blue Silver
  • Memento – Fade-Resistant Dye Ink – Paris Dusk
  • Pigma – Mircon 01 Fine Tip Pen – Black

Papers

Adhesives

  • Neutral PH Adhesive by LINECO
  • Fine-Tip Glue Bottle
  • Double-Sided Tape – 1/4-inch wide

Tools

  • Computer and Color Printer
  • Die Cutting Machine
  • Ruler
  • Scissors
  • Stamping Platform
  • Tweezers
  • Paper Masking Tape

Three Fruity Cards

Having received the Spellbinders’ All-Clubs Crate for April 2026, I decided to play with the Fresh Packed Clear Stamp + Die of the Month, the Market Berries Stencil of the Month and Seed Co. Border Press + Foil of the Month sets.

Market Tote: This is an A2 (4.24×5.5-inch) card with a yellow gingham paper mat. The die-cut brown bag is one of the dies in the Fresh Packed stamp & die set. The lemons, tomato, berries and flowers were stamped first using Chiffon, Grass Skirt, Mandarin Spice, Rockin’ Red, Samba inks. The tiny black seeds and texture were added with an ultra fine tipped pen. Next the bag was glued in place and then the sentiments which came from the same set and die-cut. The flowers were fussy cut out and popped-up with foam dots.

Stamped Lemons and Strawberries: This is an A2 (4.24×5.5-inch) card with a green pattern paper mat. The lemon and strawberries stamps from the Fresh Packed set were used with Chiffon, Grass Skirt and Samba inks. tiny black seeds and texture were added with an ultra fine tipped pen. The sentiment from the same stamp set is stamped in green, die-cut three times and glued together to add dimension.

Stenciled Berry Plants:  This is an A6 (4.75×6.25-inches) card which uses Market Berries Stencil of the Month with the ink colors of Gray Flannel, Grass Skirt, Samba & Sea Glass and Tuxedo Black. Yellow Pops of Color form the flower centers and an accent of yellow satin ribbon was added before the stenciled panel was glued on the cardbase. Sentiment is from the Seed Co. Border press plates on a bisque colored heavy weight cotton cardstock.

___________________________________

Thank you for experiencing this blog post.

I hope this inspires you and makes you smile.

Please like and leave comments 😊

Follow my YouTube channel, Instagram and Pinterest as well.

___________________________________

Disclaimer: Karen Burniston stamps and dies are provided free of charge by the manufacturer for review and use. All other items were personally purchased. Compensated affiliate links used where or when possible, meaning I will receive a small percentage commission from these manufacturers at no cost to you. This will allow me to add more content to my YouTube channel and help out a lot. Thank you.

Materials Used:

Stencils

  • Spellbinders – 4.75×6-inch Plastic Stencils – Market Berries

Stamps & Press Plates

  • Spellbinders – Clear Stamps & Metal Dies – Fresh Packed
  • Spellbinders – Press Plates – Seed Co. Border

Papers

  • Scrapbook.com – 6×8-inch -100lb Cardstock – Rainbow
  • Spellbinders – 5.50×4.25-inch A2 Panels – Cotton 118lb. – Bisque
  • White Cardstock
  • A6 (4.75×6.25-inches) Cardbase – Ivory

Ink

  • Memento – Fade Resistant Dye Ink – Gray Flannel & Tuxedo Black
  • Pigma – Mircon 005 Fine Tip Pen – Black
  • Catherine Pooler- Mini Ink Pads – Chiffon, Grass Skirt, Mandarin Spice, Rockin’ Red, Samba & Sea Glass

Adhesives

Tools

  • Die Cutting Machine
  • Paper Trimmer
  • Stamping Blocks
  • Gel Plate
  • Scissors
  • Paper Masking Tape

Miscellaneous

  • 1/8-inch wide Satin Ribbon – Yellow
  • Scrapbook.com – Pops of Color – Gloss – Sunshine

Flower Cake Pop-Up Birthday Card

This cake pop-up card is for a spring birthday for a flower garden enthusiast and is made using Karen Burniston dies.

Watch the process video to see how I made this card.

Cardbase: Using a purchased A7 (5×7-inch) cardbase, cut from at least three different pattern papers, three each of the three largest rectangle dies in the Rectangles and Labels – Crosshatch die set for the inside of the card and card front. Using the fourth largest rectangle die, cut out the centers of all but the scalloped rectangles. Glue these smaller rectangles together and cut out the largest rectangle die for the card back panel. Glue panels together and onto the card as shown in the video above.

Cake Pop-Up: Watch the assembly video at the bottom of the linked page for Cake Pop-Up. Cut the largest circle in Circles – Crosshatch set from a silver or gray paper. Cut in half and glue each half as shown in the video above. Color the fold area between the two circle halves with a silver marker.  Cut two each of the three cake dies from a white patterned paper. Assemble as how in the video above.

Sentiments: The front sentiment “Start each day with a grateful heart” and the inside “Birthday” are embellishment cards from Anna Griffin. The white label frame around the front sentiment is cut using the label frame die from Rectangles and Labels – Crosshatch. “HAPPY” on the inside is die cut from gold mirror cardstock using the letters in Happy Birthday Lorna Add-Ons. The white personal message label is cut using the Greeting Labels.

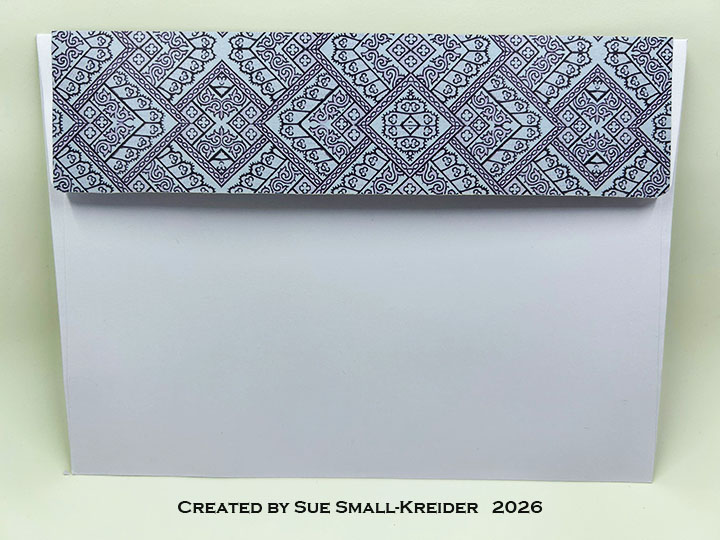
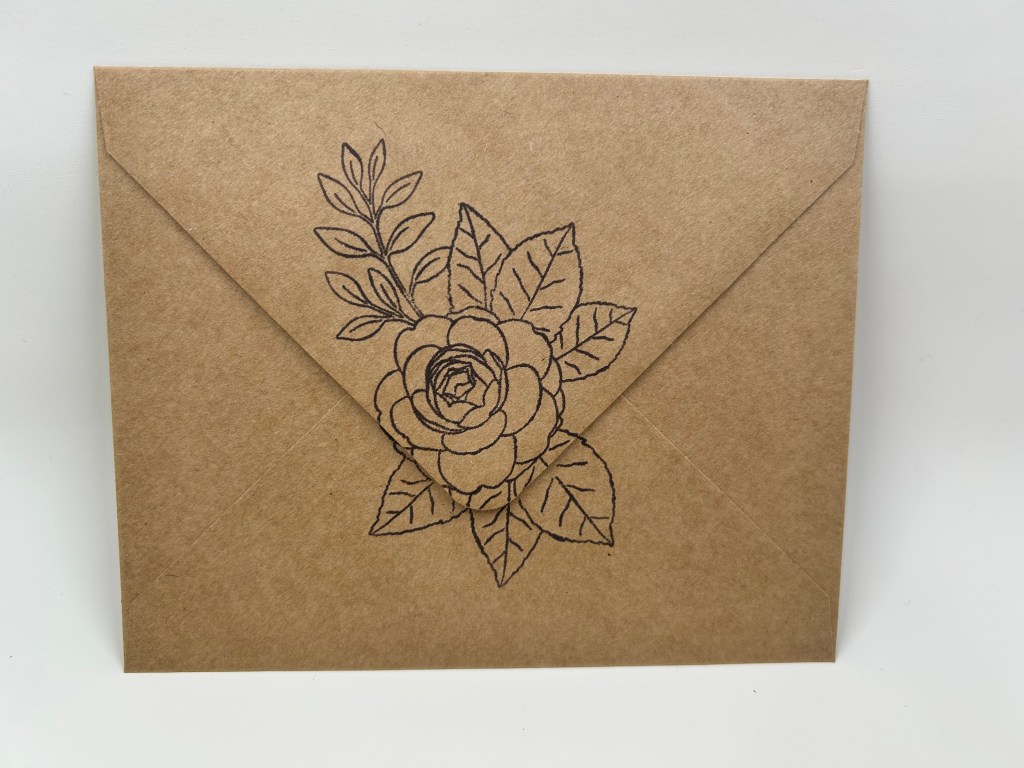
Envelope:  The card fits into an A7 (5×7-inch) size envelope with patterned paper glued to the back flap.

___________________________________

Thank you for experiencing this blog post.

I hope this inspires you and makes you smile.

Please subscribe, like and leave comments 😊

Follow my YouTube channel, Instagram and Pinterest as well.

___________________________________

Disclaimer: Karen Burniston products are provided free of charge by the manufacturer for review and use. All other items were personally purchased. Compensated affiliate links used where or when possible, meaning I will receive a small percentage commission from these manufacturers at no cost to you. This will allow me to add more content to my YouTube channel and help out a lot. Thank you.

Materials Used:

Dies

  • Karen Burniston in cahoots with Riley and Company – Greeting Labels – 1312
  • Karen Burniston in cahoots with Riley and Company – Happy Birthday Lorna Add-Ons – 1276
  • Karen Burniston in cahoots with Riley and Company – Rectangles and Labels – Crosshatch – 1233
  • Karen Burniston in cahoots with Riley and Company – Circles – Crosshatch – 1057
  • Karen Burniston in cahoots with Riley and Company – Cake Pop-Up – 1028

Papers

  • Anna Griffin – 12×12 inch Paper Collection with Embellishments – Paisley Papers
  • Gold Mirror Cardstock
  • White Cardstock
  • Park Lane Paperie – A7 Cardbase and Envelope – White

Ink

  • American Crafts – Metallic Marker – Silver
  • Pigma – Mircon 005 Fine Tip Pen – Black

Adhesives

Tools

  • Die Cutting Machine
  • Paper Trimmer
  • Stamping Blocks used as paperweights
  • Scissors
  • Reverse Tweezers
  • Paper Masking Tape
  • We R Memories – QuickStick

Miscellaneous

  • Craftstash – Gold Half Gems

Pop-Up Reindeer With Lights Christmas Card

I had so much fun making a gingerbread house ornament for the Karen Burniston Design Team April 2026 Challenge using the Stage Pop-Up die set, that I made another Stage Pop-Up Christmas card with the Snowman Pop-Up and Penguin and Reindeer Snowman Add-Ons die sets. The twinkly lights sentiment from the Christmas Wishes stamp set made me think of adding Pear Blossom Press EZ Lights to the card.

Watch the process video to see how I made this card.

Pop-Up Stage Base: (Watch the assembly video at the bottom of the linked page for Stage Pop-Up.) Cut two base pieces and two side pieces from the Stage Pop-Up die set from decorative cardstock. Cut three decorative rectangles from the Stage Pop-Up set in white. Cut two of the base polygon decorative pieces from white cardstock and two decorative papers. Save the white pieces to be stamped with a sentiments before gluing to the bottom and side of the stage base.

Reindeer Pop-Up: (Watch the assembly videos at the bottom of the linked pages for Snowman Pop-Up and Penguin and Reindeer Snowman Add-Ons and the video above for alterations to the installation of the reindeer.) Cut from brown cardstock two set of the circle sides, one set of snowman body pieces, and one base strip from the Snowman Pop-Up. From the Penguin and Reindeer Snowman Add-Ons set, cut one set of antlers, two sets of legs, one set of face pieces and one tail from brown cardstock. From white and black cardstock cut nose and eye pieces. Use the die stencil features to color leg hooves, and add highlights to eyes and nose. Assemble reindeer and add to stage base as shown in video above.

Lights: From the Penguin and Reindeer Snowman Add-Ons set, cut two sets of light bulbs from white and color with markers. Use one set of Pear Blossom Press EZ Lights which are available from the KB Riley on-line shop. (Watch the video above for how the lights were added to the reindeer.)

Sentiments: The bottom sentiment is stamped with brown ink and comes from Christmas Wishes as is the side “Merry Christmas.” the “Happy New Year” is from Season of Cheer.

Envelope: The card is about 5 3/4 x 6 1/4-inches so it fits into a catalog envelope of 6×9-inches with the Twinkly Lights sentiment stamped on its back flap.

___________________________________

I hope this inspires you and makes you smile.

Please subscribe, like and leave comments 😊

Follow my YouTube channel, Instagram and Pinterest as well.

___________________________________

Disclaimer: Karen Burniston products are provided free of charge by the manufacturer for review and use. All other items were personally purchased. Compensated affiliate links used where or when possible, meaning I will receive a small percentage commission from these manufacturers at no cost to you. This will allow me to add more content to my YouTube channel and help out a lot. Thank you.

Materials Used:

Dies

Stamps

  • Karen Burniston in cahoots with Riley and Company – Clear Stamps – Christmas Wishes
  • Karen Burniston in cahoots with Riley and Company – Clear Stamps – Season of Cheer

Papers

  • Fun Stampers Journey – 8.5×11-inch Cardstock – Pumpkin Bread
  • Recollections – 12×12 inch Single-Sided Cardstock – Christmas Noel
  • Black and White Cardstock
  • Catalog (6×9) Envelope – White

Ink

  • Memento – Fade Resistant Dye ink – Espresso Truffle
  • Pigma – Mircon 005 Fine Tip Pen – Black
  • Sakura – Gelly Roll Pen – Medium – White
  • OLO – Markers – Dragon Fruit, Ginger, Marigold & Sky
  • Sharpie – Permanent Marker – Ultra Fine Tip – Black
  • Stampin’Up – Stampin’ Write Marker – Chocolate Chip

Adhesives

Tools

  • Spellbinders Platinum Die Cutting Machine
  • Scrapbook.com – Magic Mat
  • Scrapbook.com – Mint Tape
  • Paper Trimmer
  • Stamping Blocks used as paperweights
  • Scissors
  • Tweezers
  • We R – Precision Press Mini – Stamping Platform
  • We R Memories – QuickStick
  • Microfiber Cloth

Miscellaneous

Wood Flower Card

After receiving this personalized stamp set from Altenew, I had to make something with it. Card Chaos with Irene Smith! had a Bingo Challenge on with colors. I picked ivory, brown and teal colors and found a Stampin’ Up designer series paper pack called Country Woods that had those colors.

Cardbase: I used a brown kraft paper purchased A2 (4.25×5.5-inch) cardbase. Cut an ivory piece of cardstock 4×5.25-inches and glue to the front card panel.

Flower Image: Using brown ink and the Altenew Evergreen Beauty set, stamp the image on left bottom corner of a teal wood patterned paper 3.75×5-inches rectangle (Stampin’ UpCountry Woods). Stamp it again on a scrap of the same paper and color with teal watercolor pencil and teal marker. Fussy cut around the entire colored image. On a scrap piece of ivory colored woodgrain paper, stamp the flower and color with a brown watercolor pencil. Fussy cut around the colored flower.

Using 1mm thick foam tape, pop-up the entire colored image onto the rectangle stamped image.Next pop-up the brown colored flower on top of the colored image. Add nine gold gems to the image. Glue rectangle onto cardbase.

Sentiments: From the Altenew stamp set, “Hello friend” and “appreciate you” are stamped in brown ink onto ivory cardstock and fussy cut out. Glue directly to the card front. I used my custom stamp on the card back.

Envelope: Using a purchased A2 matching kraft paper envelope stamp the flower image on the back in brown ink.

___________________________________

Thank you for experiencing this blog post.

I hope this inspires you and makes you smile.

Please subscribe, like and leave comments 😊

Follow my YouTube channel, Instagram and Pinterest as well.

___________________________________

Disclaimer: Karen Burniston products are provided free of charge by the manufacturer for review and use. All other items were personally purchased. Compensated affiliate links used where or when possible, meaning I will receive a small percentage commission from these manufacturers at no cost to you. This will allow me to add more content to my YouTube channel and help out a lot. Thank you.

Materials Used:

Stamps

  • Altenew – Clear Stamps – Evergreen Beauty

Papers

Ink

  • Memento – Fade Resistant Dye ink – Espresso Truffle
  • Pigma – Mircon 01 Fine Tip Pen – Brown
  • Sharpie – Permanent Marker – Ultra Fine Tip – Teal
  • Nuvo – Highly Pigmented Watercolour Pencils – Potato Skin & Deep Viridian

Adhesives

  • Neutral PH Adhesive by LINECO
  • Fine-Tip Glue Bottle
  • Scrapbook.com – Foam Tape – 1mm thick

Tools

Miscellaneous

  • Craftstash – Gold Half Gems

Dad Joke for St. Patrick’s Day

When I saw this Funny Bones sentiment (scroll down to see the joke), I immediately thought of Karen Burniston’s Family Room Pop-Up dies that would make some fun patio furniture using Karen’s new Stage Pop-Up as a base.

Pop-Up Stage Base: (Watch the assembly video at the bottom of the linked page for Stage Pop-Up.) Cut two base pieces from the Stage Pop-Up die set and two grassy side pieces from the Grass Stage Add-Ons set. Cut six decorative rectangles from the Stage Pop-Up set. Cut two of the base polygon decorative pieces from patterned cardstock and two more from white cardstock. Glue the patterned cardstock to the top of the bases and the save the white to be stamped with a sentiment before gluing to the bottom of the stage base.

Furniture Pop-Up: (Watch the assembly video at the bottom of the linked page for Family Room Pop-Up .) Using shamrock patterned cardstock cut the sofa and chair seats and pillows. Cut the base piece from dark green cardstock. Assemble as shown in video. (Because I used a slippery coated patterned cardstock for my card. I had to use double-sided tape and glue dots to adhere my furniture.)

Sentiments: The top sentiment “Happy St. Patrick’s Day” is from the die set of the same name. On the bottom side of the Stage Pop-Up, I stamped on the two white decorator panels with the Funny Bones “ What’s Irish and stays outside all year?” on the upper piece and the answer “Paddy O’Furniture” on the lower piece so that when the card is folded you only see the question before you see the answer.

Envelope: The card fits into 6×9-inches catalog size envelope.

___________________________________

I hope this inspires you and makes you smile.

Please subscribe, like and leave comments 😊

Follow my YouTube channel, Instagram and Pinterest as well.

___________________________________

Disclaimer: Karen Burniston products are provided free of charge by the manufacturer for review and use. All other items were personally purchased. Compensated affiliate links used where or when possible, meaning I will receive a small percentage commission from these manufacturers at no cost to you. This will allow me to add more content to my YouTube channel and help out a lot. Thank you.

Materials Used:

Dies

Stamps

  • Funny Bones by Riley & Company – Clear Stamps – What’s Irish and Stays Out – RWD-1437

Papers

  • Keep It Simple – 12×12 inch Double-Sided Coated Cardstock – Lucky Day
  • Keep It Simple – 12×12 inch Double-Sided Textured Cardstock – Jade -Lucky Clover: Buffalo Plaid
  • Cream Cardstock
  • Catalog (6×9) Envelope – White

Ink

  • Memento – Fade Resistant Dye ink – Tuxedo Black
  • Pigma – Mircon 005 Fine Tip Pen – Black

Adhesives

  • Double-Sided Tape – 1/8-inch wide
  • Glue Dots

Tools

  • Die Cutting Machine
  • Paper Trimmer
  • Bone Folder
  • Stamping Platform
  • LDRS – Stampendable Stamping Tool
  • Stamping Blocks used as paperweights
  • Scissors
  • Tweezers
  • Paper Masking Tape

A Rosy Tag Book Birthday Card

It’s time for the Karen Burniston Design Team March 2026 Challenge whose theme is For The Birds.I’ve chosen to make a Circle Tag Book Pop-Up card using rose patterned paper with bird embellishments from the Outdoor Scene die set and long stem roses from the Love Is In The Air Charms. There is also a tag bookmark feature to the card using the Topper Tags die set.

Watch the process video to see how I made this card.

Cardbase: Watch the assembly video at the bottom of the linked page for the Circle Tag Book Pop-Up. Cut four of the tag die from patterned paper. Cut one hinge piece and two of the pop-up mechanism piece from the same patterned paper. Cut four of the circles from white cardstock. Also from white cardstock, cut two each of the medium and small birds in the Outdoor Scene set. Cut from red and pink cardstock four each of the circle and flower hole protectors from the Circle Tag Book Pop-Up set. Follow the video above for the assembly of card and placement of small birds.

Bookmark: The bookmark and lacy pocket were made by cutting the smallest tag die in the Topper Tags set from patterned paper. The white trim was cut from the backside of a scrap of the patterned paper with the decorative edge die in the same set and trimmed with the smallest tag die. The pocket was made in a similar way, but using the next largest tag die to cut to size. The flying bird was cut from white cardstock using the largest bird die in the Outdoor Scene set.

Sentiments: Using a stamping platform with the white circles cut using the Circle Tag Book Pop-Up circle dies, sentiments were picked from the following Karen Burniston stamp sets: Bouquet Sayings, Stage Scenes and Strut Your Stuff. “Big Hugs” on the bookmark comes from the Cat Sayings set. The long stem roses come from the Love Is In The Air Charms set.

Envelope:  The card fits into an A2 (4.25×5.5-inch) size envelope.

___________________________________

Thank you for experiencing this blog post. I hope this inspires you and makes you smile.

Please subscribe, like and leave comments 😊

Follow my YouTube channel, Instagram and Pinterest as well.

___________________________________

Disclaimer: Karen Burniston products are provided free of charge by the manufacturer for review and use. All other items were personally purchased. Compensated affiliate links used where or when possible, meaning I will receive a small percentage commission from these manufacturers at no cost to you. This will allow me to add more content to my YouTube channel and help out a lot. Thank you.

Materials Used:

Dies

Stamps

Papers

  • Park Lane Paperie – 8.5×11 110lb. Cardstock – Roses
  • Red & Pink Cardboard Packaging
  • Red & Green Cardstock

Ink

  • Memento – Fade Resistant Dye ink – Espresso Truffle
  • Pigma – Mircon 005 Fine Tip Pen – Black
  • Sharpie – Permanent Marker – Fine Tip – Black

Adhesives

Tools

  • Die Cutting Machine
  • We R – Precision Press Mini – Stamping Platform
  • Scissors
  • Paper Masking Tape
  • Plastic Palette Knife

Miscellaneous

  • Ranger – Simon Hurley’s Astro Paste – Phoenix Feathers
  • Red Organza Ribbon 1/4-inch wide

Snow-One Sweeter Valentine

A Valentine for my sweetie! Made with Simon Says Stamp’s collaboration with Pink & Main stamp set called Snow-One Like You and a heart die.

Cardbase: I folded an 8.5×11 sheet of white 65lb. cardstock in half to create a 4.25×5.5-inch rectangle that I cut two heart shaped cardbases from with the left edge of the die slightly over the folded edge. One cardbase I cut apart to glue over the back sides of the colored images.

Sentiments: On the front the cocoa cup reads “There is Snow-One Like You” and inside “Snow-one Sweeter!” and You melt my Heart.” All the sentiments come from Snow-One Like You stamp set.

Envelope:  The card fits into an A2 (4.25x 5.5-inches) size envelope.

___________________________________

Thank you for experiencing this blog post.

I hope this inspires you and makes you smile.

Please subscribe, like and leave comments 😊

Follow my YouTube channel, Instagram and Pinterest as well.

___________________________________

Disclaimer: Karen Burniston products are provided free of charge by the manufacturer for review and use. All other items were personally purchased. Compensated affiliate links used where or when possible, meaning I will receive a small percentage commission from these manufacturers at no cost to you. This will allow me to add more content to my YouTube channel and help out a lot. Thank you.

Materials Used:

Dies

  • Fun Stampers Journey – Steel Dies – Heart-Felt – DI-0033

Stamps

  • Simon Says Stamp’s collaboration with Pink & Main – Clear Stamps – Snow-One Like You

Papers

  • White Cardstock
  • White A2 Envelope

Ink

  • Memento – Fade Resistant Dye ink – Tuxedo Black
  • OLO – Markers – Bubble Gum, Cotton Candy, Dragon Fruit
  • Pigma – Mircon 005 Fine Tip Pen – Black
  • Sakura – Gelly Roll Pen – Medium – White
  • Sharpie – Permanent Marker – Fine Tip – Orange
  • Stampin’ Up – Stampin’ Blends Marker – Light Copper Clay

Adhesives

Tools

  • Die Cutting Machine
  • Bone Folder
  • Stamping Platform
  • LDRS – Stampendable Stamping Tool
  • Stamping Block
  • Scissors
  • Paper Masking Tape

Love Notes – A Pop-Up Valentine

IT’S TIME for the Karen Burniston Products – KB Riley LLC January 2026 Release Blog Hop. (See GIVEAWAY details at the end of this post for blog hop list.) The Design Team have come together with Karen today for a fun blog hop to celebrate the release of 10 new dies and 5 new stamp sets. Sneak peeks of the new release started last week, and the dies are available to pre-order NOW!

Today’s card uses the new dies of Stage Pop-Up and Grass Stage Add-Ons and two new stamp sets – Love Notes and Stage ScenesThe card also uses previously released die sets of Mailbox Pop-Up, Fence Add-Ons and Greeting Labels.

Watch the process video to see how I made these cards.

Stage Pop-Up Base: Using the Stage Pop-Up die set, cut two of the largest die from patterned cardstock. Cut six of the rectangle decorator dies from the same patterned paper. From green cardstock cut two of the grassy stage-side strips and two of the smaller grass strip from the Grass Stage Add-Ons die set.  Glue the decorator rectangles on to the front panels of the grassy stage-side strips.  Assemble the stage platform as shown above in the video.

Fence: Cut two of the fence pieces from the Fence Add-Ons die set. Trim off the right end large post and small tabs on each end to create a symmetrical fence with a large center post that is 4-inches wide. Repeat with second piece. Glue the pieces together matching up the fence pickets.

From green cut twice the short grass die from the Mailbox Pop-Up set and then cut each of them in the middle. Glue these pieces to the ends of the grass strips cut from the Grass Stage Add-Ons. Center and adhere the grass strips on the bottom edge of both sides of the fence. Trim the grass flush with the fence edge.

Mailbox: Cut the mailbox, lid and circle dies in the Mailbox Pop-Up set from silver cardstock. Cut the same pieces from the back side of the silver cardstock so you will have the reverse set of pieces. (A suggestion that I should have done when I cut my reverse pieces, is to lay a thin piece of paper on your cutting mat then then the sliver cardstock silver side down. Then the dies and top plate. This will help eliminate all the scratches that will be embossed onto the reverse silver side.)

Cut from brown, two mailbox posts and glue them to the center post of the fence on each side. Glue the Two lid pieces back-to-back. Glue the front mailbox piece onto the top of the brown post. Adhere the back mailbox piece back-to-back with the front mailbox with no glue on the front edge where the lid will be slid into it. Trim if necessary and glue the lid into the mailbox.  Add silver circles to the mailbox sides to cover the holes. Add the red flag to the front.

Tiny Envelopes: Cut seven of the envelopes in the Mailbox Pop-Up set from thin white cardstock. Fold on the side stitch lines. Glue one envelope together as shown in the video above. Cut one set of the tiny hearts in the same die set from red. Glue hearts to envelopes top flaps with a dot of glue.

Sentiments: Stamp seven of the Love Notes sentiments on thin paper and cut out with a square die and trim to fit into the envelopes. (I used the stitched 1 1/8-inch square die in the Greeting Labels set and trimmed on the stitched lines to get a 1-inch square.) Add a ¼-inch strip of thin paper to the back of the note to go in the mailbox envelope as shown in the video. Write “Lift” on one side and “Pull” on the other side of the strip. From Stage Scenes the “Push” with arrows was stamped on white and glued to the bottom of the stage to help the card recipient know how to open the stage card.

Envelope: The card fits into an A7 (5x 7-inches) size envelope with one of the Love Notes sentiments stamped on the back flap.

___________________________________

Thank you for experiencing this blog post. I hope this inspires you and makes you smile.

Please subscribe, like and leave comments. 😊

Follow my YouTube channel, Instagram and Pinterest as well.

___________________________________

Disclaimer: Karen Burniston products are provided free of charge by the manufacturer for review and use. All other items were personally purchased. Compensated affiliate links used where or when possible, meaning I will receive a small percentage commission from these manufacturers at no cost to you. This will allow me to add more content to my YouTube channel and help out a lot. Thank you.

Materials Used:

Dies

Stamps

Stencil

  • Waffle Flower – Plastic –  Birthday Puppies

Papers

  • Simple Stories – 12×12 inch Double Sided Cardstock – Garden Party CollectionTea Garden
  • Thin White Copier Paper
  • Silver Foil Cardstock
  • Brown, Green, Red and White Cardstock
  • Park Lane Paperie – A7 Envelope – White

Ink

  • Memento – Fade Resistant Dye ink – Tuxedo Black
  • Pigma – Mircon 01 Fine Tip Pen – Black

Adhesives

Tools

  • Die Cutting Machine
  • Paper Trimmer
  • Bone Folder
  • Stamping Platform
  • LDRS – Stampendable Stamping Tool
  • Stamping Blocks used as paperweights
  • Scissors
  • Paper Masking Tape
  • Tweezers
  • We R Memories – QuickStick

GIVEAWAY

To celebrate the release Karen Burniston and each of the Karen Burniston – KB Riley LLC Design Team members will be giving away a $25 Gift Certificate to some lucky person who comments on our blog posts, so make sure you join the hop and comment on everyone’s blog post. Winners will be randomly chosen from ALL of the blog hop comments received on our blog posts by Monday, February 9, 2026. Lots of chances to win some goodies, so just leave a comment on this post or any other blog hop posts to enter! Don’t forget to leave some way for us to contact you, in case you are a lucky winner!

Karen Burniston – https://karenburniston.com/blog/january-2026-release-blog-hop/

Lois Bak https://clownmomcreations.blogspot.com/2026/02/karen-burniston-new-release-blog-hop.html

Sue Small-KreiderYOU ARE HERE

Frances Byrnehttps://stampowl.blogspot.com/2026/02/karen-burniston-kb-riley-llc-january.html

Jennifer Websterhttps://www.jlwebstercreations.com/2026/01/karen-burniston-kb-riley-llc-january.html

Suzanne Smit – https://knutselsuus.blogspot.com/2026/01/kb-riley-llc-januari-2026-release-blog.html

Nicky Foden – http://mymessycraftroom.me/2026/01/28/little-bitty-pretty-one-karen-burniston-january-release-blog-hop/

Sandy Diller – https://sandydiller.blogspot.com/2026/01/new-release-blog-hop-2026.html