Milk Shake Birthday Card

This card was made for CRAFT ROULETTE #288 whose parameters included a celebration card, on the ground colors, goes well together element, and block(s). Today’s card uses Spellbinders and Karen Burniston dies as well as stamps by Riley and Company. Glitter hearts are from Trinity Stamps.

Cardbase: I used a purchased plaid A2 (4.25×5.5-inch) card base and envelope.

Card Front: The new Spellbinders Fountain Wishes die set was used to make the milkshake and blue bird with a party hat. Many of the tiny pieces were cut from white cardstock and colored with markers. The bird and waffle fan were also inked with Distress Ink for shading. The chocolate sauce was covered in clear packing tape before die cutting.

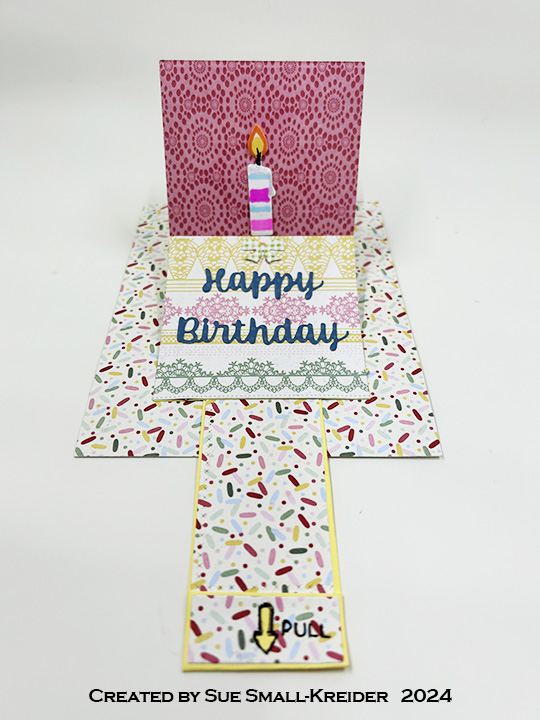
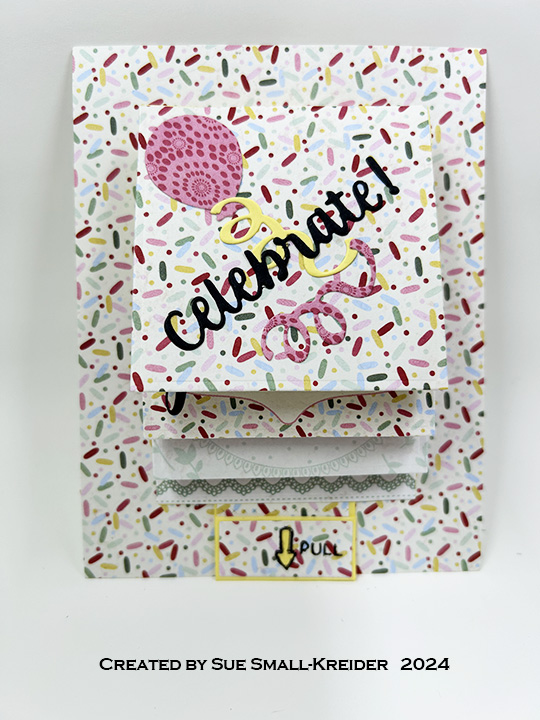
Happy Birthday Pop-Up: All the dies used to make this pop-up mechanism and sentiment are by Karen Burniston – Happy Birthday and Shadow, Katherine Label Pop-Up.

Sentiments: The inside stamped sentiment is Funny Bones by Riley and Company. The front sentiment is a Spellbinders BetterPress plate Fountain Wishes Sentiments.

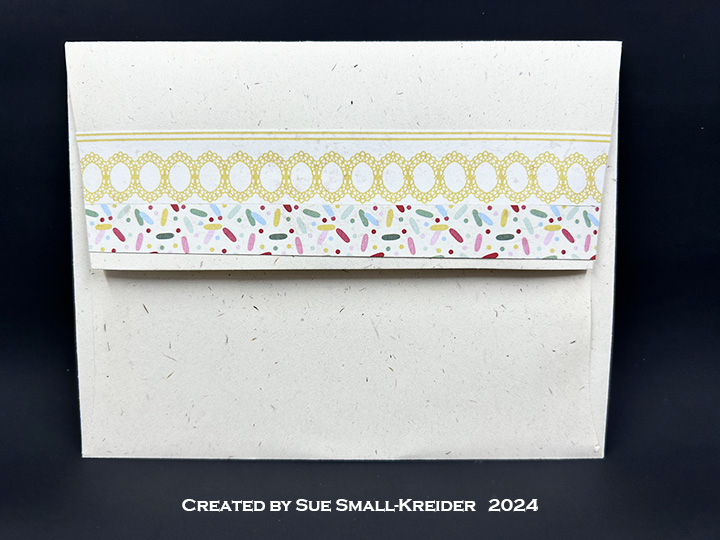
Envelope: Back flap is stamped with Funny Bones by Riley and Company and another bird from the Spellbinders Fountain Wishes die set.

___________________________________

Thank you for experiencing this blog post.

I hope this inspires you and makes you smile.

Please subscribe, like and leave comments 😊

___________________________________

Disclaimer: Karen Burniston products are provided free of charge by the manufacturer for review and use. All other items were personally purchased. Compensated affiliate links used where or when possible, meaning I will receive a small percentage commission from these manufacturers at no cost to you. This will allow me to add more content to my YouTube channel and help out a lot. Thank you.

Materials Used:

Dies

Stamp & & Letter Press Plates

  • Riley and Company – Clear Stamps – Funny Bones – RWD-738
  • Riley and Company – Clear Stamps – Funny Bones – RWD-1259
  • Spellbinders – BetterPress Plate & Dies – Fountain Wishes Sentiments – BP-338

Papers

  • Spellbinders – 8.5×11 Cardstock – Raindrop
  • Tan, Cream, Pinks and White Cardstock
  • Patterned A2 Cardbase and Envelope

Ink

  • Memento – Fade Resistant Dye ink – Tuxedo Black
  • OLO – Marker – Bubble Gum
  • Ranger – Tim Holtz Distress Ink – Salty Ocean , Vintage Photo
  • Sakura – Gelly Roll Pen – Medium – White
  • Sharpie – Permanent Marker – Chisel Tip – Black
  • Sharpie – Permanent Marker – Fine Point – Green, Red
  • Sharpie – Permanent Marker – Ultra Fine Point – Black, Red
  • Stampin’ Up – Stampin’ Blends – Dark & Light Daffodil Delight

Adhesives

Tools

Tools

  • Trinity Stamps – Embellishment Mix – Pink Sparkle Hearts

Bonus Day – Week of Good Cheer Christmas Cards

This is the Bonus Day in the Week of Good Cheer Christmas Card series featuring cups and mugs of winter cheer as beverages. Today’s card and gift box features Simply Made Crafts die set and a template by Hot Off The Press made up as a cup of coffee with cream. (GIVEAWAY opportunity near end of post.) This also was made for Craft Roulette episode #282.

Watch the video below to see how the card and gift box were made.

The spoon is a tiny shaped card while the cream is a gift box inside the cup.

___________________________________

Thank you for experiencing this blog post.

I hope this inspires you and makes you smile.

Please subscribe to the email notices, like and leave comments 😊

___________________________________

GIVEAWAY

I’m cleaning out my dies and stamps and will be giving away crafting bundles to 8 lucky crafters who follow, subscribe and comment on my Week of Good Cheer Christmas Cards posts on Facebook, Instagram, YouTube and my website. (If you comment on all 4 platforms, each day, you have over 28 opportunities to be picked for a crafting bundle.)

Tell me why you like each cup or which is your favorite cup. Winners will be picked by September 2, 2025.

___________________________________

Triple The Fun With Mini Mini Slimline Pop-Up Cards

This card was made for Craft Roulette #251 whose parameters included for a slimline card, lumberjack colors, hat(s) or cap(s), and lace or doily.

Watch the process video to see how I made this card.

Cardbase:  Each card is made from a 2×6-inch piece of double-sided patterned paper, folded into a top-fold 3×2-inch card.  The box to hold them is made using Karen Burniston’s Candy Hearts Box die.

Sentiments:  The sentiments were all stamped in black ink using the Craft Roulette Funn Sentiments #01 set except for the “Hats off to you” which was handwritten.

Envelope:  The flatten box with three cards will fit into an A2 (4.25x 5.5-inches) size envelope.

___________________________________

Thank you for experiencing this blog post.

I hope this inspires you and makes you smile.

Please like and leave comments 😊

___________________________________

Disclaimer: Karen Burniston products are provided free of charge by the manufacturer for review and use. All other items were personally purchased. Compensated affiliate links used where or when possible, meaning I will receive a small percentage commission from these manufacturers at no cost to you. This will allow me to add more content to my YouTube channel and help out a lot. Thank you.

Materials Used:

Dies

Stamps

  • Craft Roulette – Clear Stamps – Funn Sentiments #01

Papers

  • Scrapbook.com – 6×8 Double-Sided Cardstock – Noel Patterned Collection
  • Simple Stories – 6×8 Double-Sided Cardstock – What’s Cookin’?
  • Black, Brown, Red, White and Yellow Cardstock Scraps
  • Fraser Papers for William House – A2 Envelope – Genesis Text Milkweed Smooth

Ink

  • Memento – Fade Resistant Dye ink – Tuxedo Black
  • Crafter’s Squares – Metallic Markers .05 in – Blue and Silver
  • Pigma – Mircon 01 Fine Tip Pen – Black
  • Pigma – Mircon 005 Fine Tip Pen – Black
  • Sakura – Gelly Roll Pen – Medium – White
  • Sharpie – Permanent Marker – Ultra Fine Tip – Black, Blue, Brown, Red

Adhesives

Tools

Miscellaneous

  • Nuvo – Aqua Shimmer Brush Marker – Glitter Gloss
  • Ranger – Glossy Accents
  • Cotton String

Birthday Treats

This card was made for Craft Roulette #215 whose parameters included for Project – Happy Birthday, petting zoo colors, scoop element and tab(s).

This card uses Karen Burniston’s die sets of Big Birthday Charms, Waterfall Card, Sweet Treats Charms, and Word Set 2 – Birthday. The Confection paper collection by Authentique is also a star of this card.

Cardbase: Use a 5.5 x4.25-inch white piece of cardstock and cover front with confetti sprinkles patterned paper. Die cut half round notch from Waterfall Card die set at center bottom of short side of card.

Waterfall: Watch the assembly video at the bottom of the linked page for the Waterfall Card. I cut the mechanism pieces (pull strip and base) from yellow cardstock. The largest square die was used to cut four double-sided patterned paper pages. Assemble waterfall as shown in video.

Food Pop-Ups: Cut and assemble the ice cream cone from the Sweet Treats Charms set. The slice of cake and large candle are made using the Big Birthday Charms set. Cut off the charm loops on both. Cake icing has Glossy Accents clear gel on it. Candle flames have glitter gloss on them.

Cut small strips of patterned cardstock and fold in half and then fold the ends to the center fold to form a pop-up cube to glue into the first two pages. Once these pop-up cubes’ glue has dried, attach the food elements to cubes. The large candle is popped-up with two strips of cardstock behind it.

Sentiments: “Celebrate!” and “Happy Birthday” are from Word Set 2. The balloons and streams are from the Big Birthday Charms set. The quote by Iris Murdoch was in the paper collection. The back of the pull tab was stamped with “Inspired by Craft Roulette. Made by” and signature and CR episode listed.

Envelope: The back flap of the envelope is decorated with leftover strips of patterned paper.

__________________________

Thank you for reading this blog post.

I hope this inspires you and makes you smile.

Please like and leave comments 😊

__________________________

Materials Used:

Dies

Stamps

  • Craft Roulette – Clear Stamps – The Basics

Papers

  • Authentique – 12×12 Double-Sided Cardstock – Confection Paper Pack
  • Black, Blue, Brown, White and Yellow Cardstock
  • Silver Mirror Cardstock
  • A2 Envelope – Cream with flecks

Ink

  • Hero Arts – Alcohol-Marker Friendly Ink Pad – Intense Black
  • Creative Craft Products – Dual Tip Alcohol Markers -mWG1 – Warm Grey
  • Pigma – Mircon 01 Fine Tip Pen – Black
  • Sharpie – Permanent Marker – Ultra Fine Tip – Blue, Green, Orange and Red
  • Spectrum – Tri-Blend Alcohol Markers – Bright Pink, Ice Blue and Orange
  • Stampin’ Up – Stampin’ Blends Markers – Light Daffodil Delight
  • Nuvo – Aqua Shimmer – Glitter Gloss

Adhesives

  • Neutral PH Adhesive by LINECO
  • Fine-Tip Glue Bottle

Tools

  • Die Cutting Machine
  • Stamping Blocks
  • Scissors
  • We R Memories – QuickStick
  • Craft Clips

Miscellaneous

  • Nuvo – Cream Drops – Golden Shimmer
  • Ranger – Glossy Accents

Waving Hello For Valentine’s Day

This card was made for Craft Roulette #201 whose parameters included an easel card, quiet colors, sweets element and bokeh.

Cardbase: Cut one rectangle 3 3/4x 8 1/2-inches from heavy white cardstock. Cut a second white rectangle 3 3/4x 8 3/4-inches. On the largest rectangle score at 1/4 inch at one end and 3-inches at the opposite end. (The 1/4-inch is the tab folded under as the card hinge to card back. The 3-inch tab is the ease for the paper doll.)

Thank you for reading this blog post and watching the video. I hope this inspires you and makes you smile. Please like and leave comments 😊

Materials Used:

Dies

  • Karen Burniston in cahoots with Riley and Company – Hello – 1166
  • Karen Burniston in cahoots with Riley and Company – You’re Sweet – 1087
  • Karen Burniston in cahoots with Riley and Company – Ice Cream Sundae Pop-Up – 1082
  • Studio Light – Misses Dies & Stamps by Karin Joan – Betty
  • Studio Light – Misses Dies & Stamps by Karin Joan – Tasha

Stamps

  • Studio Light – Misses Dies & Stamps by Karin Joan – Betty
  • Studio Light – Misses Dies & Stamps by Karin Joan – Tasha

Papers

  • PhotoPlay – 12×12 Double-Sided Cardstock Collection Pack by Becky Moore – Snail Mail
  • Pink, Brown, Cream Cardstock
  • Heavyweight White 100lb Cardstock
  • Clear Vellum
  • #10 Business Envelope – White

Ink

  • VersaMark Ink – Watermark
  • Simon Says Stamp – Pigment Ink – White
  • Gel Pens – White and Pink
  • Black Glossy Embossing Powder

Adhesives

  • Neutral PH Adhesive by LINECO
  • Fine-Tip Glue Bottle

Tools

  • Die Cutting Machine
  • Bone Folder
  • Scoring Board
  • Stamping Platform
  • LDRS – Stampendable Stamping Tool
  • We R Memories – QuickStick
  • Craft Clips
  • Sponge Dauber
  • Stamping Blocks used as paperweights
  • Kat Scrappiness – Anti-Static Tool
  • Heat Tool
  • Scissors
  • Paper Cutter

Miscellaneous

  • Mini Woobler Spring

A July 4th Birthday

Today we are making a 3-dimensional ice cream sundae card to fit in a mini slimline envelope using dies from Dies R Us.

1. You will need:

  • One card base 11 inches x 3 3/8 inches from heavy white cardstock
  • One outside star paper 11 inches x 3 3/8 inches
  • One red and white strip inside back paper 4 3/4 inches x 3 3/8 inches
  • One wood-grained inside base paper 6 1/4 inches x 3 3/8 inches
  • One ice cream dish cut from vellum with details colored with white ink
  • Five ice cream scoops (I used 2 pinks, two white confetti and one chocolate)
  • Two chocolate toppings (I coated mine with a clear glaze to make it shiny)
  • One whipped cream topping (I used a shiny coated white scrap)
  • One red cherry (I cut from red card stock, added white gel pen accent, brown cardstock stem and coated with a clear glaze to make it shiny)
  • Two spoons (I cut mine from silver mirror cardstock)
  • Two sets of “You’re Sweet” sentiment – one red and one black or navy blue
  • Two sets of “Happy Birthday” sentiment – one white and one red
  • Stars and circles for hanging banner and decorations
  • One paper doily cut in half, 6 inches baker’s twine and clay red, white and blue confetti pieces

2. Fold the card base at 6 ¼ inches and place pop-up sundae die on fold per package instructions.

3. Follow the photos on working the folds. Start with bottom tier, then second tier and finally the two angled fold on first tier.

4. Glue narrow support piece to back of dish stem as marked in photo.

5. Glue white scrap to fill in rectangular hole in pop-up dish base, if covering with a vellum dish.

6. Place striped inside back and base papers behind/under card base and trace opening with pencil and cut out as shown in photo.

7. Adhere star paper to outside of card base.

8. Adhere inside striped papers to inside of card. Attach the cut-out sections as well.

9. Glue two scoops to pop-up dish and then add glue to back side of vellum dish where white inked decorations are so glue won’t show through vellum. Position vellum dish over pop-up dish base.

10. Attach ice cream scoops, toppings, cherry and one spoon to tiers, making sure that the movement of pop-up is not impaired by these decorations. Add clay confetti sprinkles.

11. Trim and fit a half paper doily under dish. Secure to base with dots of glue at three points.

12.Position and trim the other half of doily to front of card.

13. Glue the two sentiments together off-setting the darker shade in back to create a shadow effect.

14. Position and attach sentiments on front and inside card base.

15. Glue-up stars and circles banner on baker’s twine and glue in the corners over ice cream. Decorate with additional spoon, clay confetti sprinkles and paper stars.

Hope this sweet card has put a smile on your face and provided some inspiration for your crafting.

For another Ice Cream Sundae card I’ve made click here

Thank you for reading this blog post. Please like and leave a comment. 😊

SUPPLIES Used from Dies R Us:

Additional supplies used:

  • Ranger’s Glossy Accents
  • The Paper Studio – Crackled Stars 665976, Patriotic Woodgrain 847111 and XXl Stripe-Red/White 690587
  • The Paper Studio – Printable Vellum Paper – 8 1/2″ x 11″
  • Buttons Galore & More – Star Spangled Sprinkletez – NK114
  • BoBunny -I Heart Stars Stamp set – 121054444
  • Stampin’ Up Classic Stampin’ Pad – Dapper Denim ink
  • Taylored Expressions – Mini Slim Envelopes

Don’t forget to come join in the fun at the Dies R Us Challenge Blog. There’s a new challenge theme offered on the 1st and 15th of each month and one lucky randomly drawn winner will receive a gift voucher prize to the Dies R Us Store.  

 For your convenience, all the important Dies R Us links are provided below.

click below for:

STORE

CHALLENGE BLOG

FACEBOOK

INSPIRATION BLOG

FRIENDS OF DIES R US PINTEREST PAGE

Sundae Shop – You’re So Sweet

2 spoons-CUEX

I scream, you scream, we all scream for ice cream! Ice cream sundaes YUMMY! And even better when shared with two spoons. This is a sweet Valentine’s card made for a special couple.

2 spoons-inside

Made this card using die sets from Karen Burniston and lots of recycled colorful packaging from my stash. The shine on the hot fudge topping and cherries is Nuvo Jewel Drops. The “glass” dish is vellum that has been stenciled using the die with a white paint pen.

IMG_7833

The card front is made with papers from Authentique’s Confection Collection.

IMG_7842-cu 2 spoons

See more Valentines by clicking here.

Supplies

Dies:

Papers:

Miscellaneous: