Karen Burniston’s September 2023 release will be available on September 18. Here is a sneak peek at the of one of the die sets – the Witch and Cauldron. Look for tutorial posts on these cards next week.


Karen Burniston’s September 2023 release will be available on September 18. Here is a sneak peek at the of one of the die sets – the Witch and Cauldron. Look for tutorial posts on these cards next week.

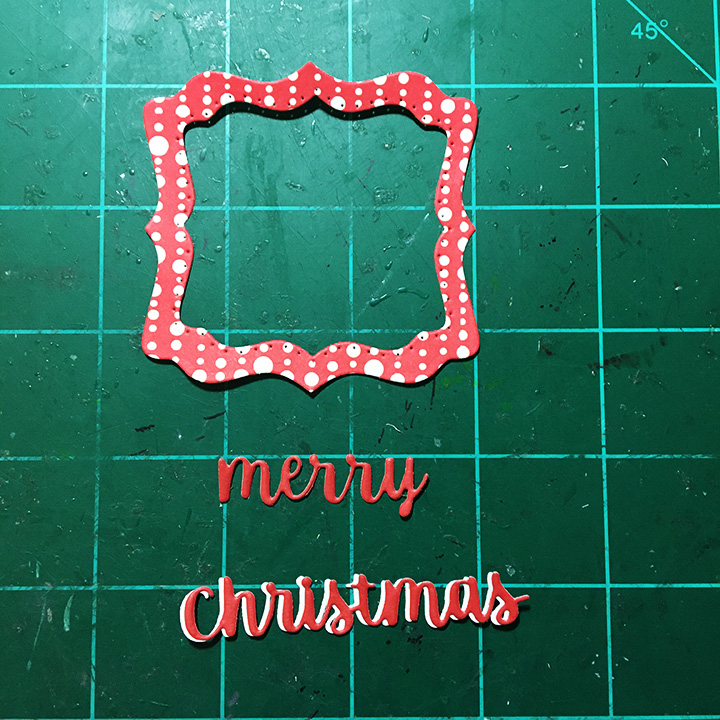
Karen Burniston’s September 2023 release will be available on September 18. Here is a sneak peek at the two word sets which are smaller and in a new script for Christmas and Halloween. Look for tutorial posts on these cards next week.


Karen Burniston’s September 2023 release will be available on September 18. Here is a sneak peek at three of new border sets for Christmas and Halloween. Look for tutorial posts on these cards next week.


Karen Burniston’s September 2023 release will be available on September 18. Here is a sneak peek at one of the die sets – the Stocking Pop-Up. Look for tutorial posts on these cards next week.


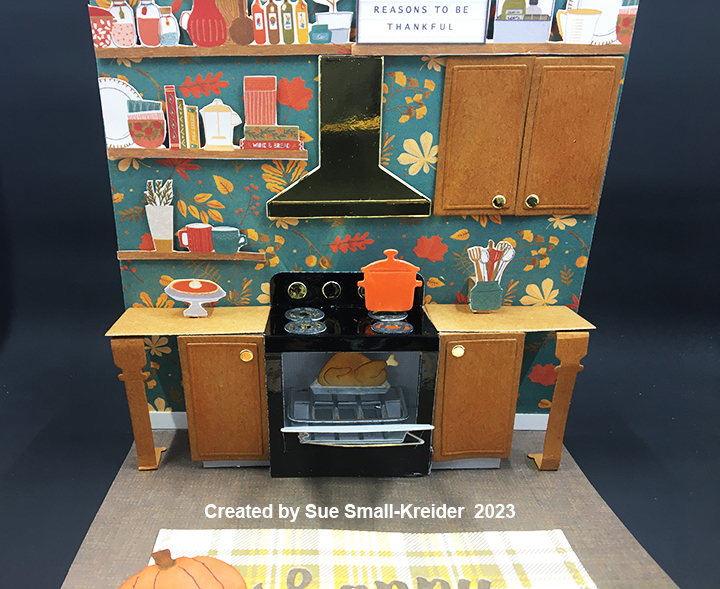
Karen Burniston’s September 2023 release will be available on September 18. Here is a sneak peek at two of the die sets – Oven Pop-Up and Oven Extras. Look for tutorial posts on these cards next week.


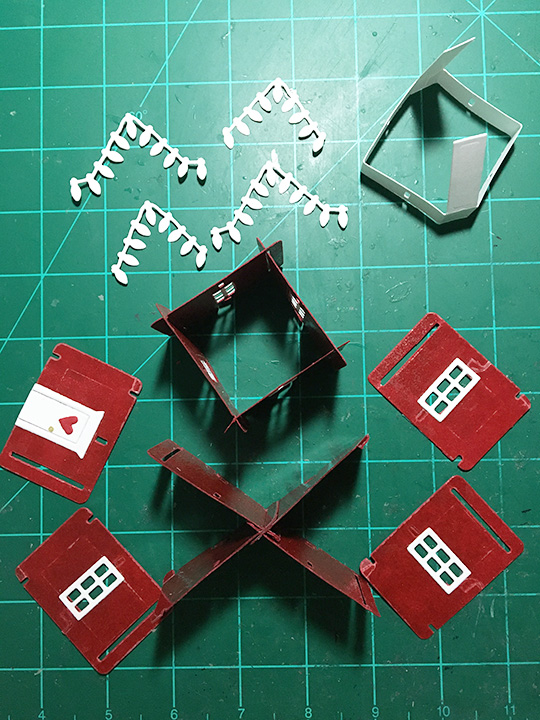
It’s time for the Karen Burniston Design Team Challenge for September. We were asked to use the Holiday House for a specific holiday. I have chosen Valentine’s Day.
I have been wanting to combine Karen Burniston’s House of Cards Pop-up set with some EZ-Lights for some time now. By using elements of the Holiday House die set – windows, door, gable string of lights – I was able to create a two-story house of cards that lights up. I also experimented with creating some double-sided coated cardstock using clear heat embossing powder.

Cardbase: I started with a purchased A6 (4.5 x 6.25 inches) cardbase with matching envelope. Because the cardbase was a wide side fold and I needed a short side fold, I cut the cardbase apart on the fold and used a narrow strip of cardstock to hinge the two pieces together which created a small gusset to accommodate the thickness of the pop-up inside. I cut two 4.5 strips of decorative paper with a patchwork design to cover the cardbase inside and out. Cutting the strips in half at 6-inches, I could adhere the four panels inside and out matching the design at the hinge. I trimmed on a paper cutter the edges to make a 4.5×6 inch card that will easily fit into the envelope with its thickness.

Coated Cardstock: After watching Jennifer McGuire do heat embossing on a full sheet of cardstock, I decided to try coated the thickest red cardstock I had (110 lb.) on both sides. I used a clear ink pad to coat my cardstock on one side and sprinkled clear embossing powder over it and used a heat tool to fix the powder into a coating. I repeated this several times on each side of the cardstock. The color darkened and the cardstock became thicker. The finish is not a smooth one, but rather bumpy like a stucco finish. (I found when I die cut the coated cardstock, the coating along the edges became opaque and, in some cases, chipped off. If I do this technique again, I will try doing only one coat of heat embossing.)

Windows and Door: Because the window dies in the Holiday House set cut two at once, I ended up die-cutting a window frame to act as my pattern to mark around on the back of the red card pieces and then cut out with a craft knife. I built my house of cards first, deciding which panels would need windows cut into them, and then removed them from the house, keeping the second story pieces separate from the end pieces. I cut the seven windows into the individual cards. The doorframe and door were glued on to the last end piece and a tiny, red heart from the holiday house set was glued to the front door.

House of Cards: Watch the video at the bottom of the linked page for the House of Cards set before starting. (I played with some practice card pieces I had cut to find the house shape I wanted to use.) Cut three of 4-card die. Cut windows into the seven selected pieces. The house starts with four cards creating an X. (Make sure the golf club cut outs are all facing out on the X. I made them facing in and the house wants to slip loose from the base after opening and closing a few times.) Make a square for the second story from four window pieces. Add the remaining three window panels and door panel to the ends of the X.
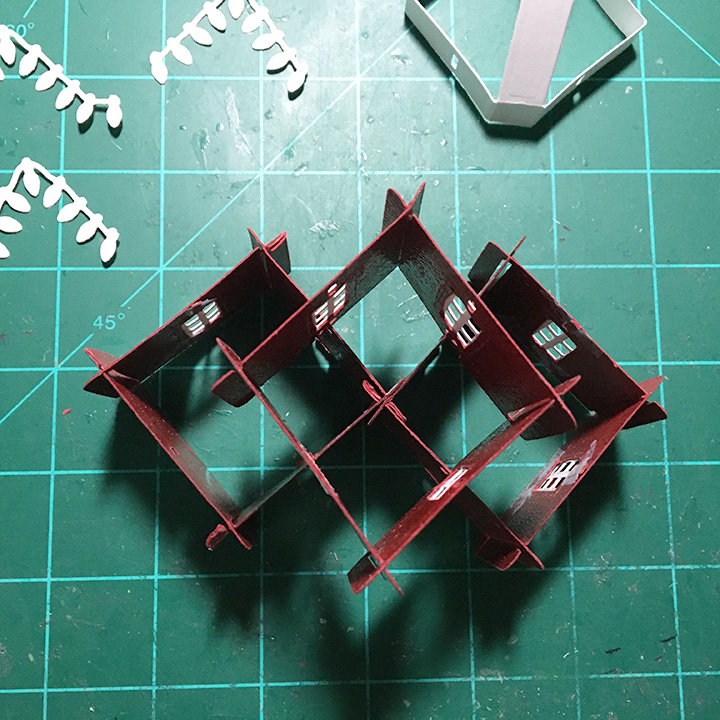
Attach the square over the center of the X. Attach the whole house to the white base. (It is easier to add the lights at this point before the gable pieces are added. See instructions below.) Glue the white base to cardbase.

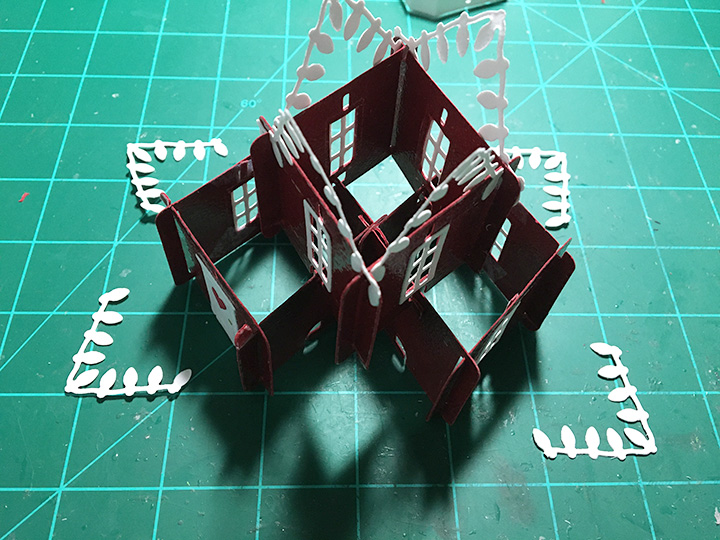
Once the lights are adhere to the inside of the house (I ended up having one wire on the outside of the house by accident) cut eight of the gable lightblubs from the Holiday House set. Trim four of the pieces to have just nine lightblubs in the gable (that two lighblubs off each end before they turn) and four of the pieces to 11 lightblubs (thats trimming just one lightblub off each end.)

Glue the longer pieces to the opposite sides of the square looping the end lightblubs over the card joints. Add one longer piece to each end of the first story of the house. Use the remaining shorter pieces to fill in the sides still needing gable pieces.
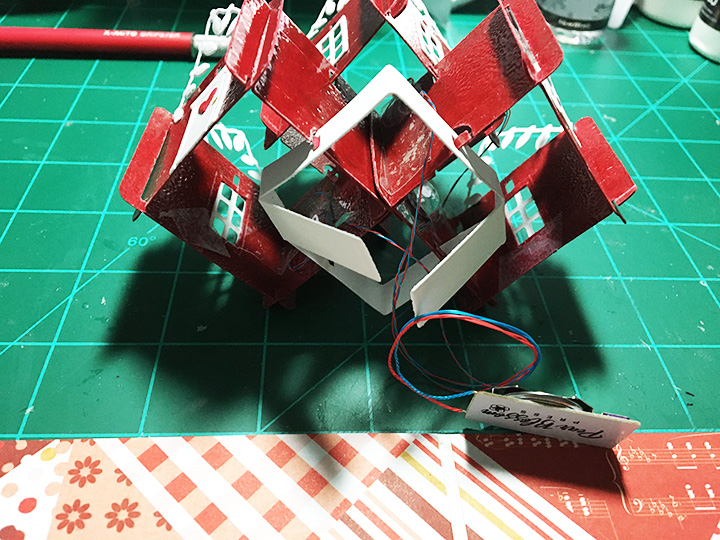
Lights: EZ-Lights are just what they say – easy to install in a card. For the house of cards, I snaked the three wires that end in a light, up through the center x-structure before I glued the white base into the card. Once the white base was attached to the card base, I played with the positioning of the wires and battery/switch plate. I used clear packing tape to secure the light wires onto the walls of the house. (If the coating on the cards had allowed glue, I would have glued a red square of cardstock over the wires.)
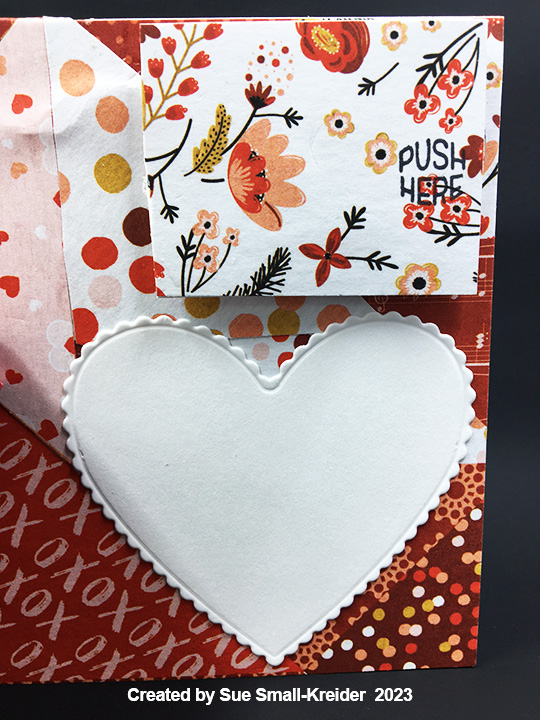
(I found the best position of the plate is almost to the top edge of the card.) To attach the battery/switch plate to the card base, I sandwiched it between double layers of thin foam tape and then took a rectangle of card stock with decorative paper and covered the plate. (Before I attached the rectangle, I stamped a “push here” on the location of where the switch was.) Next, I cut triangles from the decorative paper to glue over the exposed wires on the cardbase.


Sentiments: To make the phrase “You make Home Sweet,” I used the “You” from the Thank You set along with the Home Sweet Home set. I spelled out the word “make” from the Mini Alphabet set. The “You are the Light of my Life” was computer generated and cut with the scalloped heart from the Crosshatch Hearts set. A white scalloped heart was also cut using the same die as a place for a personal message.
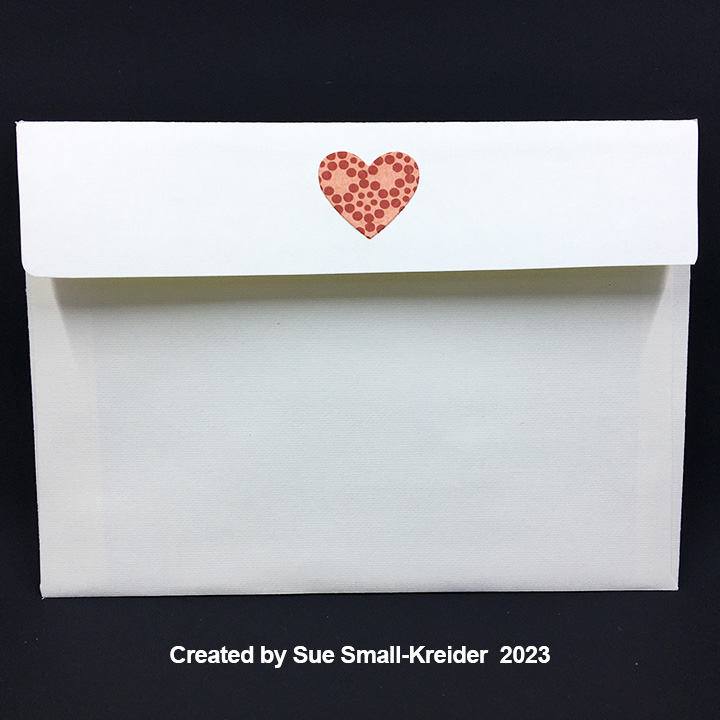
Envelope: A small heart from the Crosshatch Hearts set was cut from decorative paper and glued to the envelope flap to hint at what is inside.
Thank you for reading this blog post. I hope this inspires you and makes you smile. Please like and leave comments 😊
Materials Used:
Dies
Stamps
Papers
Ink
Embossing Powder
Adhesives
Tools
Miscellaneous

This is the eighth card in the Fireplace Christmas Card series.
Santa’s coming. Can you hear him on the rooftop? He’s sliding down the chimney.

For this card I used Karen Burniston dies to create an accordion card with a pop-out fireplace with Santa’s boots dangling in the fireplace opening. (Before starting, please watch the assembly video for the Fancy Label Accordion located near the bottom of the linked page.)

Cardbase: I cut three Fancy Label Accordion panels from heavy white cardstock. I also cut four of the same panels from red decorative paper and two panels from green decorative paper. The green paper panels I adhered to a cardstock panel. (I realized I needed to cut one more green panel to cover the tabs when all the panels are glued together.)

The red panels I trimmed out the center label at the pivot points. Using the largest and second largest label dies in the set to cut a frame, I cut borders from two of the red center labels. For the back personal message label I used the largest of the label dies to cut a frame that went to the edge of the white label.

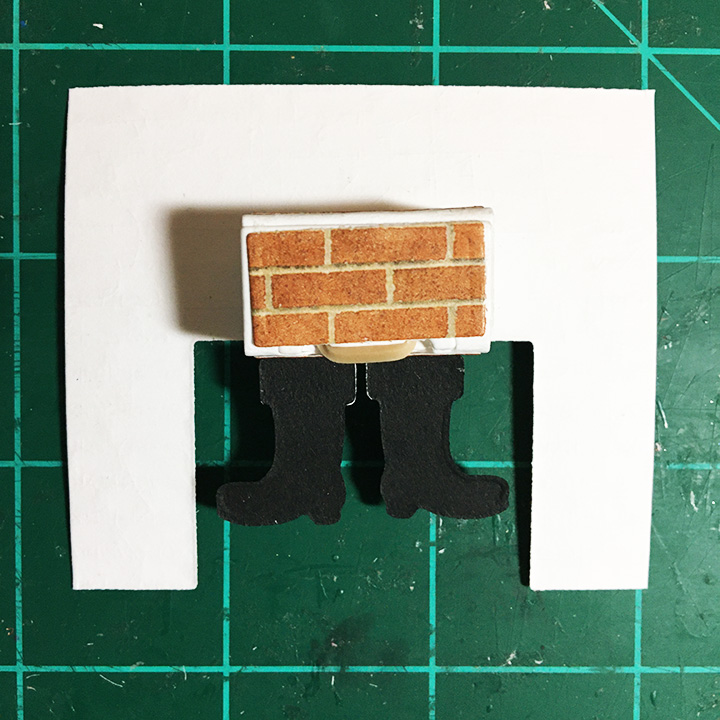
Fireplace: I cut the fireplace front and mantel pieces using the Fireplace Pop-Up. For the fireplace I glued a brick decorative paper to white cardstock and die-cut it using the embossing feature. I then trimmed off a 5/8-inch from each side of the fireplace so it would fit into the card. The mantel piece was cut from white and ink blended.

Bam Box and Boots: Because I was using a different mechanism than the fireplace mechanism, I recommend watching the assembly video for the small bam box. I tried both sizes of bam box, but you need to use the smaller one to get the fireplace to fit on the label and not catch when the card is folded closed. Glue three of the four decorative panels to the bam box. Before you add the rubber band to the bam box, cut the teardrop shaped holes for the boots (circled in red in photo below) using a sharp pointed piercing tool and scissors. (I used an old ice pick or awl.) If you plan to glue the bam box arched side to the fireplace, cut the holes in the panel just below it as shown in the photo circled in red. Attach the boots by slipping the tabs through the holes.


Assemble the bam box as usual.

I did not attach the fourth decorative panel on my card since I knew the arched side would be glued to the back of the fireplace. Test the placement of the bam box on both the fireplace and the pivot label before the glue sets. Once the fireplace is attached to the panel, attach the mantel with the wider side glued to the fireplace.

Card Back: Every time I make an accordion card, I forget to save the decorative frame papers to glue on last, to cover the tabs that get glued as the card is assembled. This time I did it to the middle green panel.

Sentiments: “Ho Ho Ho” comes from cutting down the “Hooray!” in Word Set 4 while “Merry Christmas” is from Word Set 3. The Santa face is from the Gnome and Santa die set.

To get the word” Christmas” to stand-out from the red border paper I cut an additional “Christmas” in white and off set it behind the red word.

Envelope: The red “Merry Christmas” on the envelope flap and its green border are stamps from Anna Griffin.
CRX Sheet: The card recipient experience (CRX) sheet explains how to close the fireplace. it is a free download.
Thank you for reading this blog post. I hope this inspires you and makes you smile. Please like and leave comments 😊
Other Holiday Fireplace Cards by designer/brand
Materials Used:
Dies
Stamps
Papers
Ink
Adhesives
Tools
Miscellaneous

This card was made for Craft Roulette #175 whose parameters included a 4.25-inch project, Craft Roulette colors, a night element and a bottom border.
For this pop-up butterfly tree in a box, I used Karen Burniston’s large Bam Box Pop-Up, Butterfly Collage Add-ons, and leaves from Fun Flowers and Twist Flower Pop-Up. The tag is from the Tag Book Pop-Up. (I have made a Christmas tree like this project. Click here to see blog post.)


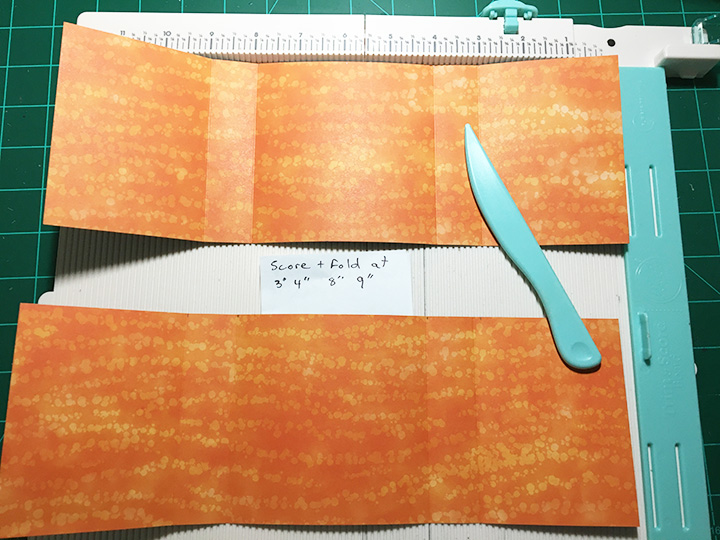
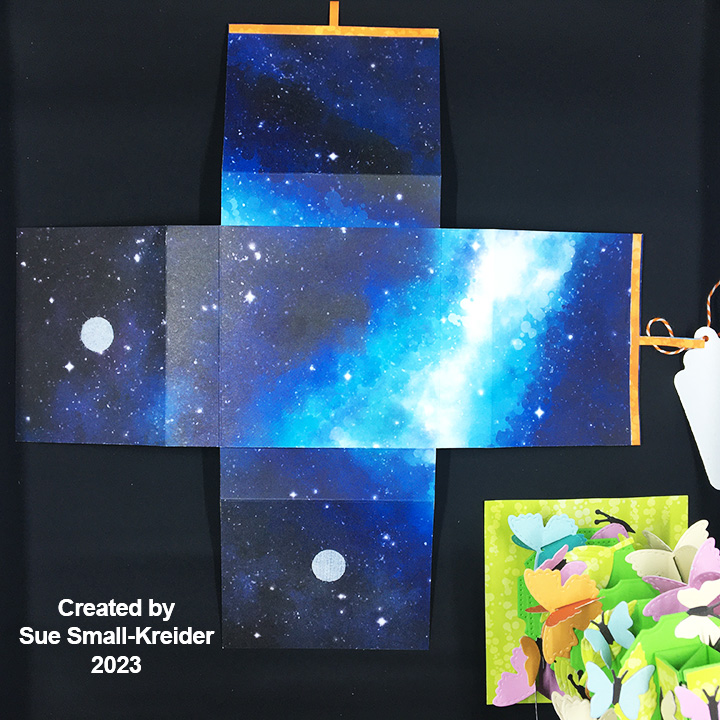
Box: The box is made of double-sided decorative cardstock cut into two 12 x 4 inches rectangles scored and folded at 3 inches, 4 inches, 8 inches and 9 inches. The middle squares are glued together to form a cross. Using strips of decorative paper for pull ribbons glued to the middle of each flap, I glued the remainder of the strips as a bottom flap border. Two adhesive-backed hook and ladder fasteners are the closures.
Tree: Utilizing the Bam Box die set, I cut six of the bam box strips, 13 of the bam box decorative rectangles and three each of the largest two fancy circles in the set from green cardstock. Because I like to let the glue dry before adding the rubber bands to bam boxes, I glue in stages. (See assembly video located at the bottom of the linked page and source of tiny rubber bands.)

Glue the decorative panels to the sides of each bam box for added thickness. (By sides I mean the sides that have the diagonal flap beside them. Not the side that has the smiley face or its parallel side.) These will be the sides seen between the layers of circles.
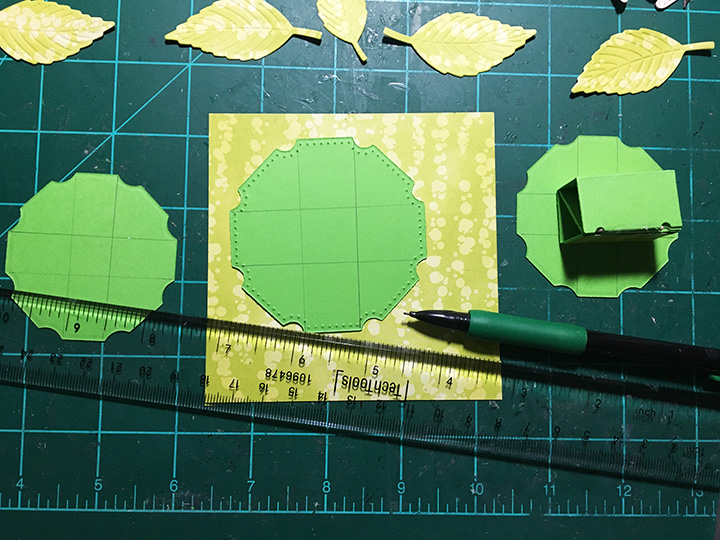
To assemble the tree, mark in pencil the location of the bam boxes on the bottom of each circle except one of the largest. Glue bam boxes to bottoms of five circles. The sixth bam box will be the top and the leftover, large circle will be the bottom.

To finish the tree assembly, alternate the direction of the diagonal inside flaps of the bam boxes, so that they make a zig-zag pattern when looked at from the side. By alternating the direction, the bam boxes will fold flat, and the tree will flatten into an oval shape. Use glue to attach each level. Once the tree is assembled, close or flatten the tree to position it on to a 4-inch square of green decorative paper that acts as the base for when the tree is in the box. Glue the tree to the square base.

Butterflies: (Watch the video at the bottom the linked page before starting.) Using the Butterfly Collage Add-ons die set, die cut all the dies from one color of doubled sided paper. Repeat with three other colors of paper. Die cut from black all non-moving butterflies four times.

Assembling the non-moving butterflies, use the black pieces as the base that the trimmed colored paper wings are glued to. On the double-winged one bend the wings up from the black body.
To attach the butteries to the tree, play with the positioning of the fluttering large butterflies on the tree in the closed position. If the butterfly stays within the green square base, it can be glued in place. I found that the flutter butterfly piece with the slot cut into it needs to be the piece glued to the tree, making sure the slot is not obstructed so the other piece can freely flutter.
I used green leaves cut from the decorative base paper to fill-in areas of the circles that were too close to the square’s edge when closed. Add in non-moving butterflies checking their position when tree is closed and that they are not creating catchpoints for fluttering butterflies.

Tag: My favorite gift tag to use for sentiments is in the Tag Book Pop-Up set. I stamped and heat embossed the sentiment. Baker’s twine was used to tie the tag onto the pull-up loop.
Thank you for reading this blog post. I hope it has provided some inspiration.
Materials Used:
Dies
Stamps
Papers
Ink
Embossing Poweder
Adhesives
Tools
Miscellaneous

It’s time for the Karen Burniston Design Team Challenge for August 2023 with the theme of ACCORDION dies.
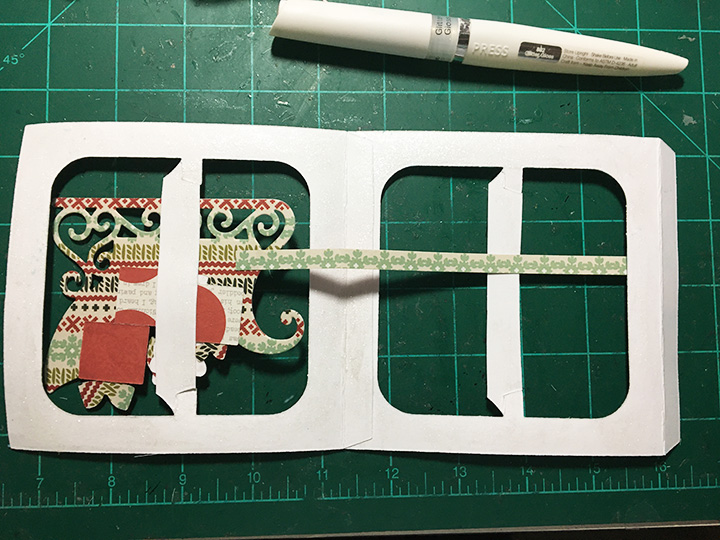
I choose to use the Fancy Label Accordion die with the sleigh from the Sleigh Pop-Up and reindeer from the Christmas Animals set as add-ons similar to the new Cupcake or Fence Add-ons for the Landscape Rectangle Accordion set. I also used the snowflake frames from the Fancy Winter Frames set.

There are several ways of assembling this accordion card – prepare frames and attach them all together and then add the sleigh and reindeer – OR – prepare frames (adding snowflake frames to fronts of accordion frames only), make all the animals, sleigh and gifts and assemble each panel as you go adding the back snowflake frame pieces after you attach the accordion frames. The latter is the method I choose to follow. Watch the assembly videos for the Fancy Label Accordion and the Fence Add-ons (located towards the bottom of the linked pages.)

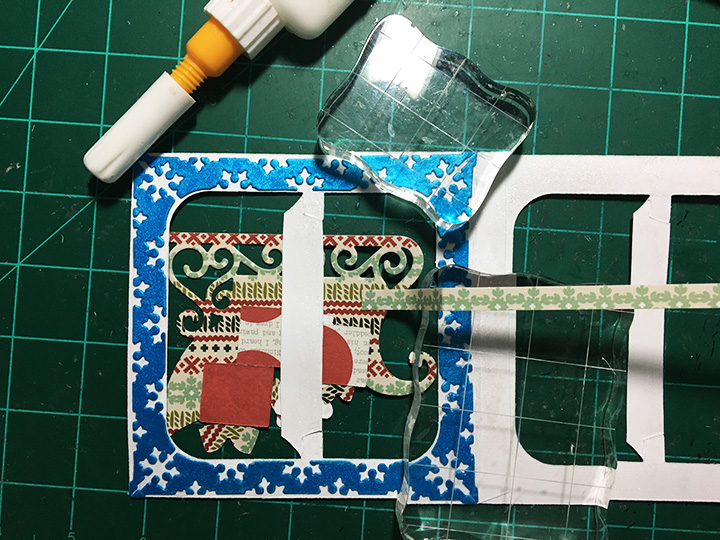
Frames: Cut four accordion frames from the Fancy Label Accordion set from heavy white cardstock. With scissors cut off the sides of the fancy label to form a pivot post on each accordion frame. Cut a total of 16 snowflake frames pieces from the Fancy Winter Frames set from blue cardstock. (I sprayed my frames with mica spray to get the metallic shiny frames.) Brush the accordion frame sides and the pivot post with glitter gloss. (I recommend doing both sides of the frame at this stage.) Glue blue snowflake frames onto the fronts only of the accordion frames. (Watch assembly video for the Fancy Winter Frames.)

Sleigh: Using red cardstock cut two sleighs. (If using decorative cardstock with a different pattern on each side, cut one red in reverse.) Cut two more of the lower portions, of the sleigh from silver foil cardstock making sure one is the reverse of the other. Fussy cut off just the sleigh runners. Glue runners to red sleigh bases.
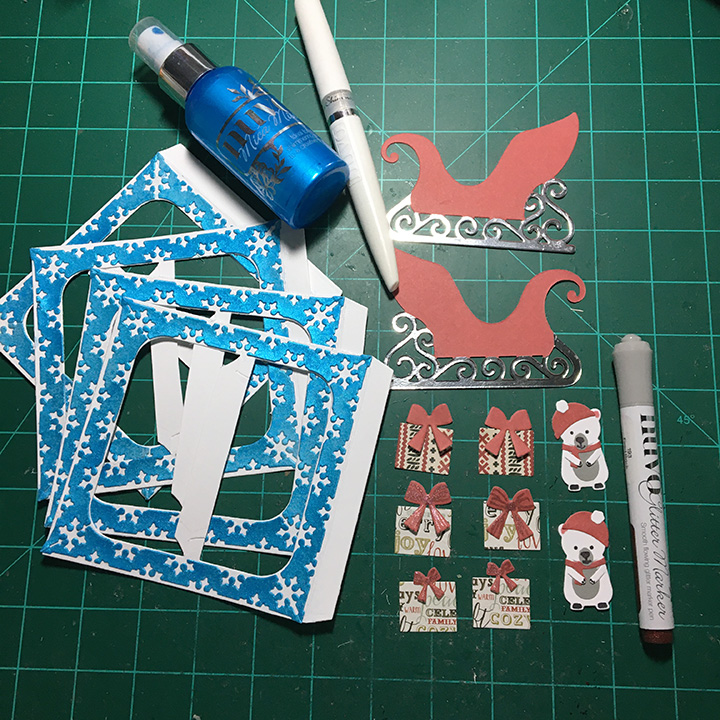
Gifts: From the Sleigh Pop-Up set, cut a total of six gift boxes and four bows, making sure you have pairs of matching papers for each box and bow. (I used a glitter marker to add some accents to the bows.) Play with the layout of where the packages and bear will go in the sleigh and still fit inside the accordion frame.
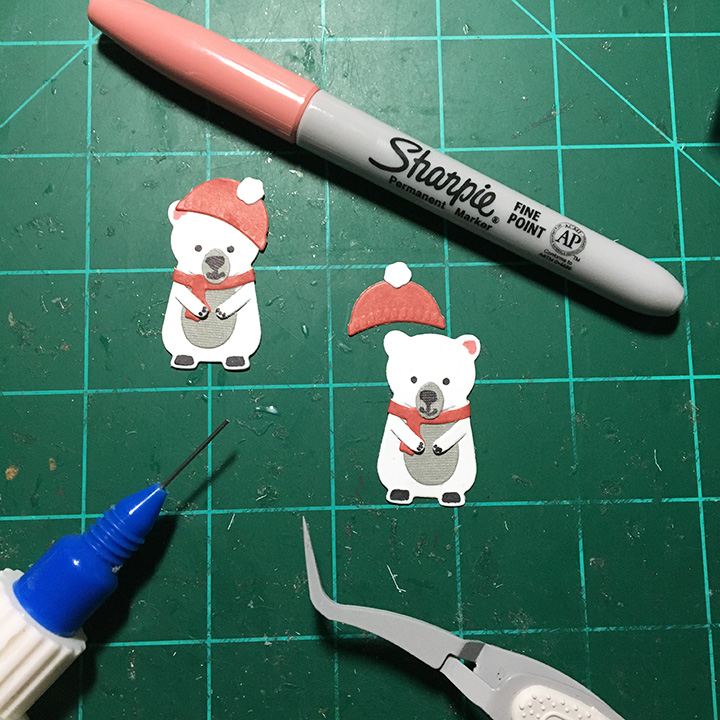

Bear: Cut two bears from white cardstock and two of the tummy and nose pieces from gray using the Winter Animals set. Cut from red two hats and scarves and two pompoms from white. Assemble as shown on the package. Use the main die to stencil the pink ears and black eyes, and the nose die to draw the mouth and nose in black. Assemble with the hat covering the opposite ear from the other bear.

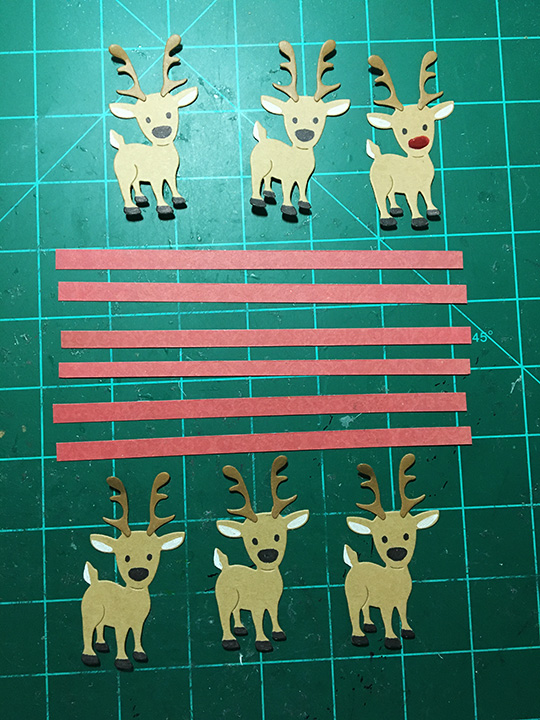
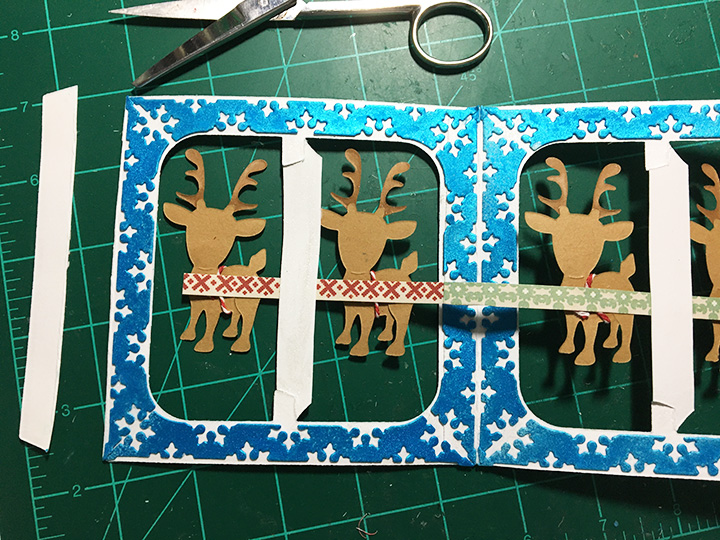
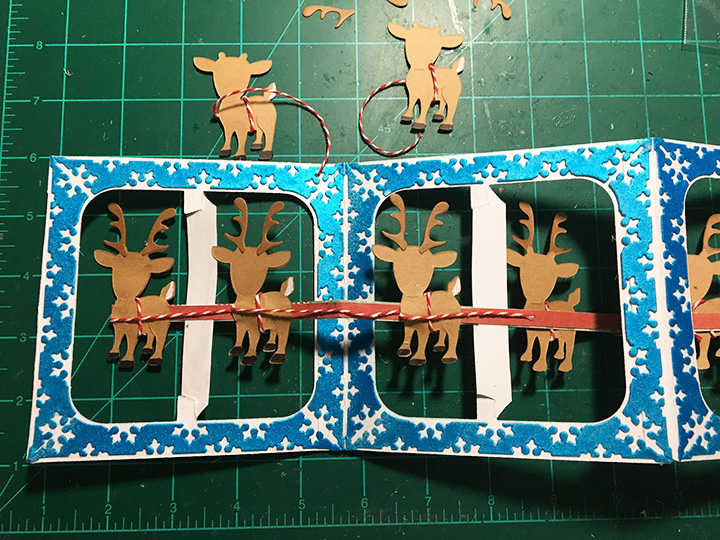
Reindeer: Cut 12 reindeer from brown cardstock and 12 pairs of antlers from darker brown cardstock using the Christmas Animals die set. With a fine tipped black marker use the reindeer die as a stencil to color hooves and faces of the six of the deer and a white gel pen to color the ears. Repeat with the remaining six reindeer, but on the reverse side. Color all the tail as shown on package with white gel pen. Glue on antlers to one set of six reindeer. You will glue the remaining six pairs of antlers on when you assemble the card matching up the fronts and backs of them. (I made one reindeer have a red nose by using red Nuvo drops.) Cut six strips of red cardstock 6-inchs long and 1/4-inches wide for the sleigh shafts that the reindeer will be harnessed to.

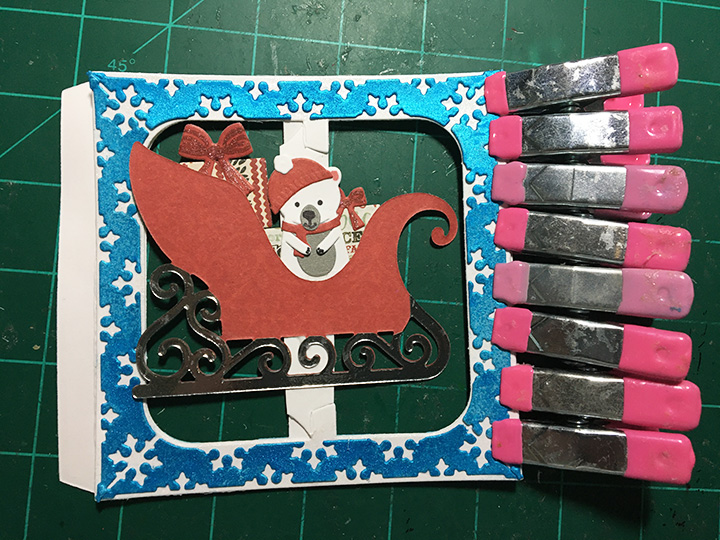
Assembly: Play with the layout of where the packages and bear will go in the sleigh and still fit inside the accordion frame. Glue the packages and bear to the back of sleigh. Start with the first frame and position the sleigh so that the front curling tip of sleigh is just inside the frame and a small portion of the back of the sleigh is over the other side of the accordion frame. (I placed my sleigh so that the shaft that will connect the sleigh to the reindeer will be approximately in the middle of the frame.) Glue the frame tab to the second frame. ( I used crafting clips to hold the frames together until the glue set-up.

Flipping the two frames over, I glued a shaft onto the back of the sleigh making sure it was long enough to reach the edge of the next frame. Next, before I glued the blue frames on , I brushed all the accordion frame sides with a glitter gloss then I attached the blue snowflake frames to the back sides of the accordion frames covering over where the tab is. Use weights to keep the frames from curling as the glue dries.

Cut two pieces of baker’s twine 6-inches long and ten pieces 5-inches long. (Use the 6-inch piece of twine for the rein deer that attach to the sleigh.) To make the harness on the reindeer start with the end of the twine on the back side going over the neck and back under the belly. Glue the end and bend to back of reindeer. Pull twine around the front of the animal and with a dot of glue, adhere the twine to the rear end of the reindeer. Glue the lead reindeer to to the second frame and glue the end of the harness twine to where it will be covered with the reindeer with with a 6-inch harness. Adhere second reindeer and wrap end of twine around the bear’s paw.

Add the next two frames following the same instructions for the second frame and reindeer. (In hindsight, I think it may be easier to assemble all the accordion frames together, adding one sleigh and attaching all the shaft pieces together. Then you can start adding the reindeer starting with Rudolph in the front, gluing down his twine harness, and adding the next reindeer and so on with each frame.)

When all the frames have been added with blue frames on both sides and front side of reindeer added, flip over and cut off the unused tab on fourth frame. Glue red shafts to the back side of shafts. (This covers the different patterned paper for my card, but also adds some strength to the folding mechanism.)
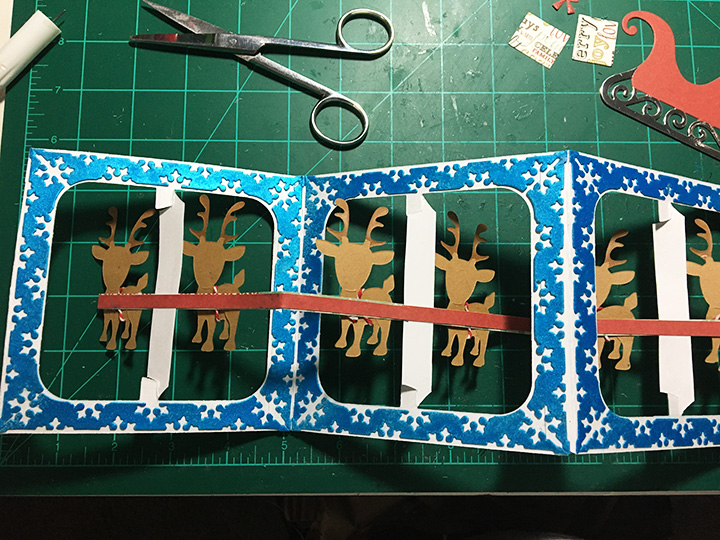

Glue the packages to the backs of the first packages matching them up. Then adhere the bear. Finally glue the sleigh in place matching up the edges and runner swirls. Use clips to keep the pieces in place until the glue dries.

Glue the remaining reindeer in place. Train all the folds. (I decided that the back side of the reindeer would look better with faces so I stenciled them on after the card was assemble.)

This card will easily fit into an A7 envelope, but it is thick, so a padded envelope or hand delivery is recommended.
Thank you for reading this blog post. I hope this inspires you and makes you smile. Please like and leave comments 😊
Click here to see other Accordion cards
Materials Used:
Dies
Papers
Ink
Adhesives
Tools
Miscellaneous
